Introduzione
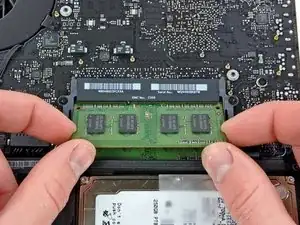
L'accesso alla memoria RAM nel computer è diretto e richiede un'operazione di smontaggio minima.
Strumenti
Ricambi
-
-
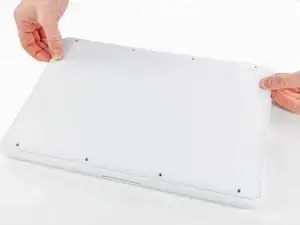
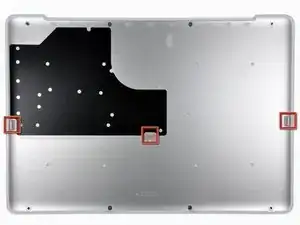
Sollevare leggermente il case inferiore in prossimità dell'apertura della presa d'aria.
-
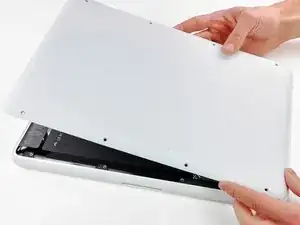
Continuare a far scorrere le dita fra i case superiore e inferiore finché quello superiore non si sgancia dalle levette di fissaggio.
-
-
-
Mediante l'estremità piatta di un inseritore, sollevare il connettore del cavo della batteria dal connettore femmina sulla scheda logica tirandolo verso l'alto.
-
-
-
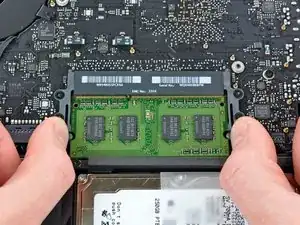
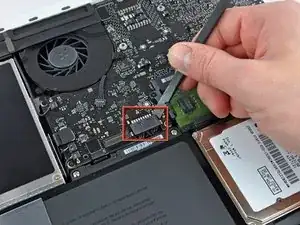
Sganciare le linguette sui lati del chip, premendole contemporaneamente in senso opposto al modulo stesso.
-
Per riassemblare il dispositivo, seguire queste istruzioni in ordine inverso.

17 commenti
I have been running 2 x 4gb chips for the last two months in my unibody white late 2009 macbook with no probs. The only difference from the standard ram chips is a massive speed boost!
alex -
Hi I'm currently installing 16gbs of ram, that is supported by my Macbook 2010 White unibody, however the mac is not reading the full amount installed. i have gotten 10gbs working, by installing one of the new 8gbs sticks, and the old 2gb. Both of the new sticks of Ram have been tested, by simply swopping them out with each other, but when combine the full 16gb sends a error code, 3 beeps with a 5 sec in between. Both ram slots work, all four sticks of ram work, the two 8gb and the old two sticks of 2gb, and computer runs right now at 10gb, so there is proof that it is supported. please help me, i am stuck.
You have two different types of ram there... One cannot be read by the Mac book for some reason because of the speed or type.
theloo32 -
Hey Skyler, I'm having the same issue. It appears that if you have at least one DIMM of 1066MHz RAM, the machine will be able to boot and clock-down faster RAM so that both DIMMs are running at this MacBook's maximum 1066MHz speed. I suspect that because both of my upgraded DIMMs are faster than 1066MHz (1300MHz), it is preventing the machine from being able to boot, and it's subsequently unable to remedy the RAM speed discrepancy. In my case, I get a single beep every 5 seconds when trying to boot which means "No RAM Installed"
The solution would be to return the faster memory and buy 1066MHz speed RAM, although now-a-days that's more expensive than buying 1300MHz or 1600MHz RAM when you're looking for 16GB. I guess you can also leave the mismatch DIMMs (10GB) if you need to, but it's definitely not optimal.
Adam T -
Excelent guide! did it carefuly in less than 5 min!
Thxs for the help!
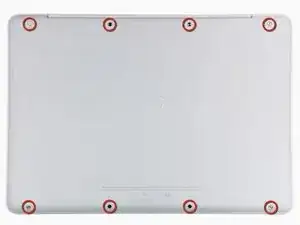
According to this page http://support.apple.com/kb/HT1651?viewl..., the 8 screws are not identical.
Can anybody tell me where each kind of screw is supposed to go?
Gregoire -
They are all 100% Identical. You were probably looking at a different model, or Apple has entered the wrong information... Hey, It happens...
Owen Davies -
The screws on the Late 2009 are identical. The blue lock compound might make tightening some require a little more effort.
svenaustx -
Can I replace it with a SATA 3 cable?
nm -
A1342 macbook does not have the right controller to support sata III
Owen Davies -
hi, i just got back from the apple store and they are really keen for me to upgrade to a new laptop since my battery is old and the screen is cracked, so glad i found ifixit i would love to upgrade this puppy! gonna make it a real sleeper! styler hall wrote about sticking 16 gb of ram in his a 1342 ? is this a simply mather of ordering 3 4gb sticks ?aslo i currently have 4 gb and would like to upgrade to 8 ( or indeed 16) does that mean i need to buy all new sticks or can i continue to use the old one and stick a new one next to it ?
thanks again mick van aar, perth western aus.
michelvanaar -
The A1342 will take up to 16 GB of RAM, however, there are only two RAM slots, so use two 8-GB RAM modules. Other World Computing (OWC) is a great reference source for info on exactly which RAM to use with which model; prices are usually much better on EBay though. Add an SSD from OWC and your machine will really scream!
I hope that helps!
gdesbrisay -
Gregoire is right. The 8 screws are absolutely NOT identical, I’m looking at them right now, weeowey weeowey.
John Guzman -
I just wanted to say that, in 2020, i used these instructions to replace the magsafe socket on my A1286, mid-2012, pre-Retina MacBook Pro. The internal layout is not quite the same but close enough for me to do the job. I skipped the steps of fully disconnecting the fans and speakers because of what others had said about breaking the sockets. it just meant I had to be extremely careful when lifting up the main board so that I did not tear and break the connections. I was able to disconnect the old magsafe socket with the board flat and in situ, but there was no where near enough room to be able to aline and press home the new par home. Reluctantly i had to lever up the board. This was difficult as there is a tapped post that holds a screw in the way close to where the USB sockets are, that prevented the board lifting up and out. I had to be quite forceful to manouevre the sockets out from the edge of the case.
Paul Burridge -