Introduzione
Usa questa guida per sostituire un altoparlante sinistro fuori uso. Questa guida sostituirà l'altoparlante sul lato sinistro del laptop durante l'uso normale. In molte di queste foto l'altoparlante di sinistra sarà sul lato destro, accertati di stare sostituendo quello giusto, e di avere la parte corretta!
Ricambi
-
-
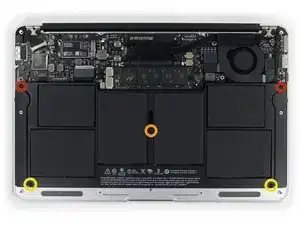
Svita le seguenti dieci viti:
-
Due viti Pentalobe 5-Point da 8 mm
-
Otto viti Pentalobe 5-Point da 2,5 mm
-
-
-
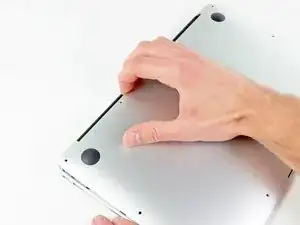
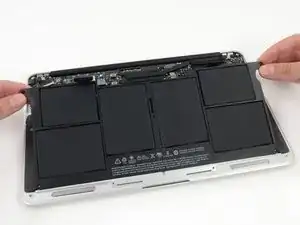
Infila le dita tra lo schermo e la scocca inferiore e tira verso l'alto per liberare la scocca dal MacBook Air.
-
-
-
Usa la parte piatta di uno spudger per fare leva su entrambi i lati del connettore della batteria per scollegarlo dalla sua presa sulla scheda madre.
-
Piega leggermente il cavo della batteria lontano dalla scheda madre in modo che non torni a far contatto con la sua presa.
-
-
-
Rimuovi le seguenti cinque viti che fissano la batteria alla parte superiore:
-
Due viti T5 Torx da 5,2 mm
-
Una vite T5 Torx da 6 mm
-
Due viti T5 Torx da 2,6 mm
-
-
-
Solleva la batteria dal bordo più vicino alla scheda logica e rimuovila dalla parte superiore.
-
Caricala al 100% e continua a caricarlo per almeno altre 2 ore. Poi, scollegala e utilizza il dispositivo finché scarico. Quando vedi l'avviso di batteria scarica, salva il lavoro e lascia acceso il computer fin quando si spegne a causa della batteria scarica. Attendi 5 ore, poi carica il computer portatile ininterrottamente al 100%.
-
Se noti qualche comportamento insolito o problemi dopo l'installazione della nuova batteria, potrebbe essere necessario ripristinare l'SMC del MacBook.
-
-
-
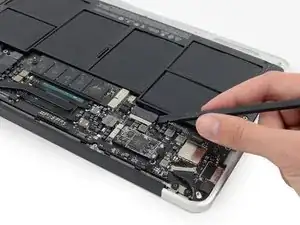
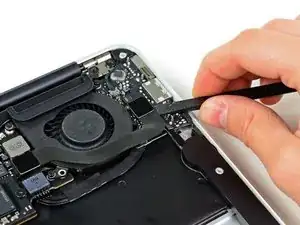
Utilizza l'estremità piatta di uno spudger per sollevare il connettore del cavo I/O dalla sua presa sulla scheda I/O.
-
Piega il cavo lontano dalla scheda I/O.
-
-
-
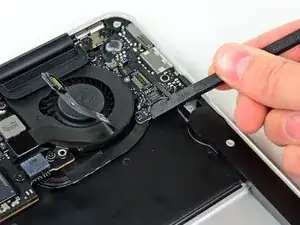
Utilizza la punta di un spudger per staccare il cavo dell'altoparlante sinistro dalla tacca scavata nel bordo della scheda I/O.
-
-
-
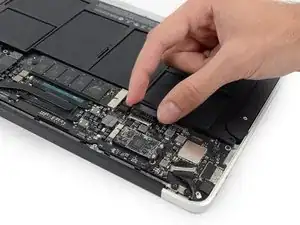
Utilizza l'estremità piatta di uno spudger per sollevare ed estrarre il connettore dell'altoparlante sinistro dalla sua presa sulla scheda I/O.
-
-
-
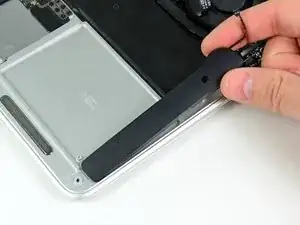
Utilizza l'estremità piatta di uno spudger per sollevare l'altoparlante sinistro dall'adesivo che lo fissa al case superiore.
-


Per rimontare il dispositivo, segui queste istruzioni in ordine inverso.

When you say:
Remove the following ten screws:
Two 8 mm 5-point Pentalobe screws
Eight 2.5 mm 5-point Pentalobe screws
Do the 8mm & 2.5mm dimensions refer to the LENGTH of those screws, or the size of the pentalobe? That is, are there other sizes of pentalobe drivers like there are for hex, phillips and torx? When only one dimension is provided, it is usually the socket/driver size, not the screw length, maybe since the length cannot be seen when the screw is installed.
Can I suggest that you clarify your instructions so folks are confident they are only in need of _one_ pentalobe driver?
Nerdily yours,
Larry (whose iPhone 4S can now get through a day without 6 recharges thanks to ifixit.com ;-)
larryleveen -
The 8mm and 2.5mm are the length of the screws. One pentalobe P5 screwdriver suffices for all the screws (P5 is implicitly the size of the pentalobe screw heads).
Michael Welham -
I sourced all the parts from ifixit, plus a magnetic project mat which I found to be very useful for organising the teardown and reassembly.
Allen -
The magnetic mat is
GERARD SZAREK -
Keep the 2.5mm tiny screws away from the MagSafe connector as they will be attracted and sucked in to the magnet.
Frank O'Carroll -
A tip an old bench tech taught me that has saved me many times: I put clear “Scotch” tape over the case screws as they became “free”. The tape kept them in place while I lifted the lid off, cleaned it etc.
Michael Mee -
Thank you for a really smart tip! I will be using that countless more times!
Lilljedahl -
I’m confused about internet recovery and installing MacOS. Is all of this done before placing in the new ssd card or after. I don’t have any files that I would like to safe/transfer, is all of this necessary, if I don’t do it before placing new ssd, will I still be able to instal/upgrade macOS afterwards.
It’s an old Mac and now it won’t start or charge, I know I will have to replace battery and put new battery first and turn on Mac before doing the ssd stuff. Since it won’t effing start.
I’m really clueless about backing up old ssd, since I don’t need any files, besides MacOS(software) ,and is that related to the ssd?
AMG -
The answer to your question: You need to insert your SSD into the computer before internet recovery. If you start the recovery before inserting SSD, it won’t affect the setup, you won’t damage anything. But your SSD will not be detected (as there isn’t one inserted.)
Also, a little tip: If you bought a used SSD, go into Disk Utility and format the drive with the highest security level to permanently remove all of the previous files.
Also a FYI: Internet Recovery will load up Mac OS X 10.9.5 Mavericks, so I would recommend making a recovery drive from a Big Sur (or desired version) through another Mac, and a USB. You can visit this support doc: https://support.apple.com/en-us/HT201372
Hope this helps! -Dan
danielwen -
I got a macbook air with a damaged and swollen battery. I could remove all screws, except one 2,5 mm screw. I’m afraid it got damaged while attempting to remove it, I have no grip with the P5 pentalobe screwdriver. How can I proceed?
Robert Hermans -
Hi Robert!
Try some techniques found in this stripped screw removal guide. Good luck!
Arthur Shi -
Hello I have a macbook air they are say they do not have parts for my laptop macbook air 11 inches 2013 mid need to replace battery which one to buy
vensilver -
Hello! This is the part you want—maybe we’re not able to ship it to you if you’re out of the United States. The battery in your MacBook Air should be the same for all 11” between mid-2011 to early-2015.
Arthur Shi -
The smaller screws went in more easily when I put back all the screws along the hinge edge first.
Rachel Slatkin -