Introduzione
Segui questa guida per sostituire l'altoparlante sinistro danneggiato.
Ricambi
-
-
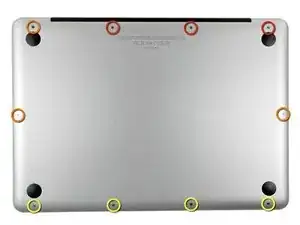
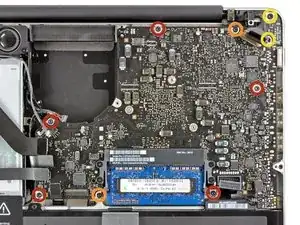
Rimuovi le dieci viti seguenti:
-
Tre viti con testa a croce Phillips #00 da 14,4 mm
-
Tre viti con testa a croce Phillips #00 da 3,5 mm
-
Quattro viti con testa a croce Phillips #00 da 3,5 mm con spallamento
-
-
-
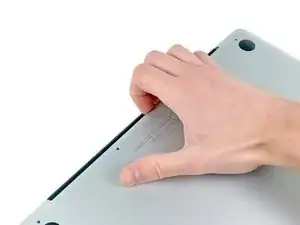
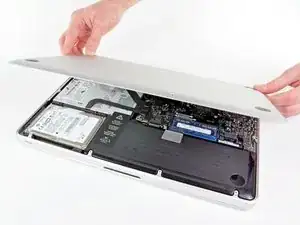
Usa le dita per rimuovere il case inferiore dal corpo del MacBook, in prossimità della presa d'aria.
-
Rimuovi il case inferiore.
-
-
-
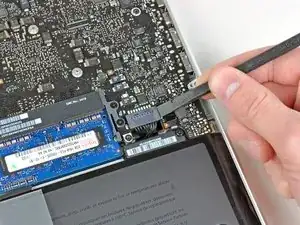
Usa l'estremità di uno spudger per rimuovere il connettore della batteria dal suo zoccolo sulla scheda logica.
-
-
-
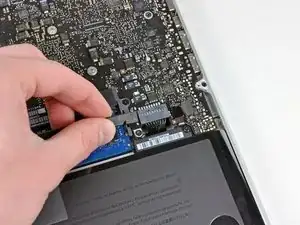
Piega leggermente il cavo della batteria per allontanarlo dal connettore femmina sulla scheda logica, affinché non venga collegato accidentalmente durante le operazioni.
-
-
-
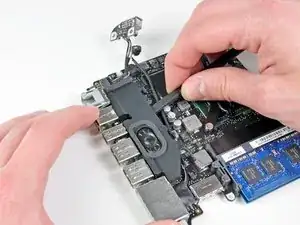
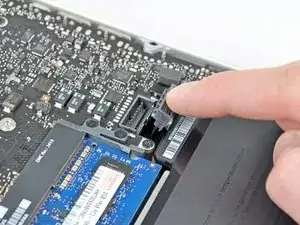
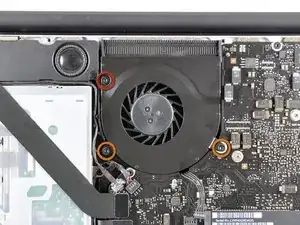
Usa il bordo di uno spudger per scollegare il connettore della ventola dalla sua presa sollevandolo dalla scheda madre.
-
-
-
Svita le seguenti tre viti che fissano la ventola alla scheda madre:
-
Una vite Torx T6 da 7,2 mm
-
Due viti Torx T6 da 5,3 mm
-
-
-
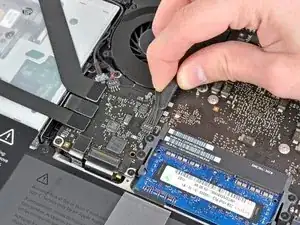
Solleva la ventola dal suo alloggio sulla scheda madre, stando attento a non impigliare il cavo.
-
-
-
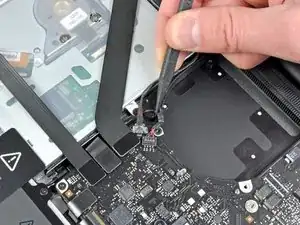
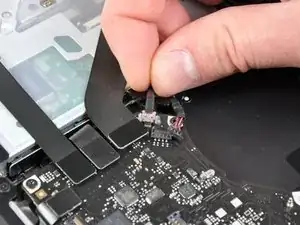
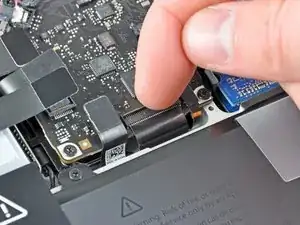
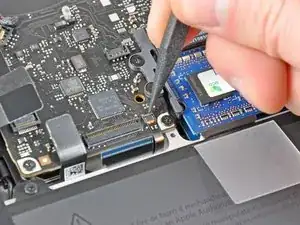
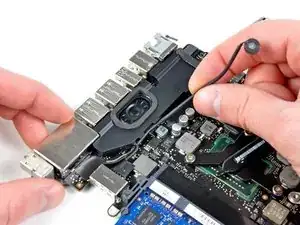
Usa la punta di uno spudger per tirare il cavo dell'altoparlante/subwoofer destro fuori dalla sporgenza di bloccaggio in plastica integrata nella scocca superiore.
-
Tira il cavo dello speaker destro verso l'alto per scollegarlo dalla sua presa sulla scheda madre.
-
-
-
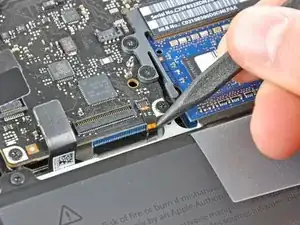
Scollega i seguenti quattro cavi:
-
Cavo AirPort/Bluetooth
-
Cavo lettore CD
-
Cavo disco rigido
-
Cavo trackpad
-
-
-
Usa un'unghia per ruotare verso l'alto l'aletta di bloccaggio sul connettore ZIF del cavo della tastiera.
-
Usa la punta di uno spudger per sfilare il cavo della tastiera dalla sua presa per scollegarlo.
-
-
-
Se presente, rimuovi la piccola striscia di nastro nero che copre la presa del cavo della retroilluminazione della tastiera.
-
-
-
Usa la punta di uno spudger o un'unghia per ruotare verso l'alto l'aletta di bloccaggio sul connettore ZIF del cavo della retroilluminazione della tastiera.
-
Sfila il cavo della retroilluminazione della tastiera dalla sua presa.
-
-
-
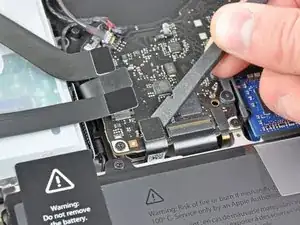
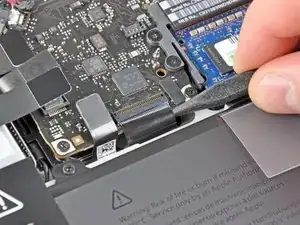
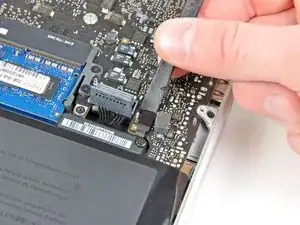
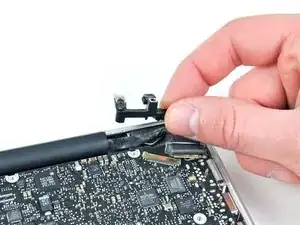
Usa la parte piatta di uno spudger scollegare il connettore del sensore di sospensione/indicatore della batteria sollevandolo dalla sua presa sulla scheda madre.
-
-
-
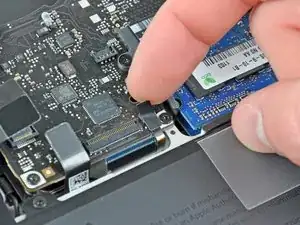
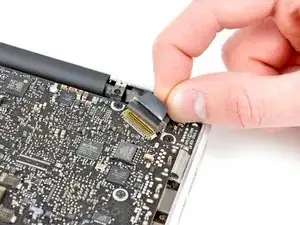
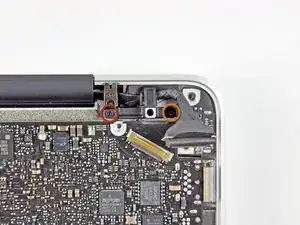
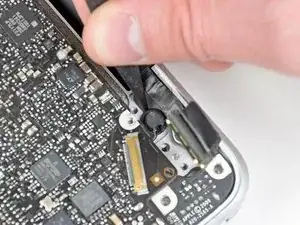
Afferra la linguetta in plastica fissata alla staffa di bloccaggio del cavo dello schermo e tirala verso l'ingresso dell'alimentazione per ruotare la staffa e sbloccarla.
-
Sfila il cavo dello schermo dalla sua presa sulla scheda madre.
-
-
-
Svita le seguenti nove viti:
-
Cinque viti Torx T6 da 3,6 mm
-
Due viti Torx T6 da 4,3 mm
-
Due viti Torx T6 da 7,2 mm
-
Cinque viti Torx T6 da 3,0 mm
-
Due viti Torx T6 da 3,6 mm
-
Due viti Torx T6 da 6,7 mm
-
-
-
Svita le seguenti viti a croce Phillips:
-
Una vite da 8,6 mm
-
Una vite da 5,5 mm
-
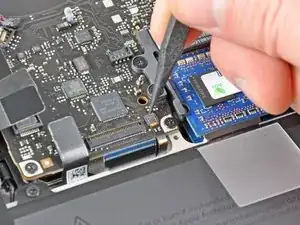
Rimuovi il fermo del cavo dello schermo dalla scocca superiore.
-
-
-
Usa la punta di uno spudger per rimuovere con delicatezza il microfono dall'adesivo che lo fissa alla scocca superiore.
-
-
-
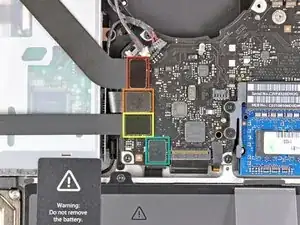
Stando attenti ai diversi connettori vicino ai bordi, solleva la scheda madre dal bordo vicino al lettore CD.
-
Senza piegare la scheda, rimuovila dalla scocca superiore, stando attento al cavo flessibile della scheda di alimentazione che potrebbe impigliarsi nella scocca superiore.
-
Rimuovi la scheda madre.
-
-
-
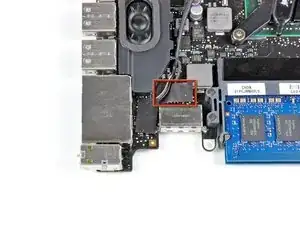
Sfila il cavo del microfono dal suo alloggio incavato nella copertura dello speaker sinistro.
-
-
-
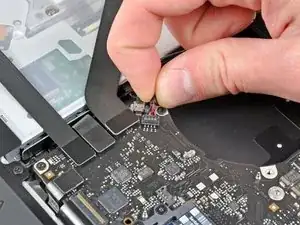
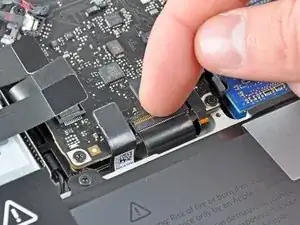
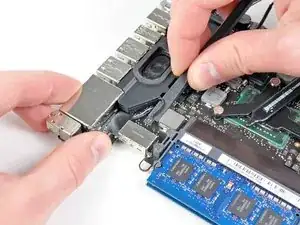
Usa la parte piatta di uno spudger per sollevare il connettore dello speaker sinistro dalla sua presa sulla scheda madre.
-
-
-
Solleva attentamente lo speaker sinistro dalla schiuma adesiva che lo fissa alla scheda madre.
-
Rimuovi lo speaker sinistro.
-


Per riassemblare il dispositivo, segui le istruzioni nell'ordine inverso.
How much weight can I save by removing the optical drive?
gunes314 -
You can save a lot of weight if lets say your installing a solid state drive or putting in a second hard drive but if you know that you use the CD/DVD disc drive a lot then you might just want to leave the drive alone.
Marshall WahlstromHelgren -
Tip: Use one of those weekday pill holders to have a cheep way to store screws you remove and each day of the week can be for different sizes or parts. It has been handy to have (much less expensive than the magnetic mat.
Robert Wacker -
Hello, where can I buy the screws I need in case I lose one of them?
taylornya -
iFixit sells a kit: MacBook Pro Unibody Lower Case Screw Set
Darrell Johnson -
I have one stripped screw... How opening without drill it?! Any suggestions please?
rodrigosady -
I also stripped a couple screws. I wasn’t able to open it up without drilling. After drilling the heads and removing the cover it was easy to hacksaw the tip and unscrew with a standard driver.
Michael Wilkens -
We have a guide for that!
Come rimuovere una vite danneggiata
Sam Omiotek -
My top tip - make sure you buy good quality Phillips screwdrivers and a magnetic holder. Cheap screwdrivers won’t get the screws undone safely. Without a magnetic holder you have no chance of getting the tiny crews in and out safely.
jeremyyoung -
A good Phillips 00 is your friend here. Also, when reinserting the screws, gently start anticlockwise and you wil feel a click at the start of the thread. This tells you you’re in the right place and less likely to cross-thread through force in the wrong place.
Iain Boyd -
I feel like these are 000 screws. Amazon sales describe them as such and my 000 screwdriver fits better
cam2000deluxe -
Before ordering a new Trackpad remove the existing battery and try clicking the Trackpad. If it clicks OK with the battery out the source of problem is likely a swollen battery, which should to be replaced even if it still works to some degree. From the side of the battery you will likely see the soft part of the battery bulging beyond the hard case.
Patrick Langvardt -
That’s absolutely correct as I can testify. With the battery removed I also adjusted the T6 set screw that adjusts the sensitivity of the trackpad click, evidently someone had cranked mine down tighter than the factory setting.
Gary Register -
Le quatrième paragraphe dans les instructions en français n’est pas correct : ce ne sont pas les 2 petites vis, mais les 7 petites vis qui sont inclinées. Et les 3 grandes sont bien verticales.
Degeorges -
Bonjour ! Merci de votre observation. J’ai corrigé la traduction. iFixit étant un wiki, n’hésitez pas à modifiez si vous remarquez une erreur :) Encore merci de votre attention et à bientôt !
Claire Miesch -
Tip: if you have a magnetic screw mat or similar, lay the macbook over the mat to make sure it catches any screws that may decide to fall of and hide under your table
Moritz -
Funny, it's not her hands that are doing the close ups. :)
Cinemated Man -
What's the difference between the shouldered and non shouldered screws? They look exactly the same to me.
MLNLRD -