Introduzione

Segui questa guida per sostituire una batteria deteriorata nelle vostre Bose QuietComfort 35.

Se la tua batteria si è gonfiata, prendete le dovute precauzioni. Per la tua sicurezza, scarica la vostra batteria sotto il 25% prima di disassemblare le tue cuffie. Questo riduce la probabilità che vada in fumo rilasciando vapori tossici, nel caso la batteria venisse accidentalmente danneggiata durante la procedura.

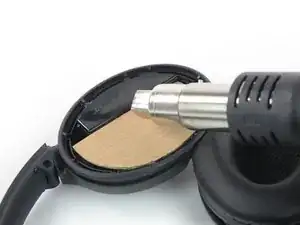
Per questa guida consigliamo l'utilizzo di un asciugacapelli o una pistola termica. È possibile disassemblare le cuffie con l'uso di un iOpener, ma in questo modo la difficoltà dello smontaggio sarà maggiore.

Serviranno delle strisce adesive di ricambio e un saldatore, per separare i componenti durante lo smontaggio e rimetterli al loro posto durante il riassemblaggio.

La tua batteria di ricambio potrebbe essere di dimensioni o capacità diverse dall'originale. Per quanto ne sappiamo, tutte le batterie di ricambio disponibili per le QuietComfort 35 sono compatibili sia con le QuietComfort 35 I che con le QuietComfort 35 II.

  1. OWwFNrPush4kKkM4
    OWwFNrPush4kKkM4
    MXqJVmGsdnZ4j1et
    drT1YKymRxSBYWNS
    • I cuscinetti dei padiglioni nelle Bose QC 35 sono mantenuti in posizione da alcune piccole clip di plastica.

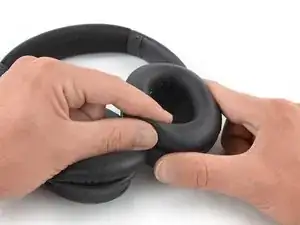
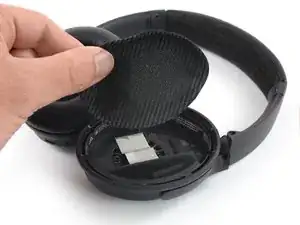
    • Afferra il cuscinetto del padiglione sinistro e tiralo verso il centro del padiglione, in modo da separarlo dalla clip di plastica che lo mantiene in posizione.

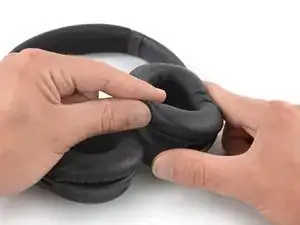
    • Ripeti la procedura per tutte le clip che mantengono il cuscinetto in posizione.

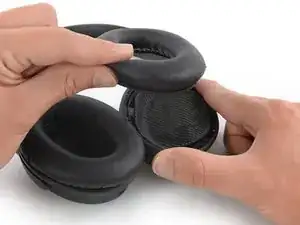
    • Rimuovi il cuscinetto del padiglione sinistro.

    gibts irgendjemand der dies als service anbietet?

    no name -

  2. jBfLJZDvKjgoSseB
    jBfLJZDvKjgoSseB
    2hpyjMBAhfHeFYAW
    cOLaNV2YHVPUQk5W
    • Facendo attenzione, rimuovi la membrana protettiva che copre l'interno del padiglione.

    • La membrana è tenuta in posizione con un debole adesivo. Se dovesse iniziare a strapparsi durante la rimozione, posiziona un iOpener riscaldato sulla membrana o usa un asciugacapelli/pistola termica impostata al valore di temperatura minimo per ammorbidire l'adesivo.

  3. EslnhYmHdsAbD6Is
    • Rimuovi le due viti a croce Phillips #00 da 6,2 mm.

  4. WqBiYGLKPxQWQFIK
    WqBiYGLKPxQWQFIK
    J32Ja5cOcdWGTA1u
    FmCxOvFYVZtc2bke
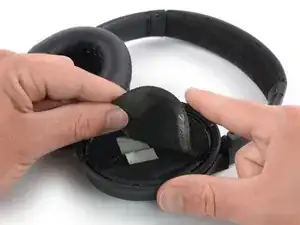
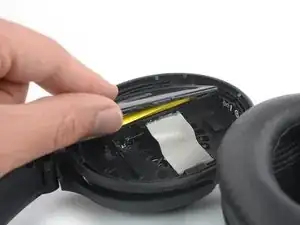
    • Capovolgi le cuffie.

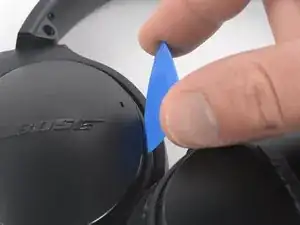
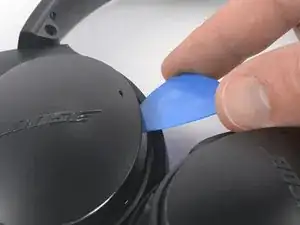
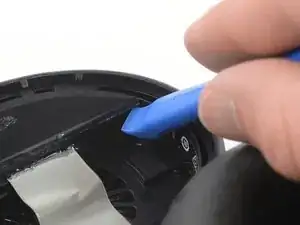
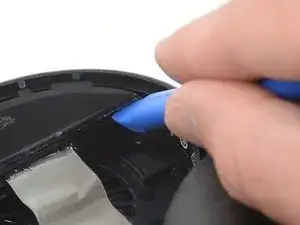
    • Inserisci un plettro nella fessura tra la cover esterna in plastica e il telaio del padiglione.

    • Usa il plettro per fare leva sulla cover esterna in plastica del padiglione sinistro.

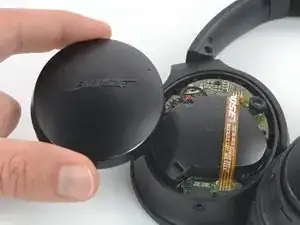
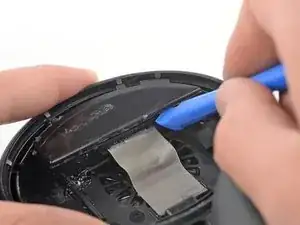
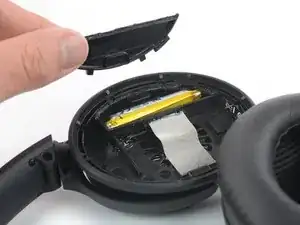
    • Rimuovi la cover esterna in plastica.

  5. W6MqXeWf2LrYBwru
    W6MqXeWf2LrYBwru
    CmBRc6T6epR2uEMq
    dq22TcTwFBn6FZ1N
    • Consigliamo di preparare una protezione adeguata per evitare di fondere il diaframma dello speaker a causa della temperatura troppo elevata a cui verrà sottoposto nei passaggi successivi.

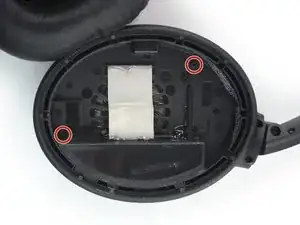
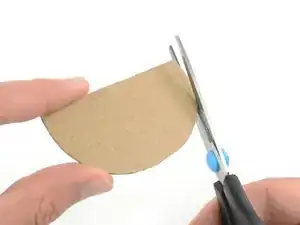
    • Ritaglia un pezzo di cartone come mostrato in figura, in modo che ricopra tutto il contenuto del padiglione tranne la copertura della batteria.

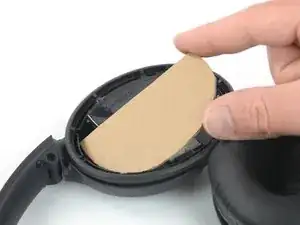
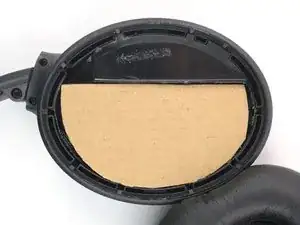
    • Posiziona questa protezione dentro il padiglione sinistro.

  6. oOkPqMiieWwFXHv4
    • Per allentare la presa dell'adesivo, raccomandiamo fortemente di iniziare con temperature basse, anche se usate il pezzo di cartone come protezione dal calore eccessivo. Se l'adesivo non cede passate gradualmente a temperature più alte (massimo 100°C).

    • Non puntate la pistola termica in verticale sopra la copertura della batteria, piuttosto puntatela in parallelo e in direzione del bordo superiore di essa.

    • Usa la pistola termica per allentare l'adesivo sotto il bordo della cover della batteria.

  7. kXJlcI3PmDUFkopN
    kXJlcI3PmDUFkopN
    crvlGHZIqlSdlBLH
    • Evita di forare la batteria durante i passaggi successivi. Non usare strumenti di metallo o forza eccessiva nelle vicinanze della batteria.

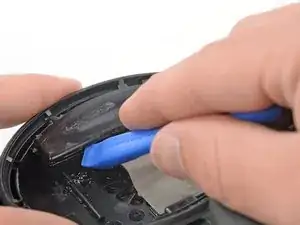
    • Inserisci il lato di uno strumento per le aperture sotto l'angolo inferiore della copertura della batteria. Può essere necessaria un po' di forza.

  8. uEkYQNBaUfUv3IEq
    uEkYQNBaUfUv3IEq
    1g6KbZHH2fADyatC
    • Fai scorrere lo strumento d'apertura lungo il bordo della copertura della batteria per allentare l'adesivo sottostante e creare una piccola apertura.

  9. 4PMqcPkGHarmcsnn
    4PMqcPkGHarmcsnn
    rUeXSweEccRy4y6r
    SnfbmcHxPBYJdJMw
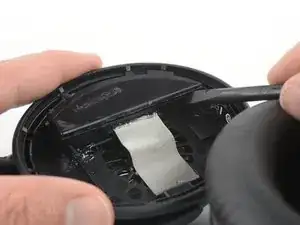
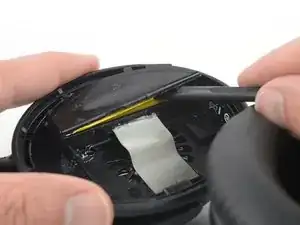
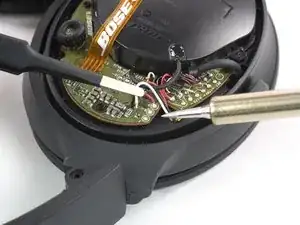
    • Inserisci il lato piatto di uno spudger tra la batteria e la sua copertura.

    • Evita di usare lo spudger come una leva nella vicinanze della batteria.

    • Usa lo spudger con attenzione per separare la copertura di plastica dal padiglione. Evita di applicare forza eccessiva sulla batteria.

    What's that white part…I accidentally push it and it's bent down a little bit…is it gonna be a problem?…please help me

    Buvisuru Bandara -

  10. eovILqypMIothqHB
    eovILqypMIothqHB
    lfAekX2FhOAtgABe
    • Rimuovi la copetura di plastica dal padiglione sinistro.

  11. KhS5ylFgPkjKyCAI
    • Nel prossimo passo bisognerà dissaldare i cavi della batteria.

    • Usa questa imagine come riferimento per la risaldatura durante il riassemblaggio. Oppure fai una foto al tuo modello se l'ordine dei cavi risulta diverso.

  12. g3siUu2cbZa6HK1F
    g3siUu2cbZa6HK1F
    yd2M52irAqCkbeK1
    j2GLGY63l5oRYepU
    • Usa la punta di un saldatore per dissaldare i tre cavi della batteria dalla scheda logica.

    I didn't feel comfortable soldering in such a tight space, so instead, I cut the wires tot he old battery leaving as long of a wire as possible, making sure to cut each wire individually so it wouldn't have any chance of shorting. Then I soldered the long ends of the wire with the long ends of the new battery. Capped it off with the black shrink wrap stuff.

    abu hajar -

  13. ihLbR3DSgBiyxfD3
    ihLbR3DSgBiyxfD3
    GnECOqbiSayGhRUI
    miBb2KhPtATmFLnS
    • Cerca di non deformare o perforare la batteria durante il seguente processo di rimozione. Le batterie agli ioni di litio a involucro flessibile possono perdere sostanze chimiche pericolose, incendiarsi o esplodere se danneggiate.

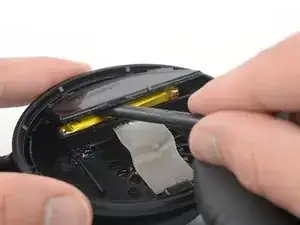
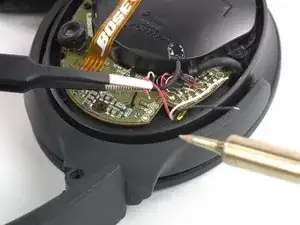
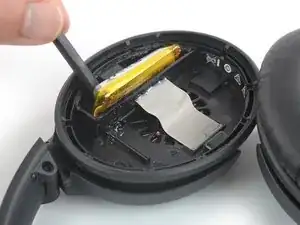
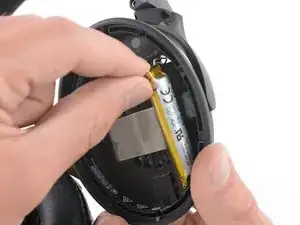
    • Inserisci il lato piatto di uno spudger tra la batteria e il suo alloggiamento.

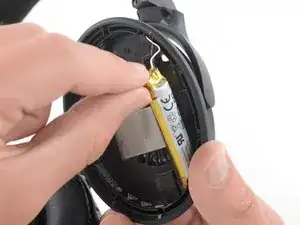
    • Sempre facendo attenzione, fai leva sulla batteria per tirarla fuori dal suo alloggiamento.

    • Potrebbe essere necessario variare la posizione dello spudger un paio di volte nel corso della procedura, per non fare forza eccessivamente su un singolo punto della batteria.

  14. RxOJgHnmGHBpjlEk
    RxOJgHnmGHBpjlEk
    PBELKDSJmWLLawtg
    DcrVJhsLpSSkHpiZ
    • Rimuovi la batteria.

    • Non reinstallare una batteria danneggiata o deformata, in quanto possibile rischio per la sicurezza. Sostituiscila con una batteria nuova.

    • Prima di posizionare la nuova batteria, rimuovi ogni traccia di adesivo dalle cuffie e ripuisci le aree che presentano tracce di colla utilizzando alcol isopropilico e un panno in mcrofibra.

    • Assicurati che i cavi della batteria siano abbastanza lunghi da poterli saldare sulla scheda logica prima di applicare il nuovo adesivo nell'alloggiamento della batteria.

    Hey, its circuit board not curcuit board.

    TimedIn -

    Really Bruno? Then I could say that your comment has also mistakes!:

    "Hey, its circuit board not curcuit board." is not, it is: "Hey, it's circuit board, not curcuit board."

    Thanks Dominik Schnabelrauch, Scott Head and Jeff Stephens for this guide.

    Jesus Areso -

Conclusione

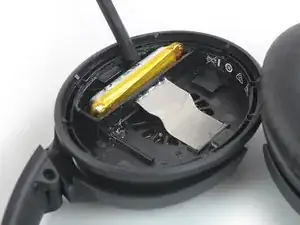
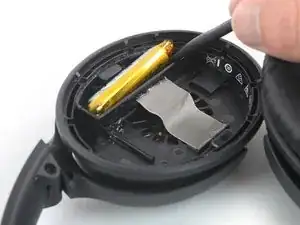
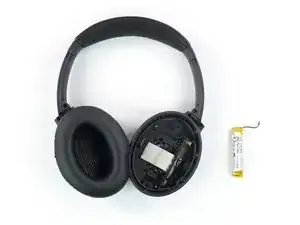
Se possibile, accendi il tuo dispositivo e verificane il funzionamento prima di richiuderlo e applicare dell'adesivo nuovo.

Per riassemblare il tuo dispositivo, segui le istruzioni elencate in ordine inverso.

Per ottenere prestazioni ottimali, calibra la batteria apena installata: Caricala al 100% e mantieni collegato il caricabatterie per almeno altre 2 ore. In seguito, usa il dispositivo fino a che non si spegnerà a causa dell'esaurimento della batteria. infine, caricalo senza interruzioni fino al 100%.

Portate i vostri rifiuti elettronici presso una ricicleria certificata R2 o e-Stewards.

La riparazione non è andata come previsto? Dai un'occhiata alla comunità Risposte per ottenere supporto nella risoluzione dei problemi.

Dominik Schnabelrauch

Membro da: 23/11/16

200708 Reputazione

40 commenti

спасибо ! будет полезно на будующее

Komar -

Hallo, tolle Beschreibung. Vielen Dank dafür.

kann man bei den Bose 700 NC auch den Akku tauschen ?

Würde mich sehr freuen, wenn das so wäre. Hat da jemand evtl bereits schon Erfahrungen gemacht. Könnte mir vorstellen, dass viele 700 NC jetzt auch in das Alter kommen, in dem der Akku schwach wird.

Jens Nußbaum -

Fk Bose for making it so difficult! They all care about the environment so much, don’t they?!

Batteries should be easily replaceable by any customer by themselves! Ear pads as well. Bose makes it harder so you would throw away your $300 headphones when battery dies. So much waste, plastic and other harmful stuff.

EU mandated to use USB-C on all devices to reduce the waste. Batteries are more harmful. They should make it mandatory for batteries to be user replaceable on tech like headphones. Manufacturers are making disposable headphones in purpose, obviously. Like AirPods and other similar earbuds. 18-24 months and you’re forced to throw them away. They should offer cheap battery replacement for AirPods and like earbuds as well. Maybe trade in deals. $70-$90 a bud isn’t cheap replacement.

Companies are lying about the love for the environment to make us buy more and add more harmful waste to it.

Usern@me -

Actually, you can buy the earpads separately, even from BOSE themselves. I’ve replaced mine 3 or 4 times already and it’s pretty straight forward

Florian Wendelborn -

Thanks. Replaced my bose qc35 headphone battery. Works perfectly!

Thomas Maher -

Wastage and ‘the environment’ are not quite the same thing. Most, if not all, of the material used to make the device is recyclable. It’s not an issue of damage to the environment for companies to make it difficult, or really, to not make it easy to replace a battery. You’ll find many companies do this in order to make their devices more water-resistant and dust-resistant. It’s not just because the big bad rich guys hate the planet.

If you’ve an issue with waste, contribute your waste to recycling. It’s your fault, not the company who made the product’s fault, if you don’t.

Great guide.

Harry Grade -

Of course it is. Recycling needs energy. And recycling needs to seperate all the parts and composites. If you really think this earphone can get completly recycled you also think the the Santa Claus who brought this to you is real. Just use Google to see where all this electronic parts are “getting recycled”. Poorest African childs are burning it to get at least the rare materials of it for a tiny bit of money. Leave your beautyful and peaceful bubble where for every problem comes a great technological solution.

Felix Kallenbach -

"its your fault the product is wasteful, not the company's". oh wonderful, a corporate stooge.

never mind the fact that even if all parts are recyclable, theyre often too uneconomical for anyone to bother. or that companies specifically design for them to poorly repairable, which means theyll end up being thrown away or be damaged while trying to do so.

its reuse, reduce, and then recycle.

and recycling your tech is hardly a solution when the battery needs replacing. what an absolutely braindead take.

SBN -

Sir do you have tutorial to repair bose quitecomfort earbuds with left side not working? thank you

densus88 densus89 -

Hi! Is this process needed to be done only for the left ear?

Andrei Verdes -

Hi Andrei,

if you want to replace the battery there is only one in the left side of the headphones you need to replace.

Dominik Schnabelrauch -

that's really important to know as the right ear as well has a shut glued battery compartment.

Florian -

Dit ziet er lastig uit, dat gaat mij niet lukken. Weet iemand een bedrijf die dit doet? Bvd, Hans

Hans Wiltink -

Did you find someone to fix your headphones for you?

David V. -

Unfortunately the battery is not available from reputable sources. I found a seller on ebay which sells compatible batteries from the brand vhbw. They look decent, however are available in 350mAh and 600mAh. If I see it correctly on the pictures above, the original battery has 495mAh.

Does anyone have a clue if those are legit and I can just use the 600mAh type?

Florian -

I just installed the 600mAh from vhbw. It works fine so far.

350mAh, 495mAh and 600mAh are different capacities and the higher is better. What's important is the voltage (3.7V) which should not differ too much.

If vhbw is not lying on its numbers, with the 600mAh you should get more music on a single charge than with the original battery, that's it 😉

Quentin H. -

Centralsound.co carries the battery

Michael H -

I just installed the 600mAh from vhbw. It works fine so far.

350mAh, 495mAh and 600mAh are different capacities and the higher is better. What's important is the voltage (3.7V) which should not differ too much.

If vhbw is not lying on its numbers, you should get more music on a single charge than with the original battery, that's it 😉

Quentin H. -

I didn't need to use any heat to lift the battery cover.

I used a thin blade / knife to cut the adhesive between the lid and the headphones on the exposed sides and then managed to carefully pry it open with my fingers.

The adhesive, in my case, was a bit rubbery and thus not too difficult to remove.

Obviously, be very careful with sharp objects around batteries, as stated in the guide also.

To put it back on, I just cut a couple of very tiny pieces of double sided tape. We'll see if that holds up well.

Also, I was wondering if the glue is there to somehow protect the wearer in case the battery does break down and catch on fire.

And thus if you should glue the battery lid shut properly after replacing the battery. Any ideas?

Albert Einstein -

The glue maintains the airtight integrity of the speaker and enhances bass response and noise canceling. You MUST maintain the seal or else sound can leak out. You can get feedback squeal if it leaks where it shouldn't.

Peter Wilson -

I want to know how to do QC45

Please write about QC45

Ifixit is best!

woojae0128 -

So I surmise that the headphones come with one battery from factory. In the left cup. But there is space for anotherin the right ear cup... any reason i cant have a battery each side and double the life? I guess I'm the guinea pig..

DVS -

How are you going to run the wires over? you do realize there are 2 folding joints and then the headband to worry about?

abu hajar -

Thank you, this was extremely helpful! If anyone is struggling to soften the glue, be patient. Even if it seems like it isn't doing anything, the cap will lift much more easily if you evenly pre-heat the glue as described here. The rest was comparatively easy. Keep in mind that the battery is also glued to the bottom of the case, so be patient and persevere, it'll come off!

Chris -

OT: I use my BOSE 700 wired. Problem is I still have to charge them for NC and during charging they don't work. Is the a mod to charge and have NC at the same time? ??

Tom George -

There is a way that only developers of the headphones can use to run the headphones while they are still charging. It requires sending a special command I think over serial but you would need to know exactly the protocol used. But the product owners in their infinite wisdom decided against this option because it would be too confusing to the customer.

The only way is to somehow hunt down and make friends with a QA person at Bose who still has access to all the knowledge and hardware to actually enable and send that command.

source: I was there when they made that decision.

abu hajar -

Easier than I thought. I had never done soldering before.

Samuel -

Where can you find replacement #00 (6.2mm) screws (step 3)?

Jeff -

Cannibalize an old cell phone, or remote control, or other obsolete electronic waste. Maybe some small electronic device. Maybe use tape around the edges of the aluminum cap, if all else fails

Peter Wilson -

I'm step 3, what is the silver looking ribbon. My dog eat the top cushion, side ear muffs, and took off the silver looking ribbon. I'm able to hear sound and everything else appears to work. I can find replacement parts for everything except for the silver stuf. Anyone have an idea?

christopher a avery -

Has anyone had any luck with these instructions for the Bose AE2W? Can't find a guide but believe the design is fundamentally the same between these models with the exception of circuitry for noise cancellation, extra switches mics, etc.

Mine appear to have two allen shaped security headed screws in alongside a small Philips head.

George “G” Mullis -

I always test the voltage present at the battery wires to confirm that the battery is dead or not holding a charge. It's no fun to replace a good battery with a new one just to have a dead headphones in the end. Sometimes the charging port in the OTHER side or associated flexible circuit boards used as conductors fail.

Peter Wilson -

Thank you! It was easier than I thought :)

Peter -

J'ai remplacé la batterie d'origine SYNERGY AHB110520CPS, 495 mAh, 3.7Vdc, par une batterie vhbw de 600 mAh, elle fonctionne parfaitement.
https://www.amazon.fr/dp/B09L5H4JDH?psc=....
Conseil, éviter de chauffer la trappe de la batterie, il y a un risque d'endommager le haut parleur du casque, c'est plus long mais j'ai utilisé une spatule en acier et l'ai introduit sous la trappe puis j'ai fait levier. Ensuite je nettoie les traces de colle restant. Pour le remontage je colle avec Colle professionnelle B7000 en tube de 15ml et le tour est joué.

Jean-Claude MARIN -

Any suggestions on appropriate glue(s) to stick things back together? I would want to use two part plastic glues since that would bond them forever. But I don’t know what else is suitable

Aaron Lawrence -

%#*!^@, I meant would NOT want to use two part plastic glues…

Aaron Lawrence -

What glue/ adhesive should I use for this repair?

Spag Tortellini -

just some tips after i did this... if you are bad at soldering/ only have cheap soldering equipment, snip the old wires on old battery (negative first (black wire), closer to the battery to have as much available wire) and solder the new battery wires to it. it is much easier to solder 2 wires together (albeit very small and delicate, make sure to use general soldering practices like tinning the wire first, and using as least heat time as possible) than to risk damaging the pcb if you don't know what you're doing. also heat gun is not necessary, you can separate the battery panel with a razor if you're being careful. it is a rubber like adhesive, just go around the perimeter carefully and it will separate cleanly.

as someone else said, it is wise to clean up the old adhesive and use a light adhesive to glue the panel back in place to get a full seal.

wagwan yute -

First time I've seen a 'Red' Charging light on my Bose QC35's. Gonna fully charge then fully drain, hopefully, I'll have a longer battery life again. Great guide. When re-applying the battery cover, I heated it up sections then pressed and held it down to allow the original glue to set it shut again.

Martin Erskine -