Introduzione

Questa guida ti aiuterà a sostituire la batteria del tuo Fitbit Alta. Se hai lasciato scarico il tuo Fitbit per molto tempo, o non hai seguito le buone pratiche di carica, o lo possiedi da molti anni, può essere che la batteria sia alla fine del suo ciclo di vita. In questo caso, il Fitbit potrebbe non accendersi, non durare molto, o non riuscire a rimanere acceso quando scollegato dalla presa elettrica.

Questo processo prevede l'esposizione dei componenti interni del Fitbit, dissaldare e scollegare la vecchia batteria, e saldarne una nuova.

Attenzione: il Fitbit può non essere più funzionante se se la saldatura non è eseguita correttamente, e non funzionerà se i cavi sono stati attaccati alle estremità sbagliate. Oppure cesserà di funzionare se la scheda madre è esposta per un periodo prolungato ad eccessivo calore.

  1. PLDBVJn3FUL4lCJP
    PLDBVJn3FUL4lCJP
    VX6ZQIDCefboZ4Q5
    tlhOFhI6eW6pOYsE
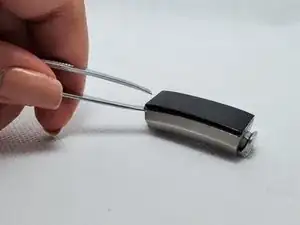
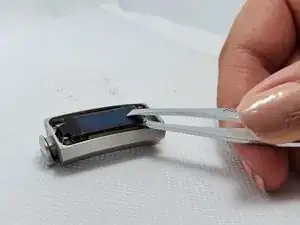
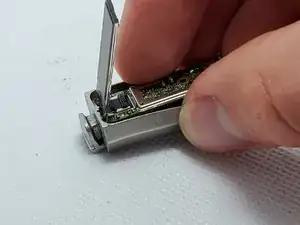
    • Ad uno degli angoli, spingi le pinzette tra il case in metallo e la copertura dello schermo. Usa le pinzette per separare le due parti. Ripeti la procedura per tutti e quattro gli angoli.

    • Questo passo richiede una quantità considerevole di forza. Far scorrere una lama di taglierino lungo i lati della copertura dello schermo/case metallico potrebbe aiutarti.

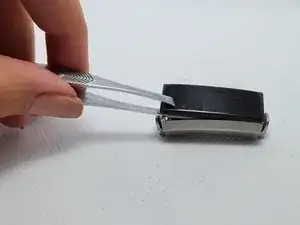
    • Una volta che lo schermo sarà rimosso, il Fitbit dovrebbe essere come nella terza foto.

    Io per togliere lo schermo ho usato la punta del taglierino facendo attenzione a non scalfirlo, seguendo con la lama tutt’intorno perché la cornice sotto è incollata.

    Claudia Spatafora -

  2. oNvJXDPigSKjBOEG
    oNvJXDPigSKjBOEG
    PmolZxAe1EtiqNI5
    YtvaPTTIjUIIuAYG
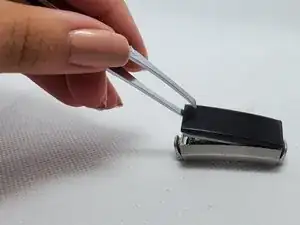
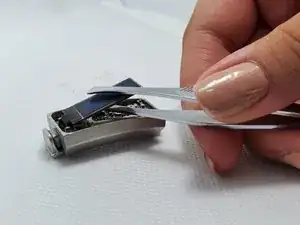
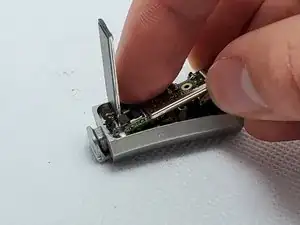
    • Lo schermo è parzialmente attaccato alla scheda madre con dell'adesivo, quindi fai scorrere con delicatezza le pinzette sotto l'intero schermo per staccarlo. Successivamente sollevalo.

    • Lo schermo è composta da del vetro sottile, quindi assicurati di non essere troppo aggressivo.

    • Dopo questo passaggio, lo schermo dovrebbe essere ancora attaccato alla scheda madre mediante una piccola cerniera nera. Questo pezzo NON deve essere tagliato/tolto.

  3. aNXnCqtpYHttNRRw
    aNXnCqtpYHttNRRw
    JWBilA3xEJe1FLMS
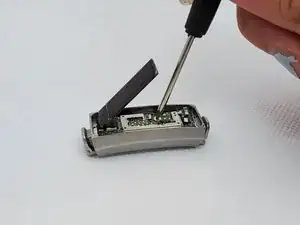
    • Una volta che lo schermo è sollevato, la scheda madre sarà esposta.

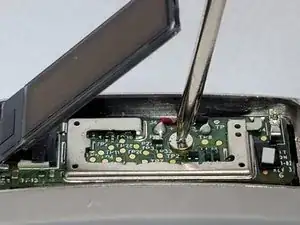
    • Rimuovi la vite centrale che tiene ferma la scheda madre con un cacciavite Torx T2.

  4. ghcdRQU1N3gYU4xs
    ghcdRQU1N3gYU4xs
    MyGZJXO1pYB2la2B
    quIQt5L5XfAgNMcn
    • La scheda madre è tenuta ferma da due piccoli ganci. Con lo schermo che si apre verso sinistra, usa le dita per premere delicatamente verso il basso e far scorrere la scheda madre verso destra. Una volta libera dalle clip, alza la scheda madre.

    • La scheda madre è attaccata al case con dei cavi, quindi assicurati di non rimuoverla completamente.

  5. O5XpIGwmioKUTyHP
    O5XpIGwmioKUTyHP
    JtFkTtbBBYoBZwqR
    XxWENk2NDL6UxchE
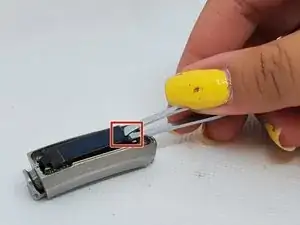
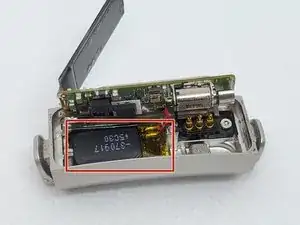
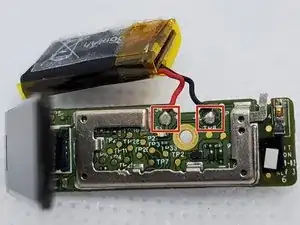
    • Una volta che hai sollevato la scheda madre, usa le pinzette per scollegare la vecchia batteria (posizionata sulla parte inferiore sinistra) dal case. Nota che la parte giallo chiaro è una parte della batteria.

    • La batteria è tenuta ferma nel case da adesivo, quindi deve essere alzata come hai fatto per lo schermo nel passo 2.

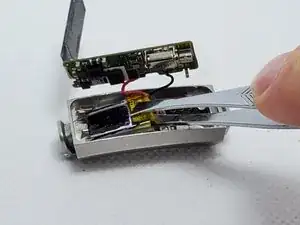
    • Una volta che hai rimosso la batteria, alza la scheda madre e i relativi componenti collegati, estraendoli dal case.

  6. bgiliGasWn4Pb6tr
    • Dovrai usare un saldatore per sciogliere collegamenti fatti tra la batteria e la scheda madre.

    • Una guida per saldare puoi trovarla qui: Come Saldare e Dissaldare Connettori

    • Taglia i cavi della nuova batteria ad una lunghezza appropriata e spela le estremità degli stessi usando un taglierino, in modo da esporre il rame.

    • Salda la nuova batteria alla scheda madre.

    • Assicurati che i cavi siano collegati nel verso giusto sulla scheda madre, altrimenti il dispositivo non funzionerà.

    If after replacing the battery the Fitbit still doesn’t work (except when connected to the charging cable) check the supply fuse (markedF1) just below the red square in the above picture next to to the red battery lead pcb connection. The fuse may have blown when your old battery went short circuit.

    I temporarily jumpered it out after replacing the battery and the Fitbit now works :-)

    Unfortunately I have no information as to the current rating of this fuse?

    If you know please add this info for me and others to benefit :-)

    dave.bullock -

    You don’t need to add more solder. Just break the old connections right at the solder joint and melt the solder slightly. Then slide the new wire into the melted solder and let it harden. Voila!!

    Eric Anderson -

    I replaced the battery on my Alta, only to discover it would only work while plugged in, but not when unplugged. My Alta worked fine before the new battery, but would only last a day or two days. I read Dave Bullock’s comment above. I had nothing else to lose with my tiny paper weight, so i placed a tiny drop of solder across F1 (the same side as the battery terminals). Nothing came to life right away. I put it all back together, plugged it in, unplugged and and Bingo! It worked!…. Thank you DAVE! I agree shorting fuses is not the best practice… but I figure this is 4.25 volts device and I am now enjoying the device again. I would replace the fuse if I could … but this thing in TINY.

    I really tried hard to not touch the battery wires to the board or case. I felt I succeeded, but with a blown fuse… I must have failed. Be careful to not let those wires touch anything.

    Darren Platt -

  7. SOBLHJPirtdOETDS
    • Ripeti i passi 3-5 nell'ordine inverso.

    • Lo schermo potrebbe essersi riattaccato da solo, impedendoti di completare il terzo passo (fissare la scheda madre). Se dovesse succedere, vai al passo 2 e poi passo 3.

    • Dovrai schiacciare leggermente verso il basso sulla scheda madre mentre avviterai la vite nella stessa, altrimenti non farà contatto.

    • Per riattaccare lo schermo, allinealo con la parte esterna in metallo e delicatamente premilo verso il basso. Potresti voler pulire lo schermo con un panno per rimuovere eventuale polvere o impronte prima di procedere con il prossimo passo.

  8. QjR4brB5wJTSq4vM
    QjR4brB5wJTSq4vM
    dNHa5X1lKuEUBUBr
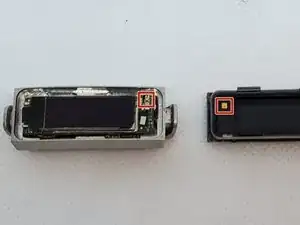
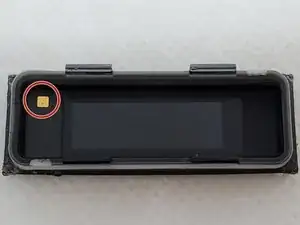
    • Sostituisci la cover dello schermo, assicurandoti che la piastra dorata sulla cover combaci con il gancio dorato sull'angolo superiore destro della scheda madre.

    • Questo passaggio richiederà della pressione, assicurati quindi di usare entrambe le mani per bilanciare la forza in modo equo su tutta la copertura dello schermo, o rischierai di romperlo.

  9. PTUBkxaDJZ1tYt4O
    • Collega il Fitbit al caricabatterie per farlo accendere e far caricare la nuova batteria, se necessario.

    Quelle pile avez vous utilisé ?

    cfauchon -

    FANTASTICO! ho acquistato la batteria su ebay e il Kit completo con il micro saldatore + multimetro Digitale il tutto a pochissimi euro! e son riuscita DA SOLA ad aggiustare il mio Fitbit! MERITO DI BENJAMIN E DEI SUOI COLLABORATORI :)))) complimenti per le precisissime spiegazioni.

    ps: sono anche fiera di me! GRAZIE MILLE per avermi dato questa gioia e soddisfazione…sperando che la batteria duri un bel po eh eh!

    Claudia Spatafora -

Conclusione

Ora il tuo Fitbit dovrebbe mantenere la carica.

Benjamin Hufendick

Membro da: 18/09/19

764 Reputazione

15 commenti

How about screen replacement? Is there a replacement part for that?

Tom Hernandez -

Hi, Tom.

I haven’t seen anything about replacement screens online. To the best of my knowledge, Fitbit doesn’t offer replacement parts for any of their devices.

Emily Parcell -

My Fitbit Alta HR has no center screw. The battery connects from the end of the mother board and there are two very small screws on the other end. It is virtually impossible to solder the new battery in without shorting to the two hold down clamps. Virtually Junk…

Keith -

Maybe try getting a few really small pieces of electrical tape to cover the clamps?

Benjamin Hufendick -

Keith,

Your Fitbit may be an Alta HR, rather than an Alta. I have the same situation you do. The PCB in the HR is different, and in the center has a very small flat-flex cable to the HR sensor below. If you are very careful, you can fold back a small piece of tape holding the flex flex in place (look closely, it is very hard to see), and then you can gently disconnect the HR sensor. The connector lifts straight up, perpendicular to the surface of the PCB. After you have disconnected, you can remove the two screws and slide out the screen, PCB, and battery assembly as a single unit. The HR sensor will remain behind in the case. I would recommend using a plastic tweezers for this process rather than metal, as if the PCB is powered you could damage it in the process.

I took some photos, but I don’t believe I can post them here.

jmmull -

jmmull,

Thank you for describing the differences between Alta vs Alta HR. The main guide was helpful with pictures. I was able to spot the differences with your detailed description. I successfully completed the battery swap for Alta HR. I found a heat gun very handy for removing the screen cover and prying the LCD screen. Note that the solder points for the battery are next to the hooks on the frame where you hook the PCB into for installation.

ganbare6 -

Thank you so much for this excellent guide! All went perfectly!

Daniel D -

A bit more tedious than expected, smallest device I have ever worked on, but the toolkit I purchased from Amazon was perfect. Instructions were 95% accurate as it pertained to the inner workings, mine had two screws at the end of the motherboard holding it in, instead of a single one in the middle. But the written instructions were clear enough to help me adjust. Great Job!

John -

Amazon says the battery is only compatible with the Alta not the HR. My HR battery says 46 mAh and the battery on Amazon is 36 mAh. Has anyone actually used the Alta 36 mAh in the HR?

Thanks!

David Kroc -

hi guys i accidentally disconnected the little ribbon cable connected to the screen

i tried to re-connect it but i failed

can you please give me some tips on how to re-connect it correctly?

Regards

SNAKE TISON -

This may be late, but hopefully useful for others. The connector is the ZIF type where the black bar on the socket needs to be flipped up (use a 2mm flathead screwdriver or similar tool to flip it). There was also a small foam pad and black tape on the ribbon cable itself, I had to remove this from the cable because it was interfering with reinsertion. Be careful when removing the tape not to tear the ribbon. Once removed, the adhesive was not reusable for me, but seems to function fine without it. With the socket opened, you can get the cable lined up and just barely put in holding the device in one hand, and the screen in the other. To get it firmly seated, I flipped the screen over the circuit board like it would normally go which created the normal “bend” in the cable. I then used closed tweezers to gently push the bend toward the circuit board to effectively push the connector all the way in. I’ve used this method about 4 times already, and it works every time.

Russel Kubes -

I replaced the battery on my Alta, only to discover it would only work while plugged in, but not when unplugged. My Alta worked fine before the new battery, but would only last a day or two days. I read Dave Bullock’s comment above. I had nothing else to lose with my tiny paper weight, so i placed a tiny drop of solder across F1 (the same side as the battery terminals). Nothing came to life right away. I put it all back together, plugged it in, unplugged and and Bingo! It worked!…. Thank you DAVE! I agree shorting fuses is not the best practice… but I figure this is 4.25 volts device and I am now enjoying the device again. I would replace the fuse if I could … but this thing is TINY.

I really tried hard to not touch the battery wires to the board or case. I felt I succeeded, but with a blown fuse… I must have failed. Be careful to not let those wires touch anything.

Darren Platt -

my fitbit alta is not working properly after unplug timing is not display in screen

what can i do pls help me… sukhpreetwithsevenseas@gmail.com Kindly revert me in this email id

seven seas -

For Alta HR owners:

Hi, i’ve successfully repaired my Alta HR with this tutorial, even if it is actually intended for a normal Fitbit Alta.

The procedure is the same excepted the order of the steps 3 to 6.

At step 3, before unscrewing the 2x torx 2 screws, (Alta HR has 2 screws instead of one) let them in place.

1/ Unsold the 2 contacts with the red and black wire.

Otherwise you gonna get blocked for pulling the battery out because of the sensor ribbon connected in the middle of the MB.

2/ Unscrew the torx screws

3/ Replace the battery (only 7€ for me in 2021)

4/ Screw the two screws back to the MB.

5/ Resold the contacts and the wires: black on -, red on + (basically step 6)

Follow step 7.

IMO it’s easier to do it this way for the Alta HR because of this new ribbon. But the whole procedure is basically the same.

Tangogow -

My versa 2 Fitbit stopped charging whenever I am trying to switch it on only battery icon appears in middle of screen and then disappear any suggestions

manjeet pannu -