Introduzione

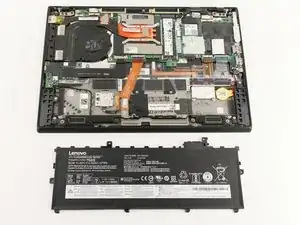
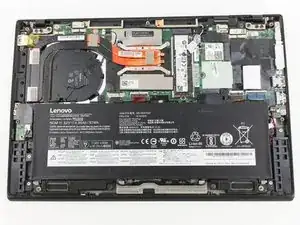
Questa guida ti mostrerà come rimuovere e sostituire la batteria del Lenovo ThinkPad X1 Carbon 6th Gen. Questo può risultare necessario se la batteria è danneggiata o semplicemente se troppo vecchia. Le batterie dei Laptop perdono parte della loro capacità quando vengono usati. Le batterie più comuni durano circa un pario d'anni. Se hai problemi col tuo computer, e sospetti che sia un problema della batteria, consulta la nostra pagina per la risoluzione di problemi prima di provare a sostituire la batteria. Tieni presente che un alimentatore può causare problemi simili. Prima di cominciare, assicurati di spegnere completamente il laptop e scollegalo dalla presa di corrente. Presta molta attenzione quando maneggi la batteri e smaltiscila adeguatamente.

  1. NFtYMIq2pIVe1NLS
    NFtYMIq2pIVe1NLS
    f3HPZLtAIooGCgUh
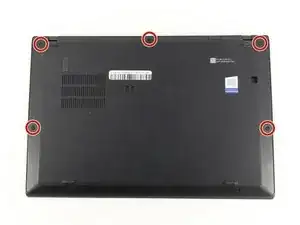
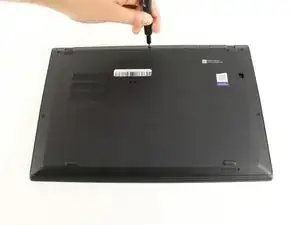
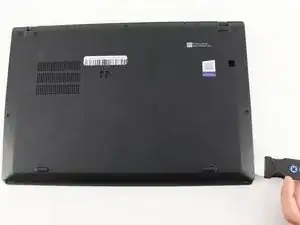
    • Usa un cacciavite Phillips #0 per rimuovere le quattro viti che tengono in posizione la cover posteriore del laptop.

    • Le viti non si tolgono completamente dalla cover posteriore. Svitale finché non saranno libere.

  2. HKMFZVKrjam3PWWH
    HKMFZVKrjam3PWWH
    6ZP1DMLSvgYbwIhX
    • Usa un Jimmy per alzare la cover dai pin localizzati.

    • Sebbene sia mostrato uno strumento di apertura metallico in foto, ti raccomandiamo di usarne uno in plastica per minimizzare i danni cosmetici.

    • Rimuovi la cover posteriore.

    • Se incontri della resistenza quando sollevi la cover, prova a svitare nuovamente le viti, in caso non siano ancora avvitate al dispositivo.

    I thank you for these instructions. They were quite helpful and I successfully replaced the fan. There is one thing however. Your instructions stated the following: "Be sure to pull on all of the cables at the same time."

    I disagree. One should never pull the wires. I was able to nudge the one part of the connector loose from the other part that it fit into." I then put the new fan in and gently and carefully pushed the connecting parts together.

    Otherwise, your instructions were clear and to the point. Thank you very much

    ALAN L SILBERLIGHT -

    The image shows prying the cover open at the bottom right. In fact, there are tabs securing the bottom edge to the frame. The cover needs to be pried open at the top edge. Once the top edge is released, the cover can be shifted slightly toward the top of the image to disengage the tabs at the bottom.

    This error, along with the similar error about removing the battery in step 4, suggests that the instructions were written with the laptop in the opposite orientation than what is shown in the images.

    EatCroc3 -

  3. 2xBAZNGktDaK54Lm
    2xBAZNGktDaK54Lm
    IIjEKPgWLiLkttCO
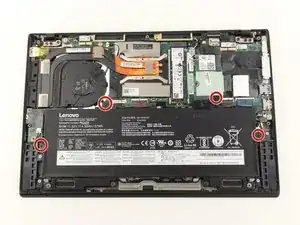
    • Usa un cacciavite Phillips #0 per rimuovere le quattro viti da 5 mm che tengono ferma la batteria al frame del laptop.

    The screw holes do not align 100%. Dont tighten all the screws as you re-insert them, leave just a little bit of play so that you can push the battery slightly until all the screws fit nicely, then tighten them. A little bit of DIY wisdom helps here. :-)

    Michael Dauer -

  4. OBGNfvQoRcUkViXt
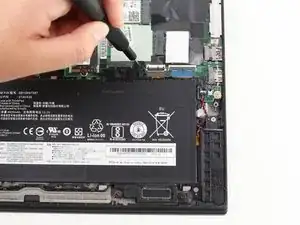
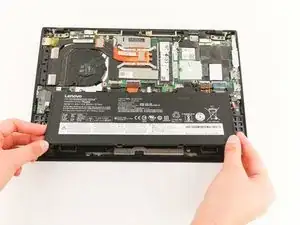
    • Estrai la batteria alzandola dal lato inferiore del laptop, e tirando nel verso opposto della scheda madre.

    Recommend changing the command language to lifting from the TOP edge, as the BOTTOM edge is secured.

    Alexander Van Auker -

    Thank you, was wondering what I'm doing wrong

    Ash Weber-Campbell -

    You forgot to tell people to disconnect the battery from the motherboard before removing…

    Becky -

    Agree with both comments above: lift from top left and top right of battery. This disconnects it and it lifts out and away.

    Marc G -

    In my 6th generation X1 Carbon there are two wires that are routed on the edge of the battery and have to be moved out of the way. These are antenna cables, be gentle with them, kinks and indents change their high frequency properties and may lead to problems with your WIFI.

    Michael Dauer -

    Before removing laptop cover you can disable the battery in the bios before beginning work for extra safety. Battery will be re-enabled at next startup automatically.

    Darryl S -

    How do I know the generation of my X1 Carbon?

    Does this batter fit all generations?

    eric gofreed -

    The generation info of Lenovo ThinkPad X1 Carbon is marked on the back cover (i.e., 6th Generation), with shiny black color (ink ?), near the fan's openings.

    The battery's original PN for 6th gen is ASM P/N SB10K97587 (FRU P/N 01AV430), marked visible on the battery (after removing the back cover).

    vsm -

    The #0 Phillips screwdriver furnished with the kit was not well machined; it threatened to strip out the Phillips cross-grooves.

    Fortunately, in my own toolbox I had a robust and well machined #0 screwdriver, and was able to remove the battery screws without stripping the grooves.

    Otherwise, the kit was excellent.

    Roger Mehle - 10/23/23

    Roger Mehle -

    Hi @rogermehle, I'm very sorry to hear about the Phillips #0 screwdriver trouble. If you would like to reach out to our Customer Support team via help.ifixit.com, they will be able to assist you. Thank you for letting us know. We're happy your repair was a success overall : )

    Sarah Westberg -

Conclusione

Per riassemblare il dispositivo, segui le istruzioni nell'ordine inverso.

Michael Megna

Membro da: 23/01/20

1268 Reputazione

6 commenti

Does it require to switch off battery in BIOS first?

Rafal Skolasinski -

My work wanted to e-waste my 3 year-old ThinkPad. Bought the replacement battery here, followed the instructions—it works fine now. Thanks a lot.

Ryan Phillips -

danke )) ))

Daniel Paul -

Great guide, and what an easy laptop to work on!!!

surfdaworld -

Step 4 is wrong.
You cannot pull the battery out on bottom edge because of the grey plastic arresting aids which you can see in the picture of step 3.
You first have to slide the battery as far as possible to the bottom edge into these grey parts so that the plug connection on top gets lose slightly and then carefully pull it out on side of the mainboard connector.

Also you do not need that Jimmy in step 2. After removing the screws just pull and lift the base cover with your fingers from the area where the hinges are located and then it easily slips out at the front.

Frank B. -

can anybody tale me , in this model what is the purpose of 2 dual type C connector . and also micro sd with sim card option .

dk yadav -