Introduzione

La sostituzione della batteria del tuo Nest non potrebbe essere più facile di così. Rimuovendo le 4 viti, riuscirai ad accedere allo schermo Nest e la batteria potrà essere estratta con facilità. Gli unici strumenti che serviranno saranno un paio di pinzette e un cacciavite Phillips #0.

  1. 1vGB1MjRGIbKOVsq
    1vGB1MjRGIbKOVsq
    y1RcOgSWnLRLZvi2
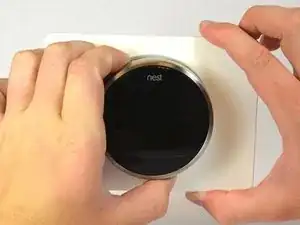
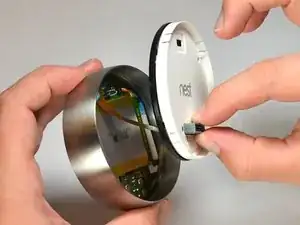
    • Fai presa sull'anello metallico esterno dello schermo e tira verso te stesso lontano dal muro.
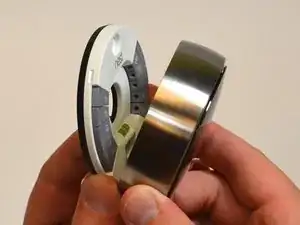
  2. 4oYJnIrEYcSEluAj
    • Gira lo schermo.

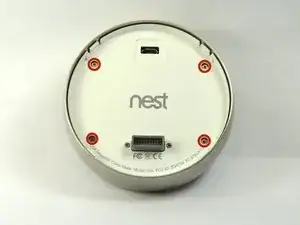
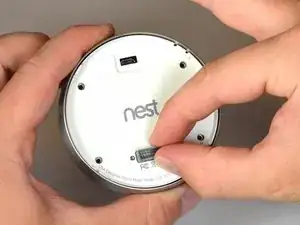
    • Rimuovi le quattro viti da 6 mm dal retro dello schermo con un cacciavite Phillips #0.

  3. mOBtrEaWsiLEdaXE
    mOBtrEaWsiLEdaXE
    1HxnywKsqvfSBEJS
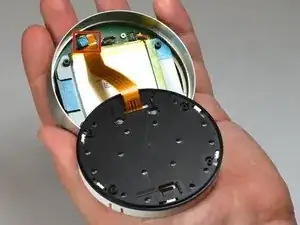
    • Afferra con due dita il connettore a 20 pin grigio e tira via il tutto lontano dallo schermo.

    • NON tirare troppo in quanto c'è un cavo sul retro del pannello che collega il connettore a 20 pin allo schermo.

    I pinched the connector and it will not pull out

    Robert Zelak -

    I’m my case, the white backplate cannot be pulled until it is turned about 1cm counterclockwise to disengage the brackets that hold to the internal plate. To do this, yo need to hold the front of the Nest with the metal frame (so the it doesn’t turn), while turning the backplate.

    Alberto Lazaro -

    And in my case, there are only 2 screws (in the 9 and 3 o’clock positions) and not 4 as shown in the photo.

    Alberto Lazaro -

  4. MawE2EjLwvfNwHVy
    MawE2EjLwvfNwHVy
    YkpSMPL24Gpv1VKw
    nhqdSlYgbHPTXPAA
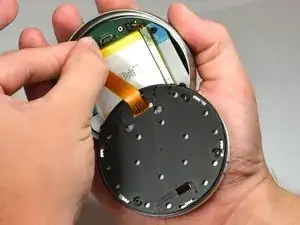
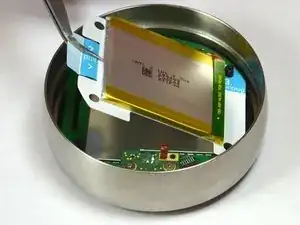
    • Cerca la linguetta blu all'estremità del cavo piatto dove riporta: "1. Pull".

    • Afferra l'etichetta con le dita e tirala direttamente via dalla scheda madre.

    How do you reattached the ribbon back to the motherboard ??

    alexehler -

  5. RkyokyRZAVvxs1XB
    RkyokyRZAVvxs1XB
    FwBGEZwN4SGLUcFb
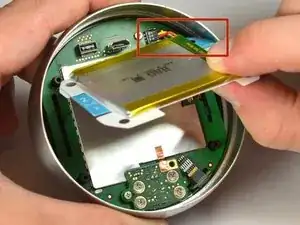
    • Trova la seconda linguetta che riporta: "2. Pull".

    • Usando le pinzette tira verso l'alto la batteria, lontano dallo schermo.

    • NON tirare troppo, in quanto la batteria è ancora collegata alla scheda madre e deve essere scollegata.

  6. QyaLKliSlJyHkMy5
    QyaLKliSlJyHkMy5
    lyPTXvRALNpJMWSg
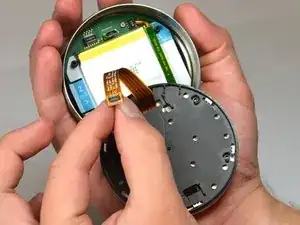
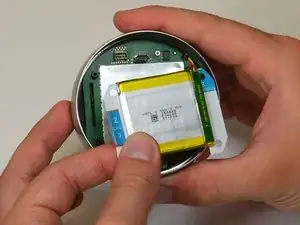
    • Trova la linguetta blu con riportato: "3 unplug".

    • Afferra la batteria con le tue dita. Tirala delicatamente via dallo schermo per scollegare la batteria dalla scheda madre.

  7. L1ZBfWWXsHGjhbaj
    L1ZBfWWXsHGjhbaj
    dMBgJuRAK2iOIXVu
    rBkNmopLvvsEX6ex
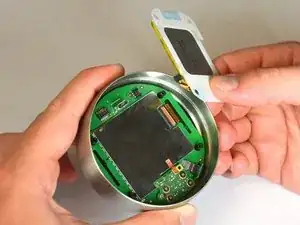
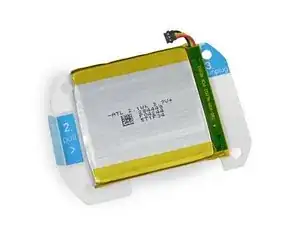
    • Afferra la batteria con due dita e rimuovi la batteria dalla scheda madre, per separarla dallo schermo.

    Where do you buy the battery?

    Robert -

    Same question

    Milutin Jokic -

    At least say the tipe of battery that's needed.

    Pedro Sanchez -

    I just ordered the battery model specified. When it arrived, I realized it doesn’t have the same specs as the battery that comes with the thermostat.

    The part listed (TL284443) is 3.7 VDC, but it is only is 380mAh (1.41 Wh) (if you zoom in on the image when you click “Buy”, you can see)

    You can clearly see in the tear-down that the battery that comes with the thermostat is 2.1 Wh.

    It might work as a replacement, but doesn’t have the same capacity.

    Gerry Beggs -

    Double check your own equip online or in the manual people.

    There are different generations of thermostats. How would this guy know which battery you need.

    Thanks for the directions.

    Helps a lot.

    LisaKK -

    To be fair, most people don’t know that there are different generations of the Nest Thermostat and clearly they didn’t read that this was for the 2nd generation Nest Thermostat. Probably should have been pointed out in the instructions more clearly for those folks. Then they wouldn’t have been so confused about the battery voltage differences.

    Resist -

    I am a 64 year old woman, I had the Nest next generation installed last year. So far it keeps telling me that the connection to my wi-Fi is not working and now it’s saying the battery is dead. I’ve gone through all the steps to re-connect to wi-fi to no avail. Could this be because the battery needs replacing?

    It’s 68 degrees in my house now and that’s thanks to my fireplace not this horrible device. I am going back to the regular thermostat, what a waste of hard earned money.

    Laura Rogers -

Conclusione

Per riassemblare il dispositivo, segui le istruzioni nell'ordine inverso.

Dustinluckenbill

Membro da: 23/09/14

667 Reputazione

15 commenti

It should be noted that doing this will void the warranty on your device. If you are having issues with the display battery you should call the tech support line and they will help you. Doing this risk damaging the device and making it to where they will not replace it if it is still under warranty.

Bob bobbado -

ON MY NEST WHEN YOU "pull 2"...IT WAS GLUED TO THE METAL TOP OP THE MOTHERBOARD UNDERNEATH...SO IF THIS IS THE CASE BE VERY CAREFUL AS YOU DISLODGE THE BATTERY ....ALSO THE PLUG FOR THE BATTERY WAS TAPED DOWN WITH AMBER COLORED TAPE WHICH I HAD TO REMOVE BEFORE I WAS ABLE TO UNPLUG THE BATTERY...I REPLACED THE TAPE WITH SOME SCOTCH TAPE AFTER REINSTALLING THE BATTERY...ALL IN ALL...GOO INSTRUCTIONS...A FIVE MINUTE FIX !!!

Andrew Jordan -

I also am having a time finding the replacement battery

Brian wilson -

I am having trouble locating a replacement battery. Any idea where to look?

Ron Temaat -

As of 12/28/17 this website has replacement batteries for $12 plus shipping:

www.batteryclerk.com

Here’s a direct link to the Gen1 battery page which has a link to the Gen2 battery page

http://www.batteryclerk.com/products/nes...

Ron Saritzky -

My Nest gen2 thermostat experiencing problems offline, low voltage etc … After extensive troubleshooting with tech support i was advised by tech support to replace my gen 2 thermostat. After purchasing a new gen 3 I disovered that the battery of my out of warranty gen 2 was not working properly. After installing a “C” wire I deduced that the battery was at fault. After replacing the battery and using the thermostat it works as intended. So when you are chasing a problem with nest thermostat and a resolution seems elusive Try the battery, the solution was much easier than the process of tracking it down. The battery would cheaper than the time I put in with tech support.

Danny Thompson -

I purchased two replacement batteries from Ifixit and replaced in two Nest thermostats. The installation was as simple as stated above, however neither one works. The thermostats just sit on the wall and blink Green. There was a card included that said discharge to 10% to ensure battery voltage is detected properly. Does anyone know what that is about? How does one discharge to 10%,. I suppose I could leave the unit off the wall for a week and see if that fixes it, but maybe there is an explanation here? Hard to believe both batteries are defective.

Jeffrey Weiss -

Wasn’t clear which way to put battery connection to motherboard—sideways or up and out? Whatever I did, I screwed up battery to motherboard; glad I had a new Nest E ordered. About $144 which avoids a lot of heartbreak.. My gen 2 did not have the colored pull tabs and the battery was well glued/taped and not as serviceable in the description

Frederick Winter -

Here’s the link for Gen 2 or 3 battery. https://smile.amazon.com/gp/product/B07C...

The appearance is a bit different than the pictures above but the steps are exactly the same. Yes, my battery had double stick tape underneath so you do have to be a bit careful when removing.

Also when you first try to remove the white back cover, there is a slight counterclockwise twist to pull it out after removing the screws.

Barbara Burbach -

This guide would be useful if it showed how to get the motherboard cable reattached. I couldn't see how to do it, and now I've crushed one of the pins on my 3rd Gen.

goldmahn -

One question. Why are all the aftermarket batteries for the Nest thermos. wh rating less (in some cases alot ) than the original 2.1wh battery.?

Anthony Capuano Jr -

Batteries e

cutefier1 -

why dbut why

Fahixe -

The original battery says 2.1 WH while most of these replacement batteries say 1.4 WH ... is that a problem?

Ronald C Fazar -

Does the new battery need to be charged before it can be used? My thermostat is blank after properly, installing the battery, I plugged it into the USB port, and the little green light on the nest is blinking, but the display is not lit up or working at all

Carla Minosh -