Introduzione

Se la tua batteria è esaurita, danneggiata o semplicemente si scarica velocemente, allora usa questa guida per sostituirla. Fai attenzione a non danneggiare il cavo piatto o bucare la batteria.

ATTENZIONE: Seguire questa guida danneggerà la guarnizione impermeabile del tuo orologio.

NOTA: Dal 2018 è riconosciuto un problema di scarica veloce della batteria su alcuni dispositivi Gear S3 (https://us.community.samsung.com/t5/Gear...) e seguire questa guida per sostituire la tua batteria potrebbe non risolvere il problema. Consigliamo ai possessori di S3 di provare delle soluzioni software (lasciare spento il dispositivo per giorni, aggiornarlo, disinstallare app, caricarlo completamente mentre acceso/spento, eccetera) prima di provare a sostituire la batteria.

  1. dkjcaDiNdnHRlBNK
    • Posiziona l'orologio a faccia in giù, in modo da vedere la parte posteriore.

  2. GGkylvHNgSn44Pgd
    GGkylvHNgSn44Pgd
    UnZkByNqSWRHiYTW
    • Rimuovi le quattro viti da 4,2 mm con un cacciavite tri-wing Y00.

    Y0 passte bei mir deutlich besser als Y00

    Alex Fi -

    Did you use iFixit tools? I just checked and I believe Y00 is correct. Y0 slips too easily. My test was with the Y bits from the Pro Tech Toolkit.

    Nicholas Dudde -

    I too had to use an Y0 screwdriver (from Ifixit 64 bit driver kit....). Y00 just don't grip, may be some batches of the watch used different screws??

    regislefeuvre -

    One screw just doesn't want to move, any suggestions/tips how to remove it?

    Slartibartfast -

    Problem solved: after 2 times of careful WD40 application and blunting the Y00 a bit it came of with a lot of patience.

    Slartibartfast -

    I also had a problem with one of the screws and flipping to Y0 worked for that one.

    Jeff Lambert -

    Yo use Y 0.6 y anduvo perfecto!!

    Gustavo Zarate -

    Yo use Y 0.6 y anduvo perfecto!!!

    Gustavo Zarate -

    The tool kit that came with my battery was a Y1.5 and worked perfectly

    jnewsom22 -

  3. SoEQC43VSGULT5ZW
    SoEQC43VSGULT5ZW
    HQQY6ay24yOxZFJc
    mKVCBwkWvxLUNqoj
    • Questo passaggio rovinerà la guarnizione impermeabile.

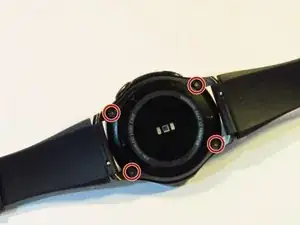
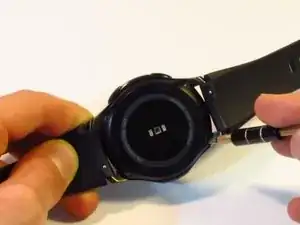
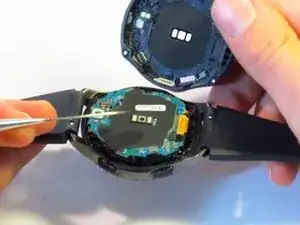
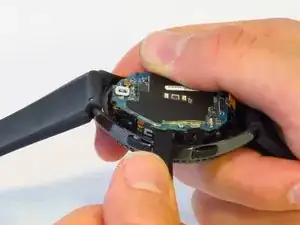
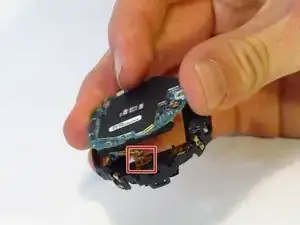
    • Incunea lo spudger metallico tra la cover posteriore e la scocca dell'orologio, lungo l'intero contorno.

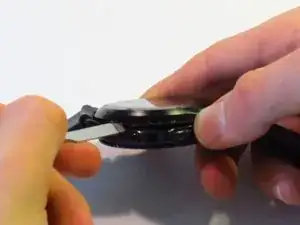
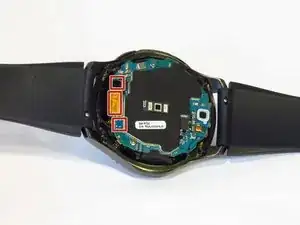
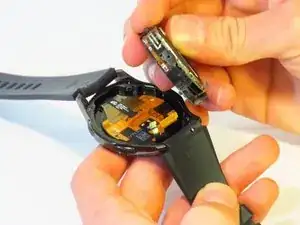
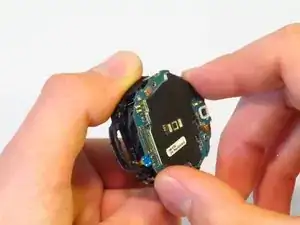
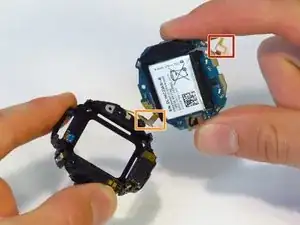
    • Rimuovi con forza la cover posteriore dalla scocca dell'orologio.

    • Questo passaggio richiede molta forza. Per rendere più semplice l'operazione, puoi usare un Jimmy al posto dello spudger metallico.

    Il est plus facile et moins domageable pour le joint de commencer par ouvrir le cache de connexion situé à coté de l’axe du bracelet long. On peut alors glisser la broche sans détériorer le joint, qui est plus éloigné du bord à cet endroit.

    Yann Richet -

    I’m pretty sure the seal is equally far away from the edge on all sides.

    Nicholas Dudde -

    This was the hardest part. I did use thin flat head screw to dismantle it. Using the metal spudger felt like impossible due to its thickness.

    Mariusz -

    Did using the screwdriver damage the case in any way? I’d recommend being careful using a tool with smaller surface area as that will apply more pressure at the point of entry. As the guide states, a Jimmy may also be used instead of the spudger.

    Nicholas Dudde -

    Anyone know where to buy the replacement gasket after breaking the seal between back cover and watch? Thanks.

    Jyon -

    Not sure if it's a gasket or some sort of sealant paste/gel. Just took my case off, and the gasket seems intact (fused to back cover of the watch. Quick search for waterproof sealant yielded lots of possibilities - don't know which one to choose. Can anyone with experience provide advice?

    Alan Lawee -

    most things I have seen online say use an RTV like permatex black sealant. pretty available at like autozone or o'reilly or walmart.

    Steven Betts -

    Ma questa guarnizione impermeabile si puo sostituire ? Come controllare se si è danneggiata? Come evitare che entri acqua dopo averlo aperto ?

    ant.beneduce -

    La photo montre une ouverture coté bouton mais pire coté car l'ouverture abime quand même le couvercle en plastique sur la face la plus visible : essayer plutôt sur les autres cotés

    stoufbook -

    Il est préférable d'utiliser, si possible, un outil adapté pour l'ouverture des boîtes de montre.

    Avec précaution, le joint n'est pas trop abîmé. Il est distendu. Possibilité de le couper et de le réajuster correctement.

    Fabrice -

    I have used a the Jimmy and I didn't need to do any force at all

    Carlos Rafael Ramirez -

    Que puedo usar para poner en la tapa y cambias el sellado ya que se me arruinó.

    Quiero que vuelva a ser hermético.

    Gracias

    damian levi -

  4. P4yRmQMdEi3qS5ll
    P4yRmQMdEi3qS5ll
    DUqw1YGV3hdissjv
    u5YIEsZxZBKXmKyV
    • Usando un'unghia, stacca i tre connettori sulla scheda madre.

    • I connettori si staccano facilmente esercitando uno sforzo minimo.

  5. hkprJoZEkEp12nS6
    hkprJoZEkEp12nS6
    EFKCNYDYZ1gxf44i
    gSdIOCiEwy1UVTD2
    • Usando uno spudger, separa la scheda madre e il gruppo anteriore dello schermo.

    Oui tuto bien clair. Opération réussi !

    Bien qu’adroit de mes mains, et après avoir découvert la “bête à coeur ouvert”, je ne sais pas si je me serais lancé... C’est tout l’interêt de ce Tuto qui invite à le faire (car pas trop de détails), et qui suivit pas à pas permet de s’en sortir. Bravo

    Merci Dan.S

    Dan.S -

    Better replace the 2 bolts from next step first.

    Gabriel Pinho -

    The guide has you remove the screws second because it makes it possible to remove the whole assembly without snapping any cables.

    Nicholas Dudde -

    Ok... Woher bekomme ich die Displayeinheit ???🤷🏻‍♂️

    Patrick Nufer -

  6. wSKBt1qxRfSYoeCe
    wSKBt1qxRfSYoeCe
    x4uTpqCCSnAtinmu
    • Usando un cacciavite JIS #00, rimuovi le due viti da 4.5 mm.

  7. PpMifwcx6bmXKIlE
    PpMifwcx6bmXKIlE
    xCXNjPtktKVv4F52
    vkiyIMERMrkBV4PS
    • Scollega il cavo piatto della batteria dalla staffa.

    • Fai attenzione ai cavi piatti della batteria e della scheda madre (posizionato sul lato opposto del cavo della batteria, evidenziato in arancione), in quanto possono rompersi facilmente(il nostro si è rotto durante lo smontaggio).

    • Nota come la parte finale del cavo piatto alloggia nella scocca di plastica. Cerca il pin di plastica sulla scocca per rialloggiarlo correttamente durante il rimontaggio.

    • Separa la scocca dalla scheda madre.

    What happens if the battery ribbons breaks?

    sarah rus -

    Hi the ribbon has come away from the mother board. How do I stick it back on? What type of adhesive do I use?

    Peter Alderson -

    I broke my ribbon :( ordering a new one. How do I stick it on?

    Justin Lalonde -

    I also broke the ribbon for the motherboard. What adhesive should I use to reattach it

    danieljchoe -

    I'd like to know too please

    Justin Lalonde -

    Be very careful with a ribbon that cannot come off on the opposite side of the red box on the motherboard when preforming this step. I found this and managed to avoid it.

    Andrew Watson -

    You should first detach/separate the buttons ribbon cable from the side of the plastic casing so you don't tear/break it accidentally. (orange box, the cable is soldered onto the motherboard cannot detach it from there)

    István Szikra -

    I would advise not to do this like a guide said. Squirt some isopropyl between the pcb and battery to unglue it and carefully nudge it with a plastic spugger. Same with the adhesive that's holding the other end of the ribbon cable.

    Cryen -

  8. LVnu5n2A26CqULu3
    LVnu5n2A26CqULu3
    OroFXIQEYGMdZIhE
    • Separa la batteria dalla scheda madre.

    • La batteria e la scheda madre sono attaccate con dell'adesivo; richiederà un po' di forza per separarle.

    • Le batterie al Litio sono potenzialmente pericolose. Maneggiala con estrema cura e non bucarla.

    I just used this guide to do a replacement, the watch works perfect now. Pay attention to whats in your hand vs whats on the guide a couple of the steps are not as straightforward just take your time. Overall good guide though.

    Michael Carlson -

    Replaced the battery successfully with this guide. Take your time to carefully see whats on the watch compared to the guide.

    I removed the battery ribbon cable in step 7 by using a really small flat screwdriver to lift the cable from the housing. It's attached with adhesive tape.

    Eric Mulder -

    Perfect. I just remove the two bolts form step 6. Battery was a little difficult to remove due to a tape that attached it on board.

    Works very well.

    Gabriel Pinho -

    It took an extra tool that isn’t mentioned (very small, thin, straight screw driver), but it took only 20 minutes! Great step by step instructions!

    Walker -

    J'ai suivi tout le processus, au final la montre charge mais ne s'allume plus.

    liotard -

  9. qGEg4qwSrPqsvCjC
    qGEg4qwSrPqsvCjC
    GhBZnfuCCq5knoOD
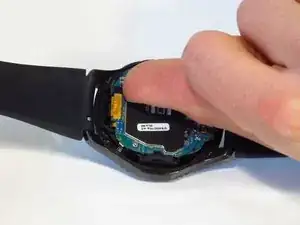
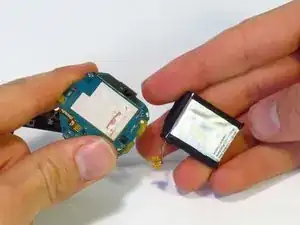
    • Durante il riassemblaggio, prima di incollare la batteria, disponila nel suo supporto in plastica: così sarà più facile posizionare il suo cavo.

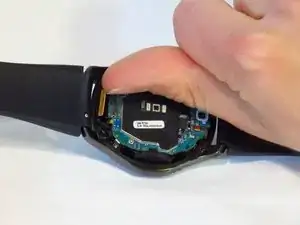
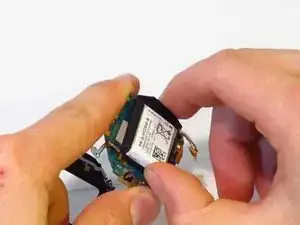
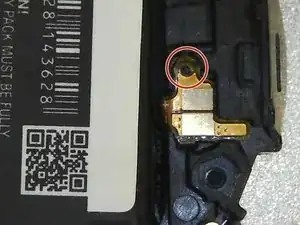
    • Prima di fissare la batteria assicurati che il foro attraverso il quale passa il cavo sia tondo. Il foro sulla tua batteria di ricambio potrebbe essere malformato. Potresti dover allargare il foro prima di fissare il cavo.

    • Per allargare il foro usa lo strumento per l'estrazione SIM nel Pro Tech Toolkit, una graffetta o altri strumenti sottili. Lo strumento scelto può anche essere usato per spingere dolcemente il cavo nella posizione corretta. Presta attenzione nel farlo per evitare di danneggiare il cavo.

    • Segui i passi dall'8 all'1 in ordine inverso per riassemblare il tutto.

    Notez que la montre ne redémarre pas tant que le boitier n’est pas fermé.

    Yann Richet -

    Formidable demande de l'attention et de la délicatesse a solvé ma montre Frontière.

    Bravo et merci de partager.

    Alain ESCAFFRE chateauneuf le rouge FRANCE

    ESCAFFRE -

    Do you possibly have any suggestions on how to repair the battery cable ribbon once it becomes separated from the mother board?

    DC Cooper -

Conclusione

Per riassemblare il dispositivo, segui le istruzioni nell'ordine inverso.

William Hurty

Membro da: 08/10/18

2662 Reputazione

46 commenti

Is there a way to reseal the watch making it water proof?

David R -

If the seal was damaged during opening the backcover, unfortunately you need a new backcover, cause the seal is integrated in the case.

Frank Mauderer -

where to buy the battery?

popoypoi22 -

https://www.amazon.com/Tesurty-Replaceme...

I bought mine from Amazon. Just replaced the battery after all the tool kit came in. It works like brand new!

Jae Shim -

is there a kit somewhere for the battery/new seal

Adam Seidlitz -

If the seal was damaged during opening the backcover, unfortunately you need a new backcover, cause the seal is integrated in the case.

I bought mine here:

Battery: https://www.schreiber-electronics.de/sam...

Backcover with integrated seal: https://www.schreiber-electronics.de/sam...

Frank Mauderer -

The battery is part number EB-BR760ABE (as seen on picture in step 8). You can find it on Amazon and eBay.

did4 -

Most difficult part is getting that battery connector back in place. Otherwise, it’s a simple process. Just make sure to be careful with the connectors if you’re not used to playing with them.

hawleyst -

this guide is really well done my device works perfectly fine now and was super easy also I believe that there is a gasket and so you don't think have to buy a sealer

Landre Farrell -

i made the mistake of pulling the board too hard…The flex cable didnt break but it came lose from the board. Is there anyway to glue it back?

Kelvin Ventura -

You ever figure this out? Thanks

Honest News Network -

If you do not put the spudger in so deep as to damage the seal you do not need to replace it. Also, you do not need to remove the whole internals to replace the battery, if you disconnect the battery cable after removing the two #00 philips the battery and circuit board pivot open. Here is someone doing this same repair as I describe.

Brent Quick -

The battery in the photo shows the S/N but if your original battery # is Eb-br760, Eb-br760abe then you can find it at www.canadianbatteries.com

https://www.canadianbatteries.com/batter...

Dan Clark -

I need Gear s3 battery

Asmat khan -

I replaced the battery but when I put it on the charger it started flashing red, I read somewhere it means its unable to charge, any advice?

baculpojl -

Screwdriver didn't fix where can I find a 2mm screwdriver?

bowieinc -

I'm using the 64-bit driver kit from ifixit. The Y00 tri-tip bit doesn't grab the screw heads on the back of the watch casing. Is there another bit or driver kit that works better for this application? Note: I've tried the bits Y000 and Y0 and the pitch still doesn't grab properly.

Paxton Powers -

Can the Battery of the Galaxy Watch be used for the Gear S3?

Dzoni Filipovic -

After following these steps, the battery was replaced. The watch charges and reaches 100%, screen shows the percentage, but the watch will not power on. No cables were torn. Would you know what went wrong?

Jerry Castillo -

Mines doing the same thing. Did you ever figure it out. I went back in and made sure everything attached. Shows charged to 100% but won’t power on

Misty scheuerman -

I am also struggling with this. Power button no longer works after replacing battery.

Justin Lalonde -

Replaced battery but still only getting 24 hours (same as battery I replaced). Does it get better over time ?

Thanks in advance

Michael Humble -

I replaced my battery a few days ago, and it lasts (Theorically) about a one day and 22 hours, but it depends on how you use it. So I’m afraid that it won’t get better after a little time.

Anyway, Samsung website says this: “With the Gear S3, you can go for up to four days before putting it down for a charge. Its battery lasts that long.

*Battery life may vary depending on usage and settings.”

I don’t use it with the maximum performance and I still not getting those 4 days. If it changes for you, let us know!

I hope it gets better.

MemoryOverflow -

So I just replaced my battery in my S3 and so far is working just find. Charge is going up no issues so far.

Ricky's Journey -

What can i do if the ribbon cable in the corner becomes unattached? Is there a way to reattach? Thanks

Honest News Network -

I want authorized dealer to replace battery of my S3 gear watch and charge for job and battery at Jaipur

mr.omprakashsharma2006 -

Buon giorno, la batteria sono riuscito a cambiarla, nel riassemblaggio la batteria si carica ma nn si accende l l'orologio, ho provato a rismontarlo, ma a vedere così sembra tutto a posto, nn capisco cosa possa essere

Fabio DALL AGLIO -

Bonjour

après changement de ma batterie, à montre fonctionne en rechargement sur sa base mais l’écran reste éteind dès que je la prend en main..

y a t il quelque chose à faire?

nicomorizot -

Mine updated, and after updated the next time i charged it got hot…i noticed after this it would not accept charge anymore. Charger would just red blinking light after a few seconds. it took a few days and finally died for good, tried a friends charger but no good…I tried everything to make sure it wasn’t software…I think these watch batteries brick immediately if they ever get hot so that they won’t explode…I just wonder if replacing the battery would fix this for me?

RIPing PUMA -

I think samsung is a good company but at the time many other people complained of the same thing that after the update came battery problems…I wonder if samsung didnt test the update thoroughly enough and unintentionally destroyed a lot of watches?

RIPing PUMA -

this was a several months ago

RIPing PUMA -

Need help, I have a Galaxy Gear S3 Frontier model SM-765A. Been having problems with battery drain. I replaced the battery with a compatible EB-BR760ABE battery. Now when I charge it it the display reads (Can't Charge, Battery Needs To Warm Up). I have left it on for hours, still gives me the same result. Any suggestions.

Sal -

Mille Merci pour cette explication.

En moins de 10mn terminé ??

Bravoooo très bien expliqué

Greg neo -

I pulled out the mother board but the ribbon can off. Can it be placed back on?

Cantwell -

i changed the battery.  I fully charged it but it won't turn on

enver anursal -

I have the same issue

Justin Lalonde -

I replaced my battery but it will not turn on now. It charges but will not power on any suggestions?

Joseph Hill -

Same here. Watch won't power on after replacing and charging the new battery. It's like the power button no longer works

Justin Lalonde -

Samsung should be ashamed of the lack of support of this watch.

Allen Martin -

Hello all, i have a problem, 2 of the back cover screws cant be removed, is there a way to resolv this problem ?

Härūmi Stûdïõ -

Excellent tutorial, well done, requires patience, some time and some electronics knowledge, but it was SO helpful for me, and made the job less stressful and I knew it was done correctly, many thanks, Laurie - South Australia

Laurie Day -

I broke the motherboard cableI broke the motherboard cable😭.

Can anyone help me with this?Can anyone help me with this?

majed s -

done! thanks a lot!

vldulloog -

After replacing my battery, I also noticed that my watch was much more responsive, before it had a noticable sluggishness and low framerate. Now it is much more snappy. I'm curious if Samsung made the watches throttle back to preserve the aging battery. Has anyone else noticed this?

John Hinton -

Bonjour,

J'ai remplacé la batterie mais ma montre ne se charge plus.

Une idée ?

Merci pour votre aide ! :)

Yves Roure -

I broke the ribbon to the mother board will the watch still work now?

tėe black -