Introduzione

Questa guida ti mostra come rimuovere il case dell'iPod di terza generazione.

  1. MmSnWJ2qcoWeh4kt
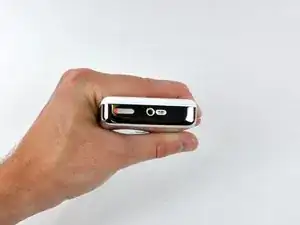
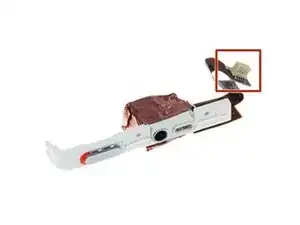
    • Prima di aprire il tuo iPod, assicurati che lo switch Hold sia nella posizione di blocco. La barra arancione dovrebbe essere visibile, indicando che il bloccaggio è attivo.

    Note that the lock will move out of position again easily once you have the case open (when disengaged from the internal switch). That being said, you will want to keep this little switch in mind even beyond making sure the lock is in the right place, as the little plastic tab that is the switch is extremely small and fragile. I ended up breaking mine off somehow while trying to get the case closed. It is small enough that I never felt it break; I finally got the iPod back together and found that the lock switch didn’t work. I was able to re-open it and use a pick tool to unlock what was left of the switch, so my iPod works, but no longer locks. I’m happy to have a working battery anyhow, but I’d have been happier yet to have completed the repair without breaking anything - be careful with this little switch.

    Joe Sutton -

  2. pdHoVQpkaYAQitXD
    pdHoVQpkaYAQitXD
    GqCC2TTTDFLRGIN1
    SSkelmrDRQue3vkr
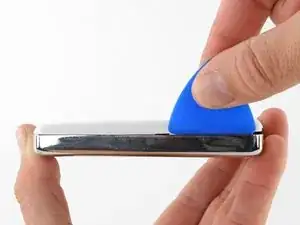
    • Inserisci uno strumento di apertura il più possibile nella giuntura tra la plastica frontale e il pannello in metallo posteriore, sul bordo destro dell'iPod.

    • Potresti doverlo far scorrere un po' avanti e indietro per farlo entrare più in profondità.

    • Usa lo strumento di apertura per fare leva sul pannello frontale in plastica e rilasciare le cinque linguette di fissaggio (vedi terza foto).

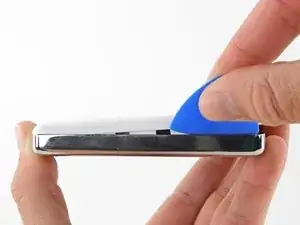
    • Fai scorrere lo strumento di apertura lungo il bordo dell'iPod e continua a far leva per rilasciare le restanti linguette.

    • Dopo che tutte e cinque le linguette sono state rilasciate, il case dovrebbe aprirsi senza troppi sforzi.

    Is that wide opening pick shown in the photo available? Or should I be able to get my iPod 3G open with just the narrow opening tool? So far I’ve been unsuccessful.

    David Troup -

    Hi David, an opening tool can definitely work, but we’ve found that the opening picks tend to be a bit easier. You can find those in our store. The clips are definitely really tough and, like Matthew mentioned, using multiple picks might help. Getting the pick in the seam is the hardest part, then once it’s in you should be able to work it in farther, or add another pick to eventually release the clips.

    Adam O'Camb -

    I had to use about 10 guitar picks. The case “clips” are amazingly tight. I’d get one in just barely, then I’d add another in the now-opened slot. Then another. I’d space them about 1 or 1.5cm apart on two sides. Work into a corner and it will release. (I’m going on memory. I bought packs of the cheapest guitar picks. I have both thin and medium. I think I used medium, but I can’t remember.)

    Matthew Robbins -

    so much easier to open with an xacto blade and handle. the blade has a more defined edge that helps to move the plastic front cover. then a pick can help do the rest.only took 2 mins. using xacto blade and handle

    dennis fowler -

    also not mentioned is reattachment of hard drive plug to board . not a normal plug as the others.need to be sure it is attached before closing up ipod. replacement battery was thicker than origional and allowed hd to not sit level

    dennis fowler -

    I had success holding the iPod im my hand, pushing the plastic with the thumb while pushing on the metal body from the other side. This opened a gap between the parts, where I could insert the pick.

    Jakob -

    After trying fruitlessly with a variety of plastic tools, I remembered I owned an iSesamo. Got in in 20 seconds.

    Alison Scott -

    I second the idea of using an Exacto handle with a flat chisel blade to start the opening on the right side. Then I could insert the pick and work it around to undo all the clips. I could get a lot more purchase on the edge and make a gap for the pick. It took some pressure as it’s been 20 years since this unit was built, an iPod Special U2 black edition.

    David Wilcox -

    As others noted, it’s darn near impossible to get a pick into the seam to get started opening the case. I finally got mine by pressing up on the back of the case, which causes the side of the back piece to angle out a bit and allowed me to get the pick that came with the replacement battery in. Once I finally got that far, it was fairly easy to slide the pick up and down the side of the case to pop free each of the clips. I scubbed up the edge of mine a bit before I figured this out, and those efforts didn’t help, so maybe avoid that. (I didn’t have an Exacto like others have suggested, but having done this, I can see how that might work well also, if you are careful about it)

    Joe Sutton -

    This tool worked great! iFixit Opening Tool

    I could push the plastic top part back enough to get the pick in.

    Brenna Rentmeester -

    Two guitar picks did the trick – as soon as the edge of the first pick goes into the gap, twist it more upright; the next pick can then be slid into the opening and the rest of the case opens up easily. One warning: be very careful near the charging port – there’s a delicate plastic trim around the opening in the metal case and I accidentally cut through the trim with the edge of a pick. The trim is attached to the case with two screws so I removed it before repairing it with superglue. This worked well and the trim screwed back in very easily.

    Ian -

    Get the plectrum in at the charging port where the metal is thinnest, then move left/right and around the first corner, keeping it tightly in the seam. Once around the corner, it begins to ‘pop’ open. Do the same for the other corner and it will open right up.

    Matt -

    Turn the iPod upside down and squeeze (push the white plastic in while squeezing). You will hear a click, creating a gap to insert the pick. You're welcome. :)

    https://youtu.be/w2DzkFrBEGw

    TONIA PROUTY -

  3. qZgT2QmRAEXefdCJ
    • Il case dell'iPod ora è aperto, ma non separare le due metà. C'è ancora un altro cavo piatto arancione che connette il jack delle cuffie con la scheda logica.

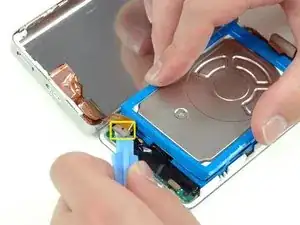
    • Apri il case come se fosse un libro con il connettore dock sulla parte superiore, e fai appoggiare la parte posteriore di fianco la parte frontale dell'iPod.

    Remember to fold the backplate up the correct direction, otherwise you might break this cable.

    iTronics Repair -

  4. cqyCZeOrrkqkBNQr
    cqyCZeOrrkqkBNQr
    XMFjiOVlKYDGGjxo
    • Usando uno strumento di plastica o le unghie, scollega delicatamente il connettore arancione del jack delle cuffie. Assicurati di tirare verso l'alto dal connettore e non dal cavo stesso.

    • Il connettore jack delle cuffie è insolitamente alto. Quando fai leva, fai attenzione a non separare la parte inferiore in plastica del connettore dal cavo piatto. Fai leva tra il connettore e la presa, non tra le due parti del connettore.

    Be more than careful with the headphone jack, because I thought I was until I broke mine (I still don't figure how I did this). Those are hard to find after and if you do, it may cost you something around 20-30$

    Tristan Gauvreau -

    Yeah, I just did the same. Oops.

    Alex Robinson -

    Yikes - yes, be SUPER careful - just damaged mine too (snapped some of the soldered connections between ribbon and plug). I only use my iPod with a dock in my car, so hoping I will get away with this.

    Russell Coleridge -

    Arrgh...I should have paid closer attention the red warnings above. I ended up pushing up on the ribbon part rather than the actual socket. Thereby completing separating the connector from the ribbon cable. I got way too excited when I finally got the case loose after an hour of trying that I rushed through this part. Now I have to see if I can replace this part.

    Eric Schenkel -

    Blech - despite these thoughtful warnings I snapped that plug right off the ribbon! So please, be careful. I found a replacement headphone jack (used) on eBay for 20 bucks. What a not-fun way to spend 20 bucks!

    Matt Michael -

    Yep - did the same. Bugger. Is it possible to carefully fix? Solder or glue or are there replacement parts? I do actually have another iPod but I was hoping to end up with two working versions rather than one just for parts.

    Greg J Mason -

    Well, that reminds me to view the comments first before attempting any of the repair steps. Did the same thing. iFixit should put that suggestion at the top of every repair guide. “Review Comments First, Save $20”.

    John Lillywhite -

    Yep, that’s me buggered too.

    Alistair Hay -

    Same thing happened to me. I was extra careful. Now what?

    Clayton Adams -

    I don’t think it’s repairable. I bought one for $20-30 off ebay and cannibalized the ribbon cable.

    kb9rhe -

    This step appears to be optional for a battery replacement - or, at least, I could not persuade the connector off the logic board without applying more force than I was prepared to given all these warnings. So I just carried on, and replaced the battery without ever removing the headphone jack connector.

    Alison Scott -

    You are correct, this step is not necessary for a battery replacement although it may give you more room to work with. In my opinion it’s not worth the risk of damaging the connector though, as you can just place the metal cover to the side like Rob said, leaving the connector attached and carefully folding the metal cover to the side like opening a book (although it may not lay perfectly parallel to the front case of the iPod).

    Bagel -

    Yep, the step should be place the metal back cover to the side without removing the connector, because you’re certain to break it, especially if this is the third time you’ve replaced the battery and you forgot to be careful the third time.

    Rob -

Conclusione

Per riassemblare il dispositivo, segui le istruzioni nell'ordine inverso.

Walter Galan

693762 Reputazione

0 commenti