Introduzione

Usa questa guida per rimuovere e sostituire la copertura inferiore in plastica della tua PlayStation 4 Slim.

  1. HVTGYelJeUQRNBTL
    HVTGYelJeUQRNBTL
    6Z3td3NoCXXHhZQI
    4ybs2g5RHLPUHZ6a
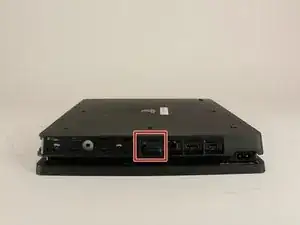
    • Trova l'adesivo di garanzia in plastica vicino alle tre porte sul lato della console.

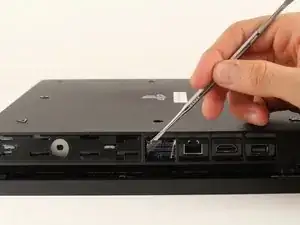
    • Rimuovi l'adesivo di garanzia semplicemente staccandolo con qualsiasi tipo di spudger.

    • La rimozione dell'adesivo di garanzia NON invaliderà la garanzia.

    Remove the screw directly to the left of that one in the picture as well. Should be silver.

    Elizabeth Johnson -

    ihr seid so ein scheiß haufen das stimmt über haubt nix

    Toaster 95 -

    einfach alles stimmt nicht

    Toaster 95 -

  2. iuwUc5FNjBXlxWDZ
    iuwUc5FNjBXlxWDZ
    NddVVDLyNaEUIPME
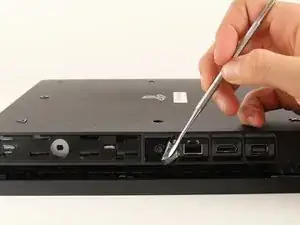
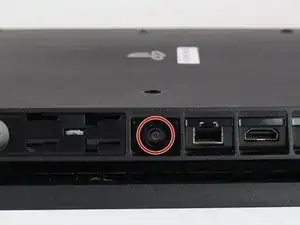
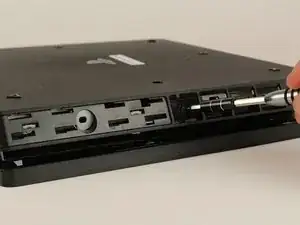
    • Svita e rimuovi la vite da 5.0 mm che è dietro l'adesivo usando un cacciavite di sicurezza T8 Torx con un movimento antiorario.

    Are you SURE that it’s counter-clockwise?

    The Stuff -

    Try T9. Fits better.

    Otter -

    T8 fits like a glove for me

    Daniel Henderson -

    Is there anything else you can use

    randomweeb -

    A small flathead screwdriver will work

    shawng6363 -

    There is a small metal rod in the middle of the screw that isn’t allowing my t8 inside. Any insight on this?

    gavinstoutconner@icloud.com -

    Some T8 bits have a hole in the middle that will allow that rod to go through; some do not. If you have a set of multiple bits, check if there are any others labeled T8 or TR8 with that hole in the middle.

    Nicholas -

    There is a metal thing inside of the screw slot any insite on this?

    Tristan York -

  3. SlFEBbB2b3bIl6BX
    SlFEBbB2b3bIl6BX
    oRDOW1Bq6YK4gBJW
    Qs6ybIWcbq4tnNZZ
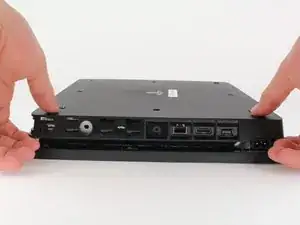
    • Gira la PlayStation 4 Slim sottosopra con il lato della vite rivolto verso di te.

    • Fai leva con le dita sui due angoli che sono rivolti verso di te.

    • Questo passaggio potrebbe richiedere un po' di forza per essere aperta e sentirai un click molto forte quando si staccherà.

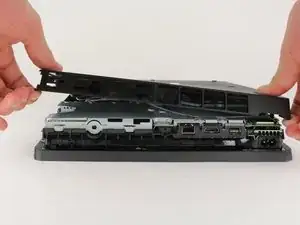
    • Rimuovi la copertura inferiore facendola scorrere lontano da te e alzandola.

    It says to place it upside down, but didn't you do so in the previous step? I've been trying to unscrew the screw with my screwdriver that I got from here and if I had to had the system right side up, I'm afraid I might've stripped the screw from all the force I tried to use to get the screw out that will NOT budge. It didn't even move the slightest after removing the warranty sticker.

    Vidal Santos -

    There is a single clip on the left side about 5cms in, and another clip on the right side equidistant to the one on the other side. Jamming a spudger in there first, and lifting those clips helped, and then I had to slide down to lift a total of 4 clips on each side (each about 4cms apart). Then push the cover away from you, if that makes more sense than “sliding it towards the back corners”, since the back corners are technically facing you.

    Emil Fisk -

    It would be easier if you just lifted the top cover of the PS4.

    Poobler -

    The earlier comment by Emil Fisk is spot-on. I found it impossible to remove the cover without first using a spudger to release the four clips on each side.

    midahed -

    I saw many video and tried it my self, you have to remove the hard disc before removing any cover.

    Bahaa CHEBLI -

Conclusione

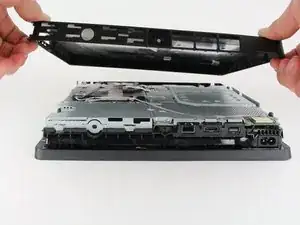
Per riassemblare il dispositivo, segui le istruzioni nell'ordine inverso.

Hernan Rodriguez

Membro da: 24/01/18

3620 Reputazione

2 commenti

Wo kann man die Bodenplatte kaufen?

Emre Kaman -

Hi hello it's Good

محب علي شاكر -