Introduzione

Segui questa guida per sostituire il disco rigido del tuo iMac. La sostituzione del disco rigido richiede la separazione dello schermo e la rimozione dello speaker sinistro.

Questa guida include inoltre i passi per aggiornare il disco rigido ad un SSD. Descrive come installare un sensore per la temperatura del SSD, in modo tale che la ventola del Mac operi correttamente.

Prima di cominciare a lavorare sul tuo iMac: Scollega il computer dalla presa a muro della corrente e tieni premuto il pulsante di accensione per dieci secondi così da scaricare i condensatori dell'alimentatore.
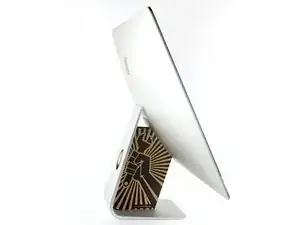
  1. osHwwTsVGOoGRyLD
  2. FkIZHINdYQaFYLVW
    FkIZHINdYQaFYLVW
    SaBSMhWoyPaOMStr
    b1vsQZmYLT5uGp1K
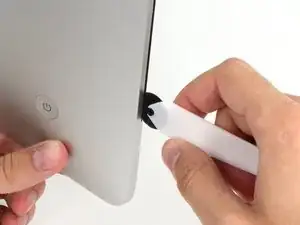
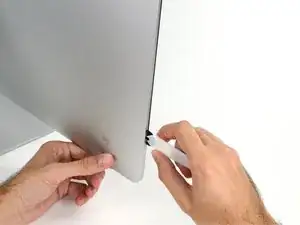
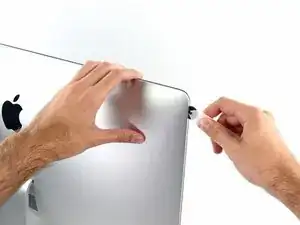
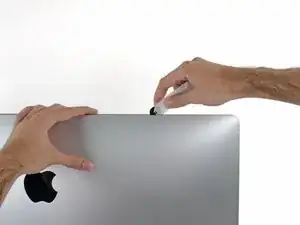
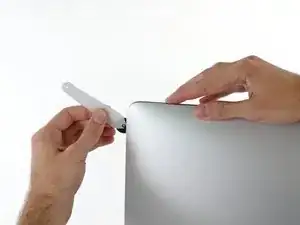
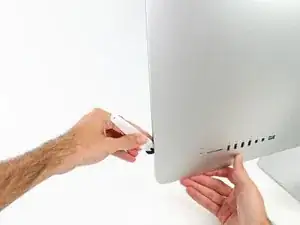
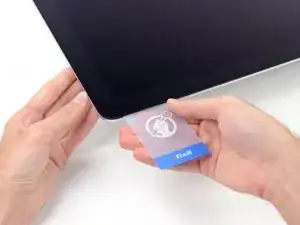
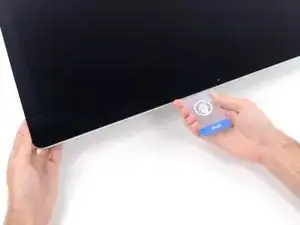
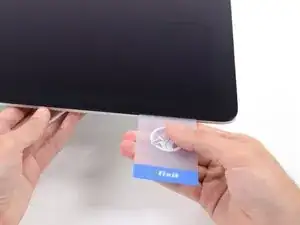
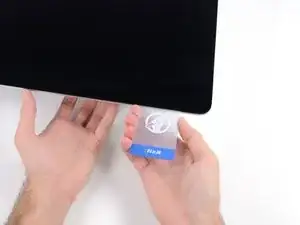
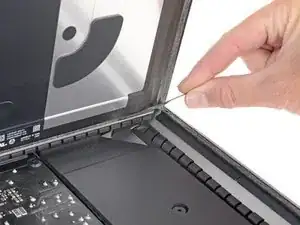
    • Iniziando dal lato sinistro dello schermo, vicino al pulsante di alimentazione, inserisci lo Strumento di apertura iMac nella fessura tra il pannello di vetro e la cover posteriore.

    • La sporgenza sullo Strumento di apertura iMac impedisce alla rotellina di entrare troppo in profondità. Se usi un attrezzo diverso, non inserirlo per più di 9,5 mm nello schermo. In caso contrario, rischieresti di tagliare dei cavi di antenna e di causare seri danni al dispositivo.

  3. YBXnnZvqvcCXc3Dh
    YBXnnZvqvcCXc3Dh
    LKTY6fnxuTkhOFEZ
    GplU2x5KlWXrhqPW
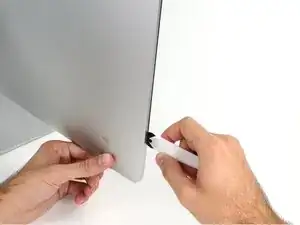
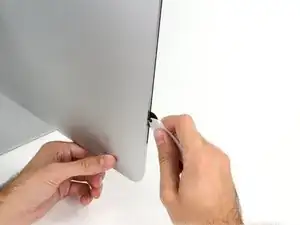
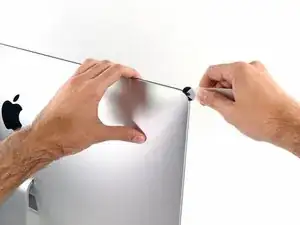
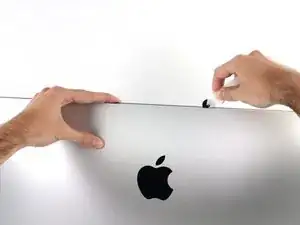
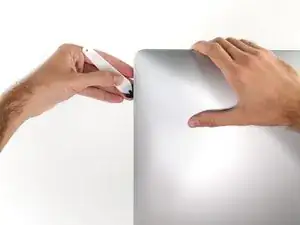
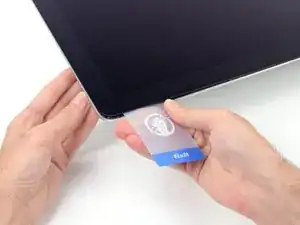
    • Usa l'attrezzo come se fosse una rotella per tagliare la pizza: fallo girare lungo la fessura, tagliando così l'adesivo in schiuma.

    • Stai attento a mantenere premuta l'impugnatura dietro la rotella. Se la tiri, la rotella potrebbe uscire dall'impugnatura.

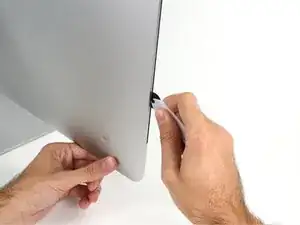
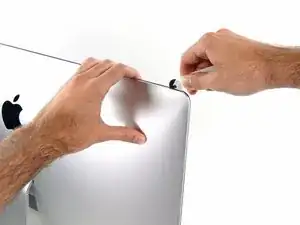
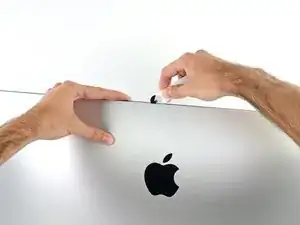
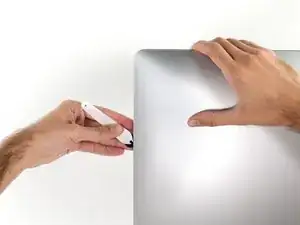
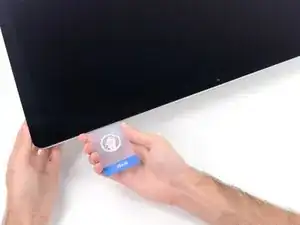
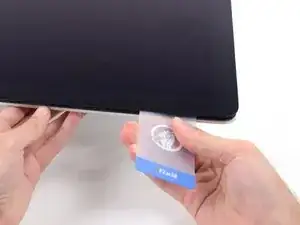
    • Passa l'attrezzo attorno al lato sinistro dello schermo.

  4. SqUGmWPNJAPDStKv
    SqUGmWPNJAPDStKv
    3R6TSjlIyerQQ2AX
    cOQGUrU1ekuPaBed
    • Continua a far scorrere l'attrezzo attorno all'angolo superiore sinistro.

  5. bfYMgtBPICJ4ROqy
    bfYMgtBPICJ4ROqy
    CXhC5LNJ6jdiHu4w
    • Taglia l'adesivo lungo l'angolo superiore sinistro del display.

  6. QVGwDDiKZB3UZvNN
    QVGwDDiKZB3UZvNN
    iBtbvCLPV2KZgoVd
    • Continua a lavorare lungo la parte superiore dello schermo.

    • Puoi far andare l'attrezzo avanti e indietro un po' di volte nei punti già trattati per essere sicuro di avere completamente tagliato l'adesivo.

  7. qpQxBHqvRfjvmcID
    qpQxBHqvRfjvmcID
    NNJxPC1uZ4wLkFiT
    ZTZAVaPN1NX5O4ps
    • Spingi l'attrezzo attorno all'angolo superiore destro dello schermo.

  8. BVZmfm5LTcwa1QrC
    BVZmfm5LTcwa1QrC
    qm3gY6CAvA1tKZEU
    • Spingi la rotella verso il basso lungo il lato destro dello schermo.

  9. oRxMayHO2sLbQc1s
    oRxMayHO2sLbQc1s
    o5OdKdGHEAt4Pty3
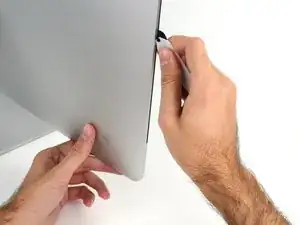
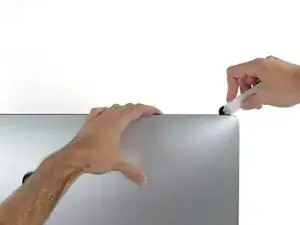
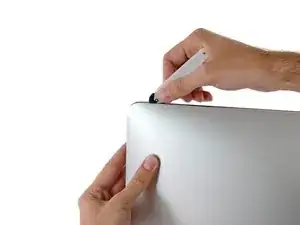
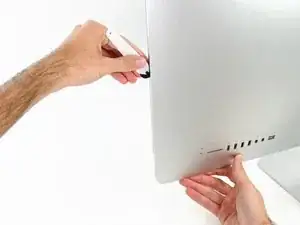
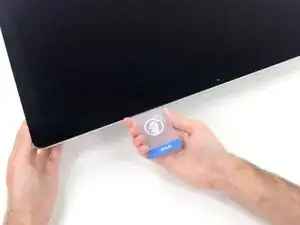
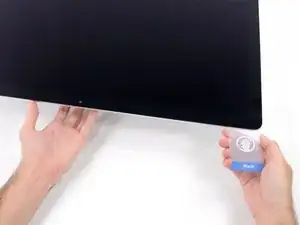
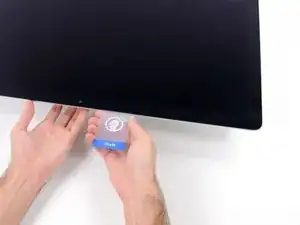
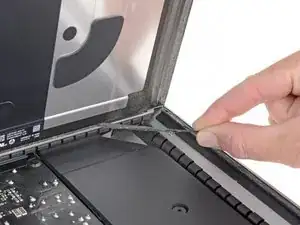
    • Finisci di lavorare con lo strumento di apertura sul perimetro arrivando all'angolo inferiore destro del display.

    • A questo punto, puoi far scorrere l'attrezzo di nuovo lungo l'intero perimetro per essere certo di avere tagliato tutto l'adesivo possibile.

  10. Muy6AIw1J2wEDPvF
    Muy6AIw1J2wEDPvF
    nbPL3P3VBylPcyhZ
    uJQxYDCVYwnx6Qbv
    • Anche se lo strumento di apertura ha fatto la maggior parte del lavoro necessario, lo schermo rimarrà ancora un po' aderente al case. Servirà una scheda di plastica per staccare l'adesivo rimanente.

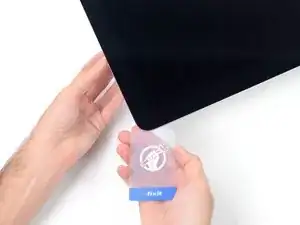
    • Disponi l'iMac in piano a faccia in su.

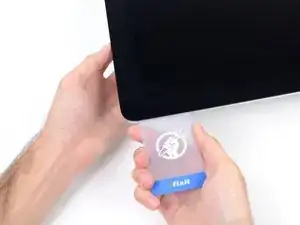
    • Iniziando dall'angolo superiore destro dell'iMac, infila una scheda di plastica tra lo schermo e la scocca.

    • Stai attento a non inserire la scheda di plastica più di 9,5 millimetri per non danneggiare i componenti interni.

  11. NjIxZSSHogTThAMd
    NjIxZSSHogTThAMd
    QRGOYnlsZyP6T5Py
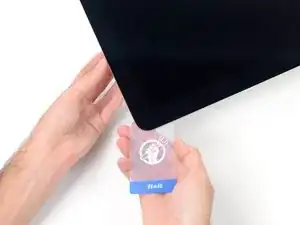
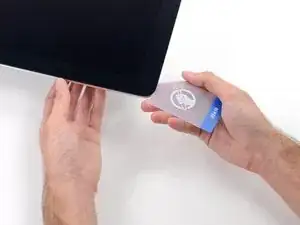
    • Torci delicatamente la scheda di plastica per creare una fessura tra il display e la scocca e per tagliare tutto l'adesivo rimasto vicino all'angolo.

    • Usando troppa forza, il vetro si romperà. Agisci delicatamente e non cercare di creare una fessura che sia più larga di circa 6 mm.

  12. jQAyIj6HrrdJJAJk
    jQAyIj6HrrdJJAJk
    xYIoQCXxGkKCZsDe
    uTgLtnrRgljTV3SV
    • Devi fermarti prima della fotocamera iSight, altrimenti potresti danneggiarla.

    • Fai scorrere la scheda verso il centro dello schermo per tagliare tutto l'adesivo rimasto.

  13. 3JgNS4JkPQitgWmT
    3JgNS4JkPQitgWmT
    oZxopX4GBdr2IZND
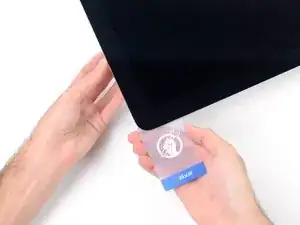
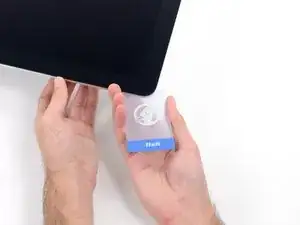
    • Infila di nuovo la scheda di plastica nell'angolo e lasciala in posizione per evitare che la colla possa riattaccarsi.

  14. CKqSXChbW1Q5J2Mj
    CKqSXChbW1Q5J2Mj
    M3mumpuHF6DuGG5d
    uZeaiM2Ss3Nhp6l1
    • Inserisci una seconda scheda nella fessura tra lo schermo e la scocca nell'angolo superiore sinistro.

  15. WVS45JD1UFeUkafQ
    WVS45JD1UFeUkafQ
    tpW1SBUu3OVBWWFf
    • Inclina delicatamente la scheda per aumentare lievemente lo spazio libero tra il display e la scocca.

    • Come già fatto sull'altro lato, applica molto lentamente la torsione alla scheda per dar tempo all'adesivo di staccarsi e presta una particolare cura a non forzare troppo il vetro dello schermo.

  16. FRjlwMRyCnMiL5uI
    FRjlwMRyCnMiL5uI
    Bk1FEUAstoZL5kPG
    AkYFNYjFGlOHPpfP
    • Fai scorrere la scheda di plastica verso il centro, anche questa volta fermandoti appena prima della fotocamera iSight.

  17. IJOHHiD2GtNNew33
    IJOHHiD2GtNNew33
    mimwcClnvQR6kwT4
    • Infila di nuovo la scheda di plastica nell'angolo superiore sinistro.

  18. yXXU4PGlmjAVts3U
    yXXU4PGlmjAVts3U
    JwFEwvPQsHIaxQ6C
    JQV5vHS5gLW2hiCT
    • Con le schede di plastica inserite come in figura vicino agli angoli, applica ad entrambe una torsione per allargare la fessura tra lo schermo e il case.

    • Se ci sono delle parti che sembrano rimanere attaccate e non intendano separarsi, interrompi la torsione e usa una delle schede per tagliare l'adesivo rimasto nell'area interessata.

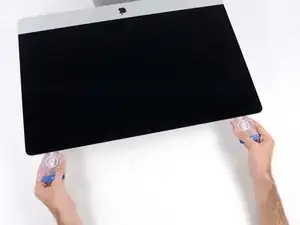
    • Inizia a sollevare la parte superiore dello schermo dalla scocca.

    • Solleva lo schermo solo di qualche centimetro: è ancora collegato all'iMac dai cavi dei dati e dell'alimentazione.

  19. wHjJRVLAFXewfnyp
    wHjJRVLAFXewfnyp
    CpBnbf1FNgAfIZn1
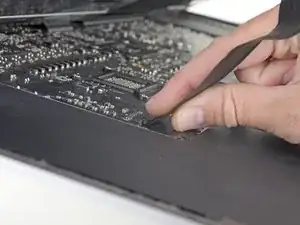
    • Mantieni lo schermo con uno mano mentre con l'altra stacchi il cavo di alimentazione dello schermo .

    • Solleva lo schermo abbastanza in alto da avere un accesso facile al connettore, ma non tanto da strappare i cavi e forzare i rispettivi connettori (alzalo di circa 20 cm).

    This is not a picture of the 2019 model. On the 2019, the cable is angled and very close to a metal part that looks like it could be a wireless card. This makes it difficult to squeeze in the edges required to release the cable. I was able to unfasten it using my fingernail, doing one side at a time.

    maccentric -

    Same issue. You can't just pull it out. I used a plastic "spudger" to push the clips in. The photo here shows where to press

    https://www.icloud.com/sharedalbum/#B0qG...

    See also my comment in step 20

    Bill4321 -

  20. VdsiAgtUyYorMen1
    VdsiAgtUyYorMen1
    KHHFi452QTQMTeBV
    CsKrEVrGRnpfrDwC
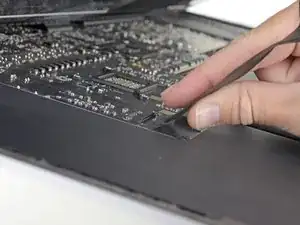
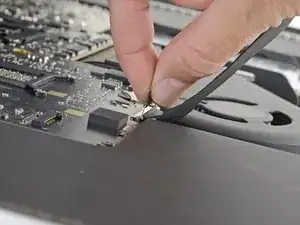
    • Sblocca la staffa metallica di ritenuta del cavo dati dello schermo.

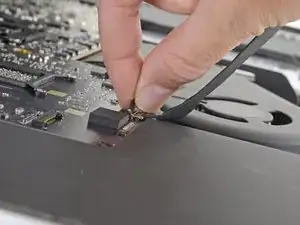
    • Scollega il cavo dati del display.

    • Questa è una connessione delicata che si può rompere facilmente. Assicurati di tirare il cavo dati dello schermo direttamente fuori della sua presa, verso la parte superiore del M;ac.

    on the 2020 model there is also a connector from the camera that is connected ted to the screen.

    Erwin Biermans -

    This isn't the photo of my IMac 27 2019.

    To remove this clip, lift up the plastic tag sticking down & the metal clip will lift too

    https://www.icloud.com/sharedalbum/#B0qG...

    Bill4321 -

  21. eJ1ZlYNHPi6CWHyZ
    eJ1ZlYNHPi6CWHyZ
    iJ1harXteIPLEIKd
    • Solleva lo schermo in posizione all'incirca verticale.

    • A questo punto c'è ancora una striscia di adesivo lungo il bordo inferiore dello schermo che tiene ancorato il display alla scocca come se fosse una cerniera. Puoi indebolire questo adesivo muovendo lo schermo su e giù per alcune volte di seguito.

  22. lACpgXcvlGFyrLvA
    lACpgXcvlGFyrLvA
    ISMvuLCodAhiRMwB
    hpHSWgP6FbSE133b
    • Stai molto attento non toccare i capi del condensatore o qualsiasi saldatura esposta sul retro dell'alimentatore (evidenziato in rosso).

    • Afferra la piccola linguetta all'estremità di una delle strisce adesive nella parte inferiore dello schermo e tira la striscia verso la parte superiore dell'iMac per rimuoverla.

    • Ripeti questo passo con l'altra striscia adesiva e rimuovi anche questa.

    • Se una delle strisce adesive si rompe prima di essere rimossa, usa una scheda di plastica per tagliare la parte di adesivo rimasta.

  23. k6S2mPdemkHANTQd
    k6S2mPdemkHANTQd
    JZD2kebALoGllJpG
    gAqAXTZm1QxOsqZu
    • Stai molto attento nel maneggiare lo schermo: è grande, pesante e di vetro. Il display ha bordi fragili. Evita di sollevarlo dagli angoli.

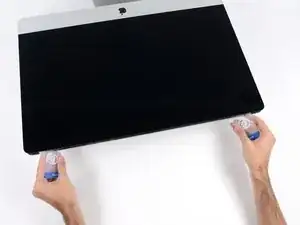
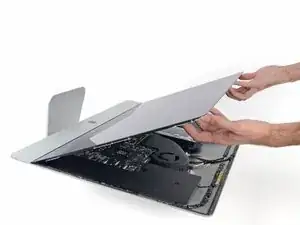
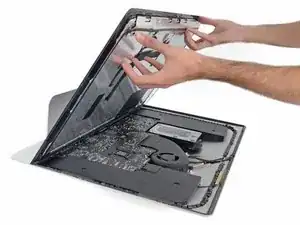
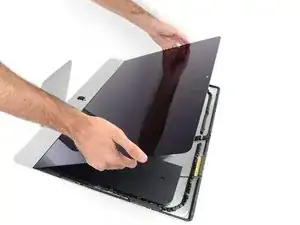
    • Solleva lo schermo dalla scocca e rimuovi lo dall'iMac. Disponi il display a faccia in giù su una superficie piatta e morbida.

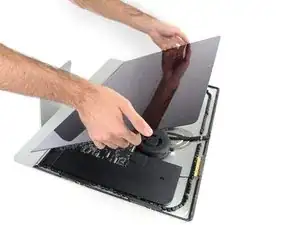
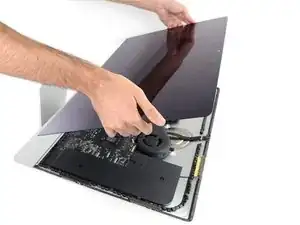
    • Può rendersi necessario sollevare lentamente il display da uno dei bordi laterali per staccare l'adesivo rimasto.

    • Dopo aver tagliato l'adesivo, non può essere più riutilizzato per rimettere al suo posto il display. Segui la guida per la sostituzione dell'adesivo del tuo modello al termine della procedura per sostituire le strisce adesive che fissano lo schermo alla scocca.

  24. e2SQbENy6wul345Z
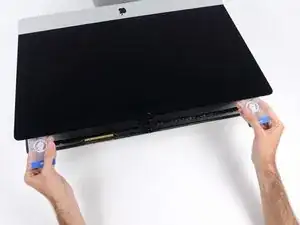
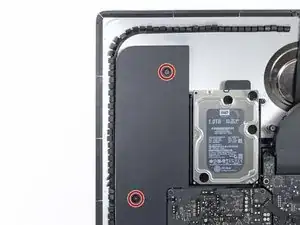
    • Usa un cacciavite T10 per rimuovere le due viti da 10 mm che fissano l'altoparlante sinistro.

  25. gKDsSsIWR4f4QgCp
    gKDsSsIWR4f4QgCp
    q3ZAsbgkhQTmAtIL
    • Fai scorrere l'altoparlante sinistro liberato verso sinistra, quanto basta per scoprire le viti della staffa dell'hard drive.

  26. POLboPSR6wDCQOrL
    POLboPSR6wDCQOrL
    AuX1HgDZFljPrFOA
    • Tira direttamente sul cavo combinato SATA per scollegarlo dal drive.

    Where can I purchase this cable if my iMac only came with the m.2 SSD?

    Julien Dal Col -

  27. WtNqEsuv3qXHIWhA
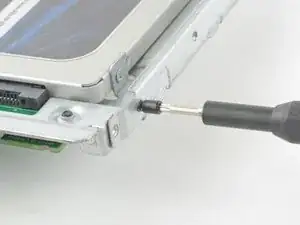
    • Usa un cacciavite T8 per rimuovere le due viti da 7,3 mm che fissano la staffa sinistra dell'hard drive al case posteriore.

    they are T9 for 2012.

    sean_gizzle -

  28. 46GMbQrdWuRMOhBW
    46GMbQrdWuRMOhBW
    pWdfnFTdXvxQueB4
    rD6ULDdslihryxhY
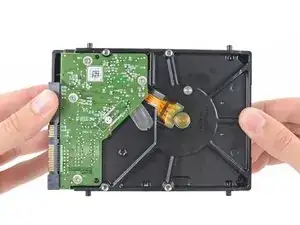
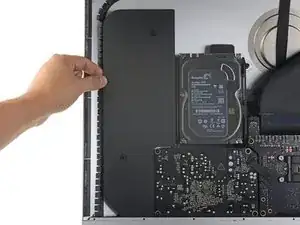
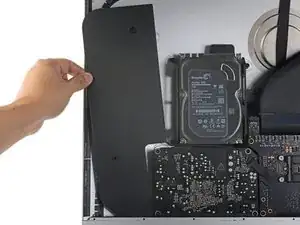
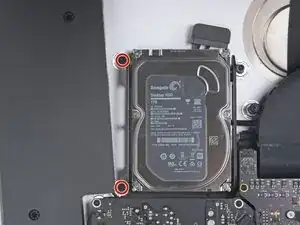
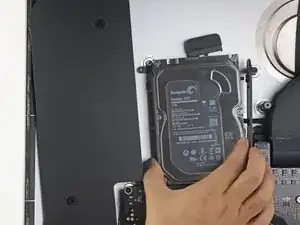
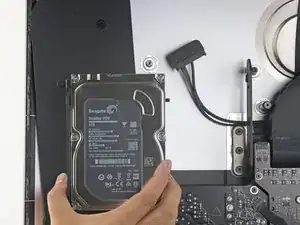
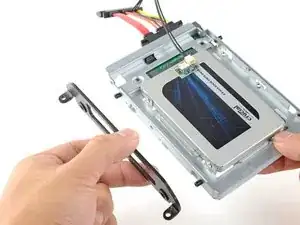
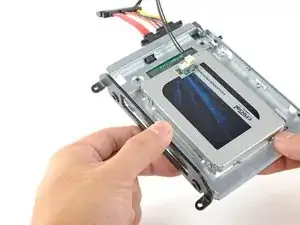
    • Afferra insieme l'hard drive e la staffa di supporto sinistra dell'unità stessa.

    • Inclina il lato sinistro dell'HD allontanandolo dal case posteriore e fai scorrere a sinistra tutto l'insieme.

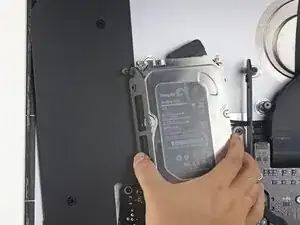
    • Rimuovi dall'iMac l'hard drive e la sua staffa di supporto sinistra.

  29. pL5C6Rk6VPJbItnW
    pL5C6Rk6VPJbItnW
    T33jCoZ6yOCtdDi3
    • Rimuovi la staffa di supporto sinistra dell'hard drive.

  30. BHci35AvSBmp2sp6
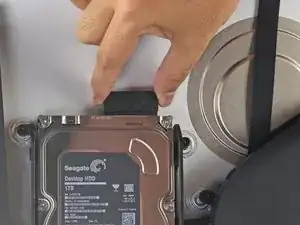
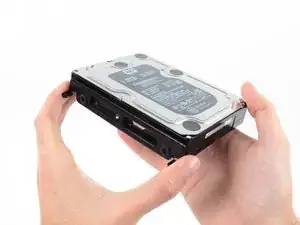
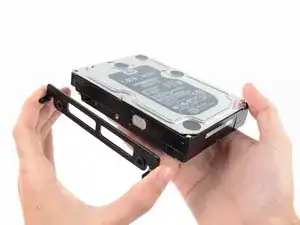
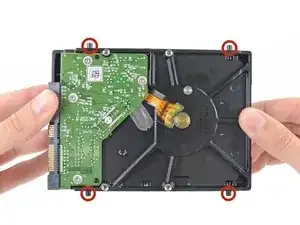
    • Rimuovi i quattro supporti per le viti Torx T8 da 8,1 mm dal disco rigido e trasferiscili sulla copertura del nuovo disco rigido.

    In my case these were T9 screw posts. Late 2012 iMac. They had traces of Loctite on them.

    rsnadd -

  31. HKQbp12ZISQhNfAv
    HKQbp12ZISQhNfAv
    C535jLFwdCXbrulv
    wDWxsjpZCDD5vCjk
    • Segui i prossimi passi se stai sostituendo il tuo hard drive con un kit SSD.

    • Se l'alloggiamento del tuo SSD si presenta come la prima immagine, segui invece quest'altra guida.

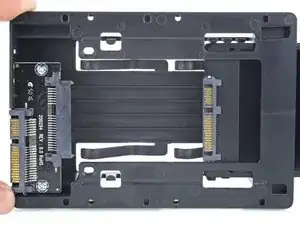
    • Allinea il connettore dell'SSD con i rispettivi zoccoli dell'involucro metallico.

    • Premi il disco contro gli zoccoli dell'alloggiamento finché l'SSD non si blocca in posizione corretta.

    • L'SSD si connette con involucro in una sola direzione. Se i connettori non sono allineati, gira l'SSD e prova di nuovo.

    what if I’m installing a hard drive?

    Troy Garcia -

    Didn’t bother with the SSD caddy. Some 3M sticky pads did the trick!

    James Clive -

    Been using them for years...works great.

    Michael Maxson -

    Two thoughts on SSD replacement/upgrade:

    1) It would help if some references were made to help us determine what we need in terms form factors. I’ve never used an SSD and see a 2.5” one that would work, but I don’t know if 2.5” SSDs are different (in form factor) from 2.5” HDs. A lot of us are still learning about SSDs and isn’t that what this site is about? (Learning new things about hardware and using hardware?)

    2) I’m not clear if I definitely need a new temperature sensor if I put in an SSD or if

    Hal Vaughan -

    Can I buy the kit without the SSD. I'm thinking of replacing my 3TB hard drive with a 4TB SSD.

    Also, would you happen to know what the maximum hard drive dimension that can fit inside of this iMac? I may try a 14TB hard drive instead.

    Larry -

    A 14Tb HDD does not represent any problem. But I will care about rising temperature. Must attach a heat sensor. If rise to high, it will suddenly shutdown to protect it.

    Neos Marketing -

  32. FtBOnUuDYZJTjvey
    FtBOnUuDYZJTjvey
    RvVXsqFVNCWuybvj
    UmyFUVECjaDZNRjp
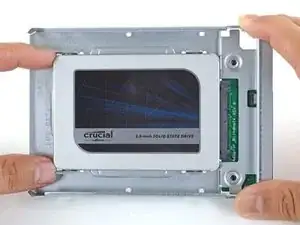
    • Usa un cacciavite a croce Phillips per installare le quattro viti cromate (due su ciascun lato) lungo i bordi dell'SSD per fissarlo all'involucro.

  33. quopgXjU6RgRFYYW
    quopgXjU6RgRFYYW
    6FVtDs36uVFQAEUg
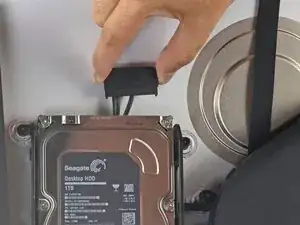
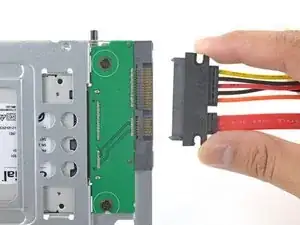
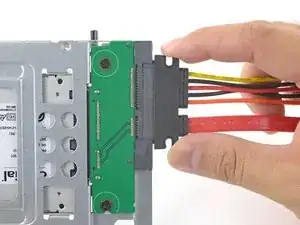
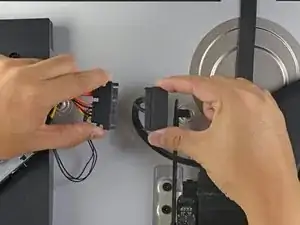
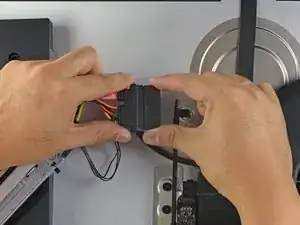
    • Collega il cavo di alimentazione SATA con predisposizione sensore incluso nella porta dell'alloggiamento.

    • Il cavo, per la sua stessa costruzione, si può connettere secondo un unico orientamento. Se non riesci a collegarlo, ruotalo di 180 gradi e prova di nuovo.

    Is the thermal sensor needed? I fitted a replacement SSD and it’s all back together and the iMac’s fans are fine. They don’t go into full max speed mode.

    James Clive -

    If you have a problem with the fans, you can always use Macs Fan Control (free) to set the speed. The sensor is not needed.

    maccentric -

    Hi, thanks for good information. Do we need intermediate SSD cables (red, black and yellow)? iMac has SATA original cable.

    O S -

  34. nFPHEiNHZQZIIWir
    nFPHEiNHZQZIIWir
    25p6UPH1X2Hpm1ut
    kZJrQ2FKFMAo4eGZ
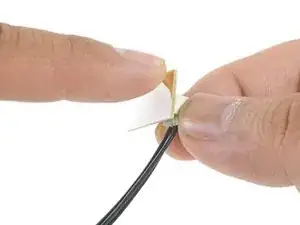
    • Stacca la protezione bianca dal retro della piccola scheda del sensore di temperatura per esporre l'adesivo presente su questo componente.

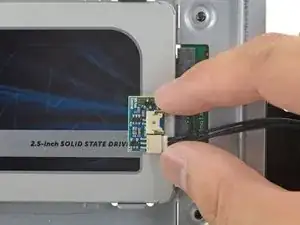
    • Fai aderire la scheda del sensore di temperatura su una superficie metallica esposta dell'SSD, vicino al connettore SATA.

    • Ripiega i cavi del sensore di temperatura che ingombrano in modo che non siano di intralcio in fase di montaggio dell'alloggiamento.

    Great pics ! Is that “temp sensor board” is already on my HDD IMAC ?? Or must I buy one ?

    kenclark200 -

    Don’t bother with the thermal sensor. I didn’t fit one and the iMac is working fine and no fans are kicking in.

    James Clive -

    Instructions say to attach sensor to the SSD, but all pictures show it being attached to the SSD carrier. This may not represent accurate SSD temp as much of the carrier dissipates the heat absorbed from the SSD

    chris byrne -

    Confirmed, no need for the extra temp sensor on Mid-2015 iMac. (EMC 2806, Mid-2015 27" iMac). Just changed the old 1TB HDD to SSD, no extra fan RPM after power on.

    Laszlo Nyirfa -

    The adhesive on the sensor is very weak. My sensor fell off after a couple of days. Is there a safe glue to use to adhere it to the SSD? Super glue?

    estyle18 -

    FWIW I bought a 4TB Western Digital Blue SSD. The entire case of the SSD is plastic- there is no metal. Hoping the temp sensor adheres to it okay.

    Kupe -

  35. TB3g2BfZthZmgZof
    TB3g2BfZthZmgZof
    UZXpLNW61PfcoLXO
    • Usa un cacciavite T8 per trasferire le spinette di allineamento dal vecchio HD ai lati dell'involucro.

  36. KBSB2H5m4afo1XQb
    KBSB2H5m4afo1XQb
    yaSlbXuRWxuB6UEm
    • Attacca all'involucro eventuali staffe di montaggio rimosse dal vecchio hard drive.

    i don't have a combo cable.i also didn't have asata drive. just a blade ssd. i don't see wwhere i could add a cable

    Larry Paterson -

  37. SldWU16exyqkJemL
    SldWU16exyqkJemL
    UjNyOhADTniaGyRe
    • Connetti il cavo combinato dell'iMac all'altra estremità del nuovo cavo combinato predisposto per il sensore di temperatura.

  38. YJqasivdZRKDWMjy
    YJqasivdZRKDWMjy
    FI6EqbMtmSvAcIM6
    DpsoNu5h3obcGm6g
    • Le immagini utilizzate in questo passo riguardano un iMac 2017. I cavi possono essere un po' diversi nella tua macchina, ma la procedura è invariata.

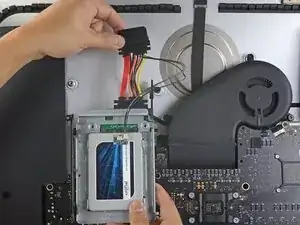
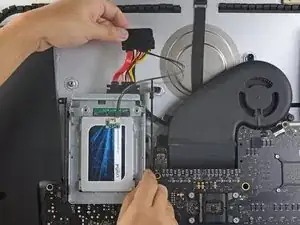
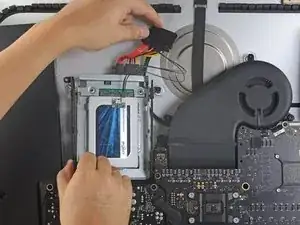
    • Fai scorrere l'involucro dell'SSD nello spazio occupato in precedenza dall'hard drive.

    • Fai passare i cavi in modo che non interferiscano con alcun altro componente.

    • Cerca di evitare brusche piegature dei cavi e disponili in modo che non restino pizzicati.

    The SATA cable on my Late 2012 was not long enough to comfortably attach to the end of the temperature sensor array after it was plugged into the new SSD. I had to fold the array and slide it under the SSD and housing. There was much resistance to the folding so I took it slowly to let the wires adjust gradually to the fold so they would not break.

    Bob Enders -

    Unfortunately, the adapter that comes with it isn't long enough to avoid pushing against the screen in the front. One week after upgrading to SSD my screen fell off shattering and breaking the power connector on the systems board. A new screen is ordered but I'm hoping the power connector isn't damaged beyond repair. I'm going to try to adhere the HD adapter to the back inside of the case with 3m adhesive to avoid pressure against the screen.

    Erik Johnson -

    As a newbie, the only other upgrade I have done is to replace my iPhone 7 battery. I had trouble on reassembly.

    This is a great upgrade guide, but it would be important to me to see the reassembly instructions including the cautions.

    For example, I had issues with reattaching the plugs in the phone. I could see having an issue with them here, as well as repositioning the display back into the cabinet.

    I do PCB board repair work and repair pinball machines. But I won’t try this.

    Larry Hamm -

    how do i glue on the new screen? which glue is used?

    Marc Seeh -

    Try 3m double sided tape from Amazon, it available in 3mm width which is ideal for iMac screen. It has a very thin foam and is much better quality than the cheap Chinese kits available on Amazon. You will have to trim it to size with a sharp craft blade as you fit. Don’t risk your screen falling off from using cheap tape in the so called fitting kits!

    Tony Street -

    In my Late 2012 27" iMac I Scotch-taped the SATA connector to the case to stop it from pushing against the screen after reassembly.

    Richard Brockbank -

    Only 39 steps!

    Is it possible to clone the internal disk and have the imac boot off the external SSD?

    D Leinweber -

    The extension cable is too long. I folded it over carefully & stuck it down to the case using a double sided sticky pad. Photo here

    https://www.icloud.com/sharedalbum/#B0qG...

    Bill4321 -

Conclusione

Confronta il nuovo componente con la parte originale. Potresti aver bisogno di trasferire i rimanenti componenti o rimuovere i supporti adesivi dalla nuova parte prima di installarla.

Per riassemblare il dispositivo, segui le istruzioni nell'ordine inverso.

Porta il tuo rifiuto elettronico in un centro di smaltimento autorizzato R2 o e-Stewards.

La riparazione non è andata come previsto? Prova a chiedere alla comunità Risposte per dell'aiuto.

Adam O'Camb

Membro da: 11/04/15

195148 Reputazione

10 commenti

Hola.

¿Es realmente necesario colocarle el sensor de temperatura al iMac A2115 de 2019?

Gracias. Saludos

thetwoangels -

A great and very carefully and detailed instruction. But what about glueing the glass pane back to the iMac? How does that work?

Thanks for any hint!

Hans Mueller -

Hi Hans,

The instructions on how to glue the display back is embedded in step 23. Here is a quick link to the instructions!

Arthur Shi -

If I replace a factory 1T SSD with a new 2T SSD . . .

am I correct in assuming it will already have the temperature sensor attached?

Would I need to replace the adhesive?

Mcorney -

If you purchase the bundle from iFixit, the bundle will come with a temperature sensor. You can’t re-use the existing adhesives and will need to replace them. They are also included in the bundle.

Arthur Shi -

Cual es el part-number del cable Sata? Sabéis si el iMac 27” 2019 con disco duro pci-express 512gb viene con el cable Sata para instalar un disco duro Sata?

gracias

What is the part-number of the Sata cable?  Do you know if the iMac 27 ”2019 with 512gb pci-express hard drive comes with the Sata cable to install a Sata hard drive?

 Thank you

Eugenio -

Can I install an additional SSD to my blade? Is the SATA cable already in or has Apple saved a few cent¿

cubdiel -

My 2019 iMac had a 2tb Fusion drive. This consisted of a 128gb blade and a 2tb SATA Seagate spinning HDD. I replaced the spinning disk with a SATA Samsung SSD + temp sensor, and then recreated a Fusion drive with the blade SSD and SATA SSD. As per this guide, I re-used the original SATA cable. Not sure if this would be different if your original spec was SSD only.

green_coconut -

I am using the late 2019 version of iMac 27". Currently, the iMac has installed 3TB fusion drive but I want to replace the larger capacity of the HDD. So what is the maximum storage capacity of the HDD? Is it possible to install a 16TB HDD like NAS HDD? Thank you for the feedback in advance.

Jay Juon -

iMac19,1,3.6 GHz Core i9 (I9-9900K)。可以,我更换的型号是:HDD西部数据WDC  WUH721816ALE6L4,NVME海康威视(慧荣主控)HS-SSD-C2000Pro 2048G。融合硬盘,缺点是更换HDD没有加装温度传感器风扇狂转,不知道更换希捷的硬盘会不会好点,我现在的解决办法是Macs Fan Control。还有就是更换硬盘前需要做U盘系统。

大木木 -