Introduzione

  1. srybvbL2FRQyrvc5
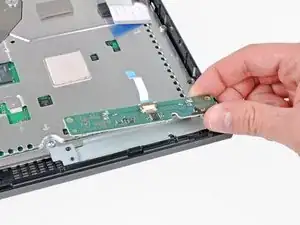
    • Tira in verticale il cavo piatto della scheda di controllo per liberarlo dal suo zoccolino sulla scheda madre.

    Some PS3 versions do not have a separate control board, since the buttons and LEDS are located on the motherboard (for example, in my PS3 model CECHG04). In this case steps 10, 11 and 13 are not applicable.

    markp -

    This is also true for my CECHH01. ?‍♂️

    Philippe Morin -

  2. YwVpEZ3cxJnHpDJB
    YwVpEZ3cxJnHpDJB
    ROIGUjOmDbAubmIA
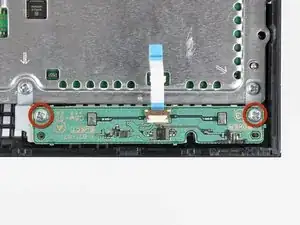
    • Rimuovi le due viti Phillips da 12 mm che fissano la scheda di controllo al case inferiore.

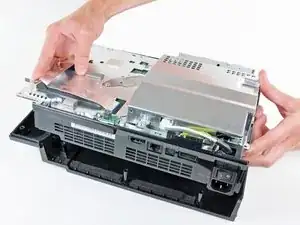
    • Rimuovi la scheda di controllo con il suo cavo dalla PS3.

  3. xaRKXjmUEQmOZKK1
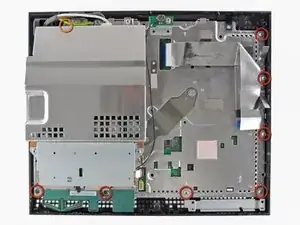
    • Rimuovi le seguenti otto viti che fissano il gruppo scheda madre al case inferiore:

    • Sette viti Phillips (ph2) da 12 mm

    • Una vite Phillips da 30 mm

    On my machine (fat PS3 with no card reader and 2 USB ports), there is no upper right screw to remove.

    alansliu -

    That 30mm screw is the one lower down under the power cable, not the higher up one with the embossed arrow pointing at it.

    James Beegle -

    Hey guys, that red and orange you are using are not at all identifiable as separate colors to some of us with colorblindness. I had to get my buddy to tell me which one was orange and which was red. In the future, it would be most helpful if you stuck to contrasting colors. Great guide, thanks for making it!

    Aksel Barnes -

    Step 17 helps with the 30 mm upper left screw

    joshuavivelavida -

    For any further vision impaired people trying to follow along, the single 30mm screw is in the top left of the image.

    James Beegle -

    Voting up the comments about the orange v red colors on the images, I'm surprised that such a simple edit has not been done over the past three+ years.

    Palfrus Wyrmrest -

  4. QtjWjem3O4L2TOUu
    • Rimuovi la staffa della scheda di controllo.

  5. eypILN1mQVYGMDRO
    eypILN1mQVYGMDRO
    jbeanei2UIcxUDvo
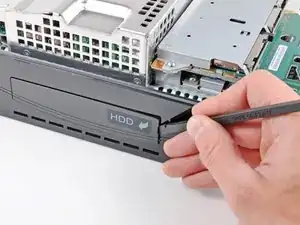
    • Usa l'estremità piatta di uno spudger per far leva e staccare la cover dell'alloggiamento dell'hard disk dal case inferiore.

    • Rimuovi la cover dell'alloggiamento dell'hard disk.

  6. jrPSWIRYp3XOm6O3
    • Solleva e libera il gruppo scheda madre dal case inferiore.

    My Ps3 was a little different..

    The rear backing plate is connected to the fan shroud beneath the unit that is screwed into the bottom of the case.. And these large chrome pieces attatched to the fan were stuck to the tray that the board is on. Came a part pretty rough, guessing the ps3 got so hot it turned the grease into glue lol

    intotec239 -

    If you already suspect you may have a slightly different PS3 model to the one pictured here STOP RIGHT NOW! Do not try and lift the motherboard off the lower casing if it is not coming easily. On mine, the cooling fan and heat sinks have extra screws directly into the lower plastic case and you will not be able to lift the motherboard out until after you have done Step 27. So skip this step, continue through the guide, skip 18-23 (you probably don't have a memory card reader). After unscrewing the 4 screws in Step 27, pull hard to separate the motherboard from the heat sinks (they will be attached with thermal paste like a glue). Only then will you be able to access the screws to separate the large fan and heat sinks from the plastic lower case.

    Incidentally I totally smashed mine trying to get the lower case off here at step 15 - I broke the screws off, warped the metal on the heat sink and snapped pieces of plastic. But I continued and did the heat gun stuff and it still actually worked!!

    Fat Albert -

Conclusione

Per rimontare il tuo dispositivo, seguì queste istruzioni in ordine inverso.

Walter Galan

693762 Reputazione

0 commenti