Introduzione

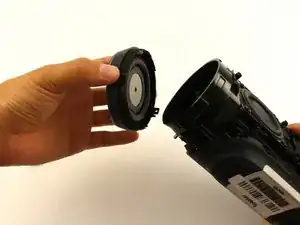
I radiatori passivi aiutano il tuo speaker a migliorare i bassi e fanno si che lo speaker sia resistente all'acqua. Rimuovere i radiatori passivi è uno dei primi passi per aprire il tuo JBL Charge 3. Puoi vedere l'interno del dispositivo dai lati.

  1. jU4akwFNVFfexeKv
    jU4akwFNVFfexeKv
    VRIS3vIlbtVuxyHY
    ZKOUcRQY2HZm1gwd
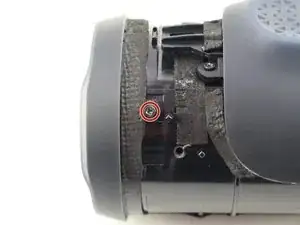
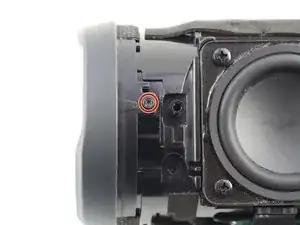
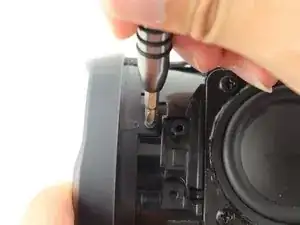
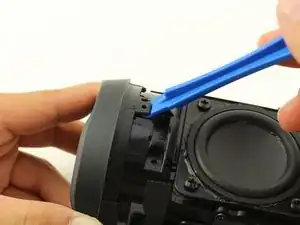
    • Rimuovi le due viti Phillips #1 da 8mm dalle linguette.

    • NOTA: potrebbe esserci solo una vite.

    If your Charge 3 doesn’t look like the above. Do not do this step YET. Go directly to Step 7 removal of the battery. By doing the battery first it will tell you which radiator to remove and thus no need to remove both.

    NOTE:

    On a newer version of the Charge 3 this image will be very different. you will not find a screw. You will also notice that there are two tabs that if slightly lifted while rotating the radiator counter clockwise the radiator is easily removed. There is also no foam or breakable seal on the newer Charge 3.

    john Ramirez -

  2. IygopFpYvBhxQHIn
    IygopFpYvBhxQHIn
    DZNJtUTQnsbFymex
    • Inserisci lo strumento di apertura sotto entrambe le etichette.

    Beim Modell 2016 geht es noch einfacher: Da ist es ein Bajonett-Verschluss (und nur 1 Schraube im vorigen Schritt). Man muss die Abdeckung nur ein paar Grad gegen den Uhrzeigersinn drehen und kann sie dann einfach abziehen. Schritt 5 und 6 entfallen.

    Franz -

    I believe this is unnecessary, just turn the passive radiator counter clockwise and pull outward. I tried to use the pry tool and broke a plastic tab.

    Frank Krantz -

    Tip— when you get to this part lightly tap the edge of the speaker on a hard surface— like you’re tapping a jar before opening it.

    maxthibodeaux -

    Muchas gracias a todos, me dieron cada uno la guía perfecta.

    Rafael de la Torre Perez -

    My charge 3 had less screws but the process was the same. Thanks for the instructions!

    Ryan Parker -

  3. InOcYxyNPntKkHeX
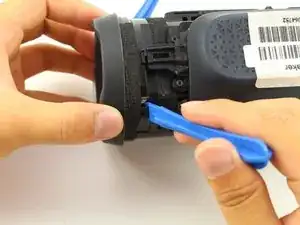
    • Gira in modo da aprire il radiatore passivo. Il radiatore passivo di sinistra si gira in senso antiorario, il destro in senso orario.

    attention assez dur a enlever, le mien dur à tourner

    Walter Rousseau -

  4. fdH5VDJu1p2DFQvx
    fdH5VDJu1p2DFQvx
    jn2wRKTPARa5OCFJ
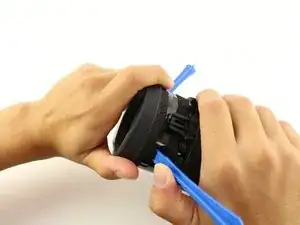
    • Ripeti il passaggio precedente anche per l'altro radiatore passivo.

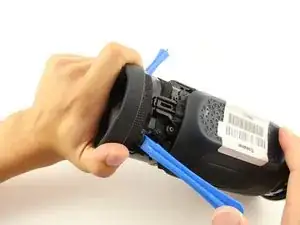
    • NOTA: solo il radiatore destro deve essere rimosso per sostituire la batteria.

    right or left…. depends on how you view the Charge 3 i guess. No need to remove both radiators for a newer Charge 3. You can remove the battery cover first…find out what side the battery wires exit the battery compartment and then remove the radiator associated with that same side.

    john Ramirez -

    Anybody else have major problems trying to twist the radiator back into position after replacing the battery? I’m having trouble getting the screw holes to line up again on the right radiator.

    Chapman Steamer 1 -

    To twist back I used saliva so it will slide easier against the rubber

    Jaakob Wolff -

Conclusione

Per riassemblare il dispositivo, segui le istruzioni nell'ordine inverso.

Jack Ng

Membro da: 08/10/18

2104 Reputazione

4 commenti

i have a different model of the charge 3 it doesnt have screws but its hard to take out

Water Bass Tester (Water BT) -

mine has screws and was also hard to pull with one hand

Carbon cookie -

Ich finde den Passivenstrahler nicht als Ersatzteil im Internet. Kann wer da helfen?

Sebastix01 _ -

I have two of the same without screws, the process is precisely the same. Just need to do it a little bit harder

Francisco Sarmento -