Introduzione

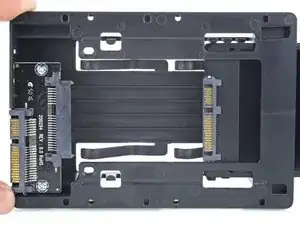
Segui questa guida per aggiornare l'hard drive del tuo iMac con un SSD usando un alloggiamento metallico aggiornato di conversione da 2,5" a 3,5". Questa guida comprende dei passi per installare il sensore di temperatura in modo che le ventole del Mac lavorino alla velocità corretta.

Questa è una guida solo prerequisita e non deve essere utilizzata da sola. Questa guida fa parte delle guide alla sostituzione degli HDD degli iMac.

  1. HKQbp12ZISQhNfAv
    HKQbp12ZISQhNfAv
    C535jLFwdCXbrulv
    wDWxsjpZCDD5vCjk
    • Segui i prossimi passi se stai sostituendo il tuo hard drive con un kit SSD.

    • Se l'alloggiamento del tuo SSD si presenta come la prima immagine, segui invece quest'altra guida.

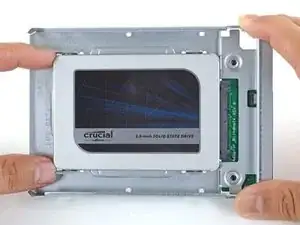
    • Allinea il connettore dell'SSD con i rispettivi zoccoli dell'involucro metallico.

    • Premi il disco contro gli zoccoli dell'alloggiamento finché l'SSD non si blocca in posizione corretta.

    • L'SSD si connette con involucro in una sola direzione. Se i connettori non sono allineati, gira l'SSD e prova di nuovo.

    what if I’m installing a hard drive?

    Troy Garcia -

    Didn’t bother with the SSD caddy. Some 3M sticky pads did the trick!

    James Clive -

    Been using them for years...works great.

    Michael Maxson -

    Two thoughts on SSD replacement/upgrade:

    1) It would help if some references were made to help us determine what we need in terms form factors. I’ve never used an SSD and see a 2.5” one that would work, but I don’t know if 2.5” SSDs are different (in form factor) from 2.5” HDs. A lot of us are still learning about SSDs and isn’t that what this site is about? (Learning new things about hardware and using hardware?)

    2) I’m not clear if I definitely need a new temperature sensor if I put in an SSD or if

    Hal Vaughan -

    Can I buy the kit without the SSD. I'm thinking of replacing my 3TB hard drive with a 4TB SSD.

    Also, would you happen to know what the maximum hard drive dimension that can fit inside of this iMac? I may try a 14TB hard drive instead.

    Larry -

    A 14Tb HDD does not represent any problem. But I will care about rising temperature. Must attach a heat sensor. If rise to high, it will suddenly shutdown to protect it.

    Neos Marketing -

  2. FtBOnUuDYZJTjvey
    FtBOnUuDYZJTjvey
    RvVXsqFVNCWuybvj
    UmyFUVECjaDZNRjp
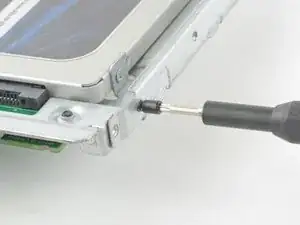
    • Usa un cacciavite a croce Phillips per installare le quattro viti cromate (due su ciascun lato) lungo i bordi dell'SSD per fissarlo all'involucro.

  3. quopgXjU6RgRFYYW
    quopgXjU6RgRFYYW
    6FVtDs36uVFQAEUg
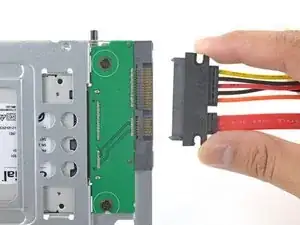
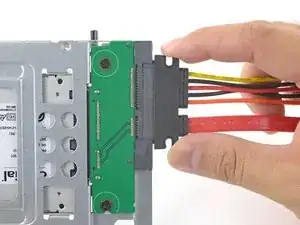
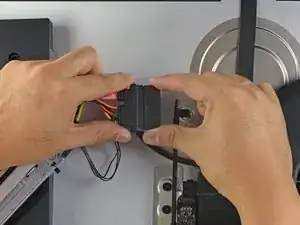
    • Collega il cavo di alimentazione SATA con predisposizione sensore incluso nella porta dell'alloggiamento.

    • Il cavo, per la sua stessa costruzione, si può connettere secondo un unico orientamento. Se non riesci a collegarlo, ruotalo di 180 gradi e prova di nuovo.

    Is the thermal sensor needed? I fitted a replacement SSD and it’s all back together and the iMac’s fans are fine. They don’t go into full max speed mode.

    James Clive -

    If you have a problem with the fans, you can always use Macs Fan Control (free) to set the speed. The sensor is not needed.

    maccentric -

    Hi, thanks for good information. Do we need intermediate SSD cables (red, black and yellow)? iMac has SATA original cable.

    O S -

  4. nFPHEiNHZQZIIWir
    nFPHEiNHZQZIIWir
    25p6UPH1X2Hpm1ut
    kZJrQ2FKFMAo4eGZ
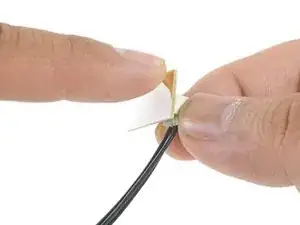
    • Stacca la protezione bianca dal retro della piccola scheda del sensore di temperatura per esporre l'adesivo presente su questo componente.

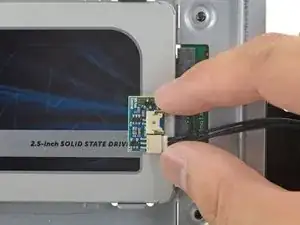
    • Fai aderire la scheda del sensore di temperatura su una superficie metallica esposta dell'SSD, vicino al connettore SATA.

    • Ripiega i cavi del sensore di temperatura che ingombrano in modo che non siano di intralcio in fase di montaggio dell'alloggiamento.

    Great pics ! Is that “temp sensor board” is already on my HDD IMAC ?? Or must I buy one ?

    kenclark200 -

    Don’t bother with the thermal sensor. I didn’t fit one and the iMac is working fine and no fans are kicking in.

    James Clive -

    Instructions say to attach sensor to the SSD, but all pictures show it being attached to the SSD carrier. This may not represent accurate SSD temp as much of the carrier dissipates the heat absorbed from the SSD

    chris byrne -

    Confirmed, no need for the extra temp sensor on Mid-2015 iMac. (EMC 2806, Mid-2015 27" iMac). Just changed the old 1TB HDD to SSD, no extra fan RPM after power on.

    Laszlo Nyirfa -

    The adhesive on the sensor is very weak. My sensor fell off after a couple of days. Is there a safe glue to use to adhere it to the SSD? Super glue?

    estyle18 -

    FWIW I bought a 4TB Western Digital Blue SSD. The entire case of the SSD is plastic- there is no metal. Hoping the temp sensor adheres to it okay.

    Kupe -

  5. TB3g2BfZthZmgZof
    TB3g2BfZthZmgZof
    UZXpLNW61PfcoLXO
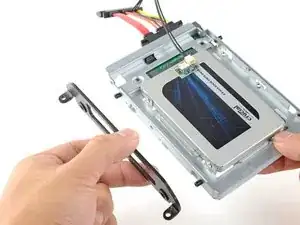
    • Usa un cacciavite T8 per trasferire le spinette di allineamento dal vecchio HD ai lati dell'involucro.

  6. KBSB2H5m4afo1XQb
    KBSB2H5m4afo1XQb
    yaSlbXuRWxuB6UEm
    • Attacca all'involucro eventuali staffe di montaggio rimosse dal vecchio hard drive.

    i don't have a combo cable.i also didn't have asata drive. just a blade ssd. i don't see wwhere i could add a cable

    Larry Paterson -

  7. SldWU16exyqkJemL
    SldWU16exyqkJemL
    UjNyOhADTniaGyRe
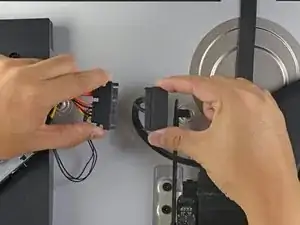
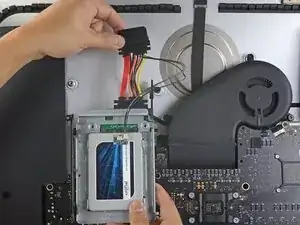
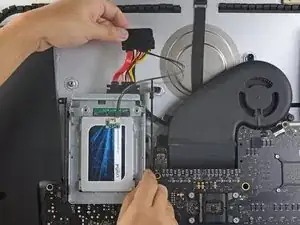
    • Connetti il cavo combinato dell'iMac all'altra estremità del nuovo cavo combinato predisposto per il sensore di temperatura.

  8. YJqasivdZRKDWMjy
    YJqasivdZRKDWMjy
    FI6EqbMtmSvAcIM6
    DpsoNu5h3obcGm6g
    • Le immagini utilizzate in questo passo riguardano un iMac 2017. I cavi possono essere un po' diversi nella tua macchina, ma la procedura è invariata.

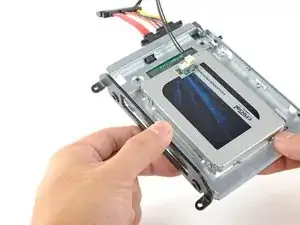
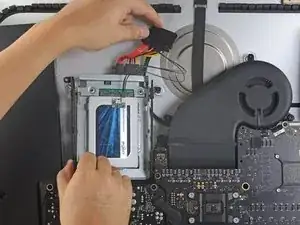
    • Fai scorrere l'involucro dell'SSD nello spazio occupato in precedenza dall'hard drive.

    • Fai passare i cavi in modo che non interferiscano con alcun altro componente.

    • Cerca di evitare brusche piegature dei cavi e disponili in modo che non restino pizzicati.

    The SATA cable on my Late 2012 was not long enough to comfortably attach to the end of the temperature sensor array after it was plugged into the new SSD. I had to fold the array and slide it under the SSD and housing. There was much resistance to the folding so I took it slowly to let the wires adjust gradually to the fold so they would not break.

    Bob Enders -

    Unfortunately, the adapter that comes with it isn't long enough to avoid pushing against the screen in the front. One week after upgrading to SSD my screen fell off shattering and breaking the power connector on the systems board. A new screen is ordered but I'm hoping the power connector isn't damaged beyond repair. I'm going to try to adhere the HD adapter to the back inside of the case with 3m adhesive to avoid pressure against the screen.

    Erik Johnson -

    As a newbie, the only other upgrade I have done is to replace my iPhone 7 battery. I had trouble on reassembly.

    This is a great upgrade guide, but it would be important to me to see the reassembly instructions including the cautions.

    For example, I had issues with reattaching the plugs in the phone. I could see having an issue with them here, as well as repositioning the display back into the cabinet.

    I do PCB board repair work and repair pinball machines. But I won’t try this.

    Larry Hamm -

    how do i glue on the new screen? which glue is used?

    Marc Seeh -

    Try 3m double sided tape from Amazon, it available in 3mm width which is ideal for iMac screen. It has a very thin foam and is much better quality than the cheap Chinese kits available on Amazon. You will have to trim it to size with a sharp craft blade as you fit. Don’t risk your screen falling off from using cheap tape in the so called fitting kits!

    Tony Street -

    In my Late 2012 27" iMac I Scotch-taped the SATA connector to the case to stop it from pushing against the screen after reassembly.

    Richard Brockbank -

    Only 39 steps!

    Is it possible to clone the internal disk and have the imac boot off the external SSD?

    D Leinweber -

    The extension cable is too long. I folded it over carefully & stuck it down to the case using a double sided sticky pad. Photo here

    https://www.icloud.com/sharedalbum/#B0qG...

    Bill4321 -

Conclusione

Per rimontare il tuo dispositivo, segui queste istruzioni in ordine inverso.

Arthur Shi

Membro da: 03/01/18

248257 Reputazione

0 commenti