
Introduzione
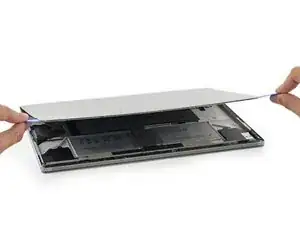
Segui questa guida per rimuovere o sostituire lo schermo del tuo Microsoft Surface Book.
Se il vetro è rotto, applica del nastro adesivo sull'intero schermo in modo da tenere unito il vetro.
Puoi fare perno dal foro della griglia dello speaker e dal retro del LCD per maggiore forza (in quanto il vetro andrebbe in frantumi se già crepato).
-
-
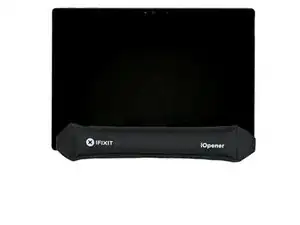
Scalda e applica un iOpener sul bordo inferiore dello schermo, in modo tale da ammorbidire l'adesivo che lo tiene fermo.
-
-
-
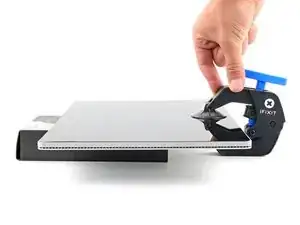
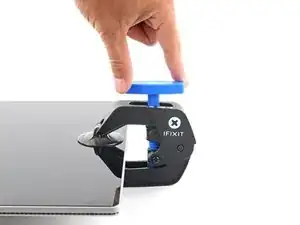
Tira indietro la maniglia blu per sbloccare i bracci dell'Anti-Clamp.
-
Posiziona un oggetto sotto il tuo Surface Book in modo che poggi in piano tra le ventose.
-
Posiziona le ventose vicino al centro del bordo inferiore: una sulla parte anteriore e una sulla parte posteriore.
-
Tieni ferma la parte inferiore dell'Anti-Clamp e premi saldamente sulla ventosa superiore per farle fare presa.
-
-
-
Tira indietro la maniglia blu per bloccare i bracci.
-
Gira la maniglia in senso orario di 360 gradi o fino a quando le ventose iniziano a distendersi.
-
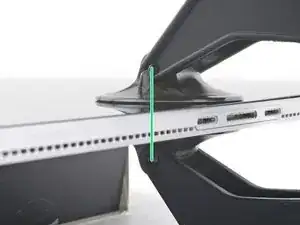
Assicurati che le ventose rimangano allineate tra loro. Se iniziano a scivolare fuori allineamento, allenta leggermente le ventose e riallinea i bracci.
-
-
-
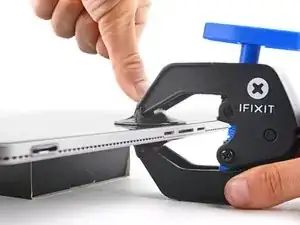
Aspetta un minuto per dare all'adesivo la possibilità di ammorbidirsi e creare uno spazio di apertura.
-
Se lo schermo non si sta riscaldando abbastanza, puoi utilizzare un asciugacapelli per riscaldare lungo il bordo inferiore.
-
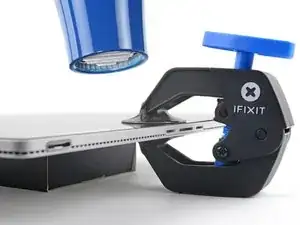
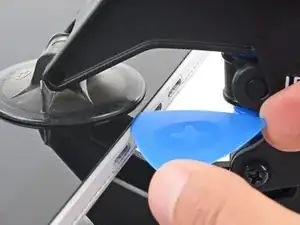
Inserisci un plettro di apertura sotto lo schermo quando l'Anti-Clamp crea uno spazio sufficientemente grande.
-
Salta il prossimo passaggio.
-
-
-
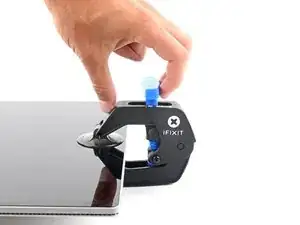
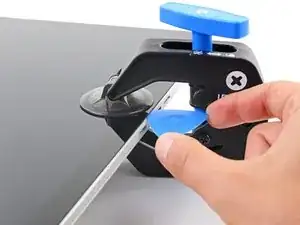
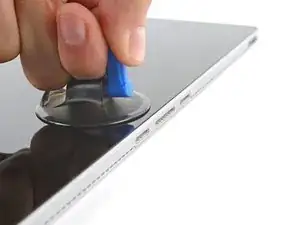
Applica una maniglia a ventosa allo schermo, il più vicino possibile al centro del bordo inferiore.
-
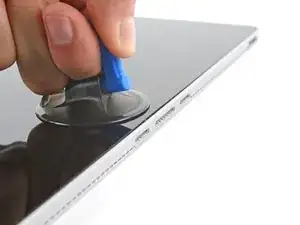
Tira verso l'alto sulla ventosa con una forza forte e costante per creare uno spazio tra lo schermo e la cornice.
-
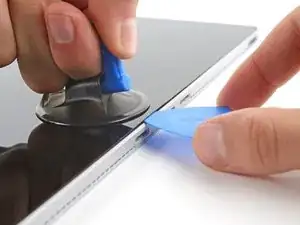
Inserisci lo strumento di apertura nello spazio creatosi.
-
-
-
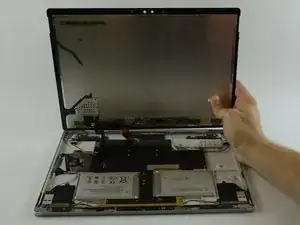
Usa lo strumento di apertura per tagliare la colla passandolo lungo tutto il perimetro dello schermo.
-
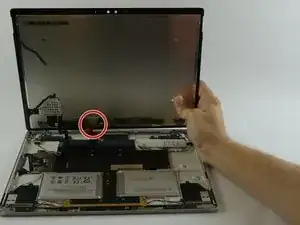
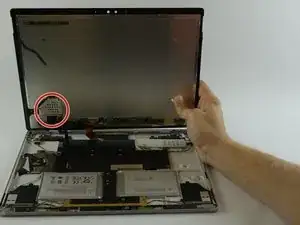
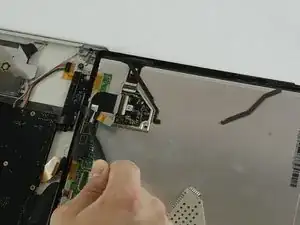
Delicatamente alza lo schermo, ma non cercare di staccarlo del tutto finché i cavi sottostanti non saranno scollegati.
-
-
-
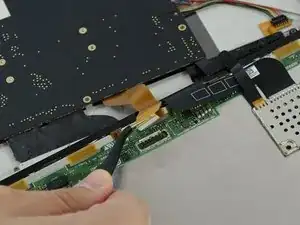
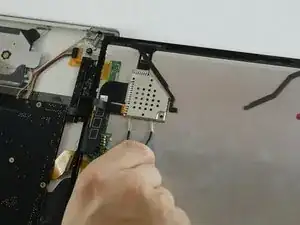
Comincia scollegando il cavo sulla destra. Con le pinzette curvate , rimuovi con attenzione la staffa in metallo per esporre l'estremità finale del cavo e rimuovilo.
-
-
-
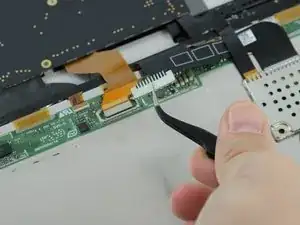
Rimuovi poi la schermatura metallica che copre il cavo. Dopo aver fatto ciò rimuovi il cavo piatto.
-
Rimuovi lo schermo
-

Confronta la tua parte di ricambio con quella originale: potrebbe essere necessario il trasferimento di alcuni componenti o la rimozione di protezioni adesive dalla nuova parte prima di installarla.
Per rimontare il tuo dispositivo, segui le istruzioni in ordine inverso.
Porta i tuoi rifiuti elettronici a un riciclatore certificato R2 o e-Stewards.
La riparazione non è andata come previsto? Rivolgiti alla nostra comunità Risposte per trovare aiuto.
30 commenti
It is very unlikely you will get this screen off without breaking it. Luckily, my customer only wanted the SSD out of the device so he didn't care if I damaged it. This screen is crazy fragile and the glue is very very strong. Do not do this job thinking you will likely not break the screen, unless you have done it before.
The only way to remove it without breaking it is to use good scotch tape and completely cover the screen with a minimum 4 layers of tape. This will keep the screen intact - but you still have to be very careful.
That’s definitely not the only way. I just did it with a guitar pick and heat pad. After doing a ton of Surface Pro 3’s, I think this one is actually pretty easy in comparison.
austin -
I needed 3 hours for this, Did this the first time. There is everything glued. and real hard to not break the screen.
Once you insert an opening pick, you can use a few drops of Acetone around the edge to loosen the glue. I found this much easier than keep reheating the iOpener and possibly cracked the display.
dan89fernando -
Bad idea to use acetone with these types of devices because of the plastic parts that can become either damaged or outright melted by the solvent. (Especially the ribbon cables and connections) You are better off using isopropyl alcohol or nothing. Easy enough just to avoid this idea completely. Not to mention that it is possible to cause the display to shatter due to thermal shock when you apply the solvent to a heated surface. Good luck to those that try anyway.
Rick Sanchez -
The iOpener did nothing to loosen up the glue. Had to use a hair dryer for almost 40 minutes to get it softened up enough to open.
david alexis -
Took at least 30 mins with a hair dryer to get the screen off. That 20 min completion time is total BS.
Tommy -
my screen is 25% off
Daniel R Patton -
Be EXTRA careful when running the opening pick around the bottom right portion of the screen. This is where the touch controller attaches to the display, and the ribbon cable is only about a quarter inch away from the edge and is easy to rip out.
Alexander V Trofimuk -
Very important hint!
Andreas -
Having recently been inside a Surface Book I purchased via Facebook marketplace, consider the screen a “cost” of replacing the battery and the pressure is off of you. I tried VERY hard not to break the glass, but…still happened. With that out of the way, I successfully replaced the screen, battery, and also battery in the base. Microsoft should be ashamed of this device. All that engineering effort built into their crappy hinge, only to have the batteries fail prematurely. Also, the mechanism to release the screen from the base sucks real bad. Mine doesn’t work, I carry a paper clip with me to unleash the tablet mode. Pathetic. Thank GOD I picked this up second hand for a few hundred bucks. Pity the folks that paid two grand or more for this turd.
Ken Okpych -
after I did reassemble back the screen, before applying the new tapes I did test it for one day and I did find out the right release mechanism was not working anymore. Accidentally I did disconnect the control wire coming from the main board. Easy to put it back in position. No need to dismantle all again. So, you can give a try and check the connectors. Both the connectors did disconnect while removing the mainboard. Just be careful and check them before gluing all back! Hope it helps.
Gian Paolo -
I just tried for over an hour and a half with heat packs and a dyson hair dryer, and got absolutely nowhere… I even bought the iSclack and had ifixit openers at the ready. I guess I’ll try a heat gun next (after I buy one). If anyone has any other suggestions, it would really be appreciated… I’m so disappointed in Microsoft right now.
Trevor Brown -
If you use a heat gun make sure to keep it moving along the edge and use your hand to shield the rest of the screen from getting hit with heat. You only want it to be hot to the touch and no further. You take a big risk of discoloring the screen if you overheat a part. Heat gun did make life much easier but you have to be very very careful and concentrated while using it.
andrew.j.nieto -
I got my computer open after completely abandoning the “step 1” instructions here. The hot pack (iOPener) and suction cups (iSclack) were completely worthless for me, and did absolutely nothing. Instead, simply get yourself a tool with a very thin metal knife, such as the “Jimmy” sold here on iFixit.
Use a heat gun to get a section of the screen nice and hot (I went with ~160 degrees Fahrenheit) then insert the Jimmy vertically in between the screen and the metal frame (a tiny gap.) Then, carefully flip it horizontally to get between the tape and the screen. After this, carefully slide the knife along the edge while using a heat gun to hover right over the place the knife will next be (I used gloves to prevent burning my hands.) Do NOT insert the knife more than a half an inch into the gap, or you might damage your screen (stay within the black bezel range.)
This will QUICKLY, EASILY, and SAFELY get the screen off.
Trevor Brown -
Attempted to do this without enough heat and the glass shattered; recommend using a heat gun and potentially using repair tape to keep the glass intact. The screen removal is the hardest part of everything.
J.K. -
I broke my screen too, but I blame myself for being impatient. Once I took my time heating with a hair dryer and getting the opening pick in there, with enough heat I could just slide the pick down the edges. Next time I’ll know better!
Kirk Feindel -
I tried the heated iOpener. I had some success but then used too much force and cracked the screen. My advice is to take you time and use the iOpener often on the very edge of the screen. Use the suction cups or iSclack as your primary tools to separate the glass form the frame. And a second set of hands is very helpful to hold the metal part of the screen onto your table. The glass will come off with patience and perseverance.
standurlacher -
Use heat, be patience don’t rush, go slow to prevent breaking screen like I did. I also damage the antenna to the wireless onboard adapter. The antenna is glued between the screen and the enclosure and is easy to damage. I didn’t realize this until after the repair was complete and my surface book no longer recognized its WiFi device. I have to use a usb/Bluetooth adapter. Good luck.
Nyaniso Rahotep -
This is vital information - I also destroyed the antenna in the process, because the pick does not discriminate between layers of adhesive. . Microsoft did a horrible design job on this.
Manuka -
The WiFi antenna is not physically connected to anything. It has a capacitive interaction with a small brick below the plastic so you can build it by yourself with a 0.2mm foil of copper or aluminum, cut the same geometry and tape it . It works. iFixit guide is pretty incomplete about that point, without mentioning all the screws forgotten to mark.
Gian Paolo -
Best place of entry for the pick is by the speaker on the right and left side. Heat up that area and then get the pick through there. I found that pretty easy and sliding the pick around the bottom (where the tablet attaches to keyboard). Unfortunately, I broke the screen up top where the webcam is. Not sure if that area is more brittle than the others due to webcam, but word of advice is to be careful there. Using a hair dryer worked best and getting this very toasty; the iOpener was useless.
Quan Thai -
Both sides of the central block “camera-Mic” there are three FSP antennas. They are easy to cut off while using an opener tool because a part can stick to the LCD and a part on the shell. So pay attention! I did cut one! You can clearly see the three antennas position in the first picture of the step 11.
Gian Paolo -