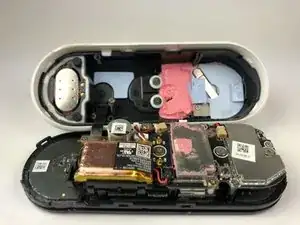
Introduzione
Questa guida ti mostrerà come rimuovere la parte frontale e la scocca del Nest Hello.
Strumenti
-
-
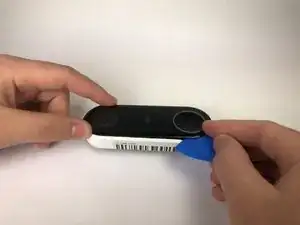
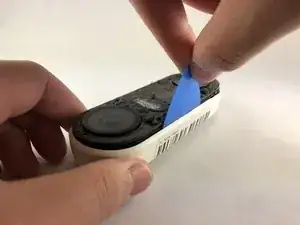
Inserisci il plettro tra la piastra frontale nera e la custodia bianca del Nest Hello.
-
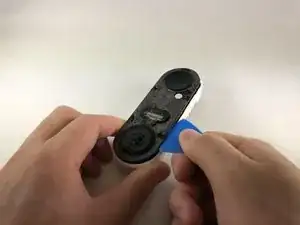
Fai leva sulla mascherina staccandola dal dispositivo con il plettro.
-
Rimuovi completamente la mascherina dal dispositivo, non temere di tirare con forza.
-
-
-
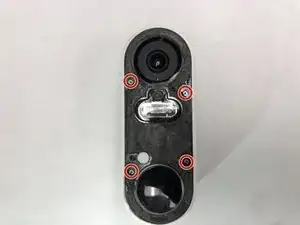
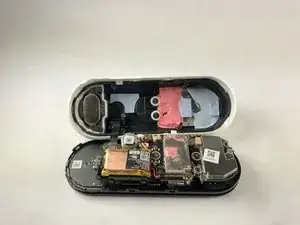
Stacca gli adesivi di copertura e usa il cacciavite a croce Phillips #000 per rimuovere le quattro viti.
-
-
-
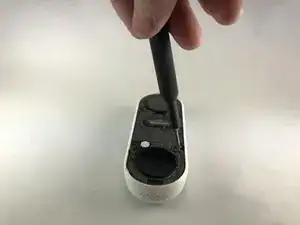
Inserisci il plettro tra la custodia bianca e la circuitazione interna nera e fai leva per estrarlo.
-
Per riassemblare il dispositivo, segui le istruzioni nell'ordine inverso.

2 commenti
Are Replacement parts available anywhere? Can’t seem to find anything… thanks!
Aside from fine grit sanding and spray painting or using a silicone cover, has anyone found a creative way to fix the delaminated an existing Gen 1 Google Nest wired / Nest Hello doorbell faceplate (remove the rest of the flaking off laminate)?
I had to use a metal spudger tool to start and then used guitar picks.
Joel Lundi -
Be afraid to pull hard. The faceplate will break in two.
B Bremer -
I did the JerryRigEverything method and slipped a razor under the faceplate to separate it carefully from the body. Worked perfectly and nothing was damaged
There I Fixed It -
Be careful with the wiring and the heater element. I must have shorted something together when it put it back together and now it will no longer power up. It is probably best to cut the wires to the heater and deal with the consequences in the cold temperatures.
Joe I. Fabritz -