Introduzione

Segui questa guida per rimuovere e sostituire il sistema della ventola nella tua PS4 Slim.

  1. HVTGYelJeUQRNBTL
    HVTGYelJeUQRNBTL
    6Z3td3NoCXXHhZQI
    4ybs2g5RHLPUHZ6a
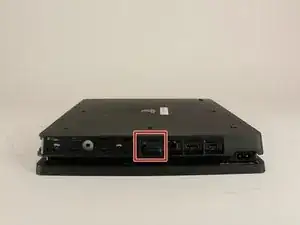
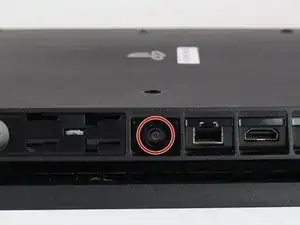
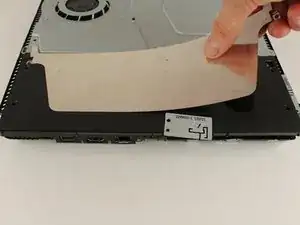
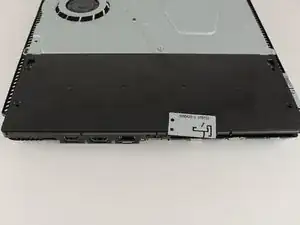
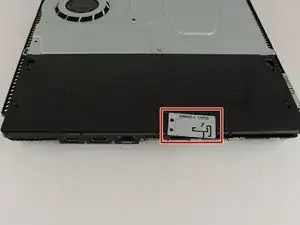
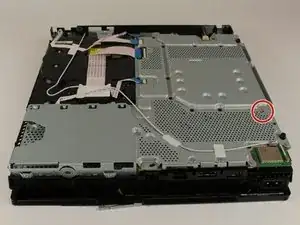
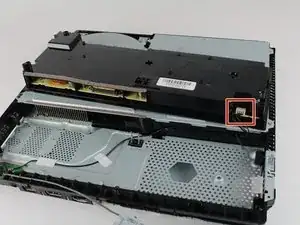
    • Trova l'adesivo di garanzia in plastica vicino alle tre porte sul lato della console.

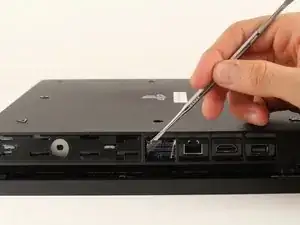
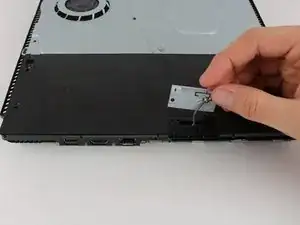
    • Rimuovi l'adesivo di garanzia semplicemente staccandolo con qualsiasi tipo di spudger.

    • La rimozione dell'adesivo di garanzia NON invaliderà la garanzia.

    Remove the screw directly to the left of that one in the picture as well. Should be silver.

    Elizabeth Johnson -

    ihr seid so ein scheiß haufen das stimmt über haubt nix

    Toaster 95 -

    einfach alles stimmt nicht

    Toaster 95 -

  2. iuwUc5FNjBXlxWDZ
    iuwUc5FNjBXlxWDZ
    NddVVDLyNaEUIPME
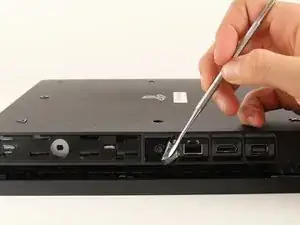
    • Svita e rimuovi la vite da 5.0 mm che è dietro l'adesivo usando un cacciavite di sicurezza T8 Torx con un movimento antiorario.

    Are you SURE that it’s counter-clockwise?

    The Stuff -

    Try T9. Fits better.

    Otter -

    T8 fits like a glove for me

    Daniel Henderson -

    Is there anything else you can use

    randomweeb -

    A small flathead screwdriver will work

    shawng6363 -

    There is a small metal rod in the middle of the screw that isn’t allowing my t8 inside. Any insight on this?

    gavinstoutconner@icloud.com -

    Some T8 bits have a hole in the middle that will allow that rod to go through; some do not. If you have a set of multiple bits, check if there are any others labeled T8 or TR8 with that hole in the middle.

    Nicholas -

    There is a metal thing inside of the screw slot any insite on this?

    Tristan York -

  3. SlFEBbB2b3bIl6BX
    SlFEBbB2b3bIl6BX
    oRDOW1Bq6YK4gBJW
    Qs6ybIWcbq4tnNZZ
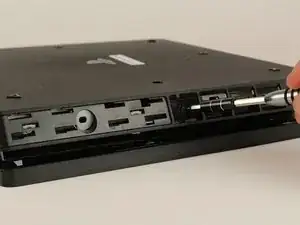
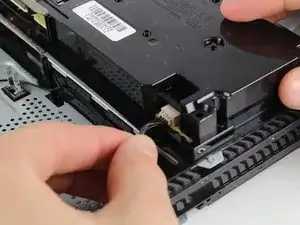
    • Gira la PlayStation 4 Slim sottosopra con il lato della vite rivolto verso di te.

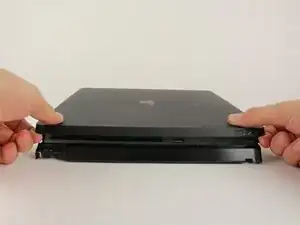
    • Fai leva con le dita sui due angoli che sono rivolti verso di te.

    • Questo passaggio potrebbe richiedere un po' di forza per essere aperta e sentirai un click molto forte quando si staccherà.

    • Rimuovi la copertura inferiore facendola scorrere lontano da te e alzandola.

    It says to place it upside down, but didn't you do so in the previous step? I've been trying to unscrew the screw with my screwdriver that I got from here and if I had to had the system right side up, I'm afraid I might've stripped the screw from all the force I tried to use to get the screw out that will NOT budge. It didn't even move the slightest after removing the warranty sticker.

    Vidal Santos -

    There is a single clip on the left side about 5cms in, and another clip on the right side equidistant to the one on the other side. Jamming a spudger in there first, and lifting those clips helped, and then I had to slide down to lift a total of 4 clips on each side (each about 4cms apart). Then push the cover away from you, if that makes more sense than “sliding it towards the back corners”, since the back corners are technically facing you.

    Emil Fisk -

    It would be easier if you just lifted the top cover of the PS4.

    Poobler -

    The earlier comment by Emil Fisk is spot-on. I found it impossible to remove the cover without first using a spudger to release the four clips on each side.

    midahed -

    I saw many video and tried it my self, you have to remove the hard disc before removing any cover.

    Bahaa CHEBLI -

  4. eG12cRbDuv1GVtZd
    eG12cRbDuv1GVtZd
    IZBxPl2oH5CkN4DP
    2SpqZiosbjQ2HxGj
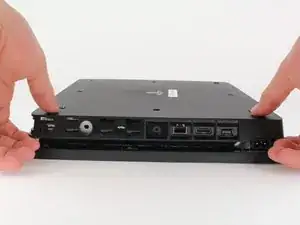
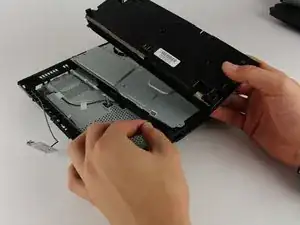
    • Appoggia la PlayStation 4 Slim a faccia un su, con il logo PS superiore e la scritta "SONY" rivolti verso di te.

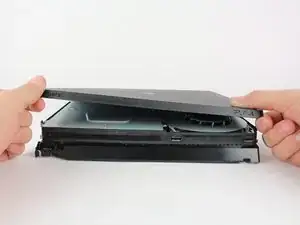
    • Fai leva con le dita sui due angoli più vicini a te.

    • Questo può richiedere un po' di forza e sentirai un forte suono quando la scocca superiore si sgancerà.

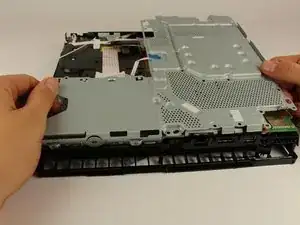
    • Rimuovi la scocca superiore facendola scorrere verso il retro della console e sollevandola.

    Undo 4 clips on each side by using a spudger. And then lift the front corners up and pull towards you to undo them.

    Emil Fisk -

  5. 3AeQgjbtK1pLrGkY
    3AeQgjbtK1pLrGkY
    iSoWBxqGEIukqO2C
    4Vw4unbMo24VFLiR
    • Svita e rimuovi le due viti (la sinistra da 31,0 mm e la destra da 24,0 mm) Con un cacciavite Torx T8.

    • Svita e rimuovi la vite da 3,0 mm con un cacciavite Philips #1.

    UK model seems to be different here. There's no Philips screw where there is on your image.

    MaFt Morley -

    This regards EU models in general, i think. My danish version is the same.

    William Villadsen -

    The screw on the left was 31mm, and the one on my right side was only 19mm.

    Emil Fisk -

  6. HrP1ICwvSbBshwxh
    • Svita le quattro viti Philips da 16 mm che tengono fermo l'alimentatore.

    Es gibt diese Schrauben bei meiner Ps4 Cuh 2116A nicht und ich bekomme das Teil so nicht raus. Kann mir jmd helfen?

    Julian S. -

    Only 2 Phillips actress here on my UK

    MaFt Morley -

    Only 2 phillips screws on the US one as well.

    Sean Douglas -

    I also only have two screws here in the US.

    Rachel Kelley -

  7. IELoveMUpqIKoH5N
    IELoveMUpqIKoH5N
    JfyvhNxHrQeavq3f
    • Rimuovi il foglio in metallo sopra l'alimentatore sollevandolo.

    Is this metal sheet required for the unit to power on?

    AlexT -

    I think the metal sheet protects the rest of the console or something from heating too much.

    BloodSpark22 -

    Kann man diesen Metallblech einzeln kaufen? Finde im Internet nichts

    SoN GoKu -

    A quoi sert la tôle métallique qui recouvre le ventilateur et l’alimentation svp

    Ittady92 -

    Que puedo hacer si uno de los tornillos que sujetan esa lamina está barrido y no los puedo quitar?

    Maalem -

  8. PNA4otMPJIQOHWDT
    PNA4otMPJIQOHWDT
    gTmbqA3sa4ExOM6K
    • Rimuovi l'antenna da sopra l'alimentatore guidando il cavo nelle scanalature sotto il pannello in metallo.

    What does this mean for part do? This part is not present in my console nor is the space where it's supposed to reside as shown in the picture above.

    The Hondo -

    Me neither, guess they are different models.

    Daniel Henderson -

    There was a longer clip 8mm long on the left side which had to be pulled straight out. However, be careful when pulling out the antenna. My cable was soldered to the metal plate.

    Emil Fisk -

    It is easier to wiggle the cable out from the plastic power supply housing in step 10.

    Emil Fisk -

  9. xoXm3taPYINyFEjd
    xoXm3taPYINyFEjd
    IvVUKwfba1q3oWup
    • Gira la PlayStation 4 Slim a tasta in giù.

    • Svita e rimuovi la vite da 4,0 mm con un cacciavite Philips #1.

    Forgot to mention to remove the hard drive.

    The Stuff -

    How do you get it when the screw is stripped

    Lucas Holland -

  10. whHYWRP6SIDDsmug
    whHYWRP6SIDDsmug
    qUvGBKWo2LhFsk3m
    4WCDCpkIr6P2lECc
    • Usa uno strumento di apertura in plastica per creare dello spazio tra l'alimentatore e la console infilandolo tra i due e facendolo ondeggiare.

    • Solleva l'alimentatore e giralo appoggiandolo sul suo supporto in metallo.

  11. TNOBblu5PIbOJR4B
    TNOBblu5PIbOJR4B
    GLVgk3vwjAfTVyGM
    PAndD6pDYuGxIrrA
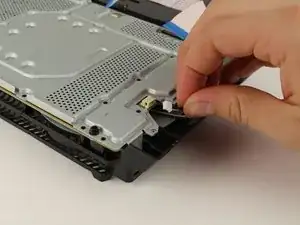
    • Scollega il cavo dall'alimentatore prendendolo saldamente con le dita o un paio di pinzette e tirandolo.

    • Solleva l'alimentatore per rimuoverlo dalla console.

    Your guide is good but detail. Could be alot better for a start you forgot to mention the screw on the other side that must also be removed to let the power supply out of ps4 slim

    Chicky Boy3 -

    Could you replace a ps4 slim model CUH-211B with a N16-160P1A power supply

    Aiden Thrash -

    Just because I feel like this needs to be stated clearly, “Do no attempt to pull the plug out by the wires!”

    Pull from the plastic, male end of the plug or you’re going to end up have a very bad day.

    Matthew D. H. -

    Literally no way I can do it by the plastic, the only way is wires. Gotta risk it I guess

    Misha FV -

    You are right, pulling the wires is entirely wrong. I used the small rectangular, thin blue plastic to push the cable back from the socket. It was too tight. From my experience of repairing, never pull wires. The consequences of damaging it are not worth it.

    El-Musleh -

  12. RHFr5wwVKGmRxmRY
    RHFr5wwVKGmRxmRY
    vxQAKwEZNOY2nGKn
    • Svita e rimuovi la vite da 31,0 mm con un cacciavite Torx T8.

    cuidado pestañita toma tierra lateral dvd y pieza negra en el otro lado

    Daniel Vila -

  13. QweEJHBb1rKIAvq2
    QweEJHBb1rKIAvq2
    FFHqyEZPchOvDwl3
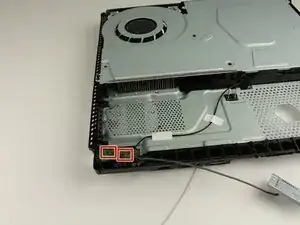
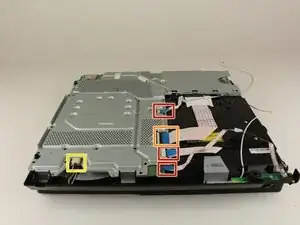
    • Trova i due cavi collegati sotto la scheda madre.

    • Scollega i cavi prendendo saldamente i connettori in metallo con le dita o un paio di pinzette e tirandoli verso l'alto.

    Doesn't exist in my

    Daniel Henderson -

    Mine only has 1 wire

    Kyle Cordle -

  14. UoJCEwjuvBDIUb2I
    UoJCEwjuvBDIUb2I
    6k2SSY2qOaAr5ZeE
    gUjvZ4vOTDrEhDuf
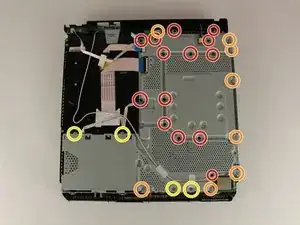
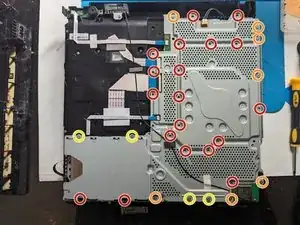
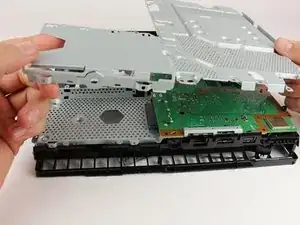
    • Gira la console sull'altro lato.

    • Svita e rimuovi le 14 (19x per le CUH-21xx) viti nere da 4,0 mm con un cacciavite Philips #1.

    • Svita e rimuovi le 8 (7x per le CUH-21xx) viti argento da 6,0 mm con un cacciavite Philips #1.

    • Svita e rimuovi le 4 viti argento da 3,0 mm con un cacciavite Philips #1.

    - There are 14x 4.0mm black screws, but the step only shows 13 of them circled in red. One of the 11 orange circles (near front of unit) is actually the 14th black screw. Photo: http://i.imgur.com/7G64egd.png

    - As for the 6.0mm silver screws, there are only 8x of those. The two silver screws behind the IO ports on the back are 3.0mm fine-threaded screws. Photo: http://i.imgur.com/cQD6KQu.png

    - Source: Have a PS4 Slim (CUH-2015A) right in front of me, doing this exact job. Hope this helps someone else down the road.

    lane anderson -

    In my PS4 slim many of the screws shown in this step are melted plastic rivet type fasteners. I guess I’m supposed to just cut through them and hope the game stays together or is there a way to remove them and drill and tap holes for screws that will hold the board etc in place? My game is getting old and I would like to clean the fan and make sure the thermal paste or Liquid Metal is still working (“the perfect amount “). The fan in my game seems to run a quite a bit. Thanks!

    Mark Frederick -

    By definition, "unscrew" is in a counter-clockwise motion. And, people who are taking apart a device like this will be able to tell when they try to turn the screw which way is correct.

    In the second picture, there is a hard disk. In the first and third pictures, there is no hard disk. You might want to update these instructions to include hard disk drive removal.

    David -

    In my experience with creating guides you use existing guides as stepping stones to build up new guides. That means sometimes pictures will show a procedure for one step where other steps may come before or after the one being described. The point is you should be looking at what's being described rather than nit-picking on things like is the hard drive there or not. Just assume if the instructions haven't told you to remove the hard drive, then you don't need it removed even if the picture shows it having been taken out.

    With regard to the second picture in particular, I added that one when I was taking apart my grandson's CUH-21xx system only to find that the screws were substantially different than the ones in the original guide. My point was to document those differences and no, I didn't worry about whether the hard drive was there or not, so my picture has it in and the others don't.

    Jerry Wheeler -

  15. TZuXlaBqAq1v1PKR
    TZuXlaBqAq1v1PKR
    pPMotqljh6IAAWia
    • Svita e rimuovi le due viti da 5,0 mm sul bordo della console con un cacciavite Philips #1.

    • Salta questo passo per il modello CUH-21xx, poiché le viti sono state rimosse nel passo precedente.

    These are 3.0mm screws, not 5.0mm. This step could probably be condensed into the previous step.

    lane anderson -

    These screws are not present on the US model

    Sean Douglas -

    Yes, my US model doesn't have it either

    Kyle Cordle -

  16. 2hLjGKE3bapn6Mp6
    2hLjGKE3bapn6Mp6
    mFNIWMZWJhVnCotL
    RuQ6AvAACWsEr5jE
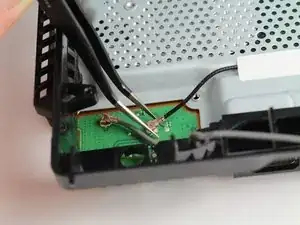
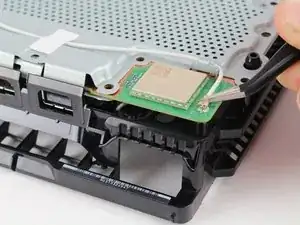
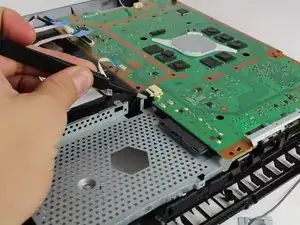
    • Trova il cavo bianco collegato ad un angolo della faccia superiore della scheda madre.

    • Scollega il cavo prendendo saldamente il connettore in metallo con le dita o un paio di pinzette e tirandolo verso l'alto.

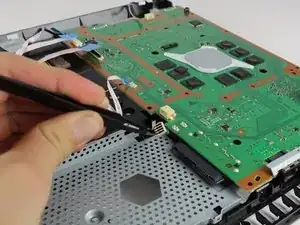
    • Rimuovi il cavo dal nastro che lo tiene fermo e mettilo da parte con le pinzette o le dita.

    This wire is black, not white on the US model

    Sean Douglas -

  17. tHSO6gCoFh2BetYM
    tHSO6gCoFh2BetYM
    sfvwkIjNjLYSW5fK
    EZNt5bm1vJynBYi5
    • Scollega i cavi tirando le alette blu.

    • Gira verso l'alto l'aletta di bloccaggio del cavo più largo prima di scollegarlo.

    • Scollega questo cavo prendendolo saldamente con le dita o un paio di pinzette e tirandolo.

  18. K4Rr6GvCDbx6LfwN
    K4Rr6GvCDbx6LfwN
    KjtQ6ePWgRCkOsI5
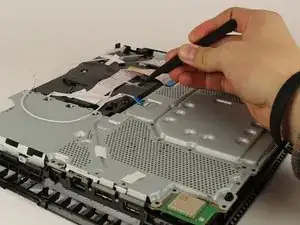
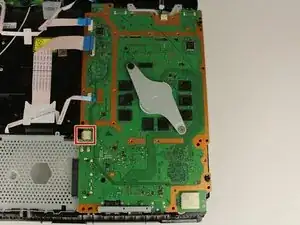
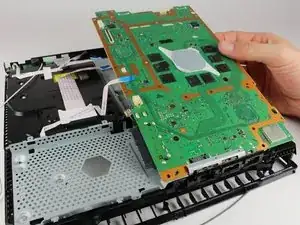
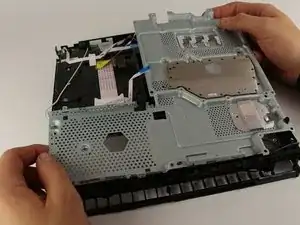
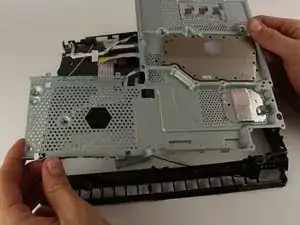
    • Rimuovi la protezione in metallo prendendola da due bordi opposti e solevandola dalla console.

    • Potresti dover far ondeggiare la protezione per liberarla prima di rimuoverla.

    • Non perdere nessuno dei pad attaccati alla scheda madre durante questo passaggio.

    This step would benefit from showing a picture of the black pads in question. Pic: http://i.imgur.com/zQnehtA.png

    lane anderson -

    The US model has two black screws under the HDD

    Kyle Cordle -

  19. PTxhB3NvK2ECgnHd
    PTxhB3NvK2ECgnHd
    R2BAVekTyKaqIEtt
    av2foEMxJfQ5kjOi
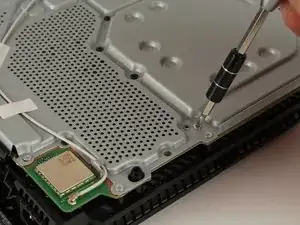
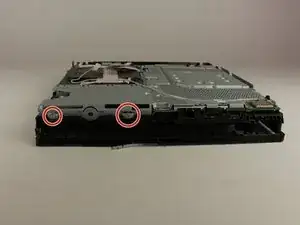
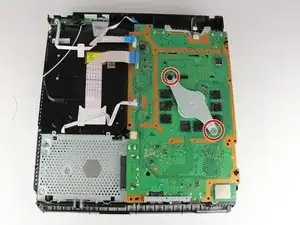
    • Svita e rimuovi le due viti da 10,0 mm (una argento e una nera) con un cacciavite Philips #1.

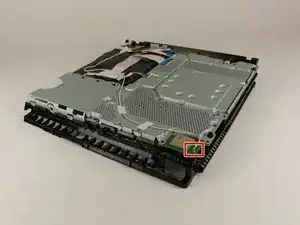
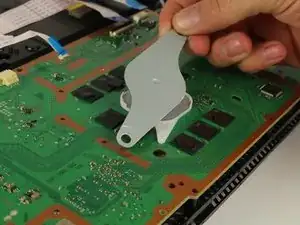
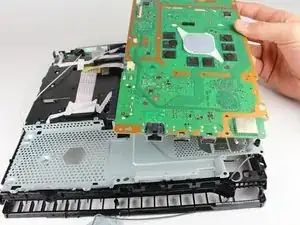
    • Rimuovi il supporto in metallo del dissipatore sollevandolo dalla scheda madre.

    Why is one silver and one black? I keep thinking they are different and try to keep track of where they go.

    Reed Deemer -

    What's the name is the part with the two metal screws that is being taken off

    Devon Higgins -

    both screws are black on the US version

    Sean Douglas -

  20. N4GKMqBLNRkrQ5L3
    N4GKMqBLNRkrQ5L3
    g3dZEyK6JVWZZxtt
    fddeLK1R2v2WAECy
    • Scollega il cavo indicato prendendolo saldamente con un paio di pinzette e tirandolo.

    • Questo cavi può richiede un po' di forza per essere scollegato, ma assicurati di non romperlo.

    Do not attempt to disconnect the plug by pulling on the wires! If you rip out the wires, you’re gonna have a very bad day. Wiggle the plug using the plastic on the male end of the connector while pulling out.

    Matthew D. H. -

    que pasa si se desolda esa parte como puedo volver a soldarlo o cuanto se cobra por solo soldar

    TheKiller Xtreme1 -

    this is plugged in WAY too hard. I've been wiggling it for 5 minutes. Not budging an inch. i learned that if you follow the cables of that, they are just held in place by a few plastic hooks. You can slide them out of there by flipping the ps4 over and then pull the motherboard out no problem, cable still attached.

    Also, dont forget about the small plug in at the top of the motherboard. That is the fan power cable and needs to be off to remove the mobo as well.

    Zoey Schlemper -

    I broke the cable by accident, where can i find a replacement?

    Daniel Dilley -

    A better approach is to unwind the other end of the cable leaving the connector plugged into main board , no risk of damage doing it this way.

    markduff -

  21. DEHv6gWHFGMSYf2Z
    DEHv6gWHFGMSYf2Z
    LTdfbpNEnnLYnFSG
    • Rimuovi la scheda madre prendendola su un bordo e tirandola verso l'alto.

    • Potresti dove far ondeggiare la scheda un po' per liberarla prima di sollevarla.

  22. lZulrs4omCxIADPH
    lZulrs4omCxIADPH
    6CKVbJhluPXYGJsP
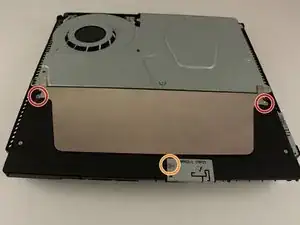
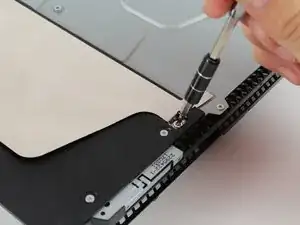
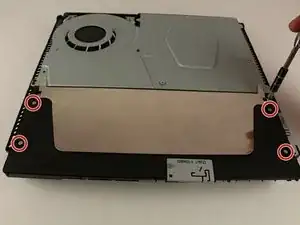
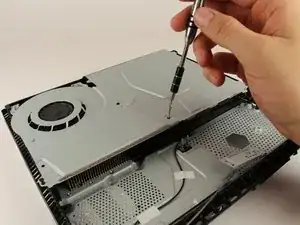
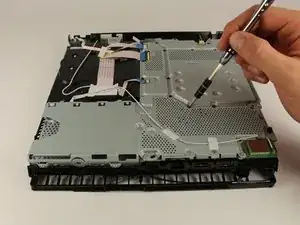
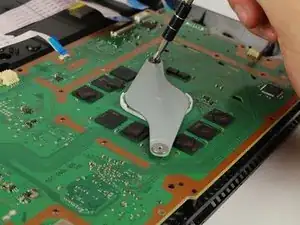
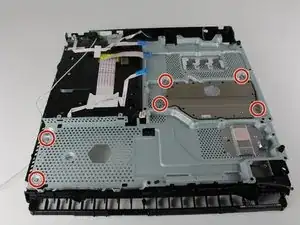
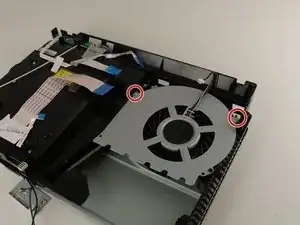
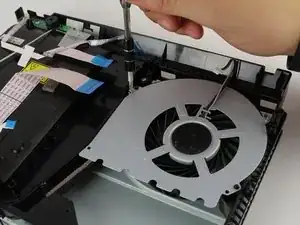
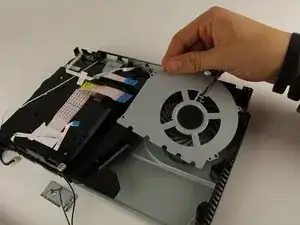
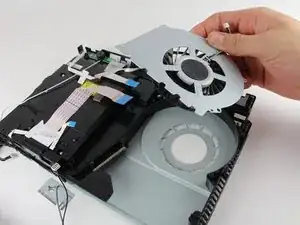
    • Svita e rimuovi le sei viti da 4.0 mm usando un cacciavite con punta PH00 con un movimento antiorario.

    On my model, there are screws on the opposite side of the PS4 that are long and have their threads facing up into this plate. You have to unscrew them from the opposite side so they come off.

    Also, you DEFINITELY need to reapply thermal paste when doing this step in reverse order after replacing the fan!! How is this not mentioned, its critical otherwise your CPU will overheat.

    Zoey Schlemper -

  23. EiTmGgYvRrKuQmcs
    EiTmGgYvRrKuQmcs
    4Sb1wXIsROkfpS1F
    • Rimuovi la schermatura di metallo afferrandola ai lati e alzandola col le tue mani.

  24. hTxnH13HaFr6C2LH
    hTxnH13HaFr6C2LH
    ypxDIajBbFhXcBWG
    • Svita e rimuovi le due viti da 40 mm con un cacciavite PH00 con un movimento antiorario.

  25. b1YHNwYBihv54BLc
    b1YHNwYBihv54BLc
    ZpOmlXKUOsauUwQe
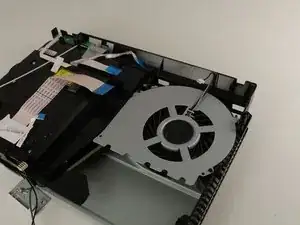
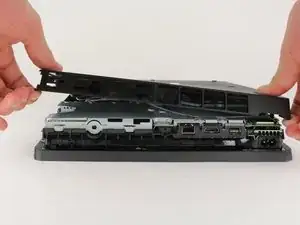
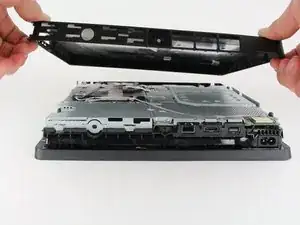
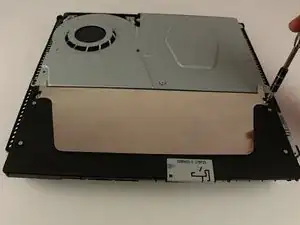
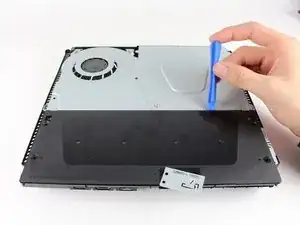
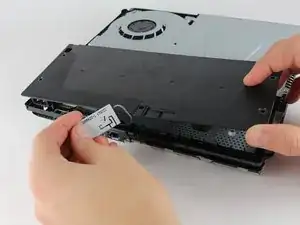
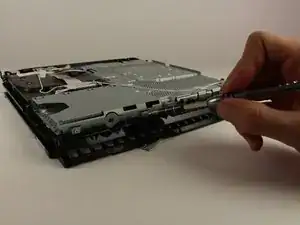
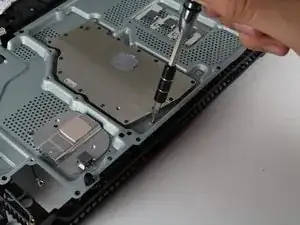
    • Rimuovi il sistema della ventola afferrandola ai lati della copertura in metallo superiore e sollevala.

Conclusione

Per riassemblare il dispositivo, segui le istruzioni nell'ordine inverso.

Harry Koos

Membro da: 24/01/18

4764 Reputazione

5 commenti

Thank you so much for this guide! It was very helpful!

David Rodriguez -

Deine Schrauben großen machen gar kein Sinn du hast mehr verschiedene Schrauben als es gibt

Andre Hollmann -

My PS4 “Slim” is quite different internally than the one shown. But regardless, this guide is an excellent resource for us diy’ers. And don’t forget any parts when reassembling, like I did. Took four tries to get everything back where it belonged. And man, was it dusty in there! Regular cleaniings are a must.

Patrick Ogren -

My ps4 slim is different it has some extra parts, now I don’t know how to put it back, hahahahahhahaha

Lancelotte Fabros -

This guide gets you 90% of the way there. Some really important pieces are missing though, primarily:

- How you dont need to unplug the power supply cable from the motherboard, you can just unhook it from the plastic clips on the case.

- It never mentions cleaning the old Thermal Paste off the heatsink + cpu and replacing with a new dab.

Both of these are essential for a proper tear-down. If you dont replace the thermal paste, your PS4 is guaranteed to break down irreparably in the future. I had to know or discover them for myself. Please, please update this guide with that info.

Zoey Schlemper -