Introduzione

Se la ventola è rumorosa o non funzionante, segui questa guida per rimuoverla in modo da ripararla o sostituirla.
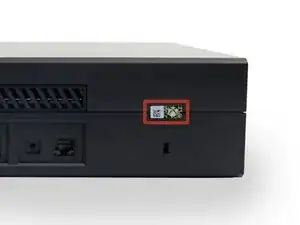
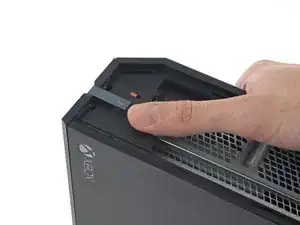
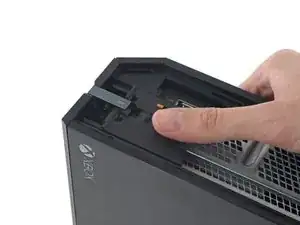
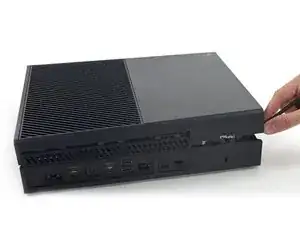
  1. fFCGnAVFSWO6MSIo

    In the United States the Magnuson-Moss Warranty Act of 1975 is a Federal Law that states that stickers and clauses are illegal. It says you can open your electronics without voiding the warranty, regardless of what language of that warranty says.

    Dustin D'Amour -

    Stickers are illegal!?

    Brandon -

    For anyone concerned, if you apply heat with a blow dryer or heat gun you can carefully remove the sticker without damaging it, making it impossible to know that the sticker was ever removed.

    Kelton Stewart -

    All the immature comments aside, thank you Dustin for sharing the information.

    Wade -

    xbox를 열기 위해서 이러한 위조방지 테이프를 자르거나 떼어내야 합니다. 하지만 걱정 마세요. 여러분이 무언가 직접적으로 망가트리지 않는한 ms는 보증을 취소하지 않습니다.

    승대/SeungDae 정/Jeong -

  2. TSL4QNCOtv534Yqk
    TSL4QNCOtv534Yqk
    nCL6Av6fkN1uQMAu
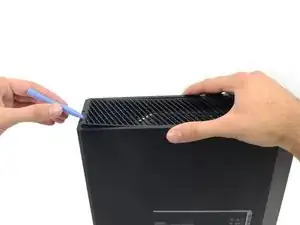
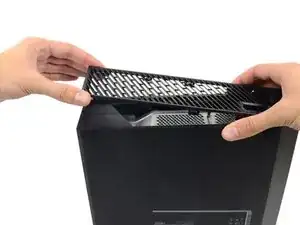
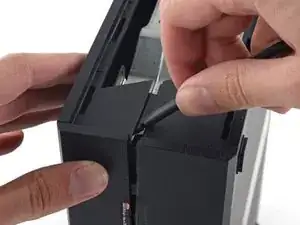
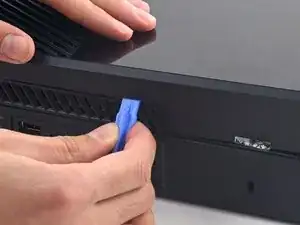
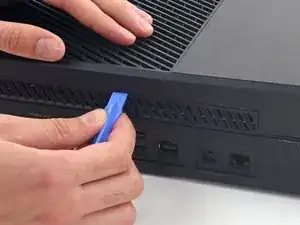
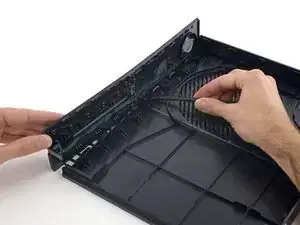
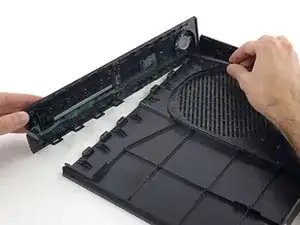
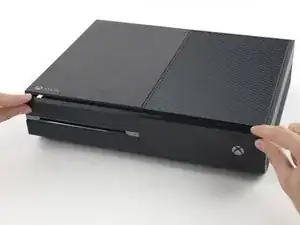
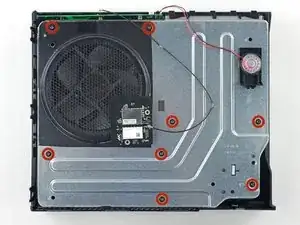
    • Usa uno strumento di apertura in plastica per sollevare e rimuovere la griglia di ventilazione che circonda la porta USB laterale.

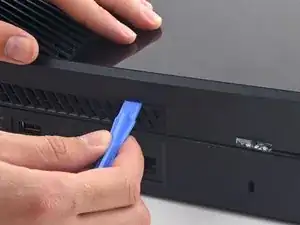
    • La griglia di ventilazione è piuttosto flessibile flessibile ed è tenuta in posizione da deboli clip in plastica - inizia a far leva dalla parte posteriore per staccare la griglia.

    - 플라스틱 오프닝 도구를 애용해서 측면 usb 포트를 둘러싼 통풍구를 들어올려 분리하세요.

    - 이 통풍구는 무척 유연하며 연약한 플라스틱 클립으로 고정되어 있습니다. 뒤쪽에서부터 들어올려 분리하고 떼어냅니다.

    승대/SeungDae 정/Jeong -

  3. BLMgn4Ddrlxat2SY
    BLMgn4Ddrlxat2SY
    KaRwhVrrZiGkLdCK
    • C'è una piccola linguetta di plastica che rinforza l'angolo frontale della Xbox.

    • Fai scorrere la linguetta verso il retro della console e rimuovila.

    Do u sell that plastic tag I need it

    Brandon -

    Here is What's Stated in Step-3 : (There is a small plastic tab that reinforces the front corner of the Xbox.) Actually, the "Tab" is NOT SMALL at all. See the Picture: The "TAB" is the Piece that this Person has their Thumb on, is the Tab that you NEED TO SLIDE TOWARDS THE "REAR" of the Unit. You will be able to tell How this Large Tab Holds the Top and the Bottom Case Covers together. Take Note how to Replace this tab back where it Belongs, when you are putting the Case Covers back together. Hope that this comment will help you. 6-29-2017

    B.L. Spence -

    - xbox의 전면 모서리를 지지하는 작은 플라스틱 탭이 있습니다.

    - 뒤쪽으로 똑바로 밀어서 제거하세요.

    승대/SeungDae 정/Jeong -

    What is this small tab referred to as?

    What is it called i need to order one.

    James Lipsey -

  4. DmSmGaCLJiWlvSFm
    DmSmGaCLJiWlvSFm
    SSs6u5TVjnYrJyRo
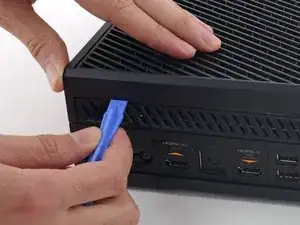
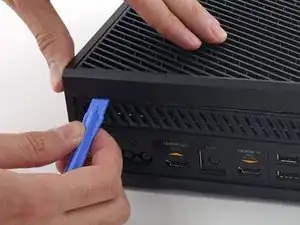
    • Inserisci la parte piatta di uno spudger tra la parte superiore e quella inferiore della scocca, nel punto punto dove si incontrano sul retro dell'apertura della ventola laterale.

    • C'è una resistente linguetta di plastica che connette le due metà (la prima di molte), così avrete bisogno di usare un po' di forza.

    • Lasciate lo spudger in posizione fino a che non avrete aperto la scocca completamente. Le linguette sono molto resistenti, quindi potrebbe accadere che le due metà si richiudano mentre lavorate.

    prying does not work. my spudger is causing damage. my soft. plastic. spudger. and the %#*@ thing does not move. this is a common issue with the instructions on this site. you write instructions like you assume people have extensive repair experience. describe the plastic tab. add detail. because simply prying WILL damage the case. hire a %#*@ writer. cause you guys do not know how to precisely convey important detail. constant problem with tech companies actually. no writers.

    Kevin Michaels -

    - 벗겨낸 통풍구쪽부터 상판과 하판 사이의 틈으로 spudger의 평평한 끝을 밀어넣습니다.

    - 플라스틱 클립들이 꽤 강하기 때문에 생각보다 강한 힘을 사용해야 합니다.

    - 케이스를 완전히 열 때까지 spudger를 계속 끼워두세요. 클립이 강해서 작업도중 다시 닫힐 수도 있습니다.

    승대/SeungDae 정/Jeong -

    it would be very very nice that the part, that you sell, will Fix. This an ols Tutorial. The new opening tools that you sell, will not help anything, cause there is no flat sign on the side. you link these tools at this tutorial, but never tested, if the new tools work. so i tell this you, no they dont fit. Thanks for nothing.

    Zeroslammer -

    I ve made it this far with only a Lego membership card and a flimsier amusement park card (I'm a big year old)

    Shadow Killz -

    I had to use a 1/32nd flathead screw driver. In the corner to get it started push the top joint of the case down and up will simultaneously pulling up and down to seperate the seam. You will need a 3rd hand to insert the 1/32nd flathead and pry up to get the case started.

    I had a virgin never opened xbox day one og so that might be why I had to do it this way.

    KSI AZZAZLE -

    even the wikihow instructions are better

    Ethan Banks -

    It’s easier if you push the top empty area part of the plastic with your finger, and stick the spudger about 3/4” (2 cm) away from the back of the xbox and start prying. You have to do this because that is the only spot where there are no clips in the way. If you do any less or more distance, the clips are in the way, and you’ll never be able to pry open the Xbox because the tool can’t get in.

    Saul Torres -

    A youtube video I found explains this step better. You are meant to pull up on one half and push down on the other, this separates the two halves. Then use a spudger on the rear of the console to separate the clip right under the warranty sticker, then move down the back of the console to the other clips

    Zachary Avery -

  5. ogjOrFJJcnxckrPw
    ogjOrFJJcnxckrPw
    JcHGErqMBV2dtooS
    • L'interfaccia tra la parte superiore e quella inferiore della scocca è tenuta insieme da diverse linguette lungo tutta la parte posteriore e su tutti i restanti lati della Xbox.

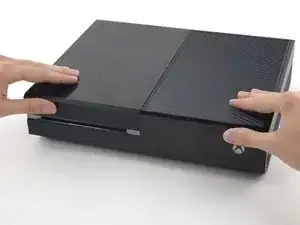
    • Inserisci uno strumento di apertura in plastica tra la parte superiore e quella inferiore della scocca per separare le clip sopra la ventola posteriore.

    - 상판과 하판 사이에 끼인 후면 단자판은 여러개의 클립으로 고정되어 있습니다.

    - 플라스틱 오프닝 도구로 후면 통풍구의 클립들을 분리하세요.

    승대/SeungDae 정/Jeong -

  6. WhqL5lXoOtd5OkSa
    WhqL5lXoOtd5OkSa
    a5dTIdSMJqCQ6NHL
    • Continua a muoverti lungo la parte posteriore della Xbox sollevando le clip.

    • Assicurati che gli spudger restino nella loro posizione che impedisce la chiusura: anche se il case si aprisse al punto di far cadere gli spudger, le clip rimaste potrebbero, agendo come molle, forzare la chiusura completa del case. Tieni gli spudger nella fessura per salvaguardare il lavoro appena compiuto.

    - 후면을 따라서 계속 클립을 들어서 분리하세요.

    - spudger가 제대로 꽂혀 있는지 중간중간 확인하세요. spudger가 빠질정도로 케이스가 분리 되더라도 남은 클립들이 매우 탄력적이라서 방심하면 도로 닫히기 십상입니다. 원활한 진행을 위해 spudger가 잘 꽂혀서 사이를 벌리도록 유지하세요.

    승대/SeungDae 정/Jeong -

  7. v5JQjSLJyhE3W2hY
    v5JQjSLJyhE3W2hY
    CAl1npTqiKdrFpqG
    • Continua a staccare le clip. Può essere utile far scorrere sulle linguette lo strumento di apertura in plastica.

    • Man mano che raggiungi l'angolo più distante della copertura posteriore, la copertura posteriore dovrebbe essere pronta a venire via. Se questo non accade fai scorrere l'attrezzo di apertura in plastica intorno all'angolo e fai scattare le clip lungo il lato senza porte USB.

    - 클립들을 계속해서 분리합니다. 클립들을 가로질러 플라스틱 오프닝 도구를 주욱 미는 것이 도움이 될수도 있습니다.

    - 후방 케이스를 따라 분리하면 상판이 열릴 기미가 보여야 합니다. 만약 열릴 기미가 보이지 않는다면 모서리부터 플라스틱 오프닝 도구로 분리를 시작하고 usb포트가 없는 쪽을 따라서 클립 분리를 다시 시도하세요.

    승대/SeungDae 정/Jeong -

  8. Bc1SKUHI3FWBknsV
    Bc1SKUHI3FWBknsV
    VkjRDdLoOFC4P3LT
    bxFDQqHFvjiMAqOl
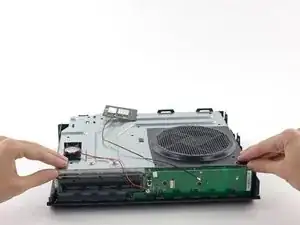
    • Partendo dallo spudger che hai inserito nello spazio tra le due parti della scocca, solleva la parte superiore della scocca per liberare le ultime clip.

    • Usa uno spudger di plastica per separare ogni clip che non si è staccata.

    • Non provare a rimuovere il case superiore già a questo punto, in quanto è ancora collegato dal cavo del bottone di accensione.

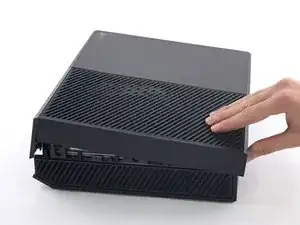
    • Solleva un po' la copertura superiore e falla scorrere per liberare l'accesso al pannello di controllo frontale.

    I got confused here. I couldn’t unclip the front panel at all. I found out that if I open the case like a clamshell (or a book, with the front being the spine of the book) I popped right off easily.

    Omar Ramos -

    Yeah, I saw your comment afterwards but this is exactly what I ended up doing as well. just a note for anyone reading this be careful of the flex cable as it does seem to put a questionable amount of strain on it when you open it in this manner.

    Graham Holt -

  9. sQaX6NR2yUNmcpZE
    sQaX6NR2yUNmcpZE
    5idQPgXXOnPUgTuE
    JpmqCQgvktBT6IZW
    • Il cavo del pulsante frontale ha un connettore ZIF esclusivo, fai attenzione ai prossimi passaggi per scollegarlo correttamente.

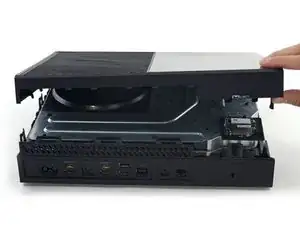
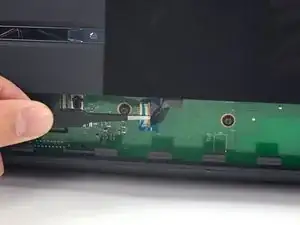
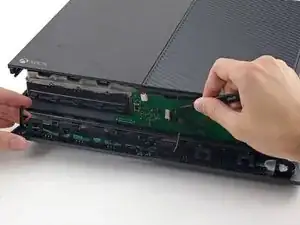
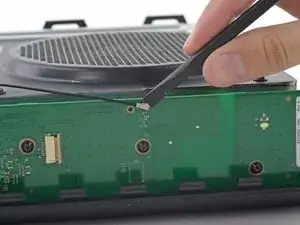
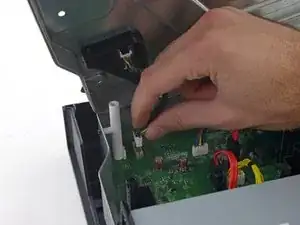
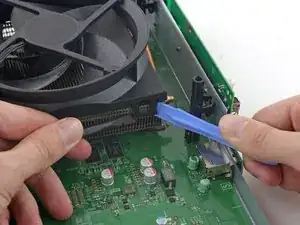
    • Usa una pinzetta per sollevare la copertura blu di plastica sopra il connettore bianco sulla scheda.

    • Usa la punta di uno spudger per premere il meccanismo di chiusura del connettore verso il cavo per sbloccarlo.

    I recently took my Xbox one apart to clean it and for some reason it's on for a couple minutes then it cuts off

    Ali -

    Or anyone else who has this problem or reads this on this thread, which is not the correct thread for this question by the way, here is a link to the forum for that. It could be any of a number of issues including overheating, Portland elation, or infestation, among others.

    Xbox One turns on then turns off after a few minutes

    Rooster Blue -

    Is there somewhere that I can buy a replacement zif connector

    Black Light -

  10. AHFqUGqKrLOvs6Mw
    AHFqUGqKrLOvs6Mw
    UKFO6I2mNG5CuVx1
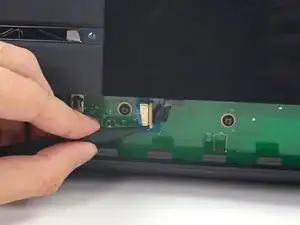
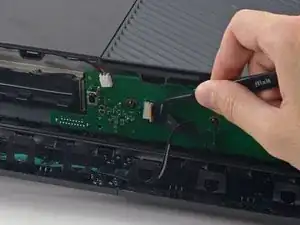
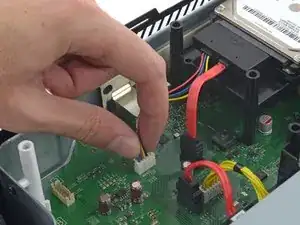
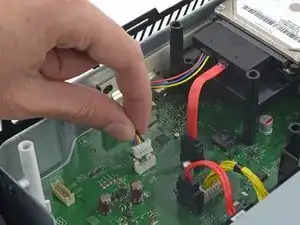
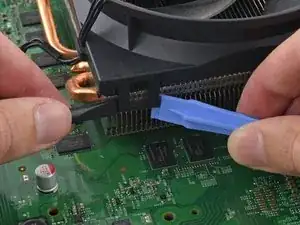
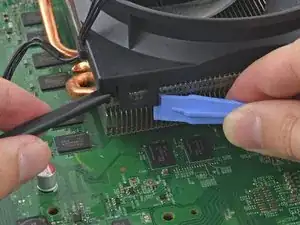
    • Usa delle pinzette per tirare il cavo del connettore fuori dalla scheda della console.

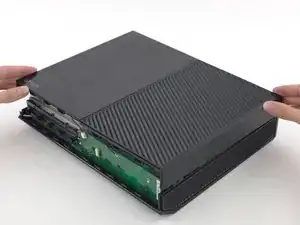
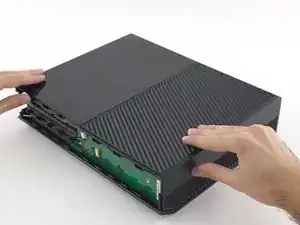
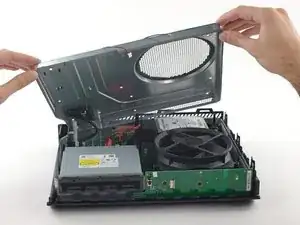
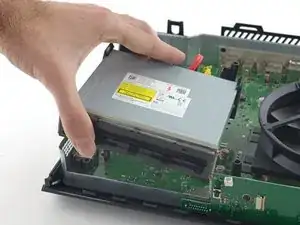
    • Rimuovi il case superiore.

    I broke that peice that white connector peice what can I do?

    devinthomason -

  11. 2FCYpEe2HZMronDK
    2FCYpEe2HZMronDK
    jg6d6lTGcEVZjWCq
    6LxAZJy1HGaIBKUj
    • I prossimi 4 passi sono istruzioni per il riassemblaggio. Saltali per continuare con lo smontaggio.

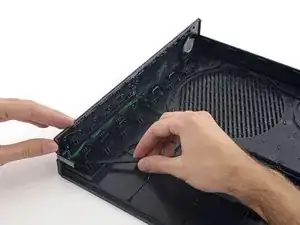
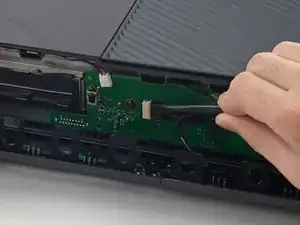
    • Usa la parte piatta di uno spudger per liberare le linguette che collegano la parte frontale del pannello superiore al case superiore.

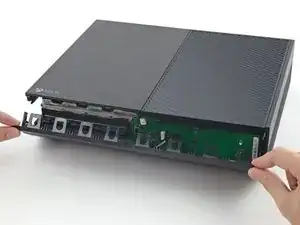
    • Rimuovi il pannello frontale dal resto del case superiore.

  12. kANCmbqNSW4gTaKm
    kANCmbqNSW4gTaKm
    fJSHsP4srEitpBI1
    rXaw12h6dMmByhSk
    • Sostituisci la parte superiore della scocca.

    • Allinea le linguette e premi saldamente per ri-sigillarle lungo il perimetro.

  13. mlcHYVINYhfQhGKJ
    mlcHYVINYhfQhGKJ
    lVXM56UFy2OiQAuD
    4K2KXjxGnI2JJOCH
    • Tieni il pannello frontale vicino alla parte anteriore dell'Xbox.

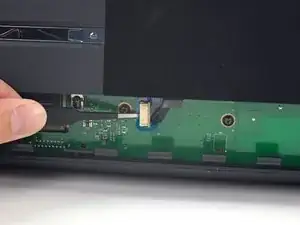
    • Usa delle pinzette per sostituire il cavo del pulsante frontale nel suo socket ZIF.

    • Usa la parte piatta di uno spudger per premere la chiusura dello ZIF a sinistra per fissare il cavo.

    My Xbox stopped working after this thanks

    nathan jackson -

    Mine did as well, its possible it may be the same reason. For me I had to unplug and plug it back in a few times and then clean off the contacts with isopropyl alcohol. Seems simple but if you haven’t already, I would try it.

    Alex Pascone -

  14. Iesh2ypKDM2MNTFi
    Iesh2ypKDM2MNTFi
    AKpcaAwyYcAC5k6H
    xOdLB1rAhB1shyVI
    • Il lato inferiore del pannello frontale ha dei ganci di plastica che si incastrano con i ganci di plastica sul lato frontale del case inferiore.

    • Con il pannello frontale ad un angolo di 45 gradi, chiudi i ganci di plastica su quelli del case inferiore.

    • Premi la parte superiore del pannello frontale nell'Xbox, come per chiudere un cassetta delle lettere. Premi con decisione così che le clip del pannello frontale al case superiore si chiudano in maniera sicura.

    Thanks, chief - you saved my leisure time tonight

    Jordan Hunt -

  15. LQkgBcyYCwXArnom
    LQkgBcyYCwXArnom
    gWBVBocWb1NkHPXS
    IK1GfZDHgomdP6Am
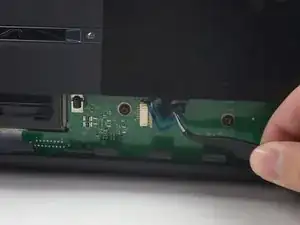
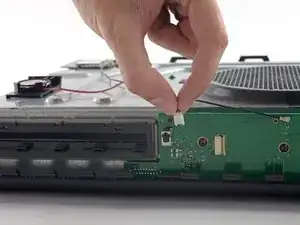
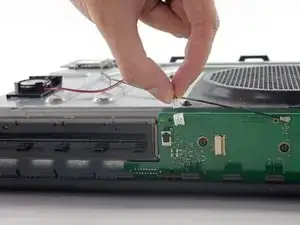
    • Disconnetti delicatamente il cavo della cassa dalla scheda anteriore.

    • Fa' molta attenzione a rimuovere soltanto il connettore col cavo, e non l'alloggiamento a cui è collegato. È piuttosto delicato, e potresti sradicarlo del tutto dalla scheda.

    • Usa il lato piatto di un paio di pinzette per scollegare il cavetto dell'antenna dalla scheda del pannello frontale.

    If this connector is broken off, will that prevent the control panel to not work at all and NOT turn on? Is there a fix or work around IF this connector is broken off?

    Michael Eh -

  16. utZcNKWNa2TR5jcM
    utZcNKWNa2TR5jcM
    UKGjtWqMYPZnANKg
    VV1kMmQXDuLBoYUn
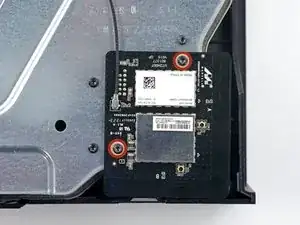
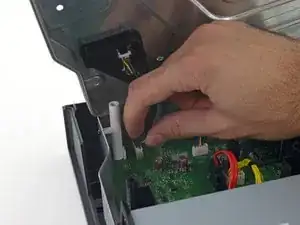
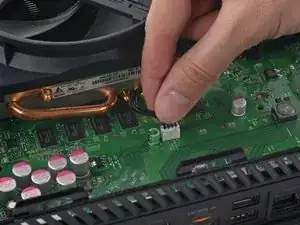
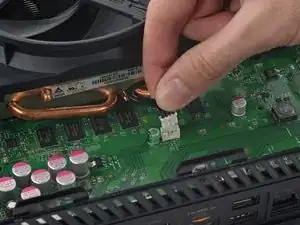
    • Rimuovi le due viti Torx T9 da 9,5 mm dalla scheda Wi-Fi.

    • Solleva il modulo Wi-Fi dal suo alloggiamento nella parte superiore della scocca metallica.

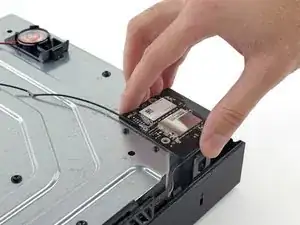
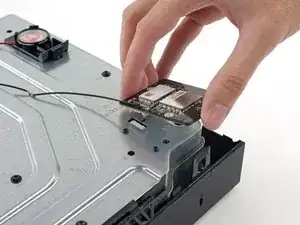
    • Lasciando dov'è l'antenna della scheda Wi-Fi, sposta leggermente la scheda, fino a scoprire la vite etichettata come "C3" che si trova al di sotto di essa.

    When reassembling- put the outer ones on first to secure the port to the metal. Then putting the wi-fi board into the port will be easy

    Nate Ennis -

    Will a cracked WiFi Board affect network connectivity?

    Kyle Webb -

    The T9 fit but was a tad big, for me the T8 worked fine

    Saul Torres -

    Where can i get a T9

    Wyatt Kyker [STUDENT] -

  17. hdHUGHWFaRvYVGhS
    • Rimuovi le otto viti Torx T10 da 65 mm dalla parte alta del case metallico superiore.

    Two of the 8 were stripped even before attempting to remove….ugggh

    Michael Massaro -

  18. VWMbtpnPxeXNBkVr
    VWMbtpnPxeXNBkVr
    dePENJIUnbGQohoU
    • Solleva - ma non rimuovere - la scocca superiore in metallo.

    • Il cavo di interconnessione della scheda Wi-Fi collega la scocca superiore in metallo e la scheda madre.

    If I need if Fix-It board

    Ramontoby13 Toby -

  19. rhjLPwOefpXlZN1d
    rhjLPwOefpXlZN1d
    RNCLEQRZGWR2dUfP
    • Scollega il cavetto della scheda Wi-Fi dalla scheda madre.

    • Rimuovi la scocca superiore in metallo.

    This connector may be exceptionally difficult to remove, and it is not strictly necessary for the replacement of the hard drive if you are careful.

    Rowan -

  20. 2bWQsTEPYDH3QytG
    2bWQsTEPYDH3QytG
    nRRFBst3KIYl6jqC
    foCoe4KPsNpjYa4E
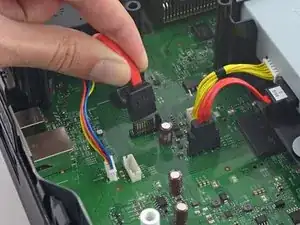
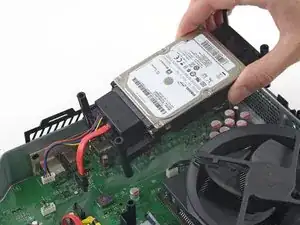
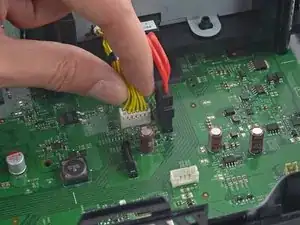
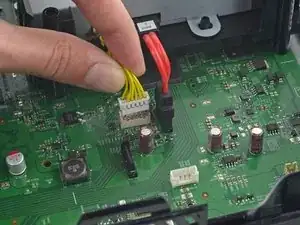
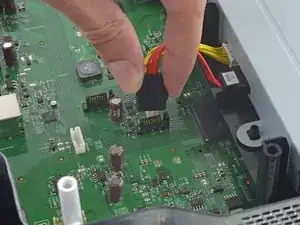
    • Scollega dalla scheda madre sia il cavo di alimentazione sia il cavo dati SATA dell’hard disk.

    I found that it is not necessary to take out the hard drive in order to remove the front panel module. If you can lift the whole metal enclosure a little to get to the right most torx screw, then you do not need to move the hard drive.

    Taiji Saotome -

    Thanks for letting us know about when the open day is going to be. Will make sure get my work completed by rushmyessay before the day so I can attend it in peace.

    shuaib ahmd -

  21. Wwcs4BNWEjGDZaHT
    • Solleva e rimuovi la struttura contenente l’hard disk da Xbox One.

  22. xYnovXjomBHPZO1G
    xYnovXjomBHPZO1G
    GmEDkZityGAY5wIv
    wXVRaIuE6HVDEX3x
    • Scollega i cavi di alimentazione e SATA del lettore CD dalla scheda madre.

    I their a way to replace the motherboard pins the piece that connects to the hard drive, part on the motherboard that connects to HD

    Frosted Flakes -

  23. SVVTEqfLpq1BkoSf
    • Rimuovi il gruppo del lettore CD dalla Xbox.

  24. HpEUMQdUIugRcoYZ
    HpEUMQdUIugRcoYZ
    2ekBwDpbyTWke5Zv
    • Disconnetti il cavo della ventola dalla scheda madre.

    What happens if you pull the pins out of the white piece in accident?

    Alex Etchison -

  25. 4wFaJUCfM6kISgre
    4wFaJUCfM6kISgre
    FKKPBwBOkW2ewmqi
    • La ventola è fissata al dissipatore con quattro robusti ganci in plastica. Facendo leva sui due ganci esposti verso l'esterno dei rispettivi canali nel dissipatore, potrai inclinare verso l'alto la ventola e rimuoverla.

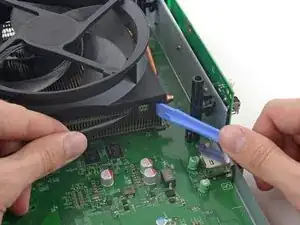
    • Usa uno spudger e uno strumento di apertura in plastica per fare leva delicatamente sul gancio di destra per rimuoverlo dal suo canale nel dissipatore.

    • Stai attento a non fare forza sulla scheda madre o a non avvicinare troppo il dissipatore alla scheda.

  26. M2pA2mJM5HTbWQAI
    M2pA2mJM5HTbWQAI
    aOXwEPrBGrRSH1x4
    IpvQTAGWYWxjgoog
    • Ripeti il passagio precedente per il gancio di sinistra. Usa ancora sia lo spudger che lo strumento di apertura in plastica per rimuovere il gancio dal suo canale nel dissipatore.

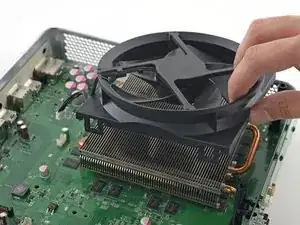
    • Quando c'è uno spazio sufficiente tra ventola e dissipatore, infilaci lo spudger e fai leva per rimuovere la ventola.

  27. bRNRFJHrrl5k5EyP
    bRNRFJHrrl5k5EyP
    B6QxkREi5qwTC4Ao
    • Usa lo spudger infilato per fare leva sulla ventola e sollevarla dal dissipatore.

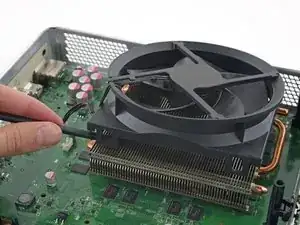
    • Rimuovi la ventola dal dissipatore.

Conclusione

Per rimontare il dispositivo, segui le istruzioni in ordine inverso.

Andrew Optimus Goldheart

Membro da: 17/10/09

502162 Reputazione

15 commenti

As a device repair tech of a 3rd party store, I have found this be quite easy and profitable for my store to make money. Thanks to these guides, I can now start working on video game consoles.

jonathon saygidia -

My fan is making a weird clicking noise everytime I turn on my Xbox One. Does anyone know how to fix this.

Tammy Privizzino -

I have a quick question so after I remove the fan then what I do

Serenity Turner -

So i dropped my xbox one ans now everytime i try to play a game my xbox will make a sound with the fan to say its loading then it will shut down .. what is it i can ro fix this problem

Chelsea -

I completely resolved my question when I read this post, thanks to the author for the detailed description. I wrote my review on the https://essaysservicesreviews.com/, you can go in and read. Thank you very much for your attention in your time.

Retrogress -

What happens when one of the plastic clips on the fan breaks. Can the console still run properly or no?

Jayden Horton -

Hi Jayden, the console should still run properly, but the fan won’t sit as secure against the heat sink as it should be. This might not make any difference at all, or the fan might vibrate because it’s not quite as sturdy.

Adam O'Camb -

puedo usar Cualquier ventilador O debe Ser un Ventilador especifico

jorge wellington -

I purchased this new fan for a Xbox One. I received an XBox fan labeled for XBox S Fan - New. The part had one clip broken and was obviously not new from the dirt covering it. Very unsatisfied with this product.

Patrick Eames -

These instructions were perfect. Made an intimidating job easy to follow and complete. I had a working fan back in my Xbox in about an hour. Thanks to the author of this guide and thanks to the guys who made this website for such an incredible resource.

Ryan McGarry -

Nice post,  <a href="https://paperwritingservices.reviews/buy... rel="nofollow">paperwritingservices.reviews</a>

Phil Reacher -

Anybody have success with a quieter aftermarket fan?

Gurt -

不同的Report代写 https://www.lxws.net/particular.php?id=1... 机构提供的服务不同,比如有些机构只提供润色、修改服务,而有些机构则提供全套Report代写服务。在选择Report代写机构时,一定要看清楚其提供的服务,确保其能够满足自己的需求。

Meeloun Education -

不同的Report代写 https://www.lxws.net/particular.php?id=1... 机构提供的服务不同,比如有些机构只提供润色、修改服务,而有些机构则提供全套Report代写服务。在选择Report代写机构时,一定要看清楚其提供的服务,确保其能够满足自己的需求。

Meeloun Education -

Different report ghostwriting https://www.lxws.net/particular.php?id=1... institutions provide different services, for example, some institutions only provide polishing and modification services, while others provide a full set of Assignment ghostwriting services. When choosing a report agency, it is important to have a clear understanding of the services it provides to ensure that it meets your needs.

Meeloun Education -