Introduzione

Se l'altoparlante del tuo Moto Z2 non funziona correttamente, usa questa guida per sostituirlo.

  1. QiPRJLgTGNmlijoP
    • Disponi il telefono su una superficie piatta con lo schermo rivolto verso l'alto.

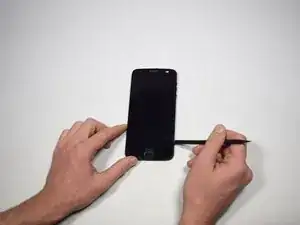
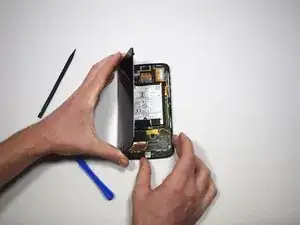
    • Inserisci l'estremità piatta di uno spudger in nylon nella fessura tra lo schermo e la scocca nell'angolo inferiore destro del telefono.

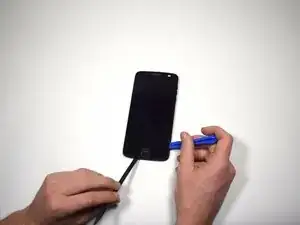
    • Fai leva per aprire parte dello schermo alzando l'attrezzo e lo schermo verso di te.

    • Può essere necessario usare un apporto di calore, ad esempio con un iOpener, per riscaldare l'adesivo sottostante e ammorbidirlo prima di tentare l'apertura.

  2. OZrETPHyQsORXwy1
    OZrETPHyQsORXwy1
    1TRWIqMx6Opr5QPQ
    eNtdGrhbMkFLsESG
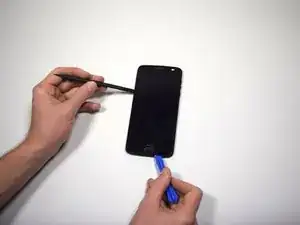
    • Incunea lo strumento di apertura in plastica nella fessura creata dalla separazione tra schermo e scocca nell'angolo inferiore destro per tenerlo aperto.

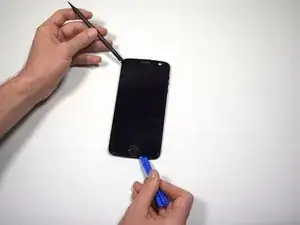
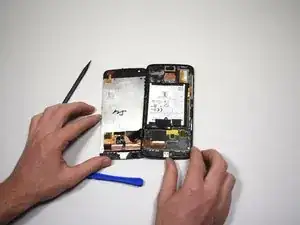
    • Inserisci lo spudger in nylon nell'angolo inferiore sinistro dello schermo e fai leva per sollevare il display.

    • Continua a inserire gli strumenti di apertura in plastica e lo spudger tutto attorno al telefono e fai leva sullo schermo nei vari punti finché non si separa completamente dal dispositivo.

    • Rimuovi lo schermo con delicatezza e lentezza, altrimenti il display potrebbe rompersi.

    No — *slaps wrist* No. Bad steps! Don’t use the suction cup at all, ever. It causes the two layers to separate immediately, long before the frame clips give way to let the screen come off.

    I’m being super ultra very careful with this second attempt on a new device (that was in pretty pristine condition, if I can keep it that way!), and right when I tried pulling as instructed, the screen layers started to pull apart. Use a blade shoved into the edge of the phone and pry it apart, releasing the latches in the process!

    Matt Falcon -

    I have to agree with Matt above. At the smallest bit of pressure on the suction cup, the screen de-laminated from the metal base. It still “works”, but….

    None of the tools in the kit is terribly suited for getting in there and prying that clip apart without splitting the screen.

    Phillip Mills -

    lease Read the Comments poste on “STEP 2”, When you apply the heat, the screen becomes unglued from the metal fram that it is attached to. I ended up damaging my screen. You need to make sure that what is coming unglued is the metal, and not just the plastic screen. I found out when I saw another video, where they do not apply heat, they just use a tool to pry the frame-display assembly… But apparently it was too late… You should be more specific about the warning…

    Juan Carlos -

    A jimmy does not come with the kit. Buy one before beginning this procedure. It is the best way to lift the screen assembly without damaging the assembly.

    Linsey Linton -

    This whole guide has been rewritten since my last comment, and I super appreciate it. The steps are now much more appropriate and less likely to cause damage. Jamming your Jimmy (huehue) into the edge of the screen is actually quite a good idea, not likely to hit anything as there’s nothing but body underneath it.

    Matt Falcon -

  3. iLCmGe1A4USSuKke
    iLCmGe1A4USSuKke
    WQlLFhgmUai3YEvp
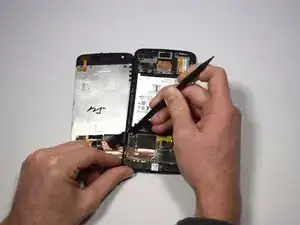
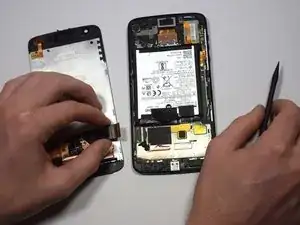
    • Rimuovi lo schermo alzandolo da destra e facendo perno sul bordo sinistro; disponi lo schermo a faccia in giù a fianco della scocca del dispositivo.

  4. XaJaOxMAjx2NOsnN
    XaJaOxMAjx2NOsnN
    SNFROBtUsPfLGjvE
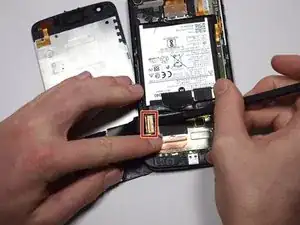
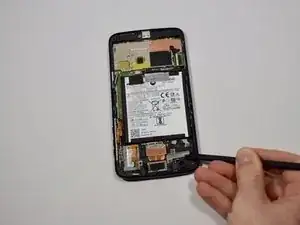
    • Usando l'estremità piatta dello spudger in nylon, tira via il nastro adesivo nero disposto sopra il connettore dello schermo a cui è attaccato il nastro nero.

  5. BGWtTOetGgVKTmI6
    BGWtTOetGgVKTmI6
    ndgfNlEMIjTLuMDI
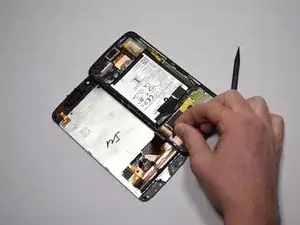
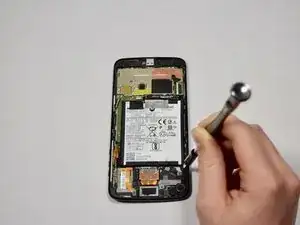
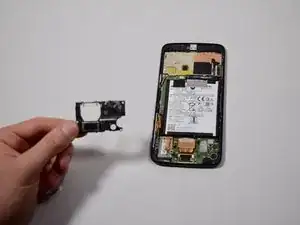
    • Inserisci lo spudger al di sotto del blocco del sistema di ritenuta che collega il nastro nero dello schermo alla scocca.

    • Spingi in alto il blocco per liberare la ritenuta.

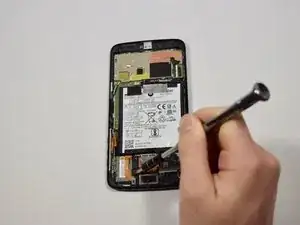
    • Separa il nastro nero dalla ritenuta tirandolo delicatamente verso sinistra.

    this is really for the digitizer and screen replacement. there are still more steps for just the screen.

    James McKinney -

    There is an enormous amount of adhesive sticking this thing together. As the adhesive is not essential (it holds together with clips, mostly), you really need to focus on *removing* the adhesive, so that it doesn’t stretch and bunch-up, preventing clean reassembly. Leave behind the adhesive that you can prevent from bunching-up (by cleanly breaking it, in turn by holding down one edge to the phone or screen), so you have some sticky left, but just make sure it’s not bunched-up.

    Matt Falcon -

    Revisiting this comment a year later: there’s now replacement adhesive available (or maybe there always was - wish I knew!) for this model in the iFixit store. So, it would be best to remove the adhesive whereever you see it, cleaning everything up and preparing for the new adhesive. That darn adhesive in step 9 below, though… ugh. Work slow, don’t expect it to all be apart by this point.

    Matt Falcon -

  6. OUwTeCooQHDNA6MQ
    OUwTeCooQHDNA6MQ
    ghDuGeSVbUf6IMwK
    CIW2pJZhSLvnyHMg
    • Svita dall'altoparlante le due viti Torx T4 da 3 mm.

    There are actually 3 screws in the speaker

    Richard Moffat -

    There are indeed 3 screws in mine as well. I updated this step.

    Matt Falcon -

    There are three screws, one additional is in the lower right corner (orientation like seen in picture)

    mesotes -

    My Z2 Force has 3 T3 sized screws. So be aware that there is often some variance in cell phone construction.

    Krash -

  7. BrRQMQvCFKSiJiyA
    BrRQMQvCFKSiJiyA
    n5Li3fWBjBcZybK1
    6LRIbrAVpDFSCNAV
    • Usa lo spudger in nylon per sollevare e rimuovere l'altoparlante dalla scocca del telefono.

    It’s not mentioned in the guide but you need to make sure to gently pry the ambient light sensor off of the speaker before removing the speaker or you will likely end up ripping its cable and connector from the motherboard.

    If this happens the phone will still boot and work but the screen will be stuck at full brightness and won’t shut off automatically when making phone calls.

    Frederick Hallock -

    Mr Hallock is definitely correct! Definitely something that should have at least noted, if not given a full description of how to do that! Be careful!!

    Krash -

Conclusione

per rimontare il tuo dispositivo, segui queste istruzioni in ordine inverso.

Davis Reschenberg

Membro da: 24/01/18

321 Reputazione

2 commenti

step 6 —- 3 T4 screws (not two)

Oleksandr Panchenko -

Where to buy replacement speaker?

danwat1234 -