Introduzione

Il produttore indica che l'utente non può eseguire sostituzioni su questo orologio. Tuttavia, questa guida fornisce istruzioni facili da seguire per la sostituzione della batteria del Garmin Forerunner 10. Non sono necessarie competenze precedenti per questa sostituzione moderatamente semplice.

  1. N2crFW1PTHeXsnHE
    N2crFW1PTHeXsnHE
    ICTG3im2vY4JKdHU
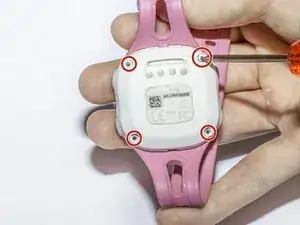
    • Usa il cacciavite Torx 5 per rimuovere tutte e quattro le viti da 1,1 mm sul retro dell'orologio.

  2. JAbT6OYqGqSAWD1D
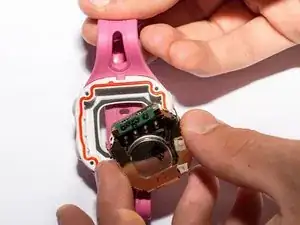
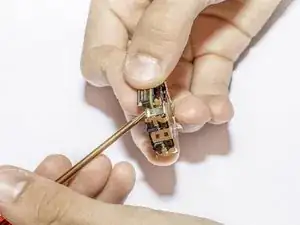
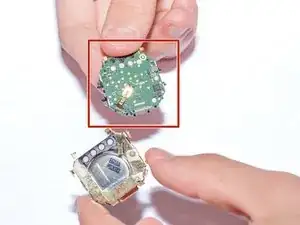
    • Metti l'orologio in posizione rovesciata e solleva dall'orologio il pannello posteriore.

    • Rimuovi l'alloggiamento della batteria dall'orologio.

    • Posiziona l'alloggiamento a faccia in su per evitare che cadano le due molle.

    • Alcuni hanno notato che alcune funzioni dell'orologio si perdono se le molle vengono scambiate. Assicurati che le molle restino ciascuna al suo posto.

  3. ifCXLXCM42EXDtDA
    • Fissa le due molle con due piccoli pezzi di nastro adesivo per evitare che possano cadere.

  4. hiNwOBwaAPWKRUbF
    hiNwOBwaAPWKRUbF
    MILMoJYMPyBGHqfX
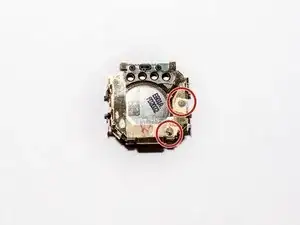
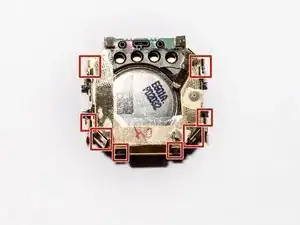
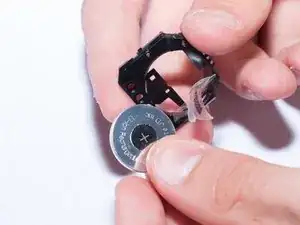
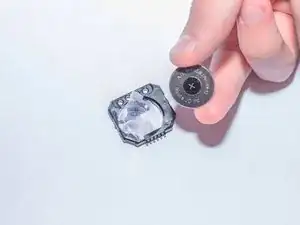
    • Rimuovi gli 8 fermi metallici dall'alloggiamento nero della batteria.

    • Piega con delicatezza gli 8 fermi in metallo per allontanarli lievemente dall'alloggiamento nero della batteria.

  5. vR4uASwgexRkkpPd
    • NON toccare direttamente il circuito stampato sulla scheda madre dell'orologio per non rendere inutilizzabile il tuo orologio.

    • Affera la scheda madre dai lati e mettila da parte in un luogo sicuro.

  6. jexVZc2VsLIWQqOQ
    jexVZc2VsLIWQqOQ
    jjP6DAhFwNqaPqdN
    • Separa il nastro trasparente attaccato alla batteria.

    • Trattalo bene! Riutilizzerai questo nastro per la nuova batteria.

  7. LVohkiLuLJCdreOP
    LVohkiLuLJCdreOP
    kwhOgeIiDAglmPlE
    • Prepara la tua nuova batteria.

    • Fissa la batteria sotto il nastro adesivo.

    • Il segno + deve essere dalla parte opposta dal nastro.

Conclusione

Per riassemblare l'orologio, segui queste istruzioni in ordine inverso. Al termine, carica l'orologio e verificane tutte le funzionalità.

Alana Joldersma

Membro da: 28/04/17

465 Reputazione

10 commenti

This was probably beyond my skill level, but I tried this and it seemed straightforward, but after re-assembly, when I hooked it up to the charge cable, the watch doesn't seem to be charging and won't turn on.

ericcox1 -

Did you get it work?

Ruslan -

great guide! thanks so much for sharing!

Lindso -

Thanks you for sharing. Easy enough to follow. A bit fiddly but took my time and made sure I had a small box to keep the bits in while I waited for the new battery to arrive. One of the springs did pop out (Step 2) but I didn’t lose it!! Reassembled and the watch turns on so all looking good! I think my old battery leaked so I am hoping no internal damage was done and the watch can recharge the new battery.

Jon Titchmarsh -

Also works on the Garmin Forerunner 15

Extra hints:

Step 2 - The red seal can come out with the back - carefully place it back into its slot in the body of the watch before reassembly. It only goes in one way. Not sure about turning it over to be ‘face up’ as the springs will fall out. Move onto step 3 and tape them, etc.

Step 3 - you can tape the springs, but when the motherboard is removed, they can fall out the back. Consider carefully removing them first and setting aside in the matching pattern for easy replacement

Steps 4-6 - all good, but don’t bend those metal clips too much…

Step 7 - consider taking the tape off the front of the battery (+ side) as well and moving to the new one

Step 8 - reassembly of motherboard - carefully compress each corner and feel as each clip ‘clicks’ back into place

Step 9 - place back in housing, making sure it sits level

Step 10 - replace back of watch - a few careful jiggles may be required as there are 6 different springs to get touching at the right places.

John Magnussen -

Regarding symptoms where the buttons don't work after putting it back together:

The rectangle cutout in the battery tape seems to be important to have in the exact same orientation so that the contacts from the cover can connect with the battery. I solved this by removing most of the tape.

I got in trouble by removing the tape to get the old battery out, thereby losing the correct placement.

Larry

Larry -

Worked beautifully - thanks for this guide. If ericcox1 still checks this, I had the same issue after replacing the battery - cleaning the charge nodes on the watch and charger cable with a Q-Tip and rubbing alcohol fixed it. Fired up as good as new.

gjmarshaz -

Hi my name is Ernesto Garcia. I have foruner25 the battery just die, I want to know if is any Garmin shop near the area to replace the battery, or how do I get this fix. Thanks so much I live in Los Angeles zip code 90019. reach me @ ernestogarcia007@gmail.com [310]593-1258

ernestogarcia007 -

Surprisingly (given my limited skill set) I was able to follow this guide and get my Forerunner 10 back to life! Couple of notes: Those two springs are tricky - I ended up just setting them aside until reassembly. Also be careful with the clips and don't bend them too much. Other than that, straight forward!

Roy Dube -

Awesome! Worked like a charm. When I went to Amazon to order the Torx screwdriver, I ended up buying a little Teckman repair kit for $9.99 that also contained some very fine tweezers and some small pry tools that came in handy on this job. Thanks for posting these directions!

BK Hogstrom -