Introduzione

Usa questa guida per sostituire la batteria dello smartphone Huawei P10 Lite.

  1. YqiUymRKMTYinZcE
    YqiUymRKMTYinZcE
    1x5qv4HPtVGSmvpD
    byJlAME6WaXCgGa2
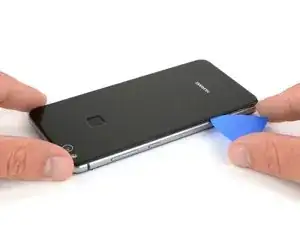
    • Inserisci la punta di un plettro di apertura tra la cover posteriore e il telaio centrale e fallo scorrere attorno al telefono per tagliare l'adesivo.

    • Può facilitare le cose usare una ventosa per sollevare la cover posteriore e creare una fessura iniziale dove inserire il plettro di apertura.

    • Se l'adesivo risulta troppo difficile da tagliare, usa un iOpener per ammorbidirlo.

    Mit dem Saugnapf die Rückseite anheben hilft ungemein…

    Matthias Eberle -

    Had to use blue wedge tool to wedge open bottom plate from the rim part in order to then use the tip of the blue opening pick under the back plate to then cut the glue. It’s like placing a pie server or knife under the plate once there’s a gap between the rim and the back plate.

    Jane -

    Be careful, there’s a cable to fingerprint sensor, very close to the edge (see pictures below)… It’s very easy to cut it through with the pick, as I just learned :)

    dambig -

  2. F5lCy2LZ2xfWDDqg
    F5lCy2LZ2xfWDDqg
    Na6gp15IRbPSW3Ll
    2xyqfXZApukGpaZe
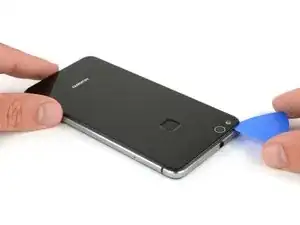
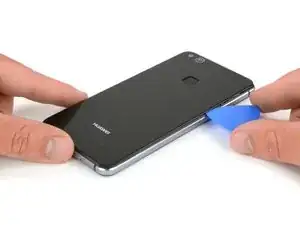
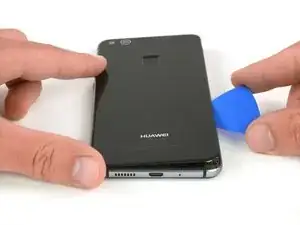
    • Dopo aver tagliato l'adesivo lungo tutti i bordi, fai ruotare il tuo plettro per separare la cover posteriore dal telefono.

    • Apri la cover posteriore a libro usando il lato destro del telefono come cerniera.

  3. oPLqQqGCxyiCQ6oZ
    oPLqQqGCxyiCQ6oZ
    gZgRjiB2CuBip3Xu
    • Svita le due viti Phillips #00.

    • Svita le quattro viti Phillips #000.

    Schritt 3 und 4 kann man sich komplett sparen. Wozu auch. Kann gleich mit Schritt 5 weitergemacht werden, zuvor einfach das Flachbandkabel vom Fingerabdrucksensor an der Rückabdeckung abklemmen und fertig.

    Bobby mcgee -

    There are four silver screws and two black to be removed.

    Jane -

    Translate what Bobby mcgee said:

    Step 3 and 4 can be completely ignored. What for? You can continue with step 5, just disconnect the ribbon cable from the fingerprint sensor on the back cover and you're done.

    Antonio Sun -

    However, the reason step 3 and 4 should not be skipped is Step 6 — Use an iOpener to loosen the adhesive beneath the battery. I.e., the adhesive cannot be easily removed without heat, however, that heat might damage the electric chips. Thus they’d better be removed first.

    Antonio Sun -

  4. jMQb6f2oPStGtZUm
    jMQb6f2oPStGtZUm
    QdMRkHKjOFsRwEGW
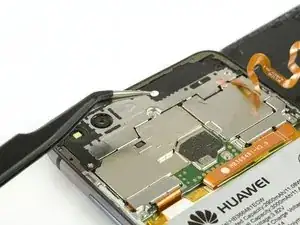
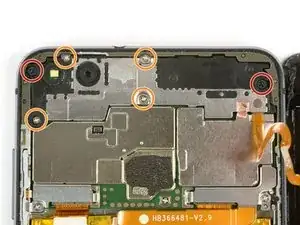
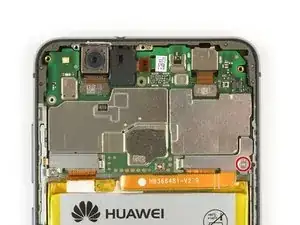
    • Usa delle pinzette per rimuovere la schermatura della scheda principale.

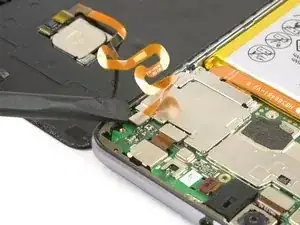
    • Usa l'estremità piatta di uno spudger per disconnettere il cavo flessibile del sensore impronte digitali.

    • In fase di riassemblaggio, applica dell'adesivo dove è necessario.

    Welchen Klebstoff soll man verwenden?

    josef navratil -

    Hallo Josef,

    sollte bei deinem Ersatzteil kein Klebstoff oder Klebeband dabei gewesen sein, kannst du dünne Streifen Doppelseitiges Klebeband verwenden. Es gibt für das Huawei P10 Lite auch schon zugeschnittene Klebestreifen zu erwerben, hierbei gilt aber je nach Händler Rezessionen zu lesen, ob die Klebestreifen auch wirklich halten.

    Dominik Schnabelrauch -

    Note that there is a copper-colored sticker to lift up near the flat cable connected from the phone the finger pad. Lift the main board plate (shield) up SLOWLY from the camera side to the other end as the plate is wedged in place.

    Jane -

    what adhesive is recommended? thanks

    darren -

    Hi darren,
    pre-cut adhesive would be the best solution if you can source it. Otherwise a two-sided adhesive tape or carefully used E6000 adhesive glue will be your friend.

    Tobias Isakeit -

  5. nTMw5AX5g1nyqUwM
    nTMw5AX5g1nyqUwM
    mAFuE2UeYPHsL42O
    qSBmSxYoBbbj6NBB
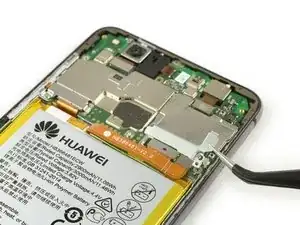
    • Rimuovi la vite a croce che tiene in posizione la piastra del connettore della batteria.

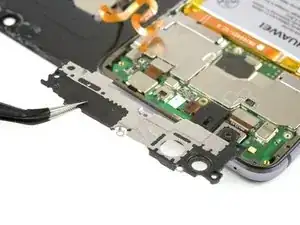
    • Rimuovi la piastra del connettore della batteria.

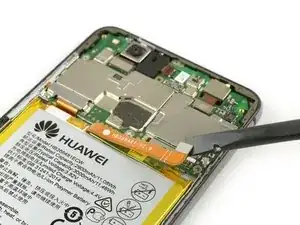
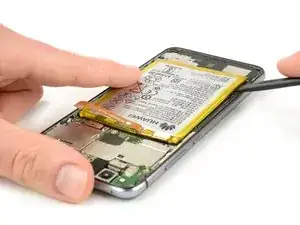
    • Usa l'estremità piatta di uno spudger per disconnettere il cavo flessibile della batteria.

    Very gently lift the silver connecter that was under the battery connecter plate and is at the end of the orange battery cable with the flat end of the spudger as indicated.

    Jane -

  6. bwFPUDOpYuVxVRnO
    bwFPUDOpYuVxVRnO
    UgttMVO2sVfbDZnE
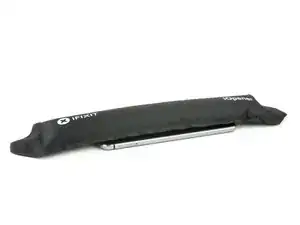
    • Usa un iOpener per ammorbidire l'adesivo sotto la batteria.

    • Inserisci uno spudger tra la batteria e il telaio centrale per creare una fessura.

    • Stai attento a non forare o piegare la batteria.

    • Inserisci un plettro di apertura oppure usa lo spudger nella fessura per tagliare l'adesivo sotto la batteria.

    • Ci sono dei cavi flessibili che passano sotto la batteria. Stai attento a non danneggiarli con i tuoi attrezzi.

    Ohne eine Erwärmung des Klebers ist die Entfernung des Akkus wirklich sehr hakelig und zeitintensiv!

    Marcel Tischer -

    You must heat the battery two or more times with the iOpener in order to remove it because if you don’t (and even if you do) the battery will certainly bend. So the battery removal has to be done delicately. Lift each corner a very tad bit and the sides to finally lift out as shown.

    Jane -

    This step takes at least 15-20 minutes.

    Jane -

    Battery easily torn. The kit should include a battery as it’s VERY delicate and would be saved if you have the replacement battery.

    Jane -

    Ich habe es mit Zahnseide recht gut hinbekommen! Habe die Seide oben angelegt um gut unter den Akku zu kommen und habe mit Wärme und hin- und herbewegen der Seide den Akku ohne verbiegen gelöst bekommen. Hat auch ein paar Minuten gedauert, aber hat sich gelohnt!

    Sash -

    Is it possible to soften the adhesive using isopropyl alcohol?

    Michele Matteoni -

    Hi Michele,

    yes, the use of isopropyl alcohol is a common technique when removing a battery in a smartphone. Especially when the adhesive is very strong. Try to apply the alcohol to every corner of the battery and let it penetrate the adhesive for several minutes. Start the prying procedure with the spudger afterwards. In case the adhesive isn’t loose enough you can reapply isopropyl alcohol any time during the removal. Keep in mind, that there’s a gap in the midframe for the display flex cable. It can happen that the isopropyl alcohol runs trough that gap and loosens the adhesive of the display as well. When the display adhesive gets loose you’ll need replacement adhesive for the display. To avoid that, apply as less alcohol as possible at a time and take especially care during prying to avoid damage to the flex cables underneath the battery. The adhesive of the cables will get loose as well.

    Dominik Schnabelrauch -

    The battery was very hard to remove. Please note: it is glued everywhere around the ribbon cables at the bottom. The battery is not glued with little strips like the back cover. The spudger and the blue cutting triangles were not very strong and the plastic tip bent upon removal of the battery. I eventually got the battery out with a metallic spatula. Be careful not to rip the shining lining of the battery while cutting the adhesive. I don’t know how people get the battery out without bending it, also every YT video I watched had - slightly - bent batteries. The glue is so strong snd sticky I did not need to apply new adhesive strips.

    anya__savina -

    If you are operating on aged ones:

    The Old double sided tape doesn’t really much care about the heat from the iOpener.

    Use a metal spudger (round edges) instead but use it with care. Slowly and evenly lift the battery and go around it in a circle. Stay close to the edges to not damage cables under the battery (seen in step 7). Start pushing closer towards the middle only when you can see the cables yet and are sure not to damage them.

    If this still doesn’t bring you closer to lifting the battery safely:

    Two Options:

    1. Try to use some small drops of adhesive remover . Best to use not to much is use Q-Tips or Cotton Swabs to evenly apply the remover through a little crack under the battery.

    2. Use unwaxed dental floss push it under the battery. Then gently move it upwards with a pulling-side-to-side motion. To accelerate the process you can also use ***adhesive remover***. The dental floss will soak it up (only works with unwaxed dental floss) and assure that it will only be where it’s needed.

    Doron Karaman -

  7. BbUx2kRY4kggXabN
    BbUx2kRY4kggXabN
    sUWjuiRLphyEnniS
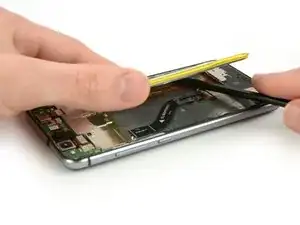
    • Usa uno spudger per tagliare il resto dell'adesivo e staccare la batteria dal telefono.

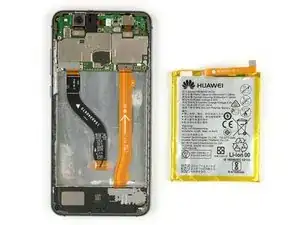
    • Rimuovi la batteria.

    • Quando rimonti il telefono, sostituisci il vecchio adesivo con nastro biadesivo o strisce adesive pretagliate.

    • Non rimettere mai al suo posto una batteria che sia stata piegata o danneggiata in fase di rimozione.

    Merci pour ce tuto absolument parfait.

    IKO -

Conclusione

Per rimontare il tuo dispositivo, segui queste istruzioni in ordine inverso. Quando rimonti il tuo telefono, applica del nuovo adesivo dove è necessario.

Dominik Schnabelrauch

Membro da: 23/11/16

200687 Reputazione

12 commenti

Réussi en 50min.

J’ai passé 17min juste sur l’étape 1 pour comprendre où était la limite entre la coque et le chassis et comment passer un outil.

Pour les étapes 1, 2, 6 et 7, je n’ai pas réussi avec mes médiators et mes spudgers, trop flexibles (ils étaient vendu en kit avec ma batterie, rien à voir avec ceux vendus par ifixit). Je m’en suis sorti avec un tout petit tournevis plat de précision mais ce n’est pas l’idéal.

L’étape 6 est particulièrement difficile. J’ai chauffé la batterie avec un décapeur thermique réglé sur 120°C pour ramollir la colle mais c’était encore très adhérent. J’ai fait très attention mais j’ai eu quelques ratés et j’ai percé l’enveloppe de la batterie (je pense qu’il y a moins de risque en utilisant un spudger très rigide plutôt qu’un petit tournevis). Une odeur très forte en est sortie, attention à ne pas la respirer.

Comete338 -

fait en un peu plus d’1h.

Une bonne demi heure rien que pour décoller la batterie, je ne souhaiter pas l’endommager ni le téléphone donc j’ai pris mon temps.

je trouve le iOpener trop petit, du coup je m’en suis inspiré pour m’en faire un plus grand, avec de l’eau et des sac congélation 3 épaisseurs pour éviter toute fuite et condensation non souhaiter.

Thibaud -

Bonjour, pourquoi déconnecter le capteur d’empreinte cela ne semble pas obligatoire pour accéder à la batterie ?

g.mouakkeh -

Je pense que c’est principalement pour une question de pratique, comme la batterie est vraiment très énervante à retirer (dû à la colle) la plaque arrière du téléphone nous gêne inutilement lors de la manipulation, comme ça coûte pas grand chose de la retirer autant le faire :’)

Lucas -

Guia de molta utilitat. Vaig fer servir un assecador de cabell per a estovar l’adhesiu i va funcionar molt bé. No vaig utilitzar iopener.

En desenganxar la bateria però, vaig malmetre el cable flex de la pantalla. La propera vegada hauré d’anar amb més compte.

Eduard roigé -

Un consiglio, prima di chiudere la cover posteriore fate attenzione che non ci sia dello sporco sulla lente della Fotocamera.

s.ledri -

45 mns nécessaires pour mener à bien cette opération. Enlever l’ancienne batterie était le plus compliqué… Ca tient bien!

Gérard CALLEWAERT -

First: Heat the back of the smartphone. Than: Start at the bottom with the “iFixit Opening Tool”. Getting the Picks in between is way harder. Be very careful with the Fingerprint-Cable and the cables behind the battery.

Marcel Klehr -

My phone works like a charm now! The battery is very hard to get out though.

anya__savina -

Translate what Thibaud had said:

done in just over an hour.

A good half hour just to take the battery off, I don't want to damage it or the phone so I took my time.

I find the iOpener too small, so I was inspired to make a bigger one, with water and 3-layer freezer bags to avoid any unwanted leaks and condensation.

Good tip, thanks Thibaud.

Antonio Sun -

Muy útil! He conseguido hacerlo sin ningún problema, aunque estuve más tiempo del que se indica jajaj Gracias!

Francisco Lastres -

Many thanks for this great tutorial!!
1. Is there a battery with greater capacity that i can use?
2. Whats the difference between the Rated and Typical capacity thats indicated on the batteries sticker?

genik -