Introduzione

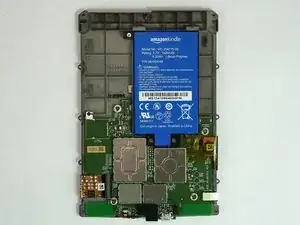
Il Kindle Paperwhite di Amazon di 3a generazione (Kindle di 7a generazione) ha una batteria ai polimeri di litio da 3,7 V (modello MC-354775-05). Questa guida richiede che il Kindle sia spento, uno strumento di apertura in plastica e un cacciavite a croce Phillips #000.

  1. mgFAVxtMlxIQ4UXM
    mgFAVxtMlxIQ4UXM
    ruqm6aaQeXEtg61H
    ZtSyLsMBHoJtCOq5
    • Assicurati che il dispositivo sia spento prima di iniziare.

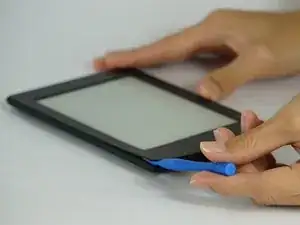
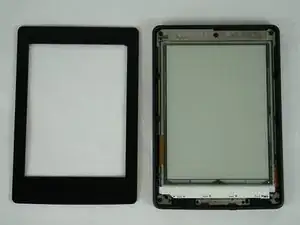
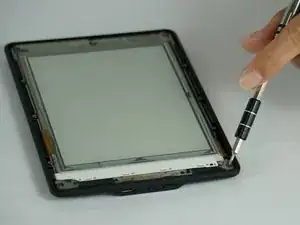
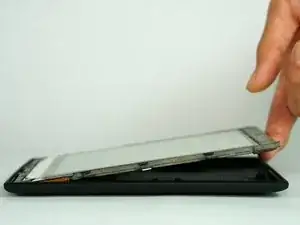
    • Fai leva delicatamente sullo schermo con lo strumento di apertura in plastica. Inizia agli angoli e fallo scorrere sotto i bordi finché non torni al punto iniziale.

    • Stai attento se stai usando uno spudger in metallo, in quanto potresti graffiare la superficie del Kindle.

    Be very careful along the lower left side, where the cable to the touchscreen can be easily cut with a plastic spudger.

    John Kenny -

    Be careful at the top of the 3G version. The wifi and cell antennas are located along here.

    James Sullivan -

    I can’t get my spudger in to start lifting. Any advice?

    Davey -

    it takes a bit of force to first insert the spudger into the crack

    jookieapc -

    Be careful inserting the spudger too quickly. The glue holding the screen pulled loose in two spots along the side before the bezel did and there are lines along the border of my screen now.

    Nick -

    I made my own version of Nick’s error: I inserted a pick too far under the bezel, and very slightly separated the screen, leaving a small shadow in a corner. Easy does it!

    Other than that, battery replacement was super-easy and successful.

    Brad Compton -

    I couldn't get a purchase from the outside, so started from the inside of the bezel. It was secured with double sided tape. Might have been better to apply some heat before prying.

    David Glover -

  2. MbWZKSBHjy5mrCMG
    MbWZKSBHjy5mrCMG
    ST1NGusypgqBckxL
    • Svita le undici viti a croce Phillips #000 da 3,2 mm attorno alla cornice.

    I have a 3rd Gen Paperwhite and there are only 10 screws. 5 along each side

    jookieapc -

    Mine had 11, as per the instructions, one of which was hidden under tape. I cut an opening in it.

    David Glover -

  3. tXbdeuCkakiQOUZC
    • Solleva delicatamente il telaio intermedio dalla copertura con le mani.

    I had trouble removing it. It was stuck and I managed only to free it with force. Now I have to fix the button..

    LGenie -

  4. qp3NYCcJFisoelfD
    qp3NYCcJFisoelfD
    STsGkWp46qJkgbPj
    • Svita le tre viti a croce Phillips #000 da 3,0 mm che tengono ferma la batteria.

  5. WdpZapnw22YZYyQl
    • Solleva delicatamente la batteria dalla cornice.

    We had a Kindle that unfortunately took a dunk in (clean) water. It was then inoperative. I followed this guide, and took the battery out, let everything dry for a few days, then replaced the battery. Now it works fine! Thanks!

    Frank Demarest -

Conclusione

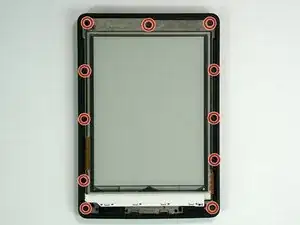
Per rimontare il tuo dispositivo, segui le istruzioni in ordine inverso.

Micah Smart

Membro da: 10/02/16

3108 Reputazione

19 commenti

Same for 5th Generation ??

PAUL FRIEND -

where can i buy a new battery ?

david horn -

you need a taobao.

lol

kassadin -

They are sold on aliexpress and ebay but the price of battery and postage is not that different from the price of a second hand 3ed Gen Kindle. But then the second hand Kindle will probably need a new battery too so, I am going to get a battery from ebay.

Timothy Takemoto -

where can I buy a replacement battery?

boelens -

If the charging light does not turn on (at all, no colour) - does it make sense for me to try a new battery?

Artūrs Lataks -

Yes unless you want to buy a new Kindle. Batteries (MC-354775-05) run under 20 from various sites.

DDD -

I used this guide to replace the battery in my Kindle which I bought in 2016 - the battery was down to only holding charge for a few hours. My kindle usage is heavy though - especially while sitting out 12 weeks of redundancy with nothing to do - it was a real sanity saver.

I bought the replacement marked as 58-000049 compatible - which it was

Thank you

jacqui_scarff -

How can I tell which generation my Kindle Paperwhite is?

pbr -

when removing the frame, the edges of the display have unfortunately lifted off a bit, respectively there are now some slight scratches at the corners of the display, as if the foil was off there.

Is there anything I can do about it? Thanks in advance

bastimm -

Thank you for this! Just did it myself. The only thing I would add to this guide is that you may need to replace the adhesive for the bezel — the corner that I initially peeled off had some trouble staying down after I replaced it.

Matthew Fox -

Worked almost fine for me! Found replacement battery on ebay with original model number.

The only point I somehow struggled with is the fact that there is no option to shut down the paperwhite. The only options my device provide are reboot and display off (and cancel of course). However, I selected reboot, lowered 2 screws from the battery and before booting up again I removed the last screw and replaced the battery.

Groej Htro -

This worked fine for me battery is great only problem is that the backlight (actually front light at bottom of display) no longer work!1

David Binder -

That worked well. Thank you.

judithmatz -

Go easier on the spudger than I did. Go in too far, and you can separate the screen, causing a permanent issue. Any tape from under the bezel that tears needs to be replaced as best you can as its absence will cause light to show through the bezel in that spot when you reassemble anything.

shf781 -

Available for Kindle 8th generation.

cssuntherrao -

Thank you, that middle screw at the very top was hidden behind the adhesive on mine so I would have missed it if it wasn't for the guide. Also wanted to mention that there is a couple of clips holding the mid frame so I had to gently pry it away with my plastic opening tool. Other than that, no issues!

Chris Horry -

Hi when I attempted to remove the bezel, it looks like the top layer of the screen came with it there are weird wavy lines on the screen. It appears the top layer of the screen separated and now won't meld properly with the underlayer. has anyone had this problem and can it be fixed without replacing the screen?

Lauren Carroll -