Introduzione

Con questa guida, sostituire la batteria del tuo Lenovo Yoga C930-13IKB è rapido e semplice. Le batterie generalmente si deteriorano nel tempo o mostrano dei problemi nel loro ciclo vitale. Questo può risultare in una scarsa durata della batteria e nella difficoltà nel mantenere la carica. Leggi questa guida ai problemi di base per maggiori informazioni su quale potrebbe essere il problema della tua batteria.

Questa guida è richiesta per quando la tua batteria deve essere sostituita per via della scarsa durata o dell'impossibilità di caricarla. Dovrai prima rimuovere la copertura posteriore per accedere alla batteria, quindi rimuovere tutti i ganci e le connessioni che la tengono ferma. Gli strumenti richiesti sono un cacciavite Torx T5, un cacciavite a croce Phillips #00, ed uno strumento di apertura in plastica.

Per la tua sicurezza, scarica la batteria al di sotto del 25% prima di smontare il tuo telefono. Questo riduce il rischio di pericolosi eventi termici se la batteria viene danneggiata accidentalmente durante la riparazione.

Se la tua batteria è gonfia, prendi le precauzioni appropriate.

  1. PGwdSeNHuIIRRAXY
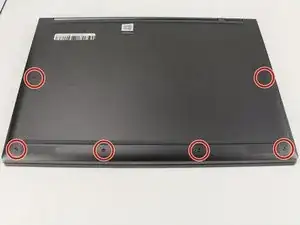
    • Gira il dispositivo a faccia in giù in modo che la faccia inferiore sia rivolta verso l'alto.

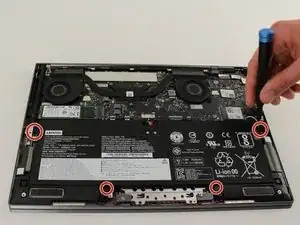
    • Svita le sei viti Torx T5 da 3,5 mm.

  2. FiWHDiuuINDJFtQr
    FiWHDiuuINDJFtQr
    t5ZLbWjWV6hmBpOI
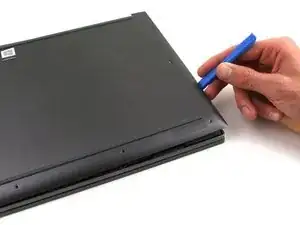
    • Fai leva sulla copertura posteriore usando lo strumento di apertura in plastica.

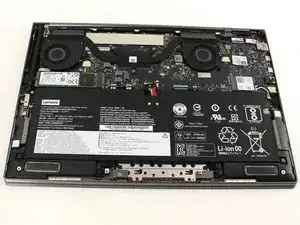
    • Sgancia la copertura posteriore in diversi punti usando lo strumento di apertura, quindi rimuovila.

    • Potresti dover far scorrere lo strumento in plastica lungo i bordi finché non trovi una piccola fessura per separare la copertura posteriore dal portatile.

    • Non usare uno strumento in metallo mentre lavori sul tuo dispositivo.

    The gap is so small that I wasn’t able to insert anything to pry the cover up. The suction cup tool lifted the cover off easily.

    Thomas Capobianco -

    There is a very convenient spot to begin the prying process. Up by the hinge, where the metal back turns in perpendicular to the edge to get around the hinge mechanism, there is a gap between the cover and the rest of the laptop where it can be pried up easily. From there it is easy to run a tool and widen the gap all the way around.

    Alex Yantis -

    I tried Thomas's suggestion first, and it worked like a charm: the suction cup took it right off.
    Instead of pushing the cup against the laptop I "pulled it flat" and placed it against the back, so it'd just suck onto it. (Didn't want to deform the laptop cover)

    Panopticon -

  3. DeoIJJRpX2hNONcY
    DeoIJJRpX2hNONcY
    k1uvqt3b2ScVvJ5s
    • Solleva attentamente la copertura con le mani.

  4. 2FISN3TQKpsRcePJ
    2FISN3TQKpsRcePJ
    bh26yNV5wwwpRZOk
    642aakhV2bHDgExw
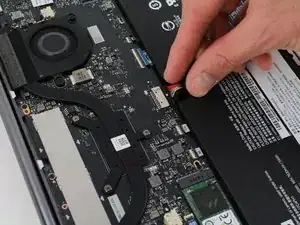
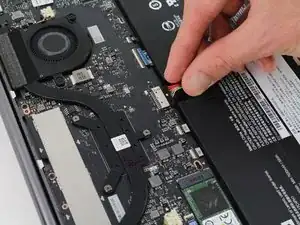
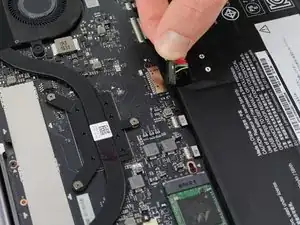
    • Scollega la batteria dalla scheda madre schiacciando i cavi con le dita e sfilandoli con forza.

    • Usa lo spudger per aiutarti.

    Pull cables toward yourself.

    Delphine Jacquet -

    I was not able to grasp the wires with the battery mounted. Once I removed the battery from the case, the connector was easy to remove

    Thomas Capobianco -

    I suggest waiting until you have unscrewed and un-stuck the battery from the laptop before removing the cable. It makes it much easier to get a hold of the wiring harness/plug so as to pull it out.

    ALSO, if you're reading this, HIGHLY RECOMMENDED that you stop now and read all of the comments below, including the ones at the very end, after the CONCLUSION section. There's stuff that's not covered in the main steps.

    Panopticon -

  5. QCvoFCpoH5HXqOPU
    • Svita le quattro viti da 3 mm con un cacciavite a croce Phillips.

    I used a PH000 for this

    Matt Orienter -

  6. bNLnHfbRxsCJbsCk
    bNLnHfbRxsCJbsCk
    WJNbDD4VLA3Qt5qW
    • La batteria è ancora tenuta ferma con due strisce adesive estensibili, simili a quelle che si trovano negli iPhone.

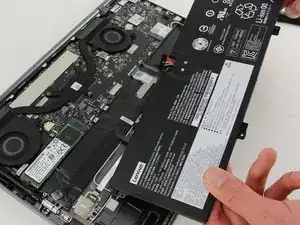
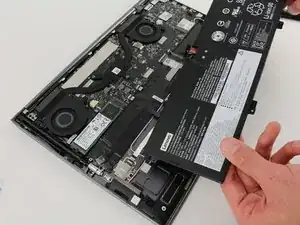
    • Usa le dita per sollevare l'aletta in plastica trasparente di una delle strisce adesive estensibili.

    • Prendi l'aletta e tirala lentamente lontano dalla batteria ad un angolo minimo. La striscia adesiva si allungherà a molte volte la sua lunghezza e verrà rilasciata lentamente da sotto la batteria.

    • Ripeti la procedura per la seconda striscia sul lato opposto della batteria.

    • Stai attento a non piegare la batteria: è pericoloso.

    • Rimuovi la batteria con le mani.

    There are two clear plastic tabs wrapped around the sides of the battery that connect to the glue strips between the battery and the backlight cover. All you have to do is peel the clear strips from the battery and pull them away. The glue under the battery pulls out like a Command Strip. No need to wreck your backlit cover and possibly the cabling underneath with tools.

    Brian Storm -

    Oh man I really wish I would have expanded the comments before continuing; something that took me an hour of painstaking prying could have been taken care of in 30 seconds. USE THE PULL TABS TO REMOVE THE ADHESIVE STRIPS!

    Ben Borgert -

    Hi Brian,

    Thanks for the tips! I’ll amend the guide to include this info.

    Arthur Shi -

    I still don’t understand Step 6. Also does the new battery stick to the existing adhesive strip?

    Allen Michael Cohen -

    @BenBorgert - agree 100%!! I would also add that I had to give the cover a nudge towards the hinge (something seemed to click into place) to get the screw holes lined up

    Thomas Capobianco -

    Did you replacement battery come with replacement adhesive strips? Mine didn't.

    If you want to re-use the existing strips, you'll want to remove them carefully. As noted in the instructions, pull those clear tabs slowly and at a shallow angle. If possible, use one hand to pull and the other to hold the lengthening strip as it emerges. The goal here is to NOT LET THE STRIP SNAP OUT when it breaks free. If it does, it might snap together in a sticky, un-reusable mess.

    So, take it slow, gather the excess as it emerges, and then you can stick the strips onto your new battery.

    Put them in the same spot on the new one as they were on the old one (just below the top screw-bracket). And when you put the new battery in place, try not to let it stick hard to the laptop. You will need some wiggle to line up the screw holes. More on that below.

    Panopticon -

    FYI, there are two very tiny metal posts in the laptop, immediately below the upper left and right screw holes. These are meant to align with some holes on the screw-brackets on the battery. So there are 3x things that hold the battery in place:

    1) the screws

    2) the "command strips"

    3) the 2x tiny metal posts

    When you put the battery in, you'll need to get both of those little posts to thread through the corresponding holes on the screw-brackets on the battery. For me, it was a matter of connecting the battery cable, gently placing the battery into the laptop, being careful NOT to press it into the sticky strip. (I pressed it in the first time and needed to take it out again, because I could not line up the 2xposts or the 4x screw holes. ) So put it in there and hover it above the screw-holes, taking care to line them up as best you can. Line up the 2x posts as well, and thread them through the little holes. Once these are threaded, check to be sure that your screw-holes are lined up and screw it in.

    Panopticon -

    Great instructions. Just replaced battery on my Yoga C930 without any issues although it took a little longer than expected. Thanks for the step by step guide!

    Tim J. -

Conclusione

Per rimontare il tuo dispositivo, segui le istruzioni in ordine inverso.

Porta i tuoi rifiuti elettronici a un riciclatore certificato R2 o e-Stewards.

La riparazione non è andata come previsto? Prova delle soluzioni di base ai problemi, oppure rivolgiti alla nostra comunità Risposte per trovare aiuto.

Hanna Lazkani

Membro da: 23/01/20

788 Reputazione

13 commenti

One little addition: After removing the bottom cover of the computer, there are two little clear plastic tapes, one on each side of the battery, that you should peel free before starting to lift the battery out. One of those tapes is shown in this photo, just to the right of the icon that resembles a figure eight: https://d3nevzfk7ii3be.cloudfront.net/ig... Those clear tapes are attached to the black plastic strips beneath the battery, that you want to try to leave in place. If you don’t peel back the clear tape tabs, they will increase the likelihood of pulling up those black plastic strips when you start to lift the battery up. My original battery was adhered quite strongly to those plastic strips, and it took a fair bit of work to “dissect” them from the battery using a straight plastic tool that had an end like a regular screwdriver. I did peel those strips up off the computer a bit, but they stuck back down after I separated them from the battery. Thanks for the instructions!

Brent Johnson -

After I had finished putting my C930 back together, I noticed that the underside of the original battery had four soft black strips adhered to it, perhaps as a cushion between the battery and the components beneath. It is possible to remove those, and they could be re-applied to the new battery before installing it, but I’m not going to bother going back now to do that.

Brent Johnson -

Those 2 clear strips work like Command adhesives, peal back, then pull - it stretches and detaches from the battery and the laptop. Then the battery just lifts out with ease… They are not really needed for re-installation. Probably more for protection during shipping or hard hits.

Chris B -

Adding to Brent’s comments. Pulling on those clear tape tabs will completely remove the tape holding the battery down making it very easy to remove the battery. My replacement battery came with 2 new tape strips, so check yours before worrying about trying to save the originals.

Leo L -

I was able to remove the 4 black, “spongy” strips from the original battery and place them on the new battery. This created a “landing” area for the adhesive strips that remained working the computer housing. All instructions were good and quite thorough. Thank you!

Chris Bearss -

Thanks for the simple and straightforward guide!

Luis Orlando Dasta -

Did you guys experience the situation that the new battery can’t be detected? I don’t know how to solve this issue

Tommy -

So, replacement went great. Battery appears to work, but the Battery indicator (on screen) doesn’t recognize the battery I guess. It doesn’t show the battery level or that its charging when plugged in. So somehow I need to get the laptop to be able to read the battery and be updating the battery level indicator. ANY HELP or experience with this?

Craig Hood -

I replaced the battery with ease. I charged it up fully and waited a couple of hours as suggested. Then, I unplugged the power adapter and let the machine run down until it went into low battery mode and turned off. I then plugged the machine back up to power adapter and let it charge fully. What I notice now is that many times the power button will be flashing so I do my typical move the mouse around or press ESC on tke keyboard to wake it up. I can use the laptop for a few minutes until the machine blacks out (like go to sleep) and the power button starts flashing again. If I do unplug the power adapter from the computer, this never happens. I am wondering if there is some sort of incompatibility with this particular battery I was sent that is having any issue with my stock charger.

Jeremy Monroe -

Same issue as Mr. Craig Hood described.

Any solutions?

AviB

Avi Bereshit -

Worked great. Thanks !

Marc Ballandras -

Works well after 3 months. Then laptop shutdown right randomly and no longer recognized battery when plug in cable and turn back on. Similar symptoms as described by Graig Hood.

I tried updating bios, power cycles, and uninstalled/install battery driver none of these work. Plugging in the old battery works for now.

Any solution?

Binh Hoang -