Introduzione

Questa guida ti mostrerà come sostituire una batteria esausta nel MSI GT72 2QE Dominator Pro. Questa è una procedura di difficoltà media che dura 15-20 minuti.

Per la tua sicurezza, scarica la batteria al di sotto del 25% prima di smontare il tuo dispositivo. Questo riduce il rischio di un pericoloso evento termico nel caso in cui la batteria venisse danneggiata accidentalmente durante la riparazione. Se la batteria è gonfia, prendi le precauzioni appropriate.

  1. iO21yGI6ZnIpUwkg
    iO21yGI6ZnIpUwkg
    4nSEnq2Dna6pAGZD
    • Assicurati di spegnere e scollegare il dispositivo prima di iniziare la riparazione.

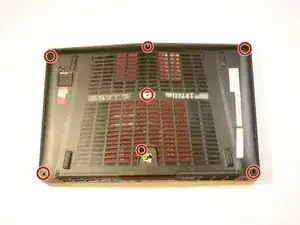
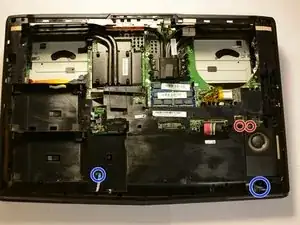
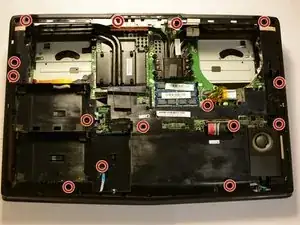
    • Svita le 7 viti a croce Phillips #0 da 6 mm da sotto il portatile.

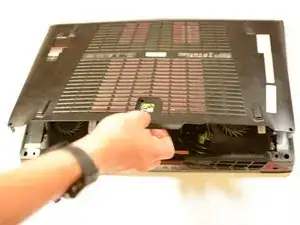
    • Rimuovi la copertura inferiore dal portatile usando l'aletta.

  2. XRvQjdMNLJPcmpZu
    XRvQjdMNLJPcmpZu
    ko2p4nYff1ICws3d
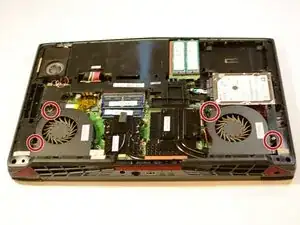
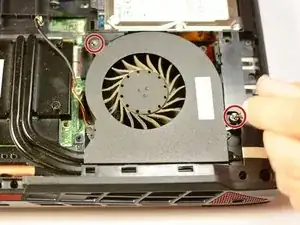
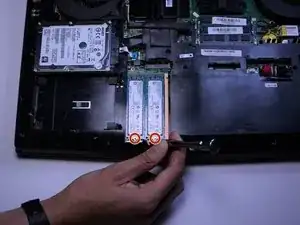
    • Utilizza un cacciavite Phillips per rimuovere una vite da 4 mm e una vite da 10 mm da ciascuna ventola.

    • La vite da 10 mm della ventola non uscirà effettivamente, poiché è collegata con un pezzo di gomma alla ventola. Svitandola dal fondo consentirà la rimozione.

    • Scollega entrambe le ventole scollegando delicatamente il connettore della ventola dalla sua presa sulla scheda madre. Se incontri difficoltà, agita delicatamente il connettore per allentarlo.

    For my laptop it seems to take a lot of force to unplug the fan cables, and I am worried about snapping them. Is there a specific trick or spot you have to press on the white connector piece?

    qualityshibe -

  3. siXsuBZCopYshCTO
    • Scollega il cavo SATA e rimuovi il disco rigido.

    • Assicurati di tirare il cavo parallelamente al disco per non danneggiarlo.

    missing steps

    FHHS-NY Friends -

  4. 2Z5YPjQXuxRhmeXl
    • Svita le due viti a croce Phillips #0 da 6 mm e rimuovi gli SSD M.2.

    • Assicurati di tirare gli SSD parallelamente alla scheda in modo da non danneggiare nulla.

  5. YAPFURNJfjRv2CXL
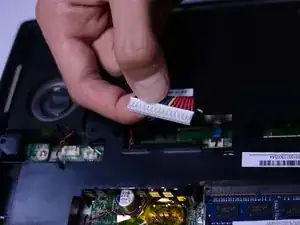
    • Scollega entrambi i cavi rossi e neri degli speaker. Tirali parallelamente alla scheda in modo che i connettori non si danneggino.

    • Scollega attentamente questi due cavi sollevando le alette di bloccaggio e poi tirandoli delicatamente.

  6. FwfZnSII3DPDq4oM
    • Scollega il cavo della batteria.

    • Tira il cavo verso l'alto in modo da non danneggiare i contatti.

    needs to show how to remove the snap in plastic cover and remove subwoofer cables and remove cd/dvd drive before lifting snap in cover

    FHHS-NY Friends -

  7. ncxVlYMQZbOpJTwJ
    • Svita le 15 viti a croce Phillips #0 da 5mm e rimuovi la copertura interna.

    • La copertura può richiedere della forza per essere rimossa, ma non fare troppa forza o rischi di rompere le alette di connessione in plastica.

    Would be nice to know where the plastic connector tabs are. Also Fails to mention the you need to gently tug the frame off the HDMI and Displayports in the back.

    warrof -

    Also fails to mention that there are 2 units that are hooked under the radiators on the outside edges.

    warrof -

    Also fails to warn of the 2 small power cables that run to the light panels on the front.

    warrof -

    Sounds like this guy had a bad time. ^^^

    extracairen -

  8. FplSV4lfA1xod24R
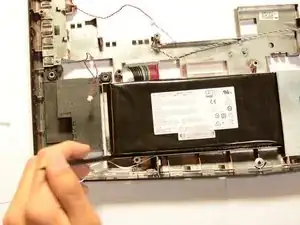
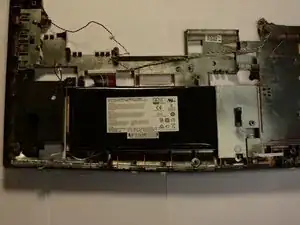
    • Usa una scheda o un altro oggetto piatto per sollevare e rimuovere la batteria dal suo alloggio.

    • Sta molto attento nel rimuovere la batteria. Se viene forata, può rilasciare dei pericolosi composti chimici, o potrebbe prendere fuoco o anche esplodere.

    I used a hard plastic mixing spatula and pushed It in from the left of the battery in the picture above. Be very careful to only insert it under the battery. There were two double sided sticky strips holding the battery to the case. I just used slow force to gradually separate it out.

    Adam -

  9. voXEGwCvybxqPyTZ
    • Sostituisci la batteria con una batteria al litio da 11,1V e 7500mAh, numero di parte MSI: BTY-L77 o equivalente.

    • Esegui la calibrazione della batteria MSI per assicurarti che il firmware possa vedere il nuovo ciclo completo della batteria.

Conclusione

Per rimontare il tuo dispositivo, segui le istruzioni in ordine inverso.

Kevin Shipp

Membro da: 18/04/17

950 Reputazione

16 commenti

Hi,

on the steep 7, you forgot a screw : just above the orange part of the heat sink.

great guide otherwise :D

Assombrance Anderson -

And another one near the bass speaker

Assombrance Anderson -

Did it but I was left with one screw. Have no idea where it goes. But hey battery works and not complaining.

Andres Estrin -

Anyone know where to find a GT72 Dominator battery?

Hunter Gronkowski -

I bought mine here: http://www.fr-batterie.com/

Thanks for this tutorial!

I used it to replace my GT72 2QD Dominator battery. It’s almost the same (yet, not a piece of cake).

Cameron -

It was a helpful tutorial but it wasn’t the best. Step 7 was one place where it went wrong. You also forgot to mention the connection to the light bars. Please update this. :(

Wasso Tasso -

Guys can u help me ??

Anyone facing a problem with the battery cable ?

I destroyed my hand to pull it but it just doesn't want to come out

Storm Shadow -

The instrucitons work and thanks to “Assombrance Anderson” comments on two additional screws.

Mine bought from https://www.laptopbattery.com.sg.

mazc hasband -

Why do i have to disconnect the speaker and fans?

analtrompete4 -

Hi,

On my GT72 2QD the heatsink must be remove, imposible to remove cap otherwhise

Then I changed thermal past (my GT72 is 5 years old)

I think It’s not so easy to change this battery and it takes more than 15 minutes !

riccolebo -

15 minutes??? Really. a am still stuck on getting the case off in step 7. I also could not find the 2 6mm Phillip screws to remove the SSD in step 4. In the same place that it shows the SSD in the tutorial there is a black plastic piece with 4 screws on it on top of the SSD card. I don’t think he is taking into consideration the differences in the difference year models.

Back to the case, why doesn’t he show anybody how to start getting it off. It is a difficult piece to get off, or even start to get off. What is the best way and the best place to begin getting that case off,

Buzzy Amos -

Thanks for the guide!!!

Computer is MSI GT72 “2QD” Dominator

The steps were easy to follow and with step 7 I used a flat head to gently remove it.

If you got the money, then have someone fix it otherwise it's real simple, just be gentle as you would with a lady.

Omar Badillo -

Anybody know whether it’s possible to simply disconnect the battery cable and have the laptop work with AC Adapter? Asking because I’m getting this Battery LED blink, and don’t mind disabling the battery entirely.

Don Pott -

My battery for MSI GT72 2qe dominator pro-211 is completely dead, Can i use it in this condition?, as it is hard for me to remove battery.

Waqas Ijaz -

Thanks a lot for this amazing guide. It took me 1 hour to open the laptop and reach the battery but it took me 4 hours to assemble it back. I got stuck at reattaching the speaker cable on the left side. When I pulled the speaker cable on left side, its pressure lid also came out and I didn't realize that that pressure lid was suppose to pull up and not pull out.
another note is that the battery was glued to the internal cover and I had to pull the battery carefully.
Everything was working nicely when I started the laptop back and ran MSI battery calibration application. Cheers to another 4 years of life to this laptop I bought in 2014, running strong in Dec 2022

Enchanted -

Instructions work for GT72VR 6RE perfectly! Took slightly longer than 15 minutes. I had to finagle the left and right speakers to work around the heat sinks during reassembly. Great guide!

Steven Bennett -