Introduzione

Questa guida mostra come aprire il Motorola Moto Z per poter sostituire una batteria morta o usurata.

Il gruppo display è estremamente fragile ed è privo di rinforzi. Nel maneggiare il gruppo display, lavora lentamente e con metodo.

Prima di iniziare, scarica la batteria sotto il 25%. Una batteria agli ioni di litio carica può incendiarsi e/o esplodere se forata accidentalmente.

Se la tua batteria è gonfia, prendi adeguate precauzioni.

  1. AOhWsAmeA3BjCQYI
    • Scalda un iOpener e applicalo sul bordo sinistro del telefono per almeno 90 secondi.

    • Puoi usare anche un asciugacapelli, una pistola termica o una piastra calda, ma stai attento non surriscaldare il telefono: sia il display OLED sia la batteria interna possono essere danneggiati dal calore.

    • Mentre aspetti che l'adesivo si ammorbidisca, vai avanti a leggere il passo successivo per farti un'idea di dove dovrai far leva.

  2. B3AD1TEtWaQNbuQw
    B3AD1TEtWaQNbuQw
    SESAOm3TZKfiLIxx
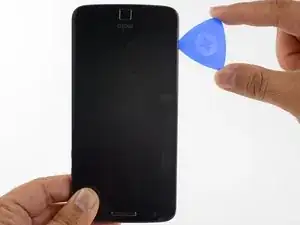
    • Nei passi successivi dovrai tagliare l'adesivo tutto attorno al bordo del gruppo display.

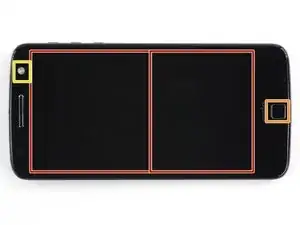
    • Per evitare danni, non tagliare nelle aree indicate qui sotto:

    • Pannello OLED

    • Pulsante home

    • Unità flash

  3. ecDSu1IwXefvHyOe
    ecDSu1IwXefvHyOe
    Sl2XHVITPZBMAA1V
    45l3ETvbWoLXAHYt
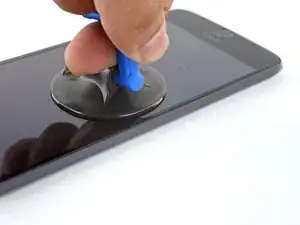
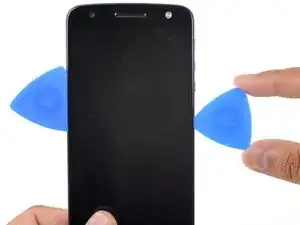
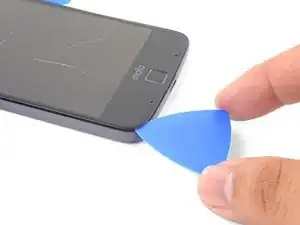
    • Applica una ventosa il più vicino possibile al bordo riscaldato.

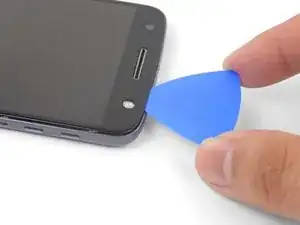
    • Solleva tirando la ventosa per inserire la punta di un plettro di apertura nella fessura.

    • Non inserire il plettro di apertura oltre 1,5 mm di profondità, altrimenti potresti danneggiare il pannello OLED.

  4. oIt5C4Ld2ZDNBqFF
    oIt5C4Ld2ZDNBqFF
    vV1rcoBNSTvN5yRd
    rTHWq4cY2OoSYtRm
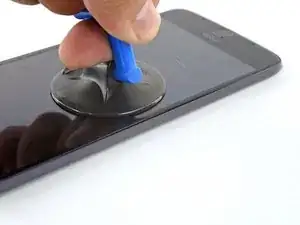
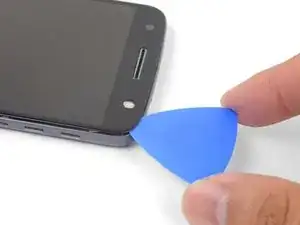
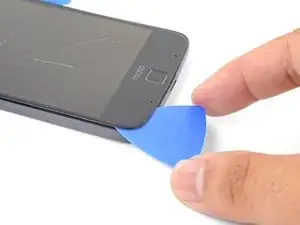
    • Fai scorrere con cautela la punta del plettro di apertura su e giù lungo il lato del telefono, facendo attenzione a non infilarla a più di 1,5 mm di profondità.

    • Mentre fai scorrere il plettro lungo il lato, sentirai la punta dell'attrezzo andare contro il bordo del pannello OLED. È questa la profondità a cui inserire il plettro senza danneggiare il pannello.

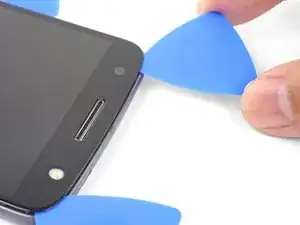
    • Una volta che hai scollato l'adesivo, lascia un plettro di apertura sul bordo per impedire che la colla si riattacchi.

  5. bUsMXMKnGssnwu5A
    • Ripeti gli stessi passi di riscaldamento, sollevamento e taglio sull'altro lato lungo del telefono.

  6. wSBsESUHl1PVsuNR
  7. rYGN2OAKDGmOhlTG
    rYGN2OAKDGmOhlTG
    14kej2hZQVqIk2J2
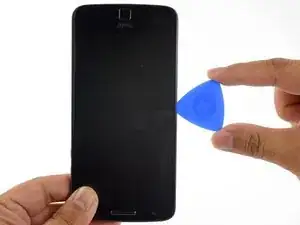
    • Inserisci il plettro di apertura nell'angolo del telefono dal lato del flash e taglia con cura tutto attorno all'unità flash.

    • Non inserire il plettro all'interno del bordo per più di 1,5 mm di profondità.

    • Eseguito il taglio, lascia il plettro nell'angolo per impedire che l'adesivo si possa riattaccare.

  8. ICwKD6Xk6t4TxUJb
    ICwKD6Xk6t4TxUJb
    pjHLdexBUTu3FjVI
    odQrxdZ4ckAPau5I
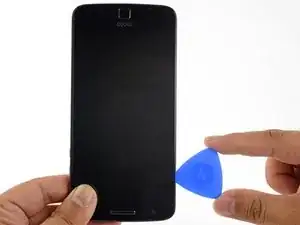
    • Inserisci un plettro di apertura nell'angolo superiore rimasto.

    • Taglia con cautela l'adesivo nella parte superiore del telefono.

    • Non inserire il plettro oltre 12,5 mm di profondità.

  9. CdtgmSxofc6FivmV
    • Applica un iOpener riscaldato nella parte inferiore del telefono per almeno 90 secondi.

  10. 2cGQEyKevPlyC6mE
    2cGQEyKevPlyC6mE
    pEWg1m4XQYxs2kmH
    tjWsxZdsvq6HgZbv
    • Inserisci un plettro di apertura in uno dei due angoli inferiori e taglia in direzione del pulsante home, fermandoti prima di raggiungerlo.

    • Una volta finito il lavoro sull'angolo, lascia un plettro in posizione per impedire che l'adesivo possa riattaccarsi.

    • Ripeti la procedura per l'altro angolo inferiore.

  11. brUPNyqVDPZVCP21
    brUPNyqVDPZVCP21
    p4HKLBK3hFxuYY1A
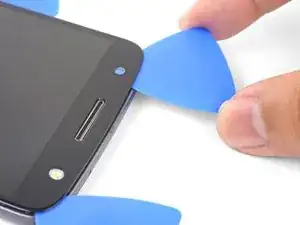
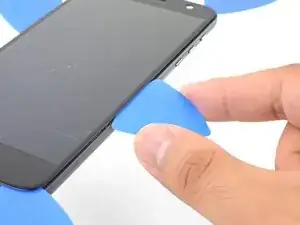
    • Ruota delicatamente e in misura minima il primo plettro di apertura per favorire il distacco dell'adesivo sul bordo.

    • Ripeti la stessa procedura per tutti i plettri rimasti, muovendoli quanto necessario e ruotandoli lievemente per staccare l'adesivo.

  12. PSbMswxRT54lC3jW
    PSbMswxRT54lC3jW
    yUnYjJkaQWgN1oUY
    XROmdJOEYlNDElxe
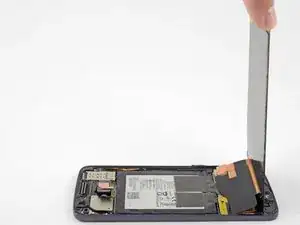
    • Solleva la parte del display dal lato dell'altoparlante voce per avere accesso ai cavi del display.

    • Non aprire il display oltre 90° e supportalo sempre per tenerlo in posizione.

    It says lift home button end of display but the photo shows lifting the earpiece end.

    Lynne Ayers -

    Good catch! I have fixed the step.

    Arthur Shi -

    When I finally got mine opened, all I see is a white piece of metal. Nothing like you photo…UhOH…

    Diana Myera -

    Oh no! It sounds like a different model! Motorola phones are notorious for their similar sounding naming conventions.

    Arthur Shi -

  13. AliGuJ5ZLd1KkOub
    AliGuJ5ZLd1KkOub
    1TNRwfivjGnX2WXk
    N5HiOnp4LXA5YLcu
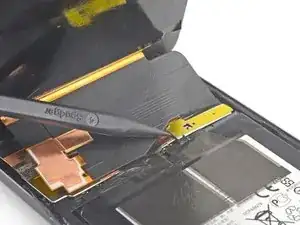
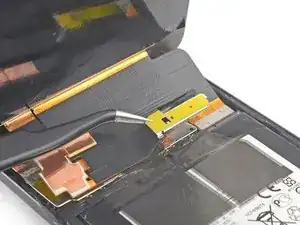
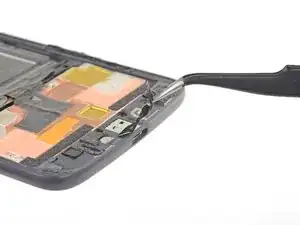
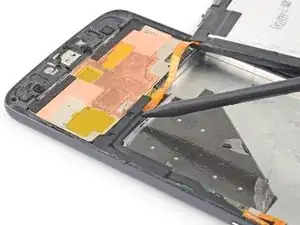
    • Usa la punta di uno spudger per staccare la schermatura del cavo del display.

    • Rimuovi la schermatura del cavo del display.

  14. AmvnVWuA4bcqApdC
    AmvnVWuA4bcqApdC
    SYEPgOWWepwwPHaW
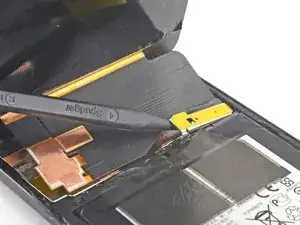
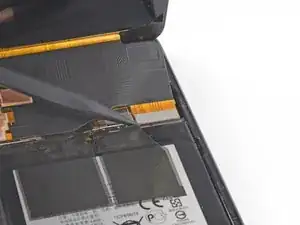
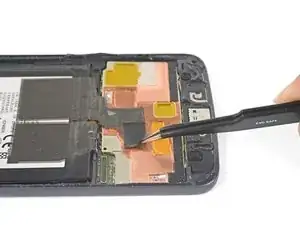
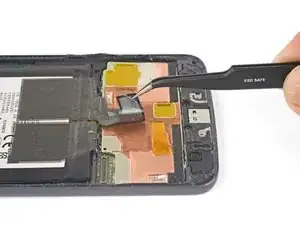
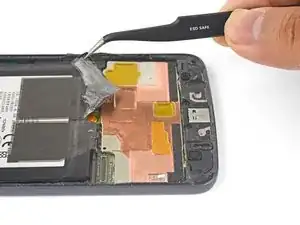
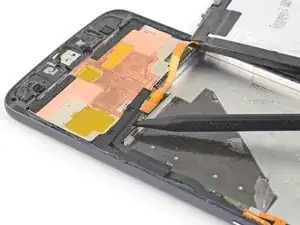
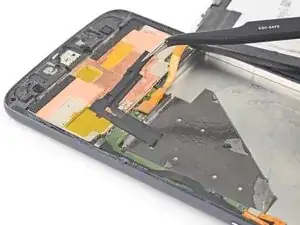
    • Usa la punta dello spudger per sollevare e scollegare dal suo zoccolo il connettore del cavo del display.

  15. MffriIMQwph2MZhw
    MffriIMQwph2MZhw
    kepJQHIFFmTjkKUv
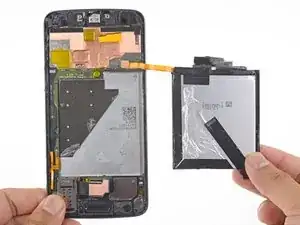
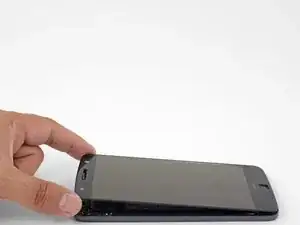
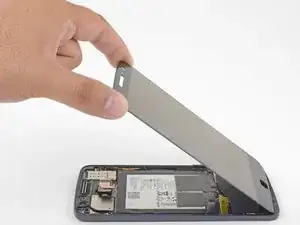
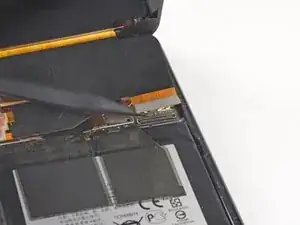
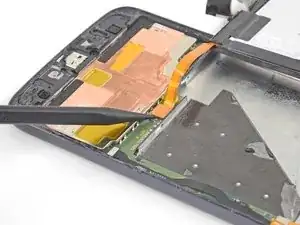
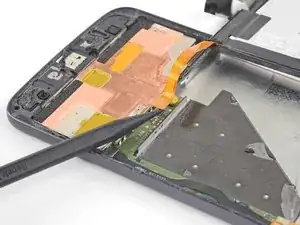
    • Rimuovi il gruppo display.

    • Prima di installare nuovamente il gruppo display, rimuovi con cura dalla scocca ogni parte rimasta di adesivo o di vetro.

    • Dopo aver rimosso ogni traccia di colla e di vetro, pulisci le aree di adesione con alcol isopropilico al 90% (o superiore) e un panno privo di pelucchi o un filtro per caffè americano.

    • Ricordati di accendere il telefono e provare la riparazione prima di applicare del nuovo adesivo e sigillare nuovamente il telefono.

    • Usa l'adesivo per display Motorola Moto Z per sigillare di nuovo il telefono.

    By removing the traces of glue from the frame, you will also remove the protective covers of the microphone and whatnot at the home button side,, as well as the speaker cover at the other side, because the glue does its duty…

    dr_baeschtlr -

  16. pTieonyRatFkw1Sf
    pTieonyRatFkw1Sf
    QyNSx5Eb1wyXfMaJ
    YwbVbeYk132DEUwP
    • Usa delle pinzette per staccare il nastro adesivo nero che fissa la batteria alla scocca.

    • Se la tua batteria sostitutiva non ha questo pezzo di nastro, trasferiscilo dalla vecchia cella a quella nuova.

    Well. ithis is multilayer tape - at least three *very* thin layers. Expect ugly results, if any.

    dr_baeschtlr -

  17. xFtqgksvbqVTPWEi
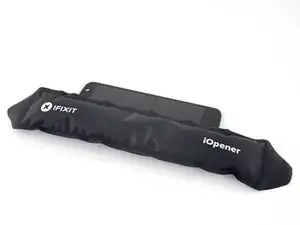
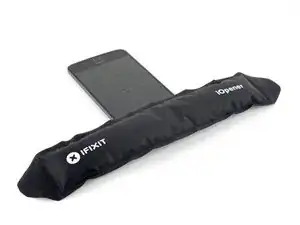
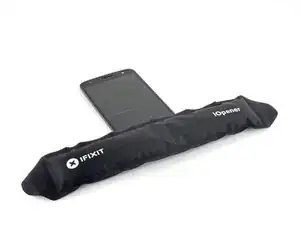
    • Disponi un iOpener riscaldato sul retro del telefono nella posizione mostrata per almeno 90 secondi.

  18. LSuKPJBL5mJwGawX
    LSuKPJBL5mJwGawX
    UItWMA1siVekX1WW
    pVPSYOxIHDWlOKbW
    • Usando delle pinzette o le dita, afferra la linguetta nera di estrazione la batteria e tirala lentamente verso l'alto finché l'angolo non si stacca.

    • Non rimuovere completamente la batteria perché è ancora connessa da un cavo flessibile.

  19. MVlV3aoZPifwUWoC
    MVlV3aoZPifwUWoC
    FOmBUSRTP1LdPL2i
    • Segui questo passo solo se la linguetta della tua batteria si è rotta. Altrimenti passa direttamente al passo successivo.

    • Inserisci uno spudger nel bordo inferiore della batteria e fai leva lentamente per sollevare l'angolo.

  20. uXXLU1plvqraRBBT
    uXXLU1plvqraRBBT
    vZVYhRVNgBeSgU2s
    5tIyxXlbtORmM4UW
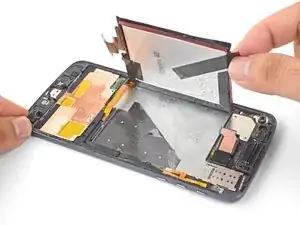
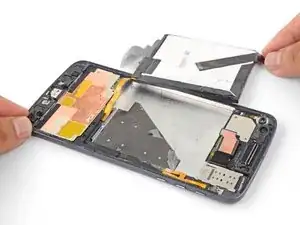
    • Ribalta delicatamente la batteria attorno al bordo destro.

    • Disponi la batteria di piatto sulla superficie di lavoro stando attento a non forzare il cavo della batteria.

  21. nI1RRDBBmqWIOqGG
    nI1RRDBBmqWIOqGG
    1SE2ebrEBoXXlkJM
    5HbwKAHWRtmkilhA
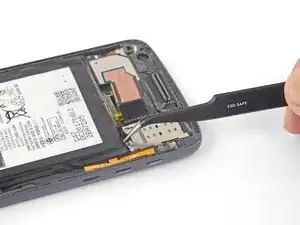
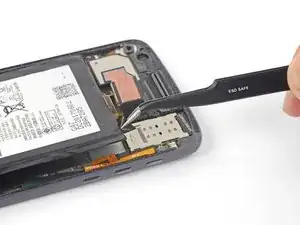
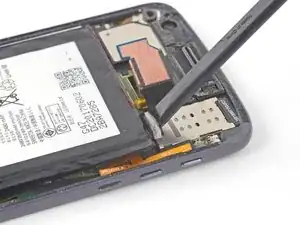
    • Usa la punta di uno spudger per staccare la staffa del connettore della batteria.

    • La staffa è tenuta in posizione da un po' di adesivo e delle linguette.

    • Rimuovi la staffa del connettore della batteria.

    • Quando rimonterai il supporto, accertati che le linguette della staffa siano allineate con gli incavi nella parte sinistra della scocca.

  22. XLqgrRkEEGEIeAYT
    XLqgrRkEEGEIeAYT
    H3TLVwn1DiAK2Wlq
    • Usando la punta di uno spudger, stacca il connettore della batteria dal suo zoccolo.

  23. CZbTsfhcblTeComv
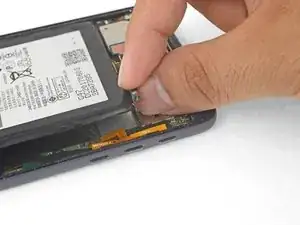
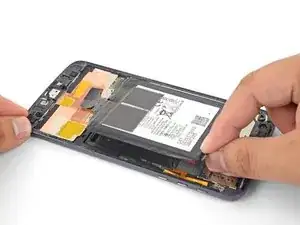
    • Rimuovi la batteria.

    • Non riutilizzare la batteria dopo che è stata rimossa, perché questo costituisce un rischio potenziale per la sicurezza. Sostituiscila con una batteria nuova.

    • Per installare la nuova batteria:

    • Rimuovi ogni traccia di adesivo rimasto sul telefono e pulisci le aree incollate con alcol isopropilico e un panno privo di pelucchi.

    • Applica delle strisce adesive pretagliate o del nastro biadesivo alla parte esposta argentata del vano batteria, non sullo strato di espanso nero.

    • Premi con fermezza la batteria nella sua posizione per 5-10 secondi.

    Really need to include how to apply the adhesive for this device, I had to go find a video on youtube which happened to be an iphone 6 video that gave me an idea on what to do, but even then, it was still guess work.

    Andrew Scorgie -

    Check out the link to the adhesive card guide in the last step—that should you a pretty good idea of how to prep the phone and battery for installation and how to use our pre-cut adhesive card and apply the adhesive. Let us know if we can change something to make it easier to use!

    Adam O'Camb -

    Only just noticing the reply now since I am redoing the adhesive on a second Moto Z I have (screen adhesive failed on its own) and while that guide is pretty good (and something I may well use now on the original one if it fails again!), I was more thinking about how to apply the display adhesive that comes within the kit. There were no instructions on how to use that.

    Andrew Scorgie -

Conclusione

Confronta il pezzo sostituito con quello originale, potresti dover trasferire componenti rimasti sulla vecchia parte o rimuovere adesivi sul retro del componente nuovo prima di installarlo.

Per riassemblare il tuo dispositivo, segui i passi descritti in ordine inverso.

Dopo aver completato questa guida, calibra la batteria appena installata.

Porta i tuoi rifiuti elettronici a un riciclatore certificato R2 o e-Stewards.

La riparazione non è andata secondo i piani? Vai sulla nostra comunità Risposte Motorola Moto Z per trovare aiuto nella risoluzione dei problemi.

Arthur Shi

Membro da: 03/01/18

248236 Reputazione

27 commenti

Kindly link me to the suitable adhesive tape for sticking back the screen…

Thank you

Anwesh Maile -

Hi Anwesh,

You can use Tesa tape for that purpose.

Arthur Shi -

I have a Moto Z Droid from Verizon. You have instruction for the Moto Z and Moto Z Droid Force. Battery replacement on the Droid Force is much easier. How do I know which one I have?

Budbradley -

Hi Budbradley,

According to Phonearena, it looks like one easy way to tell is the rear camera:

The Z has a 13MP camera, while the Z Force Droid has a 21MP rear camera.

The built-in internal storage are also different:

The Z has 32GB while the Z Force Droid has 64GB.

Hopefully you can check your specs with those and figure out which version you have.

Arthur Shi -

The hardest step in this guide is when you remove adhesive glue behind the LCD panel.

Second is clean residue glue [For this i use lint-free cloth soak with alcohol and rub on glue]

One more note - Moto original battery is su..k. Mine is degrade in 6 moths.

Rawin Juangrat -

The hardest part about this repair was definitely removing the screen ( the rest is easy once you’ve opened the phone). I believe I would not have ruined my screen had I used a heat gun rather than the iOpener provided in the kit. The iOpener did not properly heat the adhesive and caused me to have to pry a little harder than I would have had to if I used a heat gun. That little extra force causes a big difference when the screen is so thin. On this particular repair, save yourself the money and don’t buy the whole kit. Buy the battery somewhere cheap and use a heat gun like I should have. Paying the extra money for the kit also cost me the price of a new screen $100+… not a happy camper.

Gabriel Arthur -

The hardest part for me is sourcing a battery that is the right thickness for an xt1650-03!

I am on the 3rd different gv30 manufacturer/ brand --on 2 different xt…-03 and they're all too thick. My last hope was a “Cam…Sin…” brand that was 3.3mm thick. Noooooope; that still didn’t work!

Please help!

P.S. the heatgun did make the prying WAY easier (especially if you drop the extra repair money on some suction-cup-pliers) —BUT— if you heat it too long (or even graze the inside of the semi-opened phone), you seriously risk “scorching" the screen, wilting the speaker diaphram, and/ or the mic screens.

…like i did the first time.

SNfoil_hat_king -

I have the exact smae problem. On my battery, it says it is an original Motorola Part. So did the seller on eBay. Model-Number and Code are exactly the same, so is capacity. Still, the new battery is to think and has a slighlty different design. This is really annoying, the phone works again, but I cannot glue it back together.

Benjamin Geese -

Can you check if your original battery is actually thinner than 3.3 mm? If so, I’ll need to look into the guide to see if something needs to be fixed.

Arthur Shi -

I have to change the battery of my xt1650-03, too. All sellers on a|_iexpress have negative comments from at least one or more buyers complaining that the battery is a few mm too thick. How can I find the right one?

This phone starts to annoy me so bad… it dies at 60 ish percent when drawing too much power…

Martin Hammer -

You can order a battery from iFixit here. We actually sell OEM Motorola parts, and this would be an OEM battery. If it doesn’t work out, we have great customer service! Plus, I would be interested to hear if the OEM battery is for some reason non-compatible.

Arthur Shi -

I followed the instruction, and I could replace the battery, but no image is shown on the screen. When I push the power switch, the mobile vibrates, so I think battery is Okay. Did I damage the screen when I remove the screen from my mobile?

Takeo Otani -

The screen was connected to the mobile but not glued with adhesive tape yet. Is that the reason why?

Takeo Otani -

Hi Takeo,

The screen does not need to be glued in before you test the phone. I would suggest checking the display connector, re-connecting it to see if that helps. Otherwise, it may be a broken screen.

Arthur Shi -

Thank you very much for your reply. I re-connected the screen three times, but there’s no change, no image is shown on the screen. I followed the instruction, but  I may have applied strong force to the screen when I remove it from the mobile? It was really hard to remove the screen because the heater does not heat the mobile to soften the glue. I will replace the screen and see the result.

Takeo Otani -

I replaced old screen with new one, put the connector and turn on the switch without installing home button, but that does not work, no image is shown on the screen. I removed the battery and re-installed it, check all the connectors & wires, and I could not find any problem. What is the cause of the problem? mother board has been broken?

Takeo Otani -

Hi!

Did you find out what was the problem?

neven nevenković -

The problem my moto Z had in the past is, battery charge immediately decreased from more than 80% to 0% when I started an app. I thought this problem was related to the battery, but it was not?

Takeo Otani -

Saludos desde México no carga mi moto z y no es el centro de carga la pila está bien

Joseluis -

Hi, I’ve replaced the battery as instructed above. The batteries match. Phone will turn on, but not the screen. I’ve removed and reattached it several times but nothing shows on the screen. It worked fine prior to replacing the battery.

Jason

dr.jay -

Hi Jason,

Sorry to hear that! Here are some general troubleshooting ideas that may resolve the issue.

Arthur Shi -

Yeah, this repair *is* difficult. I broke the LCD (not the gorilla glas) and ripped the cables. The glue really is strong! So why does the Moto Z have an Ifixit score of 7? Even removing those small plastic and metal clips is hard as you don’t find which is the recommended way of removal.

JPT -

My moto Z had same symptoms as Takeo Otani’s. Never over-used it, kept it cool, no drops, no scratches, clean USB port.

I am also convinced, bad battery was the problem: phone indicated a full charge after just 20 mins of charging. battery life just ~2 h in standby. Energy-intensive apps like camera, let phone re-boot. After rebooting a fully charged phone (over night), it was <30% charged.

MY BATTERY REPLACEMENT ATTEMPT TODAY BROKE THE DISPLAY, ALTHOUGH, I WAS EXTREMELY CAREFUL with plektra tools, hair dryer and suction pad, even dipped tools in isoprop, which helped a bit to “cut” the glue threads.

Half way of removal (>1 h), noticed a little thin crack (in the back-layer, from bottom-right corner to 2 cm above moto logo)

Took another 1 h, until front was removed.

Last switch-on try: VIBRATES, but SCREEN is DARK -> VIBRATE reboot loop. Dis/Re-connected display twice. no change.

MOTO Z NOT SERVICE-FRIENDLY AT ALL!

Not tried new battery! Will not buy new display nor moto!

BE MOST CAREFUL WITH BOTTOM 4 cm REMOVAL!

Oliver Sternekoster -

This was a complete disaster. I was so careful, took tons of time with it. But near the bottom, as many have stated, the screen cracked a hairline crack and separated from the glass. This is more than difficult, because it requires some kind of finesse in some specific way that you can’t explain on this site or even a video. Following instructions exactly and being beyond careful does not give one the knowledge or finesse to do this repair successfully. I ordered a new screen and I hope that the battery I put in works. There’s no way to know until I get the new screen, and then hope that there isn’t something else wrong that happened in some specific way with the connectors or cables or electrical contacts in there. Disaster. And the tools are subpar too. Broke the smudger tip trying to pry off the bracket. Bent the tweezers too.

Daniyal Kazi -

I’m sorry to hear about your experience! The screen is unfortunately heavily glued onto the phone, making repairs difficult. As for the bent spudgers and tweezers, please contact our customer support and we’ll get it sorted for you!

Arthur Shi -

Exactly what I was afraid of happened. I installed the new screen and it’s not working. I just get a black screen. After plugging into a charger for several minutes, holding down the power button and hearing vibrations, I determine that the phone must be on. But screen is just black. No damage was done to this screen. It was brand new and I put it in. But something somewhere went wrong. How could I know what that was going to be? Is something not plugged in right? Did it get “fried” like someone said in another post?

Unless there’s an easy fix for what’s going on that I can try, this entire attempt to fix has been a complete disaster.

I do not have time to wait for another screen, nor do I want to pay for another screen that could just as easily not work either after I try to put it in.

Daniyal Kazi -

I understand your frustration! Thanks for bravely giving this difficult repair a chance. You may be able to test the display this way: leave the battery out, carefully reconnect the display to the phone, and plug the charging cable into the phone. Then, try to power on the phone. If the phone vibrates and the display does not light up, then either the display or something on the motherboard is bad. Again, I’m really sorry for the bad repair experience.

Arthur Shi -