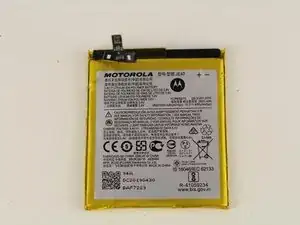
Introduzione

Questa guida ti mostrerà ogni passo dettagliato per rimuovere e sostituire la batteria nel Motorola Moto G7 Play, modello XT1952-3 o XT1952-2. La batteria è ciò che alimenta il dispositivo quando è scollegato dal caricatore. Se il dispositivo non si accende o non tiene la carica, può significare che la batteria non funzioni più. Se la batteria è gonfia o perde, presta attenzione e segui la guida di iFixit su cosa fare se una batteria è gonfia.

  1. 4Xbb5Dwi5GPdt152
    4Xbb5Dwi5GPdt152
    kI3eKVi2FslU3c1m
    • Spegni il tuo dispositivo prima di iniziare.

    • Infila una graffetta o uno strumento per l'eiezione della SIM nel piccolo foro nel carrello della SIM sul bordo destro del telefono.

    • Premi lo strumento nel foro per espellere il carrello.

    • Rimuovi il carrello della scheda SIM.

  2. HSvptNHQiyevqvmB
    HSvptNHQiyevqvmB
    lFYEQSrJXNS2cnDo
    • Usa il plettro di iFixit per tagliare l'adesivo attorno alla copertura posteriore.

    • Usa una pistola termica, un asciugacapelli o un iOpener per ammorbidire l'adesivo della copertura posteriore.

  3. fUgtTjaaQHTsNH3Y
    • Separa la copertura posteriore dal telefono.

    • Assicurati di aprire il retro da destra a sinistra per non danneggiare il cavo del sensore delle impronte.

  4. GPeuMx6mJ5PjcBNW
    GPeuMx6mJ5PjcBNW
    nMOhjnWuvKnpWOWG
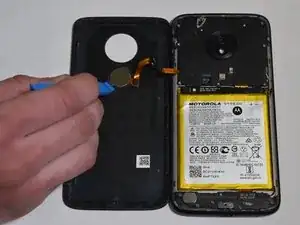
    • Usa il plettro e lo strumento di apertura di iFixit per rimuovere il sensore delle impronte dalla copertura posteriore.

    You can save a step here by keeping the fingerprint scanner attached as long as the back plate is supported by a minor angle. You’ll detach the other side at the system board in step 7, at which point you can put the whole piece to the side.

    drpotter -

  5. rYX3YWkkMY5YyIT2
    • Quindi, svita le nove viti a croce Phillips #00 da 3,2 mm sulla copertura della scheda madre.

  6. dDac1MqtLgSscSoU
    • Solleva la copertura della scheda madre dal bordo inferiore.

    • Usa delle pinzette inverse o uno strumento simile se necessario.

  7. SPDNfriDk5F2RWZ2
    SPDNfriDk5F2RWZ2
    CRjaOhwQfGSGGxSG
    odh5JgPWAYDMDXv3
    • Usano uno strumento di apertura di iFixit, scollega il cavo del sensore delle impronte ed altri 5 cavi dalla scheda madre.

    You’ll also want to detach both two antennas here and note the specific wire and its position on your system’s board. The antennas on mine are closer together, making it easy to re-connect them to the wrong terminal.

    drpotter -

  8. bKssRBEa1iQSUYyg
    • Svita la vite a croce Phillips #00 da 0,4 mm sulla scheda madre.

  9. sYr3MaWbARrMLuEm
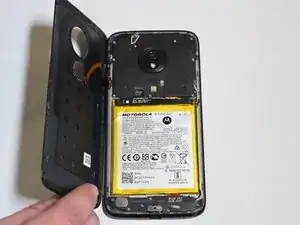
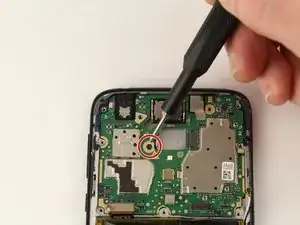
    • Solleva attentamente la scheda madre dal suo bordo inferiore con uno strumento di apertura di iFixit.

  10. QuROHCR6tIKSg2vH
    • Svita le sei viti da 3,2 mm sulla copertura del gruppo della porta di carica con un cacciavite a croce Phillips #00.

    • Rimuovi la copertura.

    Hello, I’m a new member to IFIXIT and so far your instructions have been crystal clear and easy to follow :) I was wondering if you could inform me on ways I could remove one of the six 3.2 mm screws from the charging port if the screw was stripped? I’m unable to proceed further with your instructions while one of the 3.2 mm screws is stripped.

    Theodore Allah -

  11. AO2qVcFpJRVopSMt
    • Usando lo strumento di apertura di iFixit, solleva delicatamente la copertura del gruppo della porta di carica.

  12. o5yEbwgIC2lcEgwU
    o5yEbwgIC2lcEgwU
    3xtuR3fXAVFHCs6h
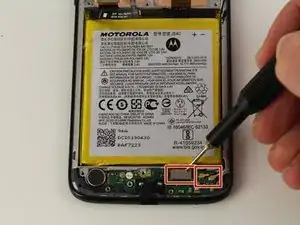
    • Usando uno strumento di apertura di iFixit, scollega i cavi dal gruppo della porta di carica.

  13. gTEXDusvYOHWrq65
    • Usando lo strumento di apertura di iFixit, Solleva attentamente il gruppo della porta di carica.

  14. dBxVpcdR5C4e2xHg
    dBxVpcdR5C4e2xHg
    jVEEIpHdvBr4DpPh
    XwryeKnIHfQLeAfq
    • Usando uno spudger, rompi entrambe le strisce adesive sul retro della batteria.

    • Usare uno spudger in metallo potrebbe forare o danneggiare le componenti nel tuo dispositivo.

    This task needed a fair amount of heat, using both a heated pad (ifixit iOpener) and a hot air gun. Insulated gloves makes this step effortless. Heat both ends just near the adhesive until you think it’ s too hot to touch w/o your gloves, then gently pry the battery out using a long plastic spudger. I started on the right side, broke it free, then worked my way left. A hand held hot air gun here is perfect for this because the adhesive, at a good temperature, cleanly peels away from the battery and stays on the phone surface, making it perfect to reuse.

    drpotter -

  15. MAuCUNvPMMgOL6Hj
    • Solleva la batteria ora che è stata separata dall'adesivo.

    When beginning re assembly and reusing the backplate seal, a fair amount a heat with a hot hair gun helps to evenly reseal it.

    drpotter -

Conclusione

Per rimontare il tuo dispositivo, segui le istruzioni in ordine inverso.

Monserath Casillas

Membro da: 10/02/20

1146 Reputazione

6 commenti

I found this useful although I was dismantling a G7 Power. The screws are in different places but most parts and the the battery are the same or similar. Fortunately, though I discovered that steps 8, 9 and 13 were unnecessary. The motherboard and charging boards could be left in place (only the plastic covers had to come off) while the battery was removed.

keithmoseley -

I successfully changed a battery on a G7 Play. I skipped steps 4, 7, 8, 10, 11, 12, 13, 14, and 15. The instructions for removing the battery are risky. I pried the battery up a little and put constant pressure on it until it came loose which took about 60 seconds. The battery comes with a tiny connector at the end of a ribbon cable. This is plugged into a board, and then the motherboard holds it in place. In general, the phone is not designed for the battery to be replaced which surprised me.

Joe Doll -

Thank you! I successfully disassembled my G7 Play after an unfortunate dive in a lake to let it completely dry. It's now working as new!

Matthieu Bister -

I followed all the steps and my phone will do nothing. Like it has no power any

Any suggestions?

hodgine -

I wouldn't recommend doing this. I somehow managed to disable the touchscreen attempting it myself and basically bricked my phone.

Shawn -

Weird instruction containing a lot of totally superflous steps:

Why removing the fingerprint sensor from backplate?

Why removing the motherboard and charging board?!

Just open the phone, remove the nine screws of the mainboard cover disconnect the battery plug, remove the battery with an old credit card e.g. and some heat from a hair-dryer, replace the battery and than everything vice versa. Done!

BTW: It is totally devious and malicious to let users write their comment just to tell them than afterwards that they have to create an account here before thay can post someting!!

I really did not want or need another accout! What is it good for? Absolutely nothing: Just another source of annoying spam and another stupid password to forget! I do not want to get 'updated' about my posts.

Gerry Kessler -