Introduzione

La batteria del tuo New Nintendo 2DS XL potrebbe dover essere sostituita se il dispositivo non si accende quando premi il tasto di accensione. La batteria è direttamente accessibile dal sotto il pannello inferiore. Per ulteriori informazioni, fai riferimento alla nostra pagina delle soluzioni di base.

  1. R3WrHkdaFuZjfZ3d
    • Prima di iniziare lo smontaggio, rimuovi:

    • La penna

    • La cartuccia di gioco

    • La scheda SD

    This is a great repair instructional, but I would advise also looking at the below video link. (I used both.) Sometimes watching 2 repair guides can help when you think you think you’re stuck. For example, I had a really hard time getting the hinge off!

    https://www.youtube.com/watch?v=Zuu_T2ls...

    (HINT: Works best if you rotate it 180 degrees, so that you are repairing it from the same perspective as the technician)

    skat1140 -

  2. qInyERKyTGMKUtxf
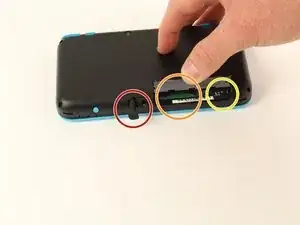
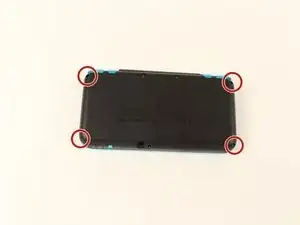
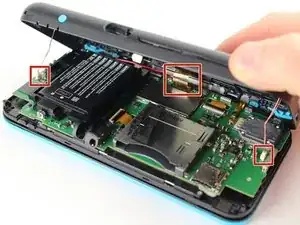
    • Svita le quattro viti tri-point da 6 mm posizionate nei quattro angoli del pannello inferiore.

    The Y0 was too big; I ended up using a Y00 and that worked fine

    Christopher Gilmer-Hill -

    Would not recommend using a Y000 like I tried to do

    Daniela Magaña-Ochoa -

    gotta use Japanese Industry Standard YOO (blunt end)- I did not, and accidentally stripped two of the screws… still trying to figure out how to remove them -_-;

    Yanko Artidiello -

    Yeah I can confirm, the y0 does not work.

    Arc Turus -

    I'm using the Y-0.6 and seems to only unscrew 2 of the screws on the right side of the handheld, the other 2 aren't moving

    Xx_Definity_J0rd4n_xX -

    screws are too tight

    Albert Einstien -

  3. FUiabbAOYVaNjG4X
    FUiabbAOYVaNjG4X
    MiHqoVbAY3mST6Ls
    • Stai attento mentre separi il pannello inferiore dalla copertura anteriore per evitare di rompere i tre cavi collegati alla scheda madre (due su entrambi i lati ed uno sul retro).

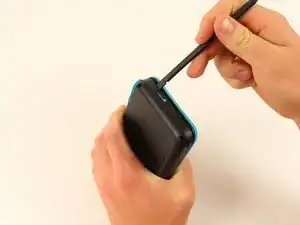
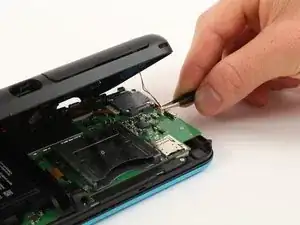
    • Usando uno spudger, separa il pannello posteriore dalla copertura anteriore facendo leva delicatamente attorno al pannello.

    • Ci sono diversi ganci lungo la cerniera della copertura, quindi ti consigliamo di lavorare su un lato corto e i due lati lunghi prima di finire con l'ultimo lato corto.

    You need to be super careful separating the top from the bottom at the rear end. I got stuck there, applied a lil more force and ripped the right shoulder button straight off the pcb!

    Dominik Leicht -

  4. hN4JmkBHkaqtRlxN
    hN4JmkBHkaqtRlxN
    sLnMpviSoWENSJQk
    CxaLwKZ2IuAS5cAV
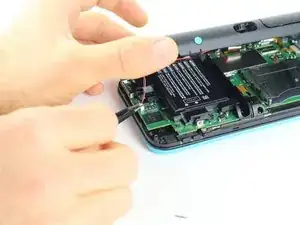
    • Usando delle pinzette, scollega i due cavi che collegano i tasti posteriore su entrambi i lati della scheda madre tirandoli delicatamente verso l'alto.

    I unfortunately took off the base of one when trying to pull apart. Is there a fix or will it not be broken?

    Phoenix Typhoon -

    Did you manage to fix this at all?

    Owen McKay -

    When you are putting these cables back, make sure to check the orientation of the cable. You have to match the cable head to the entry point, so you may have to turn the cable around. I spent a bit too much time trying to connect the cables just because I didn't realize that I had to turn the cable around.

    Hongda Wang -

    Aren't these the speaker cables? I haven't taken any 2DS's apart in a while, but I'm pretty sure these cables connect to the speakers

    darth mango -

  5. 6AT5OJ1MuuBaICeA
    6AT5OJ1MuuBaICeA
    ua4Ruiu5ewlgVKlO
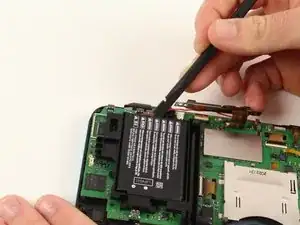
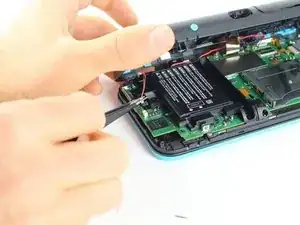
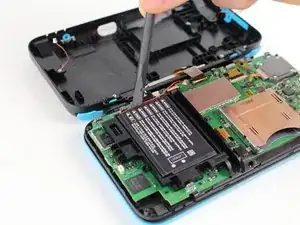
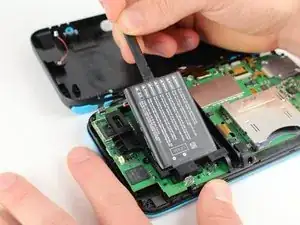
    • Usando uno spudger, solleva la batteria.

    • Ricordati che c'è un pad adesivo che tiene la batteria ferma sul suo supporto. Potrebbe essere necessario usare diversi strumenti per separare la batteria dal suo supporto e dalla scheda madre.

    Some might see this as an optional step. But you probably do NOT want to skip this. I did, and now I have malfunctions on the Nintendo (touch screen functionality not working, possibly as a result of shorts from skipping this step.)

    skat1140 -

    Personally, I skipped this step and everything still works fine. I wasn't able to take the battery out because the adhesive was too strong.

    Hongda Wang -

    Small square of adhesive. Pull up slowly and it’ll release after 10-20 seconds

    Jacob Cocanig -

    Any advise for dealing with CTR-003 spicy pillow? So far in this transplant operation, both my devices batteries are okay... but... I dunno, if I were to run into a spicy pillow in the future, what would be the least awful way to pull it out?

    Not sorry, when I see these repair jobs that involve the company gluing the battery into the device (or even soddering in that soon to be spicy pillow) this is just something I'm wondering about

    Katrina Payne -

    I haven't taken my 2ds apart yet, depending on how devices are built it might work to slide a solid thread (eg fishing rope, or floss but that might rip) under it, and do a sewing motion.

    Franziska (Natsu) -

Conclusione

Per rimontare il tuo dispositivo, segui le istruzioni in ordine inverso.

Tim Newman

Membro da: 25/09/17

1607 Reputazione

6 commenti

Does the 2ds xl have the same as the new 3ds xl

Royce davenport -

no. the 2ds shares the same battery type as the Nintendo DS and the Nintendo switch pro controller.

Jason -

CTR-003 Battery

stephen cheshire -

Do I need to put a sticky pad on the new battery?

bryan sepulveda -

Got the exact screwdriver (Y00 / 1.5 x 50mm) but it doesn‘t fit. What are my options?

Maurice Willems -

Get the one that fits: y0

Nick Bazin -