Introduzione

Numerosi Ring Video Doorbell Pro hanno smesso di funzionare a causa di una batteria interna difettosa. I sintomi di questo solitamente sono unità completamente non funzionante che non reagisce all'alimentazione o un'unità che si riavvia inaspettatamente, anche se ci potrebbero essere altri sintomi. Sfortunatamente, Ring non vende le batterie di ricambio e non si trovano da nessuna parte su internet, quindi deve venire utilizzata una generica batteria ai polimeri di litio 602025 da 3.7 V tra i 200 mah e i 300 mah. Come sempre, puoi trovare gli strumenti e le parti che ti servono per completare questa riparazione nell'apposita sezione qui sotto.

  1. VTveZ4aARRpb45PN
    • Per prima cosa, scollega e rimuovi il campanello dalla parete. Assicurati che l'interruttore elettrico per il campanello sia spento nel quadro elettrico.

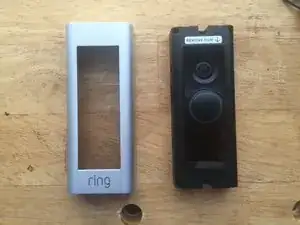
    • Assicurati di rimuovere la copertura anteriore in quanto le viti che tengono insieme l'unità sono lì sotto.

  2. fZNJIEUddFuGUY6o
    • Svita le quattro viti a croce Phillips dai quattro angoli del dispositivo.

    • Lascia cadere le viti girando delicatamente l'unità. Non perdere le viti!

  3. Zx5PVllILXCUWLEP
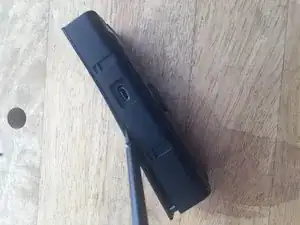
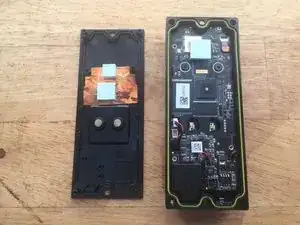
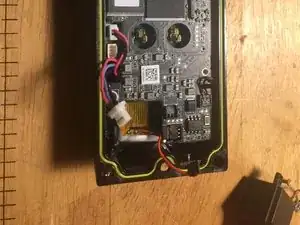
    • Usando uno spudger in plastica morbida (o uno strumento per fare leva), separa la copertura posteriore come mostrato nell'immagine.

    • Può essere richiesta della forza, ma vacci piano per non danneggiare accidentalmente qualcosa all'interno.

  4. fdEKMMdIBX2wZERR
    • Dopo aver rimosso il retro, dovresti poter vedere l'interno dell'unità.

  5. LAYCVmv1cEVIorbT
    • Stai attento mentre rimuovi i piccoli connettori. Potrebbero rompersi se non vengono maneggiati correttamente. Lavora delicatamente sotto i connettori.

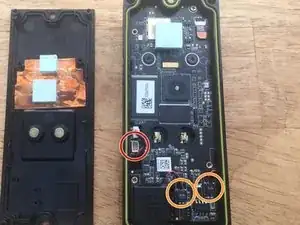
    • Scollega il connettore della batteria con uno spudger in plastica sollevandolo da sotto il connettore.

    • La batteria è già scollegata in questa immagine.

    • Ora fai lo stesso per i connettori del sensore IR e l'unità scaldante.

    This is where my unit turned to junk. Super gentle pressure on the clips and the socket came off the motherboard. Not buying ring again.

    Brian -

  6. vao36GU5msaRSxAg
    • Svita le due viti a croce Phillips argento che tengono ferma la scheda madre.

  7. wvBeqbQsIqKrrTuV
    • Se para lo speaker dall'unità girandola e lasciandolo cadere.

    • Se necessario fai poca forza usando uno spudger in plastica per rimuoverlo.

  8. BOxmJTUgjKqRfUNK
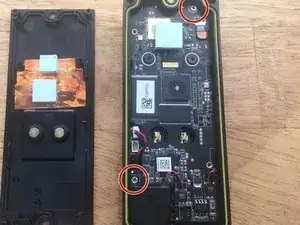
    • Applica una leggera pressione ai bordi della scheda madre per separarla dalla copertura e sollevarla.

    • Dovresti sentire poca resistenza in quando è presente dell'adesivo per tenere ferma la scheda madre.

  9. asbYELpvtcVMVLNa
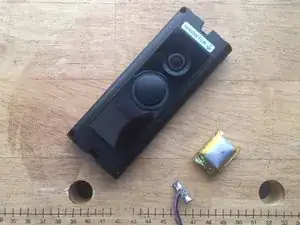
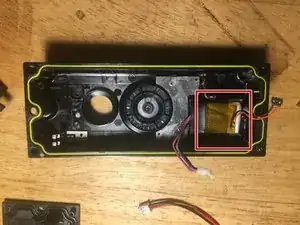
    • Rimuovi la batteria applicando una forza moderata per sollevarla dalla scopertura. C'è dell'adesivo che la tiene ferma.

    • C'è una piccola striscia di nastro metallico sotto la batteria. Cerca ti mantenere questo nastro intatto.

    * “intact", not “in tact"

    Jefferson Malone -

  10. DkcbjpQfGD1VIONN
    • Devi essere molto attento attento durante questo passaggio: se tocchi la batteria con il saldatore, potrebbe esplodere.

    • Non scaldare troppo la batteria o potrebbe anche esplodere: devi essere veloce nel saldare.

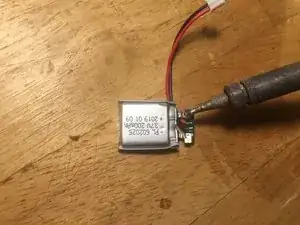
    • Rimuovi il nastro trasparente dalla batteeria originale.

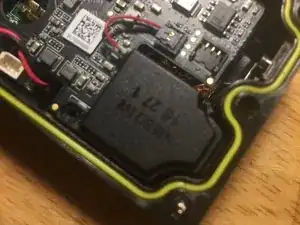
    • Dissalda il circuito dalla batteria originale.

    • Ti servirà questo circuito, quindi stai attento a non danneggiarlo!

    • Dissalda il circuito della batteria sulla nuova cella e salda il circuito della batteria originale su quella nuova. Questo convertirà la tuo nuova cella con una compatibile con il circuito di carica del Ring.

    • Assicurati di rispettare la polarità. Il contatto accanto al cavo rosso va con il polo positivo della batteria, mentre quello accanto al cavo nero con quello negativo.

    Just a little extra clarification on the de-soldering: I struggled at first because I thought the metal foil strips from the battery were the things to be de-soldered, but in fact they are stamped onto small, thin, square metal plates and its the plates that need to be de-soldered from the circuit board, not the foil (same of course for the new battery as well as the old one).

    Mark -

    I had the same problem, didn't realize what the solder point was. In addition, first attempt at a repair and I definitely overcooked the circuit while desoldering. Any idea how I could locate another? Other than that, the process went pretty well - other than it not working when I put it back together;-)

    Dennis M Fisher -

  11. FakDfRXKAh4gdT5F
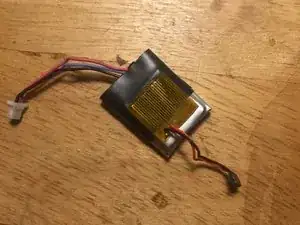
    • Dopo aver eseguito le saldature necessarie, piega attentamente il circuito per attaccarlo sulla batteria.

  12. qrSsXPuefVWfVJlD
    • Dopodiché, copri il circuito della batteria con del nastro isolante per evitare dei corto circuiti.

    • Rimuovi l'unità scaldante dalla batteria originale e attaccala alla nuova batteria con dell'adesivo spray.

    Heater? U sure that isn’t the WiFi antenna?

    Btw, I just finished this procedure. The hardest part was soldering the new battery to the old board. Almost immediately the tiny square pads that the battery tabs need to be soldered to will become unseated. Very very frustrating.

    Jim Banville -

    Yes, it can be a bit tricky. BTW, the battery works just fine without those silver contacts. Those are for the special “spot welding” procedures, meant to avoid any heat contact with the battery. If you remove the contacts, there’s a grid pattern underneath, just put enough solder on to cover that pattern and look like the silver pads are still present. Or, you could try to leave the pads on, it’s up to you.

    You can’t spot weld to solder pads on a PCB, so those extra thick pads were added to allow this procedure.

    As far as that heater/antenna is concerned, I’ve heard it referred to as both! Not quite sure on that one.

    Matthew Bishop -

    Just changed it from heater, to “antenna pad”.

    Matthew Bishop -

    Heater was correct, you can see “heater" in the photo on step 7

    Wade Knoke -

    Do you have information on where you sourced your battery? Why wouldn't you leave the existing battery circuit on replacement in place and just change the connector?

    Something like this:

    https://m.aliexpress.com/item/817340919....

    Carlyle Christensen -

    Calyle, the battery needs to have three wires. The item you linked has only two wires.

    I haven’t tried myself, but this item seems to meet the size and three wire. It is still 250mah compared to 300 mah, but hopefully it should work:

    https://www.aliexpress.com/item/40005051...

    shjin -

    What is the largest battery that will reasonably fit? Sourcing the part has been tricky. Will the charging circuit work for larger capacity such as 400-500mah?

    David Reese -

    What is this battery meant for, as back up power when mains are out? It's capacity is too small to be for backup isn't it?

    Rossi -

    When a traditional chime is installed with the Ring Pro, the device would lose power without some type of battery, because the only way to get the chime to activate is by shorting the wires now powering the Ring Pro. So, when the Ring shorts the power wires to make the chime work, it relies on the battery for a few seconds to stay powered.

    Matthew Bishop -

Conclusione

Per rimontare il tuo dispositivo, segui le istruzioni in ordine inverso.

Matthew Bishop

Membro da: 08/02/19

749 Reputazione

58 commenti

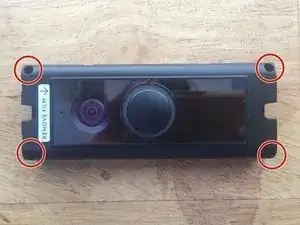
This guide was very helpful for me and allowed me to save my Ring Pro. The only thing I would say it is missing is a better description of how to get the black connectors off the board (two of the orange circles). They are extremely fragile and must be dealt with carefully. The first one I removed shattered and cost me additional work during the reassembly. The important part I learn is to not apply any force to wires themselves (don’t lift from the cabled as described). I found the best way to get the connector off the board is with a very small knife slid under the connector. I followed underneath the wires with the blade to slide it under the connector. Once the blade is under the connector you can gently pry it up and it will be reusable. lifting from the wires caused my connector to fall apart.

This is the battery worked for me. basically you are looking for a 200mAh 3.7v cell.

Amazon search - uxcell Power Supply DC 3.7V 200mAh 552025 Li-ion Rechargeable Lithium Polymer Li-Po Battery

Michael Schultz -

Hi, glad this fixed the issue for you. I will try to fix the article with better instructions on removal of the connectors. I do believe, that using a knife could be dangerous.. electrically speaking. Believe it or not, the ring is still quite active when it appears dead. The battery in mine still had 3.5v on it. When the unit gets below 3.8, it cuts off, but still has plenty of power. If you use a knife, it will short the pins on the connectors and possibly destroy the electronics, especially if the battery hasn’t been unplugged. I do believe that there is a better way than pulling on the wires though.

Just edited, and I used your method, but used the plastic spudger instead of the knife.

Matthew Bishop -

I've found the old battery type is: FT60205P/300mAh 1,14Wh 3,8V 3C.

Was your's also this type? Because u use for the new battery a 3,7V with a capacity of 200mAh.

Hendry -

Hi Hendry,

The old battery from my Ring was also 300mAh 3.7V. The reason I replaced it with the 200mAh is I couldn’t find a 300mAh battery small enough to fit at the time of replacement. 200mAh or even 100mAh would probably do just as good since the ring is only powered for about 3 seconds on battery (while the circuit to the door bell chime is completed).

Matthew Bishop -

Hendry,

Did you find the exact battery that would fit in the ring pro?

Jeff Sheehy -

Ring says they offer a replacement if it is still under warranty. If not under warranty, we offer a discount code - to purchase a new one at a discounted price.

anonymous 8727 -

Discount code for a new battery cell, or a new Ring? Most people have come to this site because their Ring Pro is no longer in warranty. I think it’s foolish to just toss the Ring and use a discount code to get a new one, especially after users have come to this page to learn how to fix it. This guide is on how to fix the Ring Pro, and it’s fairly straightforward to understand, so I hope users will fix their Ring rather than just buy a new one… even at a discount.

Matthew Bishop -

This was a great resource to find after my Ring Pro went quiet after 2 years of service. I ordered the recommended battery from amazon ($6.49) and attempted the fix my self with success. The doorbell powered up and has been working just fine.

I would like to suggest several updates to the DIY.

1.) You do not need to remove all of the plugs from the motherboard. I found that you only need to remove the plug for the battery. The battery can be taken out without removing the motherboard. Un-clipping all those micro-connectors introduces unnecessary risk.

2.) Cut the battery tabs off the old battery as close as you can to the battery seam. This will give you more material to solder too when attaching the circuit board to the new battery. For the new battery, cut the tabs off as close to the circuit board. This will enable you to solder tab to tab vs. overheating the circuit board or battery.

Beyond that a very helpful fix it!! This provide a $6.49 solution to a $250 replacement issue. THANK YOU THANK YOU!

Clifton -

Would you have dimensions of original battery? This would be helpful in selection of replacement battery.

leff1rj -

You can find the battery on amazon.

Below are the details requested.

Voltage: DC 3.7V; Capacity: 200mAh

Material: Lithium Polymer; Net Weight: 5g

Size: 27 x 20 x 5.1mm / 1.06" x 0.79" x 0.2" (L*W*T)

Clifton -

Awesome. A dead Ring Pro was brought back to life. Thank you so much.

I could not find the 602025 battery through Amazon, but there is a close alternative, 502025 with the same 3.7V and 200mAh and a price tag of $6.49 as of December 31s 2019. The instructions were perfect, and when complete, I simply had to reconnect the device using the App.

Don’t forget to reconnect to your home network after temporarily connecting to the “Ring” network during setup.

kfbeilstein -

QUESTION for those who were successful: After reassembly do I need to plug in the micro usb cable and charge the new battery ? Or did you just wire it back into the 24VAC or whatever you have on the doorbell transformer secondary? Thanks.

Jack Hudson -

Hi Jack,

I connected my unit to the microUSB just to verify it was working and I left it to charge for a short while. Then, I connected it back to the doorbell connection.

Matthew Bishop -

Hi,

Mine has also this battery FT60205P/300mAh 1,14Wh 3,8V 3C.

Does anyone know where i can find this battery? Or can i just use the model 3.7v 200mah?

jo vs -

Hi,

Unfortunitely, the 300mAh battery that ring originally included in the device can not be sourced. Maybe it’s out there now, but I couldn’t find it at the time I drafted the guide. You can use the 200mah 3.7V battery referenced in the article, it will work great!

If you find a 300mAh battery online that will fit properly, please let us know by putting it in the comments!

Matthew Bishop -

Excellent tutorial - allowed me to fix my Ring Pro that died all of the sudden. Had it pegged to the battery but found your tutorial which helped give me the extra confidence I needed to fix it. Bought a battery that was slightly higher capacity (240mah vs 250 mah) but same physical size; swapped the boards, reassembled and presto! Works like new, didn’t even have to reprogram. Thanks!

Ken Kelly -

would connecting a transformer without the 25w 50 ohm resistor cause the battery to fail? Cause that ‘s what I did and now it doesn't work. It shuts on with power, but then shuts off shortly after…

Alonzo Boschulte -

I just removed the 4 screws on the case and tried to separate the front from the back. All of the 4 sides have released their plastic clasps but there is something in the center holding the 2 sides together. I suspect it is the plastic weld under the bar code label on the back. I stretched the sides out about 3/8’\” and I am afraid I will break something if I pull on it any further. There is a depression so I peeled the label back locally and I don’t see a screw there so I think it is a weld. I bought this unit in feb 2018. Anybody else see this?

Pat

Patrick L -

It's a heat transfer pad similar to the heat transfers sitting between a computer's processor and fan...

Kev -

OK, I was able to see inside and see that there were a couple of pieces of double back foam tape holding them together and was able to release the back. (I hope my experience will help other ) I tested the capacitor and it measures 229 uF which is good since the rated capacitance is 220uF. the battery measures 4.01 Volts which should also be acceptable. Now I am lost as to why the live view was not available to my phone most of the time, and at times showed a green shaded picture. The problem was first noticed when someone rang my doorbell and I could not see who was there. That seems consistent with the fact that the battery comes into play when the doorbell is used (as I understand it anyway) . I wonder if the battery is dropping voltage when under load. Not sure how to test that, maybe put a resistor across it and see what happens to the voltage. Suggestions welcome. I have checked the rssi and other health parameters and all look good.

Patrick L -

Hi Patrick,

My old battery was registering as 3.8V, which should have been good as well; however, the old battery was swollen and bulged. I think it’s the exposure to the elements which kills the LiPo batteries in these units. Yes, a failing battery will cause the unit to shut down and reboot due to lack of battery ‘stamina’ when the doorbell button is pressed. Then, as the battery gets worse, the unit will stop working all together. All of these mentioned symptoms point to the battery, and if you ever experience any issues with the Ring Pro, the battery is most always the issue.

Matthew Bishop -

Incidentally, the grid on the back of the battery is a heater I believe, not the antenna. the 2 wire connector goes to a connection on the M/B that is labeled “heater”.

Patrick L -

Ok, Thanks! I first had it labeled as heater in this guide, and then someone reached out and said it was a WiFi antenna. This new evidence regarding the heater connector label on the motherboard is all I need to change it back. Thanks a lot for the comment, I will change it!

Matthew Bishop -

Checked the internal resistance of the battery and it is >700Mohms. That is definitely the problem, should be around 8 or 10 Mohms. I ordered a new 552025 from Amazon (currently out of stock).

thanks for the good set of instructions on the take apart.

Patrick L -

I had endless problems with my Ring Video Pro after the first year. I bought a bigger power-supply, rewired, and disconnected/reset many times only to have it fail again shortly after (often on the first button-press). I didn’t even know it had an internal battery until red the reddit post -

https://www.reddit.com/r/ringdoorbell/co...

The battery wasn’t available anywhere in the US, so I found a source in China and waited 4 weeks for a batch of 8 units.

Dismantling the old battery/circuit-board and preserving its insulation was a fiddly process, but it finally works now!

Thank you for excellent guide!

Mark -

Can you post the information on the batteries you ordered from China?

FonsFL -

Hi Matt,

Thanks for the comment. This is the battery I originally used (and many other users as well), but it was out of stock for a time, so I had to recommend another suitable replacement for the guide until this became available again.

I’m glad to see this battery is back in stock, thanks for the link, I updated the parts list to include it again.

Matthew Bishop -

Thanks for this write-up. Got my Ring Pro going again after stuck flashing 180 degree blue light. Connecting to the micro USB port exhibited same result. Before ordering the battery wanted to make sure it was the battery. After unsoldering the battery circuit board, temp connected it to a lithium coin battery with some clip-on leads and reconnected to the motherboard. Powered the Ring up via the USB port and the blue light was now 270 degree flashing indicating it was charging. Voltage across the coin battery also spiked a bit. The original battery was less than a 0.5 volt.

Had ordered three Ring Pro’s and this one was not installed and shelved for more than a year and could have resulted in the battery draining.

NASA Services -

Hi I’m caden ring doorbell pro

Caden Nguyen -

Hi matt. I just bought a ring pro. It’s been in the box for 6 months. I get know power from the ring on the transformer and have checked the battery 3.9v. Is this a battery issue or something other

thanks Kevin

Kevin Tunnicliffe -

Finding a battery that will fit that’s above 200 mAh and below 401 seems to be a problem. They come is all sizes. Please tell us the dimensions of the factory Ring battery and if you can, estimate if there is any wiggle room in there. Thanks.

Fred Tschirgi -

It seems like this battery would work without doing soldering. This has three wire and 1mm 3-pin socket and also wire seems to be in correct order.

https://www.aliexpress.com/item/40005051...

shjin -

There is small wiggle room vertically and this person successfully used 602030 size instead 602025 size:

https://www.reddit.com/r/Ring/comments/d...

However I found another alternative battery here (Disclaimer: I didn’t try it yet):

https://www.aliexpress.com/item/40005051...

This has three wires and it looks to be in correct order and also same size as OEM. The capacity is 250mah instead of 300mah, but better than 200mah one linked in this article and you don’t need soldering.

shjin -

Does anyone know if it is possible to bypass the battery? If the factory battery only lasts a year, I doubt the replacements will last much longer…

Bryan Florkiewicz -

Look at my fix with 18650 battery with 3500 mAh not 200 or 300 mAh, two winters and no problems, probably will go for many years if battery dies then I can change it without taking the main unit apart

Automatoholic -

This is what I did when my ring pro went dead and wouldn't connect to Wi-Fi. I did exactly what is shown here, the only difference is that I used one 18650 battery and since it's too big to fit inside ring pro I installed the battery inside a ring pro bracket I bought on Amazon. All worked out great, the bracket let me adjust the position of the camera better then what it was before without the bracket. I didn't install the heater on the battery, I glued it to the speaker instead to keep the camera heated in the winter. It has been over a year since the modification and I didn't have any problems since, battery voltage is 4029 mV as per device health and it's the second winter since the fix, I live in Canada. I'm about to do the same fix on my second ring pro which is at my cottage, it was purchased December 20, 2019 installed January 2020 and went dead December 24, 2020, just like the first ring pro I at home which died after 14 months, looks like it's a defect that is on all rings pro, just a matter of time

Automatoholic -

Very interesting…

I’m curious if you were able to maintain the water tight integrity even while applying this fix. If so, I would love to see a Youtube Video/blog tutorial on how to do this. My Ring Pro has failed again after about a year of use after replacing the battery. I have since purchased a new Ring 3 plus and custom fit some PVC to extend my doorbell doorframe area to fit it. At least the 3 plus has big replaceable battery packs and works with the chime.

Matthew Bishop -

I did exactly what is shown here, the only difference is that I used one 18650 battery and since it's too big to fit inside ring pro I installed the battery inside a ring pro bracket I bought on Amazon. Here is video of how i did it, part 1

https://youtu.be/ts83cHDZHdc

All worked out great, the bracket let me adjust the position of the camera better then what it was before without the bracket. I didn't install the heater on the battery, I glued it to the speaker instead to keep the camera heated in the winter. It has been over a year since the modification and I didn't have any problems since, battery voltage is 4029 mV as per device health and it's the second winter since the fix, I live in Canada. I'm about to do the same fix on my second ring pro which is at my cottage, it was purchased December 20, 2019 installed January 2020 and went dead December 24, 2020, just like the first ring pro I at home which died after 14 months, looks like it's a defect that is on all rings pro, just a matter of time

Automatoholic -

Having had the same issue and doing some digging. This appears to be the actual battery used in the ring.

575166

https://www.hkailoka.com/index.php?main_...

hmltnangel1 -

Hi,

The provided link is not the same battery Ring originally used. The size is incorrect, and the connecter only uses 2 wires. The Ring Pro requires 3 wires to be used on the connector.

Matthew Bishop -

Hello all iFixit users,

I am the original author of this guide. I have since done extended testing on my ring pro doorbell after performing the fix and writing this guide, and after about a year of using it with a new LiPO battery with the original charging circuitry migrated, I have found the doorbell has failed again.

Here’s what happened and the timeline:

- PL602025 200mah battery installed with the original charging circuitry migrated. February 2019

-Ring pro put back into service. February 2019

-Ring pro experienced same failure as originally observed December 2020

-New replacement battery found swollen just like original.

So what does this mean? Quite simply put, the iFixit guide here I wrote is the only real method to fix a failed battery, but the poor design of the device and the harsh weather conditions will ensure even the replacement battery will fail again after 1-2 years. I’m now using a Ring doorbell 3 plus.

Matthew Bishop -

How come the video shows 3 wires and my battery only comes with 2 wires. A red and black wire.

john collins -

Hi John,

This is why you have to transplant the charging circuitry from the old battery to the new. The new battery only comes with two wires, but the Ring requires a battery with three wires, so please look at steps 10-12 to transplant the circuit board to the new battery.

Matthew Bishop -

I completed the battery replacement without this guide. I found the guide only after I worked at the replacement. The author of this guide did a fantastic job. I wished I would have had the guide before I started the replacement.

Michael Kilmer -

Does anyone know if the new Video Doorbell Pro 2 has this same issue or did they solve the battery issue with the latest revision of this doorbell?

Joe Halleck -

I would love to know this as well, Joe. I am using the plus model now, and it is really too big for my liking. If you ever find the answer, please share it here as the rest of us would love to know I’m sure.

Matt

Matthew Bishop -

Thank you for the nice guide ! I’m in the same situation, after 1,5 yrs my Doorbell Pro died. The ring works if connected to the side USB plug, but not on wired power. Wired power is there, this should be not a problem. I went trough the steps, and checked the battery. 4V , so looks not died yet ?? Any other tip ? so should I order a new one to replace ? Note: the additional power kit not installed, I used the transformer by RING and the old ring staff not connected at all.

Andras Szonyi -

Hi Andras, the symptoms you described is almost certainly the battery. The voltage doesn’t have to be low for the battery to be weak/failed. The battery could have low stamina, meaning it will read 4V on a multimeter, but when put in circuit, get pulled down. As always, you should make sure your wiring setup is compliant with Ring’s guidelines. If you have the old chime in use, make sure to use the power kit. Refer to user manual and installation guides.

To start, just replace the battery following the guide and see what happens. You should also check for water damage in the unit on disassembly and for the big capacitor, as that component has failed for some users.

Hope this helps

Matt

Matthew Bishop -

An excellent guide.

Got the replacement battery from Amazon, Followed your detailed instructions and my Ring Pro is working fine again.

Thank you for saving me purchasing a new one!!

Bob Atkins -

I started having some issues with the Ring Doorbell Pro like others have mentioned. I disconnected the doorbell (hardwired typed) and plugged it in for 12 hours to charge the internal battery. This seems to have fixed the issue for now. I'll definitely come back here when I need to replace the battery. Just be aware that if you contact ring support, like I did, and ask them about the internal battery, they will denie that there is no internal battery. I went round and round with the lady on the phone about this. So ring support is useless in regards to this matter.

JB-10/19/22

Elk Hunter -

Haha that’s interesting! So Ring is still denying the battery exists, even though it clearly has a charge port…

Matthew Bishop -

Thank you for this guide.

I was able to breath new life into our device with this information. I chose to carefully perform the surgery without removing any black connectors other than the heater connection for the battery... which did disintegrate. With careful soldering and a touch of hot glue to provide insulation, reassembly was a success.

Difficult... Yes.

Time required... 5 hours overall.

The battery I used was:

https://www.amazon.com/dp/B07C9R84QS?psc...

Bryce Ligus -

Thats a fair point honestly… The seasons and temperature changes make the plastic brittle and as these units age, getting the plugs disconnected without damage will be incredibly difficult. 5 hours is about right, even though some have reported it taking under an hour. When I wrote the guide, I put in 3 hours.

Matthew Bishop -

Thanks to this write up, I am now able to try and repair my Ring Pro which quit working. I have found the "charging" technique on youtube which worked for a few months, but now the internal battery won't hold charge.

[url=https://flic.kr/p/2oGARFW][img]https://live.staticflickr.com/65535/5296...[/img][/url][url=https://flic.kr/p/2oGARFW]battery 01[/url] by [url=https://www.flickr.com/photos/strobemonk...](the original) strobemonkey[/url], on Flickr

[url=https://flic.kr/p/2oGyWLA][img]https://live.staticflickr.com/65535/5296...[/img][/url][url=https://flic.kr/p/2oGyWLA]battery 02[/url] by [url=https://www.flickr.com/photos/strobemonk...](the original) strobemonkey[/url], on Flickr

[url=https://flic.kr/p/2oGBh6R][img]https://live.staticflickr.com/65535/5296...[/img][/url][url=https://flic.kr/p/2oGBh6R]battery 03[/url] by [url=https://www.flickr.com/photos/strobemonk...](the original) strobemonkey[/url], on Flickr

Kev -

To those having the same issue, there is now a similar sized battery on amazon, be it 3.7v, 250mAh only, but it works.

Kev -

hi all sorry to coment on this at this time but this cure the wifi dropping out and not getting connected to the wifi as the white circle doesnt spin

Brian Cook -