Introduzione
La tua batteria si scarica troppo velocemente? Sei costretto a ricaricare il tuo S7 più di una volta al giorno? Questa guida ti mostra come rimuovere la vecchia batteria stanca dal tuo S7 e sostituirla con una nuova.
Nota che la videoguida raccomanda di rimuovere la scheda SIM. Non è necessario ma non avrà effetti negativi sulla riparazione se la rimuovi.
Prima di smontare il tuo telefono, scarica la batteria sotto il 25%. Una batteria può prendere fuoco e/o esplodere se forata inavvertitamente.
Se la tua batteria è gonfia, prendi le dovute precauzioni. Non scaldare il tuo telefono. Se necessario, puoi usare un contagocce o una siringa per iniettare alcol isopropilico (purezza oltre il 90%) attorno ai bordi della cover posteriore per indebolire l'adesivo. Le batterie gonfie possono essere pericolose, quindi indossa occhiali protettivi e usa la necessaria cautela; se non sei sicuro di saper eseguire la procedura, porta la batteria da un professionista.
-
-
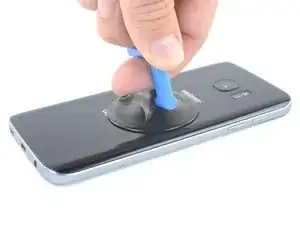
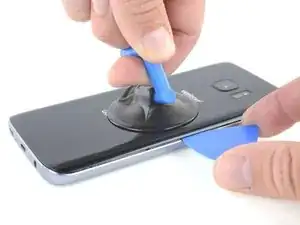
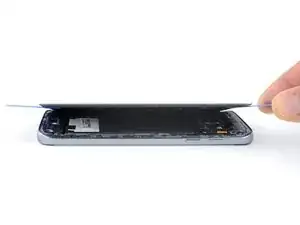
Quando il pannello posteriore è caldo al tatto, applicaci una ventosa, il più vicino possibile al bordo riscaldato ma evitando la parte incurvata.
-
Solleva tirando con la ventosa e inserisci un plettro di apertura sotto il vetro posteriore.
-
-
-
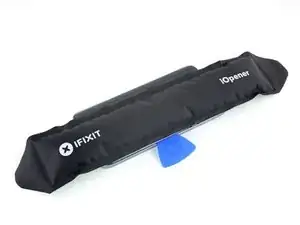
Quando il plettro è saldamente inserito sotto il vetro, riscalda e applica di nuovo l'iOpener per ammorbidire l'adesivo.
-
-
-
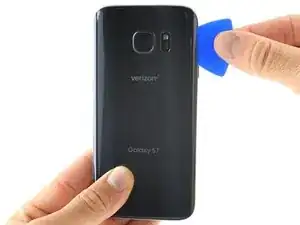
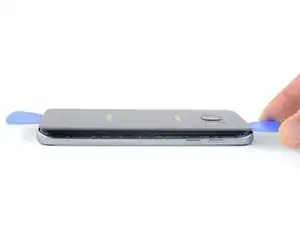
Fai scorrere il plettro di apertura lungo il bordo del telefono per tagliare l'adesivo.
-
Lascia il plettro in posizione e prendine un altro per procedere al passo seguente. Lasciare inserito il plettro evita che l'adesivo appena tagliato aderisca di nuovo.
-
-
-
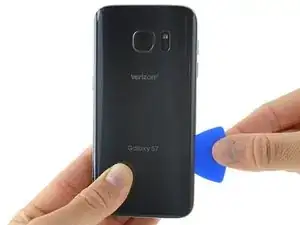
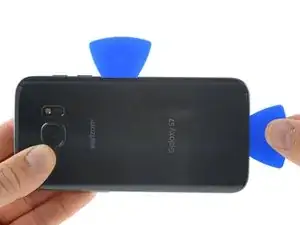
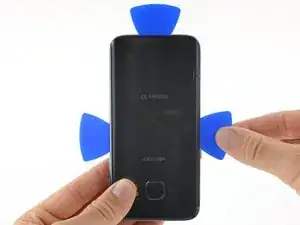
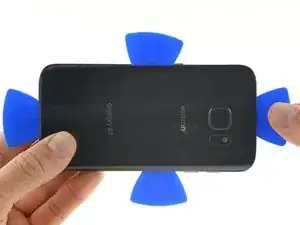
Ripeti la procedura precedente di riscaldamento e di taglio per gli altri tre bordi del telefono.
-
Lascia un plettro in ogni bordo del telefono mentre procedi con il successivo per evitare che l'adesivo aderisca di nuovo.
-
-
-
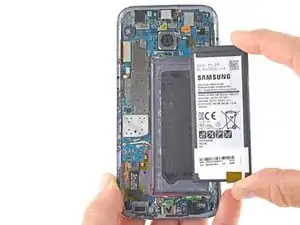
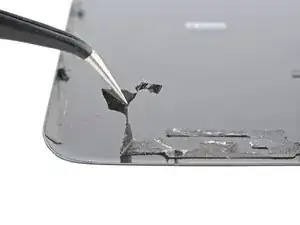
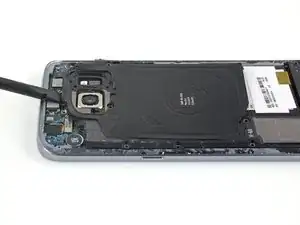
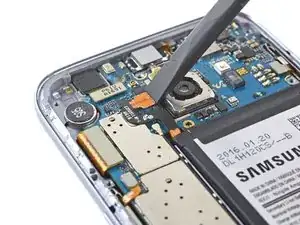
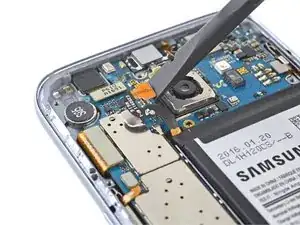
Inserisci la punta di uno spudger dentro il piccolo incavo a destra del comparto dell'antenna e fai leva verso l'alto per rimuovere il gruppo stesso dal frame.
-
Rimuovi il comparto dell'antenna.
-
-
-
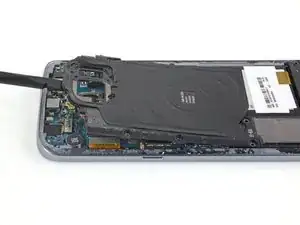
Usa l'estremità piatta di uno spudger per sollevare la bobina di ricarica wireless fuori dal telefono.
-
-
-
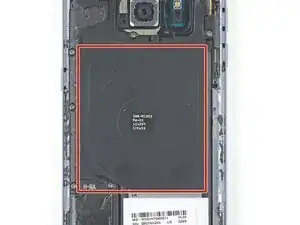
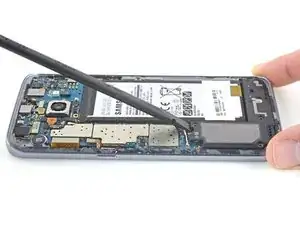
Disponi un po' di alcol isopropilico ad alta concentrazione (>90%) sotto ogni angolo della batteria e lascia agire per diversi minuti per aiutare ad ammorbidire l'adesivo.
-
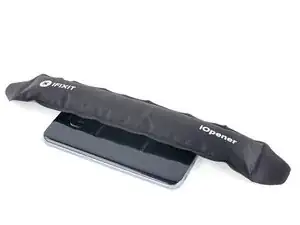
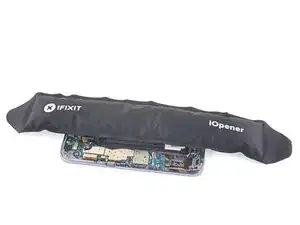
In alternativa, prepara un iOpener e applicalo direttamente sulla batteria.
-
Applica l'iOpener per almeno un minuto per ammorbidire l'adesivo della batteria.
-
-
-
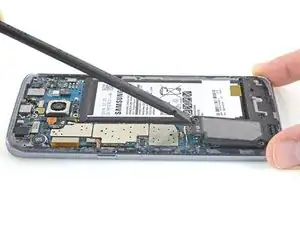
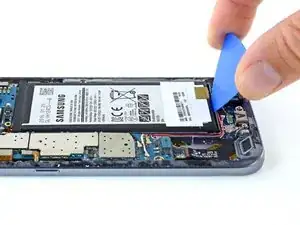
Fai scorrere un plettro di apertura lungo il bordo della batteria per tagliare ogni adesivo rimasto.
-
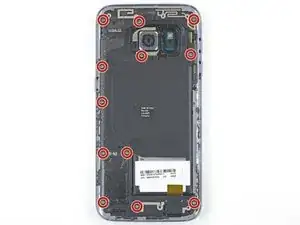
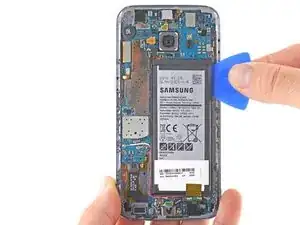
Solleva la batteria fuori dal case.
-


Per rimontare il tuo dispositivo, applica dell'adesivo sul vetro posteriore e segui queste istruzioni in ordine inverso.
Dopo aver completato questa guida, calibra la batteria appena installata.

57 commenti
After this is it still waterproof?
In theory, if you applied the replacement adhesive 100% correctly, it will retain its water resistant properties. However, I would never deliberately expose any device to water, as you can never be completely sure that all the seals are perfectly intact.
That is actually covered in the video. Did you actually watch it? If water resistant is important to you then what you would do is purchase new gasket material so that after you have opened up the phone and removed all the existing gasket you would apply the new gasket and then finish up and re-seal your phone. As to how water resistant it is after re-sealing the phone all depends on how careful you are and how exact your work is.
Sooooooooo why exactly did Samsung make it impossible to open the phone?
Because screws are unsightly :P… and repairing your old phone makes you not want to buy a new phone.
The display is coming off instead of the back panel. Do you have any suggestions if this happens?
I used a heat gun and heated it a little too much. The color of the rear glass is just a sticker on a clear cover. Due to this I tore the sticker off. Now the back cover is see through, which isn’t a bad thing but the repair was for a customer.
Kevin Bishop -
When using the iOpener, you may need more than 30 seconds, especially in compact or low wattage microwaves. Take this slowly, though, and be extremely careful, as it is easy to overheat your iOpener. Remember, you can always heat it up a tad more, but you cannot undo overheating it.
Jacob Pratt -
I used an adjustable heat gun and set it to 400 degrees (F). That was enough to seperate the glass without having to worry about exposure times of the heat. The front of the phone was just fine. Just be ready to use a bunch of picks to slide in between because they will be needed this way.
Ryan Schumerth -
I went from the bottom center up, using one ifixit tools, one suction cup and one pick.
Pick just popped in with some minor pressure.
Laid heat pack along base of phone 2 mins first and worked up slowly, rotating picks as I went. Had to heat iopener over several 30 second bursts
Lauren Burt -
This is useless because the phone does not recognize the new battery and will behave like on the old one
Search for “battery count xda"
Albert Einstein -
That is an interesting discovery! Thanks for pointing it out—I’ll have to look into it.
Even if this is true, replacing the battery should still give restore a significant amount of life, since the max voltage affects a minor amount of the battery’s capacity. If you charge a worn battery and a new battery to the same lower max voltage, the worn battery’s voltage will dip more under use and will be depleted faster.
Arthur Shi -
Thanks for the guide! It helped me replace a friend's battery with no problems!
Darren Crook -
I will never replace a screen again, and don’t recommend it. Not for phones nowadays. Once upon a time everything was screwed together, and you might even get the same quality or better screen when buying from eBay. And having the phone repaired was nearly the cost of the phone. Now, it’s the reverse. Removing the glued back and screen and cleaning off all the glue for a clean re-seal is an ordeal that takes multiple hours, AND, often the screen you buy on eBay is NOT OLED, but an LCD, and a blurry one at that. And the local phone repair store will replace the screen with an OLED, reliably, same day turn around, for not much more than the cost of an actual OLED screen, because they have the parts in bulk, and the tools and experience to do it quickly. Never again!
domarius -
have you ever had one that just wont open at all? i can not get mine to open to replace the battery i have heated with a heat gun and attached suction cup and it will not lift at all
Carla James -
Hi Carla,
I've definitely had that experience before. The adhesive is very strong, and the curved back makes getting the initial seam very difficult. I'd suggest focusing on one small area on the edge. Apply steady force when you pull, and repeat a few times to loosen the adhesive. Eventually it will give and present a small gap.
Arthur Shi -