Introduzione

Il tuo dispositivo non resta più carico a lungo? Si spegne e riavvia da solo senza preavviso? Sostituire la batteria può risolvere questi problemi.

  1. G5Jo2NlpVoHkSiRd
    • Lavorare sul dispositivo mentre è accesso potrebbe farti prendere la scossa. Assicurati di spegnerlo e scollegarlo dal caricatore prima di iniziare.

    • La rimozione dello schermo può risultare difficile a causa dell'adesivo resistente usato.

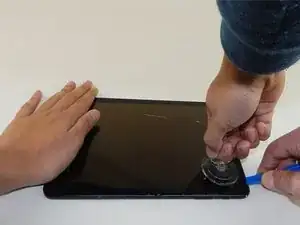
    • Scalda tutti i 4 bordi del dispositivo appoggiandoci un iOpener o usando una pistola termica per ammorbidire l'adesivo lungo i bordi dello schermo.

    m.E. wichtig vorher die Kartenhalter für SIM und SD entfernen, sonst löst sich der Kontakt unkontrolliert bei Schritt 6.

    Frank Huebner -

    You make no mention of re-Glueing the screen, just applying the steps in reverse order - does that mean simply applying heat again will re-glue the components from the residue?

    Robin Penny -

    i replaced the battery, the sticky tape did hold up again, but if you replace the screen it depends on whate side the tape sticks to. On ine the most part of the tape stuck to the screen.

    Steffen Hahn -

    I know its 2020 but i cracked my screen and idk if its on or not

    benjamin burkowski_FaZe -

  2. BLZ2ilURXWWMtnqH
    BLZ2ilURXWWMtnqH
    yAmeeyVFkboaMmbN
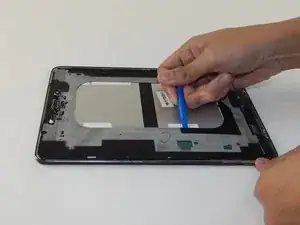
    • Infila uno strumento di apertura in plastica nella fessura sul bordo del dispositivo vicino ad un angolo, dal quale inizierai a rimuovere lo schermo.

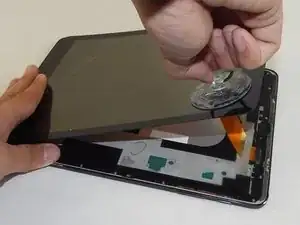
    • Applica una piccola ventosa vicino all'angolo dove hai infilato lo strumento di apertura.

    • Tira verso l'alto la ventosa mentre spingi verso il basso lo strumento di apertura per rimuovere lo schermo (potrebbe servirti una mano per tenere fermo il dispositivo mentre fai leva).

    • Un cavo a nastro è collegato al retro dello schermo. Evita di sollevare o muovere lo schermo più di 8-10 centimetri prima di scollegare il cavo, altrimenti potresti danneggiare il cavo stesso o il dispositivo.

    The lower portion of the screen is glued to the body. The screen is unable to be completely removed.

    Chad Naville-Cook -

    That blue plastic tool doesn’t work

    Jarred -

    starte oben, unten verhindert eine Nase an dem Audioanschluß das erste anheben.

    start upside, downside a nose at the audio connector prevents the first lifting.

    Frank Huebner -

    Difficile, j'ai acheté les outils nécessaires. Après avoir chauffé les côtés et essayé de les décoller, la vitre a craqué.😠

    Pierre Simard -

    Had to use a heat gun to remove with patience and time, using a pic to "saw" into the seal, starting with the right side corners. Stopping every few seconds to reheat with heat gun. Take care on the bottom left corner, and left side. There is very little room between the edge and LCD, making it easy to stick a plastic pick or removal tool in between the LCD and front glass. The other sides have more room for prying. I nicked the bottom left corner with a prying pic, which killed the entire display :-( Good luck!

    Dustin Eyestone -

  3. MopncCRVsusSWaEW
    • Un pezzo di nastro argentato è incollato sopra il cavo a nastro dorato che collega lo schermo al tablet.

    • Usa un paio di pinzette per rimuovere attentamente il nastro argentato.

    Hi. My SM T 815 (Tab 2) flickers and switches off. The screen is still fine. Well atleast it looks fine. But it doesn’t switch on. Could it be the reflex cable? Why is it doing this? And how can it be solved?

    Thabo -

  4. FZRqiZVICTA1HWwV
    FZRqiZVICTA1HWwV
    cALdJRorR3I33xdI
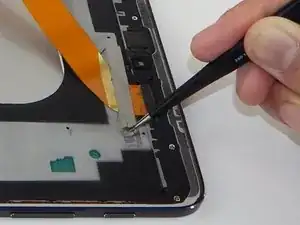
    • Usa lo strumento di apertura in plastica per sollevare delicatamente e scollegare il contatto del cavo a nastro dorato dello schermo dalla sua presa nel tablet.

  5. v2wPcLhfmnVWg5w5
    v2wPcLhfmnVWg5w5
    a2MfE1TagKEqcTfM
    • Svita le diciannove viti Philips #1 da 3 mm.

    make sure to remove the 2 black screws on the frame. i fix it doesnt say to take those off. nearly damaged the frame

    bryzz tortello -

  6. Xaji5FQuplJkS6hG
    Xaji5FQuplJkS6hG
    uWoe5HLB16AcSlrG
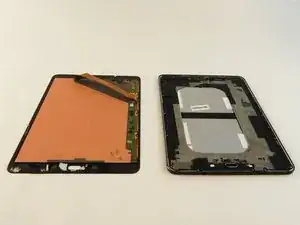
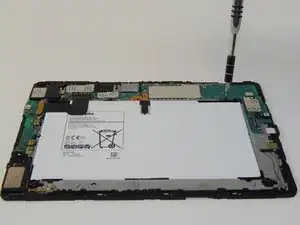
    • Apri la copertura protettiva del dispositivo facendo leva con uno strumento di apertura in plastica.

    • Anche se il dispositivo si apre lungo i bordi esterni, usare quelli interni (come nelle immagini) per fare leva può semplificare la procedura.

    -Zuvor unbedingt SIM Karte u microSD entfernen, sonst bleibt der Elekronikpart am Gehäuse fest und das Flachbandkabel davon kann beschädigt werden!

    -Lösen des unteren Teils des Innengehäuses zum Schluss, da Ladebuchse eine Nase hat und sich erst löst wenn man es schräg nach unten abhebt.

    Michael -

  7. HYP4CPIPSwVKAhF1
    HYP4CPIPSwVKAhF1
    L2XlHA6LVjaaFqQq
    • Svita le quattro viti Philips #1 da 3 mm che tengono ferma la batteria.

    I had an issue with charging of Tab S2. When you connect it to a charger, it detects it, charges for 2 seconds, stops charging for 7-8 seconds and charges again for 2 seconds. It keeps going on in circles. It actually did charge to 100%, but it could take a whole day. I watched some videos online and there’s a way to get to it from behind. I got myself tools and a new battery, thinking it could be a battery problem. Long story short, there are flat cables reaching behind from volume buttons glued to the back cover and they use pressure from the back cover to make contact. Of course, I broke the flat cable. Most of the back cover is held in place by clips, but right next to the round metal looking “buttons” there is some extra strong glue (north of those “buttons”). Samsung didn’t want to make repairs easy and simple :/.

    sbelosevic -

  8. uGjWXB5uXZIAkXuW
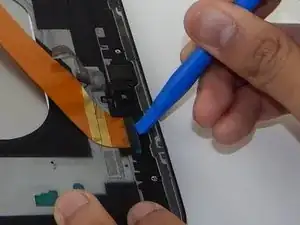
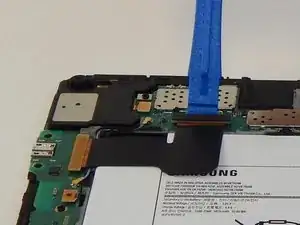
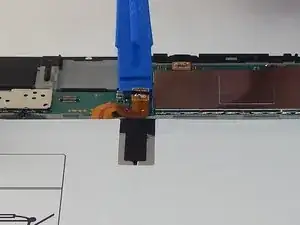
    • Usa uno strumento di apertura in plastica per ruotare verso l'alto l'aletta di bloccaggio sul connettore ZIF nell'angolo in alto a sinistra del dispositivo.

    • Una volta sbloccato il connettore, sfila il cavo a nastro dalla sua presa con un paio di pinzette.

    • Puoi non rimuovere del tutto questo cavo: basta un'estremità per liberare la strada alla batteria.

    I did not find it necessary to detach this cable. The battery slid out from under it easily.

    Yishai Sered -

  9. oTea6UgETG5xGhyq
    oTea6UgETG5xGhyq
    TQWfGNR5NiIY2AIn
    • Usa uno strumento di apertura in plastica per sollevare e scollegare il connettore del cavo della batteria dal dispositivo.

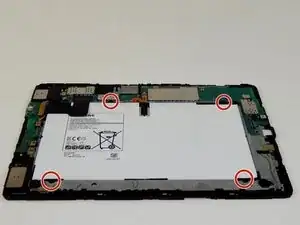
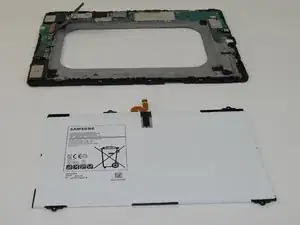
    • Ora puoi sollevare e rimuovere la batteria.

    I was proud of myself. It was for me as easy as this, videos online showed more difficulty . The suction cup and the jimmy was enough to open the screen. Do watch some videos online to see all the parts you could damage and on how to open the different cable connectors as they are and work different.

    Rene vandockum -

Conclusione

Per rimontare il dispositivo, segui le istruzioni in ordine inverso.

Jovina Martinez

Membro da: 20/01/16

2084 Reputazione

17 commenti

Thanks for the guide. At least Apple has an out-of-warranty service for the battery replacement of $99. To replace this battery, with a dubious quality 3rd party battery as I don't think it's possible to buy a OEM Samsung battery, looks like a disaster waiting to happen, not worth the effort or time, I returned mine to Samsung after seeing this guide. I'm not suggesting Apple is a saint for the $99 replacement, but at least they will do it with an OEM battery.

adobepro -

Can you give a link to this apple offer for an ipad ?

stagiaireekimia -

after I did this, my display was dead. Nothing showed. Tablet was receiving email notifications and lights worked.. just a blank screen. What happened?

Mr Betatester -

You crackedbthe oled panel

Biuro Lul -

The Battery is accessible from the rear panel!

**It will damage two plastic mounts on the rear panel, however an appropriate adhesive (GO2 by loctite) or bonding tape, will fix this**

1: On the back, there is a clearly visible outline of a plastic cover.

2: Starting from the side opposite the “Little round button things” on the back, run a case opening tool slowly around the seam, popping the small plastic hooks. Do all three sides EXCEPT the side with the round button things.

3: When you get to this forth side, carefully and slowly work around the round buttons, working the case up. Then flex up the back plastic from the side you have already removed, and using a long case tool, insert it in all the way past the battery to the inside edge of the round button things and gently twist here. The tabs will pop and that side will release. Repeat for the other snap button.

4: Your back cover is now removed and you have access directly to the battery !

Do this If you are not confident lifting a $350 dollar screen…

tek Gadget -

The “two plastic mounts” are not “snap buttons.” There are two nuts mounted on the back panel, and they are attached by screws from the front. The process described in this comment will at least separate the nuts from the back panel. The back panel itself may crack, or even the nut and its attachment may remain connected to screw and a hole be formed in the back panel.

The proper procedure is to remove the display as shown here. Then remove the black screws connecting to the back panel, instead of all the silver screws in step 5. Then use an opening tool on the back panel and remove it safely to access the battery from the back side.

Unfortunately it’s hard to find the adhesive cutout needed to properly re-attach the display after removal (I only found the part GH81-13867A on eBay from Europe, about $28 with shipping). And even then it would be hard to remove the old adhesive well. We’ll likely have to reply on reuse of the old adhesive, and the display will not longer be attached perfectly as before.

Yishai Sered -

Yep, this is the much easier and safer way to do it.

Blair Skinner -

Thanks tek Gadget!

Antonio Zanella -

Many tanks tek Gadget!

Antonio Zanella -

Is this possible without breaking the screen ? or does it always break when removing it

Rolo -

Please take care of the Comment of tek gadget!!! Because the photos are horrible wrong. You MUST turn it and get of the cover of of the backside!!

tek gadget explained it very well on 31.10.2017!!

Rudolf Pezzei -

Failed to mention that if you take the screen off, there are 4 ribbon cables on the left side. If you go around with the guitar pick looking tool, you will rip right through them. Just destroyed my tablet.

Russell Streitz -

Inside of my tab S2 looked slightly different (probably just a newer model) and yes there are ribbon cables to be aware of; however, I was able to replace my battery following this guide. It wan’t easy though!

Chris Batchelor-McAuley -

Why not just remove the rear cover instead? Easy access and no chance of screwing up the screen, adding to your replacement costs?

Gregg Stanley -

If following the guide as listed. Step 6, you may want to pry on sides/top. For the bottom the headphone jack plug slightly juts out and its easier to slide out than work against it with fear of breaking.

Jeremy Smith -

Hi, ich habe hier ein samsung sm-t810 , jetzt gibt es 2 verschiedene wege. warum nicht durch die klappe hinten öffnen?

liebe Grüße

michael buss -

I find it way easier to remove the back panel, and break the two nuts.


The nuts are close to the snap button for the flip cover. By using the metal spudger, you can get a proper leverage close to the nuts, and get a clean break.

To do this, I detached all the clips I could, to the point where the cover is only attached by the two nuts. Then, to break a nut, I insert the spudger from the opposite side. I press the tablet against the table (not the cover...), and I lift the spudger until the nut break. Repeat with the second nut.

Then you gain access to the battery.

You can put back the cover without any glue or whatever, it already holds enough thanks to the numerous clips.

Adrien Horgnies -