Introduzione

Questa guida mostra come sostituire la batteria del tuo Sony Xperia Z3 Compact. Segui questa guida in ordine inverso per rimontare il dispositivo e applica del nuovo adesivo dove necessario.

  1. QSvvMjjJIQdjjIQg
    QSvvMjjJIQdjjIQg
    L4RFHZ66iqAfr45s
    YptMYDDkKoJJvUXE
    • Riscalda la cover posteriore del tuo Xperia Z3 Compact con un iOpener per ammorbidire l'adesivo sottostante.

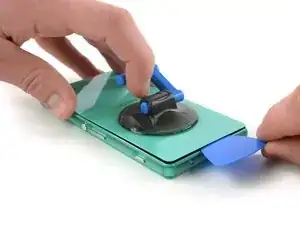
    • Solleva con una ventosa la cover posteriore per creare una fessura dove infilare un plettro di apertura.

    • Muovi con delicatezza il plettro lungo i bordi per allentare l'adesivo su ogni lato del telefono.

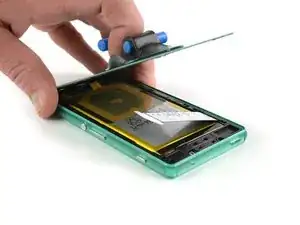
    • Ora puoi sollevare la cover posteriore con la ventosa.

  2. kYqurXC1QQqyYQ2D
    kYqurXC1QQqyYQ2D
    ZLEcQtvXAEWWKfFB
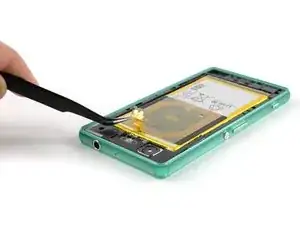
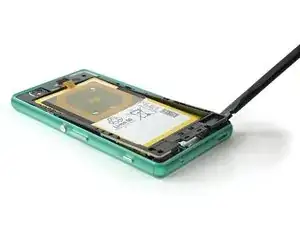
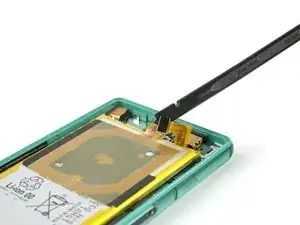
    • Usa delle pinzette per rimuovere l'etichetta con il numero modello che è agganciata sul lato destro del display.

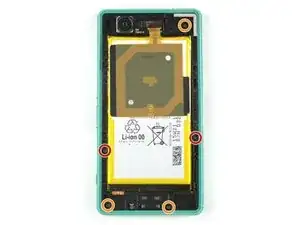
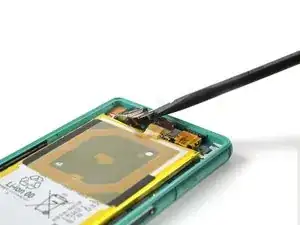
    • Stacca il cavo flessibile dell'antenna NFC usando delle pinzette.

  3. vdTDeTqjExdmpW1K
    vdTDeTqjExdmpW1K
    HFLTNQYb61D1ySem
    • Svita le viti seguenti che ancorano il telaio centrale del Sony Xperia Z3 Compact.

    • Due viti Phillips #000 da 2,7 mm

    • Tre viti Phillips #000 da 2,5 mm

    • Usa uno spudger per sollevare il telaio centrale da ciascun lato.

    • Ci vuole attenzione e pazienza: il telaio intermedio in plastica e fragile e potrebbe rompersi se lo pieghi troppo.

    Silver screws (2) belong to the side of the frame. Golden screws (3) for top and bottom.

    Joachim Burket -

  4. ZqSSUgbjGvuBRqj6
    ZqSSUgbjGvuBRqj6
    qqZGUTbcpbhcE1uJ
    5lWiV61l2esitwmx
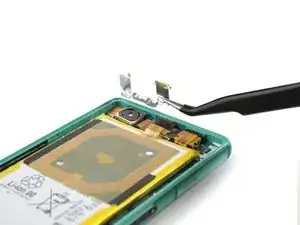
    • Sgancia la staffa metallica che tiene giù il connettore flessibile della fotocamera posteriore.

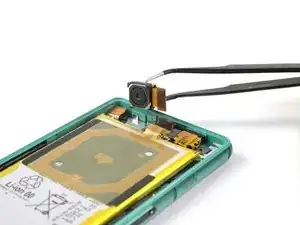
    • Scollega il connettore flessibile della fotocamera posteriore e solleva dal suo alloggiamento la fotocamera stessa.

  5. RFNUQr1KKfchUHlB
    RFNUQr1KKfchUHlB
    ePX1c2vGtWZFUTQ1
    • Usa uno spudger per scollegare il connettore del jack cuffie e del sensore.

    • Svita la vite singola Phillips #000 da 2,5 mm disposta sul lato superiore sinistro della scheda madre.

  6. fyLgUHOSalZ6dgFY
    fyLgUHOSalZ6dgFY
    HxjjTHSRrIRlhA2F
    j3yYGOOayqZM1nrR
    • Scollega i connettori flessibili della batteria e del display.

    • Fai uscire gli alloggiamenti delle schede SIM e micro SD e rimuovili.

  7. ikkYQLAjYFXDExl5
    ikkYQLAjYFXDExl5
    iN6EJlwYL6mNDlSf
    2Ehu1dUQyipmVw52
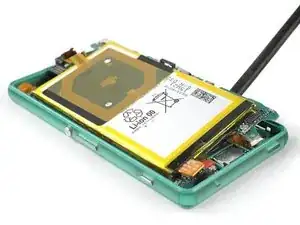
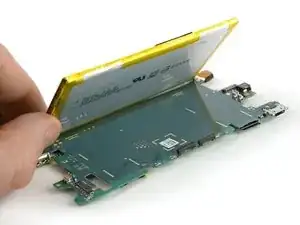
    • Usa uno spudger per sollevare lievemente la scheda madre.

    • Presta attenzione! Devi far passare il cavo flessibile del display attraverso una cavità nel la scheda madre mentre sollevi la scheda stessa. Il cavo è connesso anche il motore di vibrazione, che resta ancora attaccato al telefono.

    • Rivolgi una particolare attenzione ai due connettori neri a lato della batteria. Possono rompersi facilmente nel corso della rimozione alla scheda madre.

    • Usa delle pinzette per estrarre il motore di vibrazione e quindi rimuovi completamente la scheda madre.

  8. YOpbk5T4cqZ1Ytj2
    YOpbk5T4cqZ1Ytj2
    rLQZxpWyTAn2FTJK
    aPosxZhGUlrGLQIr
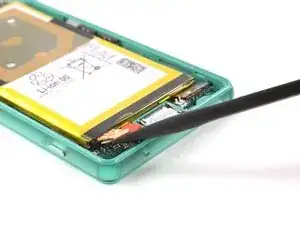
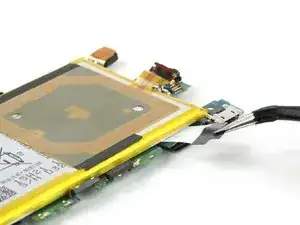
    • Tira verso l'esterno, con delicatezza, entrambe le strisce nere con le linguette adesive sotto la batteria.

    • Non tirare mai le strisce verso l'alto ma sempre lateralmente. È facile rompere le strisce adesive. In questo caso, usa una scheda di plastica per staccare, con delicatezza, la batteria. Applica un po' di calore se necessario!

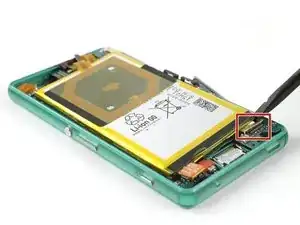
    • Ora puoi rimuovere facilmente la batteria dalla scheda madre.

  9. NNbIFnOZKdPQSAKp
    NNbIFnOZKdPQSAKp
    ZPwXhstywUdqLSTj
    iQIJkLEu6xip6hTh
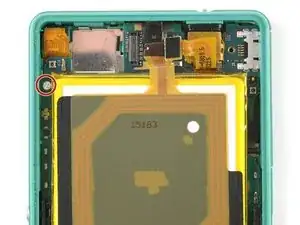
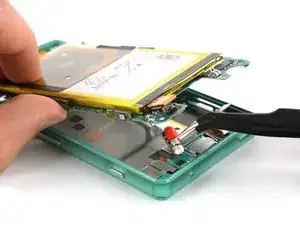
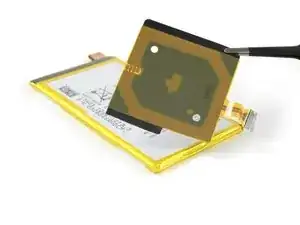
    • Scalda lievemente l'antenna NFC per ammorbidire l'adesivo sottostante.

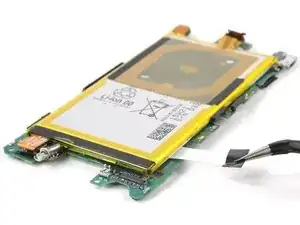
    • Stacca la batteria con cautela. Se l'adesivo inizia a fare resistenza, usa una scheda di plastica per allentarlo.

Conclusione

Per rimontare il tuo dispositivo, segui queste istruzioni in ordine inverso.

Tobias Isakeit

Membro da: 31/03/14

116544 Reputazione

10 commenti

Thank you Tobias !

My Z3 compact starts now his second life :)

Guy Hard -

Thank you for repairing your phone and giving it a second chance.

:)

Tobias Isakeit -

Where do I need the Back Cover Adhesive Strips for?

Visser -

The guide doesn’t mention that one needs new adhesive for the battery (the one I bought isn’t sold with it). It would therefore be wise to mention what kind of adhesive (two-sided, what thckness, etc.)

axel -

Double sided tape is enough to keep it in place, as the back cover and midframe holds everything down for extra reinforcement. Sony sure makes their smartphones !&&* to repair, but that’s another rant.

William Nephew -

Nice tutorial, thanks.

CAVE: I broke off one of the connectors to the magnet-charger contacts on the very edge of the mainboard when lifting it off the case. The same seems to have happened to the author (Step 8 and 9 - the lower one of the two black bridges looks rather wonky)

Pitfall: When lifting the vibration motor (Step 7), make sure you check the cable running on the underside of the mainboard afterwards. It is the connector to the on/off switch. If you unplug it accidentially (like I did), you won’t be able to turn your phone back on after the work is done.

Max -

Thank you for the precise guide, I’ve followed it with no major problems and no damage done :)

Just a friendly notice to others that will try this, reversing steps order is not enough to reassemble the phone if you’re not careful. Some parts are tricky such as the need to put LCD tape back through motherboard hole or the need to watch out not to destroy jack/sensor tape when pushing motherboard back. Also, you’ll need a double sided tape to glue the battery back to the motherboard - original tapes are destroyed during disassembly. The camera clamp is tricky to remove without bending it. Also, it seems that it’s only kept in place by back plate pressure. Also, remember or take a picture of how the NFC connector is attached - I’ve had problems figuring it out when reassembling.

All in all, great guide and my phone will work for me for months or even years instead of going to a trash can because of a swollen battery. Thanks again!

Grzegorz Krugły -

Took a couple hours but I couldn’t have done it without this guide, thanks! Lets hope the new battery won’t be dying on me by lunchtime every day :)

red_carbon -

After replacing the battery and turning on the telephone my Xperia doesn’t see the SIM card.

I did everything very carefully and I don’t know what can be the reason for that.

It’s not like there’s no service, it just can’t read any other SIM card too.

Does anyone have an idea how to fix it?

zofia.bochnak -

Amazing - with Carbon Rom this phone is still a daily driver and the old battery needed replacement due to gases expanding the body. I used a bit of sugru for the adhesive parts, especially the back cover. Although it is not waterproof anymore I am really happy that I could repair it with your guide. Much appreciated!

Simon -