Introduzione

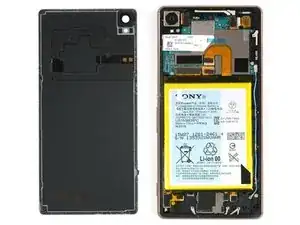
Usa questa guida per sostituire la batteria usurata del tuo Sony Xperia Z3.

  1. IBVhVNAcgUXkELdR
    IBVhVNAcgUXkELdR
    6JK4olH1QPKLLwOa
    HUQ2FtAZb6BU55OX
    • Scalda la cover posteriore del tuo Xperia Z3 per ammorbidire l'adesivo sottostante.

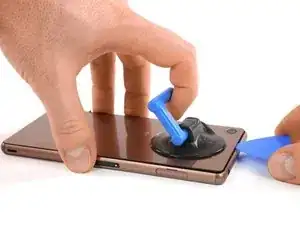
    • Tira la cover posteriore con una ventosa e infila un plettro di apertura nella fessura che si è creata.

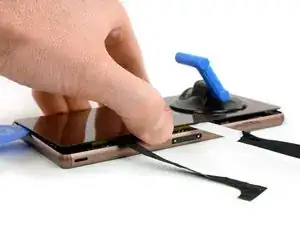
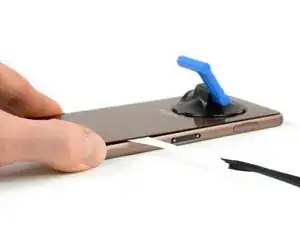
    • Muovi il plettro con cautela lungo i bordi per allentare l'adesivo su tutti i lati del telefono.

    • Non infilare il plettro troppo in profondità sotto la cover posteriore per non danneggiare i componenti all'interno del telefono.

    How hot (how many C) should the iOpener be? I think it would be safer / more accurate to heat the iOpener in an oven with accurate temperature control.

    Magnus Myklebost -

    Careful here. The back cover cracked in two places. Once when I exerted pressure with the suction handle, and in the corner when moving the pick around the edges- even though I was very gentle. The battery was adhered firmly to the back cover.

    Joseph Doyle -

    I cracked the back cover instantly. Make sure to buy a spare one before opening!

    raffaelecaroppo -

  2. gAPs2OKNE2jFrYEo
    gAPs2OKNE2jFrYEo
    ZWXMfEZUoFXZNtsY
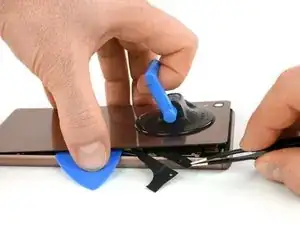
    • Dopo che l'adesivo attorno ai bordi è stato allentato, forza l'apertura della cover posteriore con la ventosa.

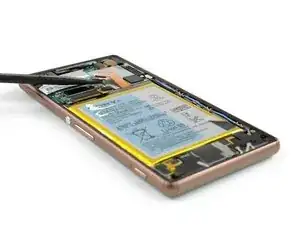
    • Usa delle pinzette per tirare verso l'esterno le due strisce nere che sono collegate due pezzi di adesivo disposti sulla batteria.

    Careful during this bit. My old Z3 back cover couldn’t take it and split into lots of pieces (probably weakened over the years!). Just order a replacement for £3 off ebay before doing it ;-)

    Bruce Wiggins -

    Merci pour ce tuto. Excellente procédure. Travaux réalisés en 20 minutes sans aucun problème. Attention: au remontage, il n'y a plus d'adhésif sur la batterie, la coque arrière peut éventuellement tomber. Je ne l'ai pas fait mais il faut peut-être mettre un petit double face sur la batterie.

    Patrick Prel -

  3. InbaMOV3DWrHJVIa
    InbaMOV3DWrHJVIa
    meP2FFCEEUXJ2oL1
    • Tira con delicatezza all'esterno le strisce nere con le linguette adesive.

    • Non tirare mai le strisce verso l'alto ma sempre lateralmente. È facile che si rompa la striscia adesiva sotto la cover. In questo caso devi usare una scheda di plastica per staccare, con cautela, la cover posteriore; se necessario applica ancora del calore.

  4. RaESkTApChpTNMDs
    RaESkTApChpTNMDs
    Fut6DNQrqXXALvsP
    • Dopo aver tirato via le strisce adesive, puoi sollevare la cover posteriore e rimuoverla.

  5. oDgQiiMN4YTyHo2E
    oDgQiiMN4YTyHo2E
    jgVRsCU2JSMV5Ufd
    • Scollega il connettore flessibile della batteria.

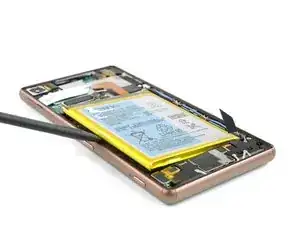
    • Usa delle pinzette per tirare via delicatamente la striscia adesiva sulla parte inferiore della batteria.

  6. RKmlYKT6k54PTcuC
    RKmlYKT6k54PTcuC
    XUTjqjATMmWYD61p
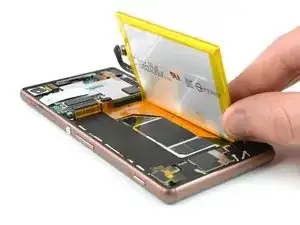
    • Usa uno spudger sul lato sinistro del telaio per far leva ed estrar della batteria.

    • Stai attento con lo spudger, ci sono dei cavi sotto la batteria!

    • Rimuovi la batteria.

Conclusione

Per rimontare il tuo dispositivo, seguì queste istruzioni in ordine inverso.

Dominik Schnabelrauch

Membro da: 23/11/16

200657 Reputazione

6 commenti

En hoe krijg je ‘m dan weer goed dicht?

Tijmen Brozius -

If the original tape won’t hold anymore, you could replace it with double sided adhesive tape to reseal the back cover. Take a look here:

Tesa 61395 Tape

or directly in the EU Store for shipping to the Netherlands:

https://eustore.ifixit.com/en/Tools/Cons...

Tobias Isakeit -

When I opened up my phone to replace the battery, almost everything in this guide was still correct except that now the battery is screwed in with 1.2mm star screws.

Marisha Parker -

Once replaced do i need to recalibrate the phone to show charge level correctly or should this happen automatically? As phone seems to discharge to 8% then stay there for a couple of hours?

Craig -

This guide worked for me.

But during step 3, the tabs ripped off, and I had a hard time separating the battery from the back cover.

So instead I used a tweezer to disconnect the battery (step 5), and slowly pried the battery off, along with the back cover. After that, you can have more space to work with removing the battery from the cover.

Chawit Leosrisook -

Great guide, worked a treat.

Z3 lives again!!

Love this site and all it stands for,

Many thanks : )

George Kaimakis -