Introduzione

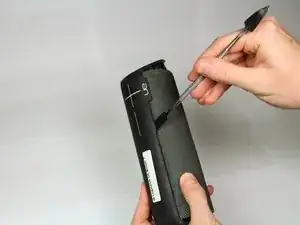
La batteria è posizionata sotto la copertura superiore della UE BOOM 2. è tenuta ferma da 4 viti e può essere sostituita usando solo un cacciavite ed uno spudger.

  1. LlO3GgL5oAqkaYZt
    LlO3GgL5oAqkaYZt
    F2OtV4IytQG5FVlv
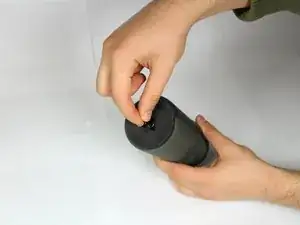
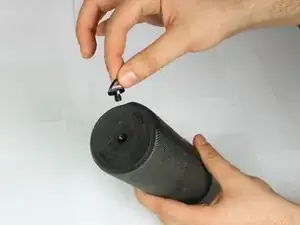
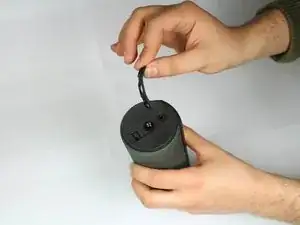
    • Per iniziare, rimuovi l'anello a D sul fondo della UE Boom 2, dalla parte opposta del tasto di accensione.

    • Rimuovilo ruotandolo in senso antiorario.

  2. eOiFynbco1LUfgX3
    eOiFynbco1LUfgX3
    BIbr3QABRNdV6Yiy
    • Dopo aver rimosso l'anello a D, rimuovi la copertura in gomma delle porte.

  3. K51ToXcrp6y5CV5O
    K51ToXcrp6y5CV5O
    FEryGMY4xjSHEyGU
    T3Yywg4e1WjrmiTD
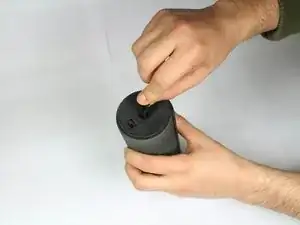
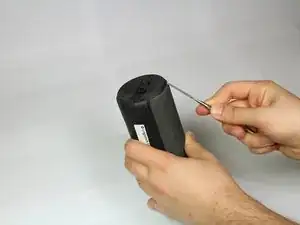
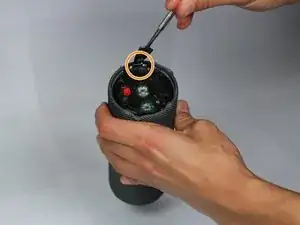
    • Rimuovi la copertura in gomma usando uno spudger in metallo.

    • Fai leva lentamente attorno ai bordi della copertura per sollevarli.

    Note - the end cap is an assembly of rubber pad glued to a plastic cap. Make sure you pry up from under the edge of the plastic cap, not remove the rubber alone.

    You don’t need to continue down the side as mentioned below.

    rogkellidean -

    This step is a little bit hard. It requires little bit more force. Make sure not to damage the silicon part, push the tool more in where you can feel the hard plastic part.

    Márk Baráz -

    Quite difficult non to break the retaining clips: be slow and careful. Here is a close view of the clips… so that you know what you have to manage…

    https://youtube.com/shorts/jeU21ZM7roA?f...

    Gianluca Meardi -

  4. dDbZtrVXELOYVoAM
    • Continua a rimuovere la copertura in gomma lungo il lato del dispositivo.

  5. AxvV22AQ5FSCkYox
    AxvV22AQ5FSCkYox
    cT1D1o4GtHVjAVZC
    hVKseceuHywQOAQK
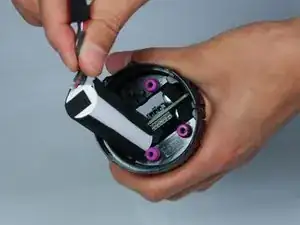
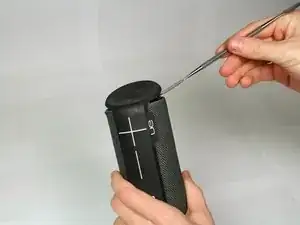
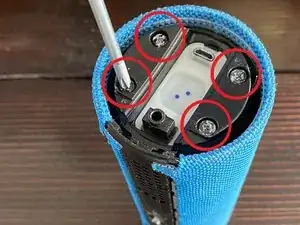
    • Usa un cacciavite Philips #2 per svitare le quattro viti da 1,5 mm sul fondo della cassa. NON APRIRE IL LATO CON IL CAPPUCCIO ROSSO (COME MOSTRATO IN ALCUNE IMMAGINI): LA BATTERIA E' SULL'ALTRO LATO.

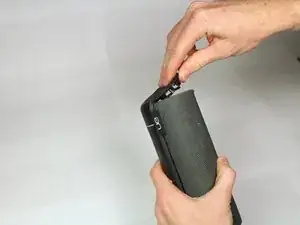
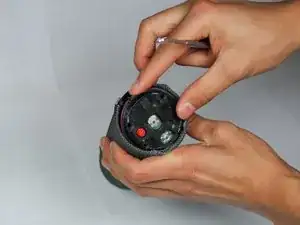
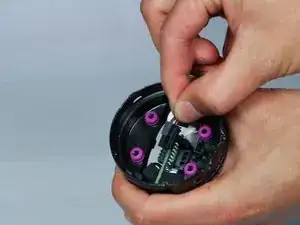
    • Usa uno spudger in metallo per sollevare il cappuccio in plastica.

    Guide is missing a step as there are no screws under the rubber strip.

    Jack Arnold -

    In the picture, the instructor is taking off the top of the speaker. DO NOT DO THIS. You must take off the bottom.

    Tanner Bilcowski -

    If you make the mistake of opening the top and pulling out the board that holds the power button, what may help you align the board back is undoing the fabric cover clips right on top of the volume up button and gently sliding that board back into place. The connectors aren't as forgiving (yup, it just slides through holes in PCB) as the bottom ones that have tapered female ends so go slow and gently as you can.

    Matthew Ballard -

    Wish I read these comments before trying this step.

    GGAmber -

    Future readers: Do not.... I repeat, DO NOT follow ANY of this article. I now have a UE Boom 2 that is a complete sh@#show! Rubber I can't fix, and scratches all over like you wouldn't believe. Listen to the previous comments instead. I now have to glue the rubber back on to mine.

    tre-rocks -

    Ok no screws - feeling really stupid for starting this and ordering the stuff from Ifixit

    Mary Johnson -

    Same as above there are no screws visible and I am feeling really stupid from ordering the stuff from IFIxIt. Any solutions?

    Mary Johnson -

    You only have to open the bottom cap. No need to remove the lateral.

    Quite difficult non to break the retaining clips of the bottom cap: be slow and careful. Here is a close view of the clips… so that you know what you have to manage… https://youtube.com/shorts/jeU21ZM7roA?f...

    In any case, after having replaced the battery, the cap does not close anymore like new: I’ve now about a 0.7-1mm gap. Not a problem for water (shower, not submersion) anyhow, as the impermeability is given by the second cap inside.

    But… my dear UE Boom designers… it’s really sad that such a nice sounding device is so badly designed to replace a simple battery (something that is mandatory after some 2-4 years of usage… especially if very limited usage): quite disappointed!

    Gianluca Meardi -

  6. UwATnsSbNwCX61Pv
    UwATnsSbNwCX61Pv
    6DKPclnTWUVHVZUx
    • Scollega attentamente il cavo dalla scheda madre con uno spudger in plastica.

    • Sfila lentamente la batteria e maneggiala con cura.

    I can not disconnect the battery from the motherboard!!

    Cathleen Maugeri -

    I had the same problem. However, I eventually found that if you push the little clip in towards the main part of the connector, it comes free easily. Hope that helps!

    kennydoitnow -

    I have the same problem as Cathleen. Is there a small clip that needs to be undone on the battery cable?

    benjaminlaird -

    Battery What type of battery is better and how many amperes?

    Wira Ananta -

    What type of 18650 battery is in amperage and how many pieces are needed

    Wira Ananta -

    Any tips on how to replace the rubber cover? Is a type of glue needed?

    Ramon Macias -

    I had the same problem as Cathleen, too. However, I eventually found that if you push the little clip in towards the main part of the connector, it comes free easily. Hope that helps!

    kennydoitnow -

    Hello do you know where I could get the part with the PCB that holds the female jack and the power inlet

    Laurent BUGEAT -

Conclusione

Per rimontare il dispositivo, segui le istruzioni in ordine inverso.

Brandon Yowakim

Membro da: 19/01/18

1164 Reputazione

26 commenti

what kind of battery ?and do you have a link to buy one

wrig5235 -

I was looking for a battery replacement all over the place. Came up with this site that carries parts for the Boom 2:

https://www.joesge.com/products/ue-ultim...

Frederic -

Why is this set to difficult though? It doesn’t look THAT hard… And will this affect waterproofing of the feature?

Frederic -

Because you do not simply stick the plunger in and pop those tabs. They are a force of evil and I even bent my metal tools to open mine.

Joseph Murphy -

It isn't that hard if you've done a couple of repairs, although you gotta work slow and really make sure you got yourself like 3-4 spudger like items (butter knife) and look at reference images where the tabs are. Btw. You don't need to remove more than the bottom plastics and the plate with 4 screws to change the battery. Managed to change my battery while not damaging a single plastic tab

Lucas Schießl -

People replacing the battery be warned, you can buy a battery from China for 17 shipped on eBay, however what this guide does not tell you is one you open it, and re close it, there will forever be a gap on the top and bottom between the mesh and the rubberish spine. I have not since then tested the water proof feature because of this gap. You are warned and he should have warned us as well.

Joseph Murphy -

I managed it without a gap using e/t-6000 tech glue and some clamps and tape, you could also try:
- harvesting and cutting the adhesive strips out of an old iPhone or Samsung screen replacement kit

-that good old orange double sided tape.

BP 159 -

Missing a step, after removing the rubber you are met with smooth caps on the top & bottom of the speaker, no screws holes

Jack Arnold -

Be careful to unscrew only the bottom part and leave the top part in place (the photo is misleading, he removes the top part). the bottom is where the battery is.

lginoux -

Is this just a standard 18650 battery? Looks like it from the picture.

Tim Ligtermoet -

Will it effect the waterproofing?

Jake Militano -

If not done correctly, 100%

Lucas Schießl -

What have my ue boom ,sound comes on and goes off when is’s fully charged

Wesley Inia -

What's the course of a ue boom when turning it on, sound comes on and goes off again the sound don't finish but cut off not complete sound comes on just half sound only,but it's fully charged

Wesley Inia -

What's the course of a ue boom when turning it on and goes off again the sound comes on just half sound not really the complete sound

Wesley Inia -

Then we buy a new battery or we just replace the same one. Please clarify me here?

GILBERTH IMBUN -

What do you mean exactly? You need to buy a new battery and replace the one in the speaker with the new one.

Elias Bürgisser -

Does Somebody also has this Problem?

I changed the battery, everything worked fine. But when I cranked the volume at the maximum, the speakers suddenly shut down and they only work again after inserting the original battery. I bought two batteries from different sources and both had the same problem. Is it just bad luck or does anybody else has this problem?

Elias Bürgisser -

You need to get the same type of battery as the original. The original is probably a high discharge cell so that it can supply the strength to power higher volumes. There should be markings on the original that give a clue to what the exact cell is in there.

Nemat Heydary -

Doing this will cause cosmetic damage to the device around the base. This does not damage the waterproofing.

Waterproofing is provided by:

A) the rubber cap held on by the D ring protects the USB/AUX ports.

b) The purple O ring under the black plastic cap held in by the 4 Phillips screws.

So, if you put all that back correctly, the waterproofing will be fine.

I found that To more easily remove the top, Re-install the D-ring during step 3, then unscrew it 1.5 turns, and grip it with a pair of vice grips.

The vice grips in combination with the Spudger will ease removing the top cover. BE GENTLE, you don’t want to tear the rubber!

If you remove the blue rubber, and it’s smooth plastic underneath instead of 4 screws, you %@#%ed up, and separated the rubber over-molding from the top plastic.

Adrian Neill -

Thanks Adrian!

Most helpful post here!

Thangfish -

How this guide became “Featured” is beyond me. Some of the pictures show him opening up the wrong end of the speaker, but most importantly the technique shown here WILL break stuff. The way the top/lid is made makes it impossible to open like this without breaking the structure.

It will however mostly go back together, so it is possible to do it like this, just know that it wont be entirely like before. From what I gather the rubber seals are positioned so that the speaker should still be waterproof after changing the battery.

I took a lot of pics of mine after I opened it, shown here: https://www.reddit.com/gallery/iqq59a

erlendds -

The spudger isn’t the right tool to try and open the case. It bends way too easily. I used a large flat head screwdriver, which had the right leverage to try and open the case.

C W -

used two small flat head screwdrivers to work around popping cap; worked fine, be sure to insert the blades between the cap teeth. I received a small circuit board with battery; what is that for?

William Wade -

Excellent guide. Beware though, it’s more about finding the right spots to put the spludge in since you need to pop the tabs. I think i broke one but there’s like 7 left so it’s pretty much as good as before. Except now the battery isn’t drained everytime I want to listen to it.

andersson.d -

Can I send my UE boom in somewhere to fix it?

Leah Mulder -