Introduzione

Segui questa guida per sostituire la batteria nel tuo iPad Mini WiFi.

Se la tua batteria è gonfia, prendi le appropriate precauzioni.

  1. PFpjwVSYrnq3JQap
    PFpjwVSYrnq3JQap
    RFsyoneYVYQDPSht
    • Ti raccomandiamo di pulire il tuo forno a microonde prima dell'operazione, perché ignobili entità unte e appiccicose potrebbero attaccarsi all'iOpener.

    • Disponi l'iOpener al centro del tuo forno a microonde.

    • Per forni a microonde con piatto rotante: assicurati che il piatto giri liberamente. Se l'iOpener si incastrasse da qualche parte, potrebbe surriscaldarsi e bruciare.

    I didn't find this to be as hard as I had built it up in my mind to be; HOWEVER, saying that I need to say years ago I was the local Nokia service center in my town. But many years ago right after they got rid of analog times. Yeah. A classic installer/repairer mistake when starting something they haven't fixed or installed before is picking up the instructions, flipping through them; maybe even reading a section that is new-then tossing the instructions over the shoulder. "I got this." This usually comes right before something major gets broke. And I can tell you when you try to do it yourself and then mess it up horribly then take it to the repair shop. Well we called that "I can do it myself" syndrome and charged extra to put back together what they brought in in the box. Now knowing all this - I can't stress this enough because I am stupid, stupid, stupid. COVER YOUR SCREEN IN CLEAR BOXING TAPE AND READ ALL THE INSTRUCTION BELOW THROUGH TO THE END BEFORE EVEN ATTEMPTING THIS FIX. Take my advise.

    windizy -

    I didn't have an iOpener, so I used a wheat type heat bag. If you do this though, make sure you put a layer of plastic between your Mac and the bag, or you'll get condensation in places you don't want it.

    Martin Gray -

    I started out using the iOpener but switched to my wife's hairdryer. A heat gun or hair dryer proved to be much more convenient and is a time saviour. You can heat more and the glue becomes more fluid make the next steps with the opening picks much easier

    Jan Van Puymbroeck -

    I know this is obvious, but backup your iPad with iTunes before you start. I'd also turn off your passcode if you have one.

    Laurie Higgins -

    Ther first time you heat up the iOpener for this repair when its room temperature I had to heat it up for more than 30 seconds. I remember I had to heat it up for around 45 seconds. However, after that when you need to reheat it again during the repair 30 seconds will be enough.

    Yousef Ghalib -

    I used the wheat bag in a sensor microwave heating up to 65-70 deg C (155 def F).

    ian cheong -

    Get yourself a cherry pit bean bag the size of your iPad. Heat it, put the iPad on it for 3 to 5 minutes or so, reheat the cherry pit bean bag, again put your iPad on it. Then heat the iOpener and start working. The cherry pit bean bag will have to be reheated several times, but it will soften the adhesive so you have less problems with the iOpener

    Tim Feyaerts -

    The heating can be done very effectively (and quickly) with 3d printer heated bed. Make sure the bed is clean. Set the temperature to 60c, (130f ) and put the ipad face down for +/- 10 minutes. Repeat as needed throughout the “gentle prying” stages.

    polleyphony -

    The iOpener did not work at all for me.

    I had to use a heat gun and bring the edges of the case up to ~200 degrees (used an infrared thermometer to measure) before the glue would weaken. This obviously superheated the metal frame, so I also had to wear gloves to handle the phone while prying the back off with the included picks.

    Mike Jeanette -

    Repair instructions worked like a charm. Had to be patient with the iOpener and getting the screen off. I tried repeatedly without success until shifting the suction cup a bit to the left side where perhaps the glue had loosened up a bit more.

    Kyle -

    The iOpener, in my opinion, is of no help. Many warnings to say “don’t warm it too much”, but the glue doesn’t melt if not warm enough. As a result, a complete waste of time and energy. In addition, too much liquid in it, so it doesn’t lay on the device on a sufficient surface. I took a hairdryer and it worked much much better.

    laurentvidu -

    I used an immersion bath to heat this to 180F and applied it to the device until the outside temperature of the opener read 150F with an IR thermometer. Removing the screen took very little force with this method.

    breadandbits -

    My experience. I was replacing the screen which had been cracked and a little shattered in some places. The iopener is pretty much useless, so was the suction cup. The suction cup would probably be more useful if I was doing something besides the screen. Also you probably want the clean the screen before using it so it can get good suction. I used a hair dryer on high for a couple of minutes at a time (someone on this tread suggested that). I used my exacto knife and a razor blade to get into the adhesive. First the exacto to get the initial cut, then the razor blade to go a little deeper. Could have probably just used the razor blade, but the exacto has a little more finesse. I got the razor blade in and a little under the glass then I used the picks to wedge in. I didn’t want to risk anything using the razor blade too much. Used tape to keep the shattered glass together.

    trebor65 -

    My experience pt2

    Fortunately the shattering was mostly on the edges and most of it had adhesive on the back so it stuck together. Just take your time and work your way around following the guide to get the screen off. Have some goof off or goo be gone to clean the frame when putting the new glass on or putting the existing one back. (someone suggested that also, very good idea). Be careful of the LCD (you should know that). The cable on my LCD was pretty tight, so I propped it up while taking the cable cover off and when I put it back on I did the same thing. I just put a bottle on the battery and leaned the back of the LCD on that while attaching the cables and putting the screws back on the cover. Also be careful with the home button and the bracket on the back of it. I had enough old adhesive on left on the bracket that it stuck back to the new glass fine. So far only 12 hours in, so we will see how that holds up when the kids get at it.

    trebor65 -

    Another alternative if you do not have the iopener is to use a bed time hotwater bottle. Do not over fill it though. Just put enough hot water in to support the phone while you work around the adhesive.

    I use both the hot water bottle and iopener together on Samsung's. It makes life easier

    gazza667 -

    I followed the directions and heated my iOpener for 30 seconds in a 1000 watt microwave, and it came out at 160 degrees F, as verified by a infrared thermometer. This allowed me to separate the last bit of the back of my Samsung S8, which was already coming off due to a swollen battery (hence the reason for the repair).

    Dennis -

    Hallo,habe den Akku erfolgreich getauscht.Doch seitdem gibt es bei Telefonaten eine Rückkopplung für den anrufenden.Bei mir ist alles normal.Woran liegt das?Mfg

    Manu R -

    If you follow these instructions, you will crack your screen like I did. Heating the iOpener for 30 seconds, using it to melt glue, then waiting 10 minutes to reheat is useless. The iOpener can be used to maybe warm the glue on whatever side you aren’t working on. You need a hairdryer and/or a heat gun to melt the glue and separate the glass from the iPad.

    Anyone want to buy an old iPad with broken glass and a dead battery?

    mpulliam -

    Not everybody has a microwave. You should provide a target temperature for the iOpener and instructions for a conventional oven, or pot of warm water, or whatever. Although I will probably use a heat gun …

    Esmond Pitt -

    Three times heating opener and no luck. Tried pressing down gently on opener with a towel, and the opener broke. Wondering if I now replace table mats, fancy table cloth, etc. or will this stuff wash out.

    Not impressed so far. Maybe the hair dryer next.

    doug -

    I support the comments about the iOpener. Everyone has a hair drier, FHS, so get a cheap IR thermometer (£18) and blow heat until the area is 60+ deg C. Still takes w while, and getting the screen off is v scary, but just add more heat if you feel resistance.

    The rest of the kit is good, esp the magnetic screwdrivers.

    Richard O'Brien -

    No, everyone does not have a hairdryer. Some of us don’t even have hair. Thank goodness I already had an IR thermometer, though.

    nin10doh -

    #### WARNUNG WENN MINIMALSTER SPRUNG IM DISPLAY IST FUNKTIONERT DAS NICHT!!! ######

    Hatte einen winzigen, minimalen Sprung im Display. Ich dachte es könnte gehen, weil der Sprung “abgeschlossen” war. Er hat in einer Ecke ein winzige Glasteil rausgeschnitten. NEIN! Geht nicht. Habe alles mit viel Geduld dem iOpener und einem Föhn erhitzt. Es ist trotzdem sofort über das komplette Display zersprungen…

    T z -

    I’ve started with iOpener but changed very quickly to a heatgun. That was more efficient.

    Mizzoo, s.r.o. -

    I could not get the iOpener hot enough to melt the glue on my ipad 6. I heated for 45 seconds once and it was boiling and it still never worked. Thank goodness contributors mentioned using a hair dryer. Using an 1700w hair dryer on high did the trick to get the screen off. Still took some time and the case got pretty hot but be patient. It took twice as long and a lot more patience to get the battery out.

    Randal Haufler -

    I have an Ipad with touch screen issue, if i replace this part it should be Ok?

    janderson martin -

    WARNING - DO NOT MICROWAVE ON A METAL MICROWAVE RACK

    The metal microwave rack can heat up and melt through the iOpener cover letting the contents leak out.

    Not a big issue for me as I have a heat gun and used that instead.

    Run Up A Tree -

    I opened my iPad with the iOpener. Be patient! It may take quite a bit longer to it the iOpener in the microwave than it says in the guide. My microwave can only do 800W and I had to put the iOpener in several times (maybe a total of 90-120 seconds). I recommend that you have the transparent side up an watch the bag carefully. As long a the bag doesn't bloat up and the liquid doesn't start bubbling you should be fine. But I recommend to take the iO out from time to time to check it. (More comments in Step 6.)

    marcelflueeler -

    I gave upon the I opener and used a hairdryer. (Fixed an iPad 6)

    Tom Weber -

    iPad mini gen5. I used the iOpener. My microwave is 1200w with carousel. 30 sec got the iOpener to 155ºF. For the 2nd heating, after 10 minutes sitting, the temp was still around 125º so I only cooked it for 15 sec. Not enough increase so +5 sec more which me to 165-170ºF. This should be considered ballpark info because who knows the real output of the various microwaves and the quality of the IR tool used to determine temp.

    To successfully open my iPad mini I applied the iOpener twice to the left edge and twice to bottom. & once to R edge. Using the suction cup was difficult for me (I'm in my 70's so my hands don't work too well anymore). I had trouble holding the guitar pick and slipping them in (at an downward angle). In the end, sliding my thumbnail along the edge opened it very slightly and allowed the pick to get into the gap. I marked the ends of all my picks with a sharpie pen for the recommended 2mm insertion to avoid going in too deep. To get the screen open it took me approx 1 hour.

    jharrison -

    Can’t you just use a hair curler instead?

    Aspect22 -

    A hairdryer or heat gun works, if heating is kept around 100 deg C (212 deg F - boiling point of water). But… heating this way is cumbersome. Using a hotplate, set to 100 deg C, measured carefully with a fairly inexpensive IR gun, is simpler and easier, if you can afford the hotplate (I used an old pancake griddle with a thermostat knob). It works great for phones, setting them face down for 2 minutes, then picking them up with insulated gloves - cheap, wool gloves work fine. This may require repeated reheating to continue the display removal, but its much simpler.

    Because its almost impossible to repeatedly lay an iPad/tablet on the hot plate, I propose an alternative.

    Initially lay the larger iPad/tablet, face down, for 2 min, to heat all of the adhesive surrounding the display. Lift and begin the picking process describe in your removal steps. Then lay an iOpener on the hotplate for 2 min (already set to the exact, desired temp) to bring it to working temp for the remaining operations.

    Dan Smith -

    For iPads in particular, it makes sense to construct a simple, aluminum window frame, laid on a hotplate (see my comment above) that only touches the edges of the display, heating only the adhesive underneath. This prevents general heating of the entire device. Four strips of aluminum, placed together as a frame, would be the simplest and allow variations for all devices - envision it as a pinwheel of strips, radiating outward. Use it for any size device.

    Dan Smith -

    BTW, always read all comments at each step. New, and possibly useful, suggestions appear on occasion that can be crucial.

    Dan Smith -

  2. ylYXoFMbBeXNAIyj
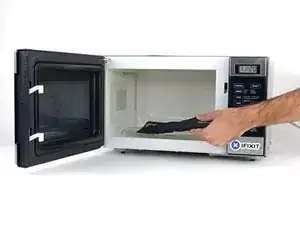
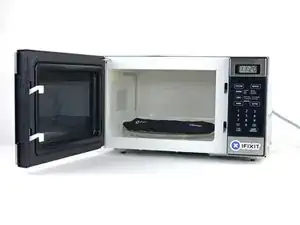
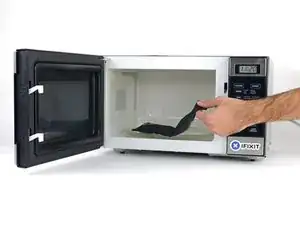
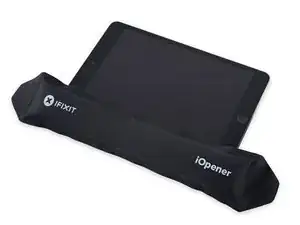
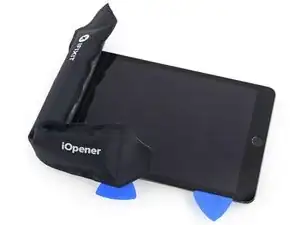
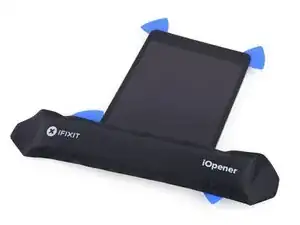
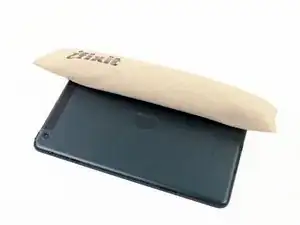
    • Riscalda l'iOpener per 30 secondi.

    • Se durante la riparazione l'iOpener si raffredda, scaldalo di nuovo nel microonde per altri 30 secondi.

    • Fai attenzione a non surriscaldare l'iOpener durante l'operazione. Il surriscaldamento potrebbe far esplodere l'iOpener. Non scaldare sopra i 100°C (212°F)

    • Non toccare mai l'iOpener se appare gonfio.

    • Se l'iOpener è ancora troppo caldo in mezzo per poterlo toccare, continua a utilizzarlo mentre attendi che si raffreddi un po' prima di scaldarlo di nuovo. Un iOpener riscaldato correttamente dovrebbe rimanere caldo fino a 10 minuti.

    I had to heat mine up for more than 30 seconds. After 30 seconds on high it was only warm. It had to keep trying different times and checking it until it got hot. I think the initial time that I put it in for was over a minute.

    whale13 -

    DO NOT USE IN NON ROTATING MICROWAVE! It will pop a hole. I had it in for 45 seconds the first time. It wasn't very hot inside and I saw it started to leak on the paper towel I put under it. Just a fair bit of advice. I think I will just stick with the heat gun. Loud but useful.

    Alex Jackson -

    I heated mine up for 30 seconds, tested, then again for 30 seconds. It felt adequately hot. Leaving it on the left side, per the instruction, for a minute did not loosen the adhesive. I ended up pulling the suction cup hard enough to shadder the old screen. Moral of the story, I don't think it gets hot enough safely to have an affect.

    Travis Dixon -

    There is a clear problem here with the heating part using the iopener things....no details are given. Whoever is testing them needs to make it clear - What temperature does it need to be? And for which phone models, because they differ in what's needed. It's only £10-15 for a laser guided temp sensor unit, and the designers/repairers should have one of those already for doing these kinds of repairs. Explaining half a repair, is worse than not explaining at all :-(

    assortedrubbish -

    All phones/devices differ it’s unrealistic and unsafe to put a exact time/temperature needed to soften the adhesive. It’s really quite simple you warm the device evenly and in a controlled manner just enough to enable pry tools and picks to begin separating. Best tool in my opinion but again this is because I have experience is a hot plate and heat gun both of which are used at nearly the lowest settings and I can handle flat palming the plate for almost 10 seconds I leave the device to conduct heat until approx it’s about 110 at most 120 ish this will be plenty to soften all the adhesive if any problem areas I use heat gun while prying. Again you need go slowly and learn with a throw away phone

    Greg Latta -

    I used a hot water bottle, works well as it covers the whole screen and stays hot for longer.

    dave -

    If I may suggest include your microwave wattage so people can get an idea on time for there own

    Patrick Storey -

    I agree with this.

    Jarl Friis -

    I ended up using a hair dryer. That iOpener thing took forever.

    mark fitzgerald -

    30 seconds sure isn’t cutting it… 45 didn’t get the screen of my iPad air 2 to budge either… even after resting on the ipad for 4 minutes.

    60 seconds in the microwave, the iOpener burst.

    I’ll get a new one and try once more with heating it 45 seconds and repeat that for 30 minutes like others have said here. If that doesn’t work it’ll have to be the heat gun.

    K

    Karl Marble -

    I can’t recommend the microwave. If the the iOpener becomes too hot, it bursts. Better put the opener in cooking water. Dry it and use it. Instead of an iOpener you can use hot/cool packs as well.

    Bernhard Keim -

    Great idea with using the heat packs. I will try that next time. Thank you

    Collins -

    Trust the directions! I forgot and left it in the Microwave too long and after 1 minute I had Mt Vesuvius - the iOpener burst and spewed the goodies out. The problem is, the Digitizer can be damaged by a hot air gun, so I had to tough out and remove the glue the hard way. I made it … with lots of patience! Tough lesson.

    Larry Bennett -

    I also used a hairdryer. I used it on the low setting and I cut a piece of carboard to protect the rest of the screen. The iFixit tool and method is vert tedious and very time consuming in comparison. With the hairdryer method you can literally have the display apart in a few minutes. Using your other hand nearby the area you are heating it should be very hot but not enough to burn your hand. You only have to heat metal part of case near glass edge. If you have a cellular model then you need to be very careful because the black antenna area is plastic. So less heat and work your way up in adding heat just enough to separate around the area but not so much you melt the plastic!

    Fixrights -

    iOpener was the worst part of the kit. Followed directions for :30 in microwave and took 4 trips to the microwave to loosen adhesive on left side of home button. I thought I was figuring it out and it was working well… even set a timer to wait 10 minutes between heating it up. Was on the right side and was on my 12th heat up when it exploded in the microwave. My only tip is that if you set it clear side up, as soon as you see any bubbles or boiling in the liquid, STOP! If you put a pot holder over the iOpener and press slightly to make good surface contact, that seemed to help. I finished heating with a “Corn Sack” that held heat better than the provided iOpener.

    digital_only -

    Mon iopener n'a pas tenu une réparation. Je ne vous conseille pas ce produit

    Berard Romain -

    Bonjour,

    Nous sommes désolés que votre réparation ne se soit pas déroulée comme prévu. Il se peut que le produit était défectueux. Veuillez contacter notre service client support@ifixit.com (boutique américaine) ou eustore@ifixit.com (boutique européenne) en décrivant ce qui s’est passé.

    Claire Miesch -

    Readers looking for temperature advice might check the comments of the previous instruction, as there are more there. I used an immersion bath to heat this to 180F and applied it to the device until the outside temperature of the opener read 150F with an IR thermometer. Removing the screen took very little force with this method.

    breadandbits -

    Thank you for posting some actual temperatures. I have a heat gun with a very fine self-temperature regulation setting capability.

    I will set it for 150-180 F, and use that to soften the adhesive.

    G Trieste -

    Get a heat gun.

    alesha adamson -

    I followed the directions and heated my iOpener for 30 seconds in a 1000 watt microwave, and it came out at 160 degrees F, as verified by a infrared thermometer. A second heating about 15 minutes later in the micro and it came out at 190 degrees F. Plenty hot enough to soften the adhesive for removing the back on my S8. Based on the comments above I think people just need to use more patience.

    Dennis -

    I used various time settings. It got very hot. It would soften the glue but not a whole lot. If my screen had been intact and I was replacing something that was not a digitizer, it may have worked. A broken screen makes the process significantly more difficult. I ended up breaking the home button cable. Good bye TouchID…

    cvela90 -

    After reading previous comments I didn't even use the i-opener. Used the heatgun ( hairdryer ) which works great for me. Maybe I was lucky as this is my first attempt at replacing a cellphone battery. Motoz 3

    Collins -

    It appeared 30 seconds were not enough, so I heated it more, by 5 seconds at a time until I got the right temperature about 70 degrees Celsius (measured with infrared pistol) to get the screen heated up to 60 C, the best for softening the glue. But the heat was quickly dissipating by the big aluminum back cover, so the best I got in 2 minutes of applying iOpener was around 45 C, which made the procedure difficult and having risk of breaking the screen. So I eventually abandoned iOpener and user a hot air gun with precise temperature setup. I set it to 90 C, which allowed me to open my iPad quickly and safely.

    Sergey Kofanov -

    I, too, ended up using a hot air gun. I’ve done earlier versions of iPad before but the adhesive used on this IPad 5 A1822 was particularly difficult to remove.

    Also, while the suction cup worked great when the glass is in tact, any cracks in the glass make the suction cup useless.

    manningrl -

    You need to remember here are different sizes of microwaves. I had the same issue.

    Heating on a smaller unit I used 45-60 seconds. That worked but was time comsuming

    William Draheim -

    Yeah, the iOpener didn't work for me either.... ended up using a hair dryer and that worked. The iOpener was too warm to soften the glue in my case.

    Andrés Vettori -

  3. Q3OPkaQyxV6cdnx3
    • Rimuovi l'iOpener dal forno a microonde, afferrandolo per una delle due estremità piatte per evitare il contatto con la parte centrale calda.

    • L'iOpener sarà davvero caldissimo, perciò fai attenzione quando lo maneggi. Usa una presina da forno, se necessario.

    I did this repair. I used a hair dryer, I think it works better: gets very hot fast.

    Cobus de Beer -

    I did too, you get far more control and no expense on fancy equipment.

    Billinski -

    Readers looking for temperature advice might check the comments of the previous instruction, as there are more there. I used an immersion bath to heat this to 180F and applied it to the device until the outside temperature of the opener read 150F with an IR thermometer. Removing the screen took very little force with this method. I don’t know how much microwaves vary in heating consistency with these pads, but knowing how inconsistent the temperature of a bowl of plain rice gets in my microwave, I wasn’t interested in even trying to use it for this.

    breadandbits -

    I used an electric griddle set to the lowest setting. It seemed to work very well.

    John -

    I vote for the hair dryer. The other methods work too but if you aren’t having any luck, switch to the hair dryer. While holding the iPad in my hand, I found that I am aiming the dryer at my finger at the same time and it gauges how hot it is. I stop when my finger can’t take it - maybe five seconds up close. Repeat as needed like I did.

    Robin -

    This thing melts when placed up side down in the microwave…

    Mark -

    If the maximum temperature for this iOpener is lower than the gadget glue minimum temperature, this device does not make sense.
    I think the maximum temperature for this iOpener is below 100⁰C and most gadget glue minimum temperature is higher than 100⁰C. So the iOpener is useless for many opening steps in repair guides. But who knows because temperature range is not specified for this iOpener.

    Jarl Friis -

  4. 2Nj3CEcEUHn2EtLQ
    2Nj3CEcEUHn2EtLQ
    lgRIBJjmHo2vTdda
    • Se non hai un microonde, segui questo passo per scaldare il tuo iOpener in acqua bollente.

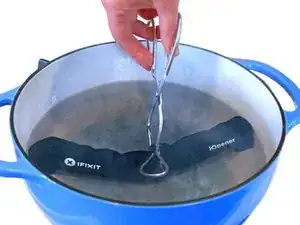
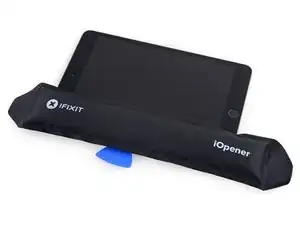
    • Riempi una pentola o una padella con abbastanza acqua per immergerci un iOpener.

    • Scalda l'acqua finché non bolle. Spegni il fuoco.

    • Posiziona l'iOpener nell'acqua calda per 2-3 minuti. Assicurati che l'iOpener sia completamente immerso nell'acqua.

    • Usa delle pinze per estrarre l'iOpener scaldato dall'acqua calda.

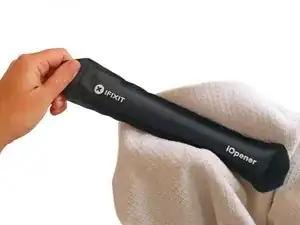
    • Asciuga accuratamente l'iOpener con un asciugamano.

    • L'iOpener sarà molto caldo, quindi fai attenzione e tienilo solo dalle linguette alle estremità.

    • Il tuo iOpener è pronto all'uso! Se devi scaldare di nuovo l'iOpener, scalda l'acqua fino all'ebollizione, spegni il fuoco e immergi l'iOpener in acqua per 2-3 minuti.

    What do I do if I don’t have a iopener?

    alexdelarge103@gmail.com -

    Use a hair dryer

    Edited To the max -

    2 or 3 cups Rice in a sock, heat for about 2 minutes. But, I recommend the iopener.

    Robert Garcia -

    When boiling in water you can put the iopener in a ziplock to keep it dry.

    Robert Garcia -

    Even if you don't put in a ziplock bag, I found that the surface is mostly hydrophobic so drying it is very easy. I also didn't have tongs, but the bag is denser than water, so it sank and I attached clothes pins to the ends and was able to remove it with those.

    Jack Adrian Zappa -

    2-3 minutes in near boiling water, then 2-3 minutes on my s10+ and it was super easy to cut the glue off.

    Kipras Bielinskas -

    I have a question, if I have a pan, and I have water, and a mean to boil the water, won't it be easier and cheaper to just use that.

    Ollie Tan -

    Have you tried it? Water limits your temperature to 100℃, whereas 'pan on the stove' can easily get up to twice that. If your pan is even slightly warped, you'll have a few hot spots of direct conduction with convection everywhere else, heating things unevenly. Assuming you get the device up to temperature, how will you get it out without scratching it or burning yourself? After you're finished, do you really want to prepare food in the pan you warmed up adhesives and trace manufacturing substances in?

    .

    Boiling something form fitting to heat your device with is a lot more foolproof, and not being foolish is easier and cheaper. Direct pan heating can work, but you are leaving yourself open to a lot more problems than just taking the safe route.

    James Beegle -

  5. cbHhknNQZuH52rXR
    cbHhknNQZuH52rXR
    fxTQqMPurYGyRJx1
    RVcvcMZjrVloNAUQ
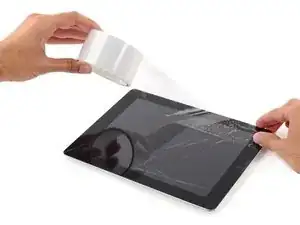
    • Se il tuo vetro è rotto, evita di romperlo ulteriormente e di tagliarti con le schegge coprendolo con del nastro adesivo.

    • Applica delle strisce di nastro adesivo trasparente da pacchi sul vetro, una sopra l'altra, finché non è completamente coperto.

    • Ciò conterrà le schegge di vetro e manterrà l'integrità strutturale quando dovrai fare leva e sollevare lo schermo.

    • Fai del tuo meglio per seguire il resto della guida come descritto. Comunque, una volta rotto il vetro, continuerà a rompersi mentre ci lavori e potresti dover usare uno strumento di apertura in metallo per rimuovere il vetro.

    • Indossa degli occhiali protettivi per proteggere gli occhi e stai attento a non danneggiare il pannello LCD.

    In case of broken glass, here are some hints:

    - I prefer 3M "3350" tape; a metalized polypropylene tape with an acrylic adhesive. It's a very thin, silvery HVAC tape, not your standard duct tape.

    - Test your tape to make sure it sticks really well to the glass.

    - Use isopropyl alcohol on a paper towel to remove fingerprints and other dirt to help the tape stick to the screen.

    - Use the widest tape you can find, and apply it evenly, without trapping bubbles, without crinkles: This greatly improves your chance of success with the suction cup later.

    - Cut tape pieces long enough and go over the (rounded) edge; afterwards carefully run a scalpel alongside the edge (between bezel and glass) to trim off any excess.

    - Don't overlap edges of the tape: butt-join them instead.

    - If needed: repeat in other direction.

    - If needed: Cut square piece of tape (size of suction cup) and place it where you want to lift the glass, so that the suction cup doesn't cover any butt-joins.

    Good luck, you brave person!

    volty -

    This is the second broken screen I’ve fixed. Overlapped package tape carefully stuck to the glass and trimmed to the edges will contain most of the shards. I found that a hair dryer works for softening the glue. After getting under an edge with the suction cup I carefully followed the opening sequence using a combination of plastic picks and a single edge razor blade to get under the small pieces. It was slow going with lots of reheating with the dryer (about 45 minutes), but the taped glass came off without glass everywhere.

    Bill Roughen -

  6. JTXNMU2mRHaO3VHM
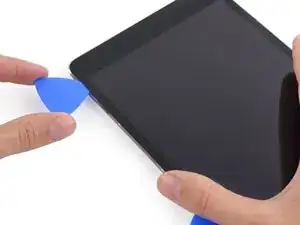
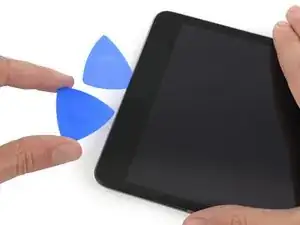
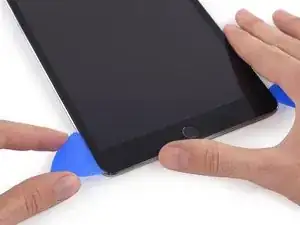
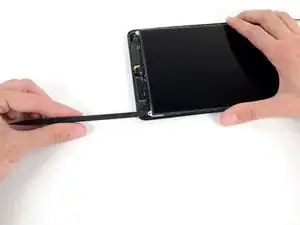
    • Prendendolo dalle alette, appoggia l'iOpener scaldato sul bordo a sinistra rispetto al tasto Home dell'iPad.

    • Lascia l'iOpener appoggiato per circa cinque minuti per ammorbidire l'adesivo sotto il vetro.

    I worked at it for over 2 hours before deciding to microwave the opener for 45 seconds at a time. That seemed to do the trick.

    jaromhyde -

  7. IcDren6BTpiUttKB
    IcDren6BTpiUttKB
    DK4YJPomRE1DXANh
    GGV46hLdgsrtBdqP
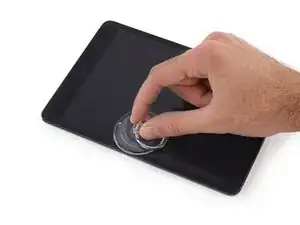
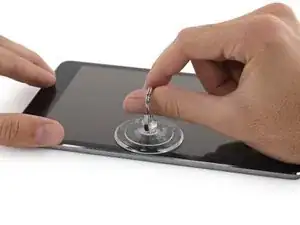
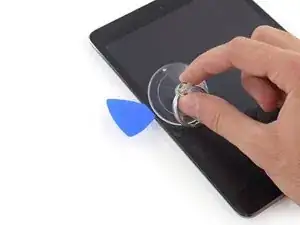
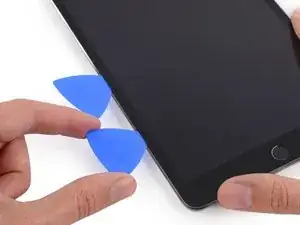
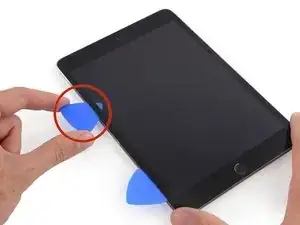
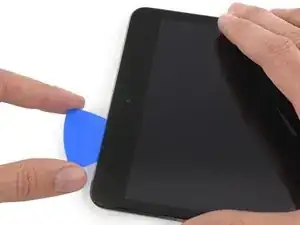
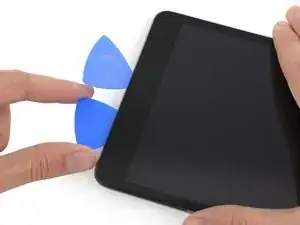
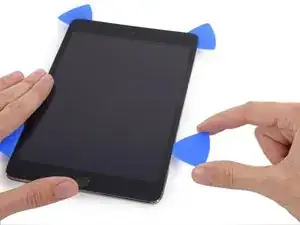
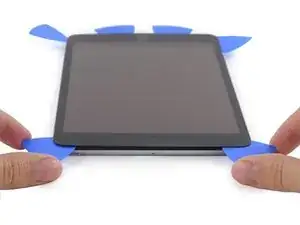
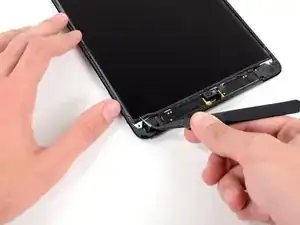
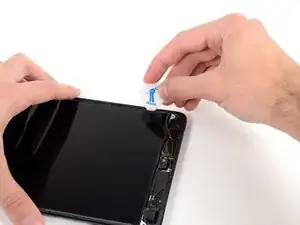
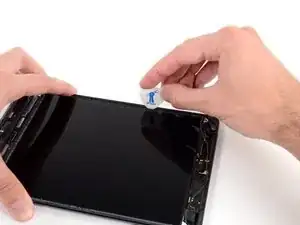
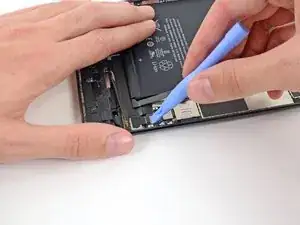
    • Applica con cura una ventosa al centro del bordo scaldato.

    • Assicurati che la ventosa sia completamente piatta sullo schermo per avere una miglior presa.

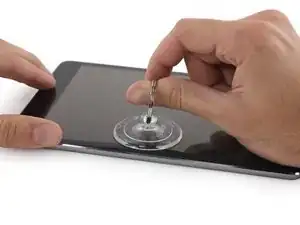
    • Mentre tieni fermo l'iPad con una mano, tira verso l'alto la ventosa per separare leggermente il vetro dalla scocca.

    • Assicurati di sollevare il vetro giusto il necessario per infilarci un plettro: se lo sollevi di più potresti romperlo.

    This step is totally pointless if you have a shattered screen. The suction cup is rendered useless. Any tips on what to do if you can't get any suction due to a shattered screen?

    robloomis -

    just pick out the glass shards if it is cracked that bad you are better off scrapping the digitizer

    echow2001 -

    for shattered screens I cover the screen with tape. I find packing tape works best for me.

    George -

  8. xdR4G2kpVpmVoWFx
    xdR4G2kpVpmVoWFx
    xQTLcgMQh4MZbtco
    shpcxsgNSc4GTuCR
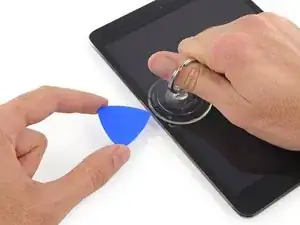
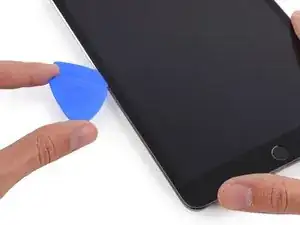
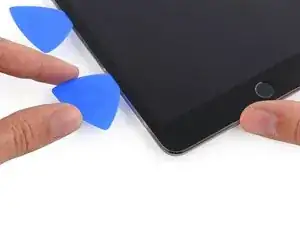
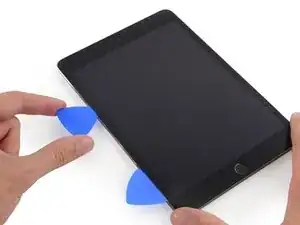
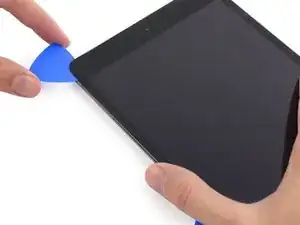
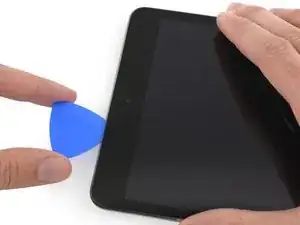
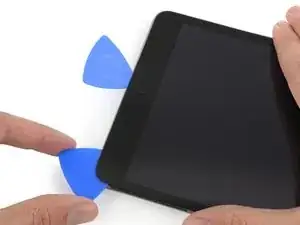
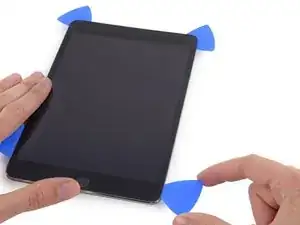
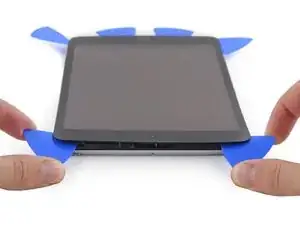
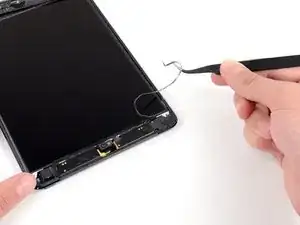
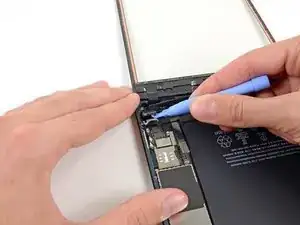
    • Mentre tieni sollevato il vetro con la ventosa, infila la punta di un plettro nella fessura tra il vetro e la scocca dell'iPad.

    • Non infilare il plettro oltre la cornice nera del vetro. Inserendolo a profondità maggiore, potresti danneggiare il pannello LCD.

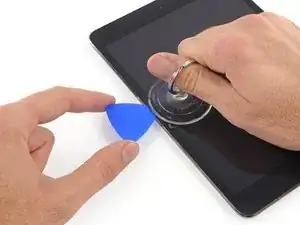
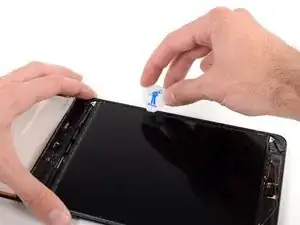
    • Tira la sporgenza sulla ventosa per rilasciarla e rimuovila dal gruppo dello schermo.

    you have to pull up on the suction cup harder than you might be comfortable with!

    jfaulks1 -

    thanks jfaulks1 (I did not copy and paste lol)

    iliketrains kid -

  9. hnTrXWSgZRITDQGT
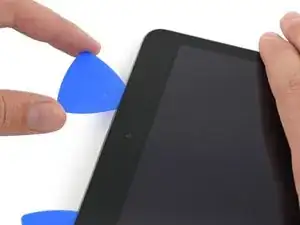
    • Scalda di nuovo e riappoggia l'iOpener.

    • Stai attento a non surriscaldare l'iOpener durante la riparazione. Aspetta sempre almeno dieci minuti prima di riscaldare nuovamente l'iOpener.

    • Lascialo appoggiato per qualche minuto per riscaldare il bordo sinistro dell'iPad.

  10. 1SNJmJ5QLCHNmoxD
    1SNJmJ5QLCHNmoxD
    Zo2QMtHXIHdcI25K
    GZmWxlRfQKsDBOLg
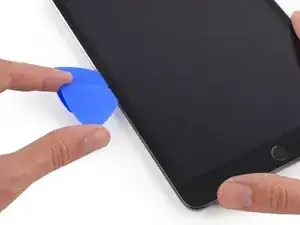
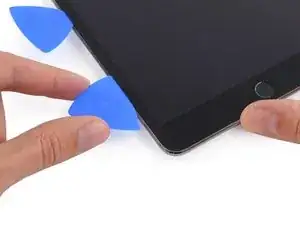
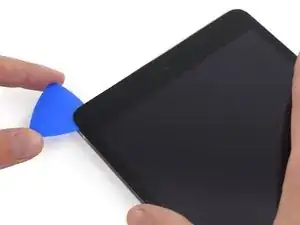
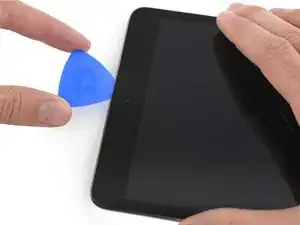
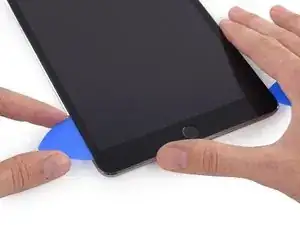
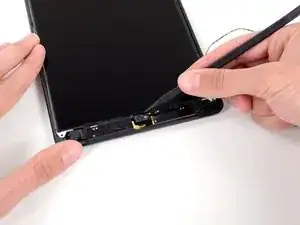
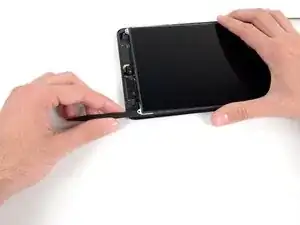
    • Infila un secondo plettro accanto al primo e fallo scorrere sotto il bordo dell'iPad verso l'angolo inferiore per tagliare l'adesivo.

    • Durante tutta la procedura, se incontri troppa resistenza mentre fai scorrere i plettri sotto il vetro, fermati e riscalda la parte sulla quale stai lavorando. Fare troppa forza con i plettri può rompere il vetro.

  11. MQQJILRkA6hCIHSF
    MQQJILRkA6hCIHSF
    yRCgTHJxv2gvmPMr
    3xSoO5ID1OKpK6Xg
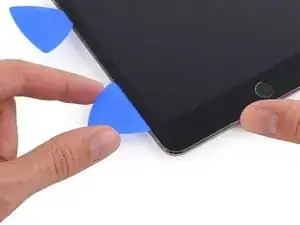
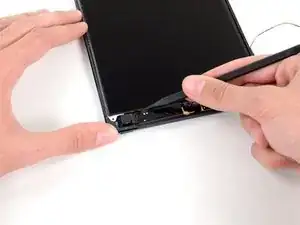
    • Continua a far scorrere il plettro lungo il bordo dello schermo verso il basso per tagliare l'adesivo.

    • Se il plettro si incastra nell'adesivo, "ruotalo" attorno al bordo dell'iPad per far staccare l'adesivo.

  12. J2NyCSdkLdbXkWes
    J2NyCSdkLdbXkWes
    PLGWXbvQRMKqINgh
    Wo1Blkhkt3LIsDY1
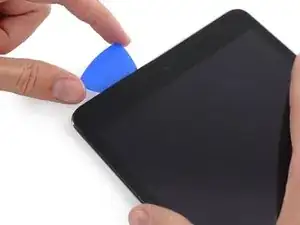
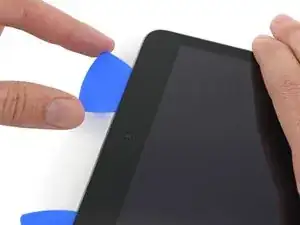
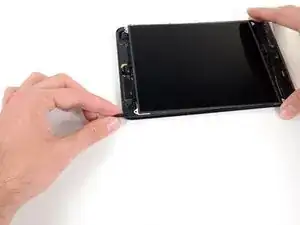
    • Prendi il primo plettro che hai inserito e fallo scorrere sotto il vetro verso l'angolo superiore dell'iPad.

    • Se vedi la punta del plettro sotto il vetro, niente panico: semplicemente tira un po' indietro il plettro. Probabilmente tutto funzionerà ancora, ma cerca di evitare che succeda per non depositare dell'adesivo, che sarà poi difficile da rimuovere dal pannello LCD.

  13. FQPGUTFQrYRiZKmU
    • Scalda di nuovo l'iOpener e appoggialo al bordo superiore dell'iPad, sopra la fotocamera frontale.

    • Stai attento a non surriscaldare l'iOpener durante la riparazione. Aspetta sempre almeno dieci minuti prima di riscaldare nuovamente l'iOpener.

    • Se hai un iOpener flessibile, puoi piegarlo in modo da scaldare sia il bordo superiore sia l'angolo superiore sinistro allo stesso tempo.

    I left my iOpener on the bezel the entire time I slid picks in. worked great

    jfaulks1 -

  14. lujiMvxormXIDU26
    lujiMvxormXIDU26
    sQQTCde4Q3V1ciNr
    TNmwWFLZURKdolgB
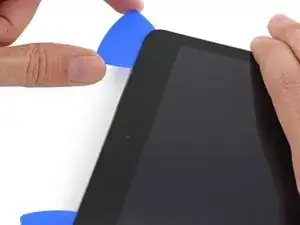
    • Fai scorrere il plettro attorno all'angolo in alto a sinistra dell'iPad per tagliare l'adesivo.

    Gezz this is though! Cracked the glass while replacing it.

    Padraic Hoselton -

    :( sad (rip glass lol)

    iliketrains kid -

  15. lJLMG3Ay6yfBPpQf
    lJLMG3Ay6yfBPpQf
    CR6HLmWxJaNTJ4GS
    aU15SLvVAYEmSTNt
    • Fai scorrere il plettro lungo il bordo superiore dell'iPad, fermandoti subito prima di raggiungere la fotocamera.

    • La terza immagine mostra dove sono posizionati nell'iPad la fotocamera frontale e il suo supporto.

    • Evita di passare il plettro sopra la fotocamera frontale: potresti sporcare la lente con l'adesivo o danneggiare la fotocamera. I prossimi passaggi ti mostreranno come evitare al meglio di interferire con la camera frontale.

  16. IacYHeoIp1uGLHPB
    IacYHeoIp1uGLHPB
    5SgmAXiQtNxTBMfJ
    gam1PUEfWPvW2Us1
    • Tira leggermente indietro il plettro e fai scorrere solo l'estremità della punta oltre la sezione della fotocamera frontale.

  17. FUYufEfbXgIBBEDw
    FUYufEfbXgIBBEDw
    ahvu32nDE2TBE61g
    qxkIkjEgirYs1uh2
    • Lascia il plettro infilato nell'iPad appena oltre la fotocamera frontale.

    • Prendi un altro plettro e infilalo a sinistra della fotocamera, dove sei già passato con il primo plettro. Fai scorrere questo plettro tornando indietro verso l'angolo in alto a sinistra per tagliare l'adesivo rimasto.

    • Lascia il secondo plettro infilato sotto l'angolo per evitare che l'adesivo si reincolli.

  18. 1Y4Xtw23PQkLFS5B
    1Y4Xtw23PQkLFS5B
    vgvbjXCsI6A4OamX
    n4YSDj5ToMmalJSA
    • Reinfila più a fondo nell'iPad il primo plettro e fallo scorrere allontanandolo dalla fotocamera verso l'angolo a destra.

    Shattered my screen pretty bad here, making it so that whenever I continued to move the pick the glass separated and I couldn’t continue moving it. Be VERY gentle moving the pick; almost no force is required.

    Jasper Holden -

  19. xuGYowtmiIbT4YgX
    • Lascia i tre plettri sotto gli angoli dell'iPad per evitare che l'adesivo si reincolli.

    • Scalda di nuovo l'iOpener e appoggialo al rimanente lato lungo dell'iPad, quello destro dove ci sono i tasti di accensione e del volume.

  20. sqfAhxUXVyFfkHZe
    sqfAhxUXVyFfkHZe
    INfyKIdLBI2GpZLw
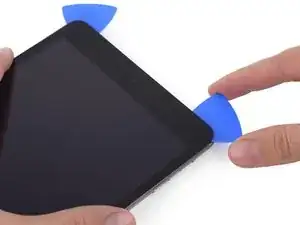
    • Fai scorrere il plettro nell'angolo in alto a destra attorno all'angolo stesso per staccare completamente il bordo superiore del vetro.

    • Lascia il plettro in questa posizione per evitare che l'adesivo si reincolli e prepara un altro plettro per il prossimo passaggio.

  21. TsxjgvU1QIAFFAiZ
    TsxjgvU1QIAFFAiZ
    UQcQY6Dxut2IwkOF
    X1kjp3YqeKPBXU3m
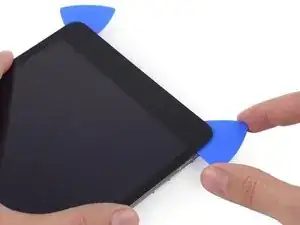
    • Infila il plettro che hai preparato sotto l'angolo in alto a destra e fallo scorrere verso il centro del bordo destro dell'iPad per tagliare l'adesivo.

  22. WuyJRhHOvCltXoIZ
    WuyJRhHOvCltXoIZ
    UexwnTumDH4sHBjN
    64RCwFrV2rHZo5B5
    • Continua a far scorrere il plettro lungo il bordo destro dell'iPad per tagliare l'adesivo.

  23. rCdDXGBXQ6w311va
    • Lascia i plettri sotto gli angoli e scalda di nuovo l'iOpener.

    • Ricorda di non surriscaldare l'iOpener: non scaldarlo più di una una volta ogni dieci minuti.

    • Appoggia l'iOpener riscaldato al bordo inferiore dell'iPad, sopra il tasto Home, e lascialo lì per qualche minuto per ammorbidire l'adesivo sotto il vetro.

  24. vBnWthHm3ZgtlAim
    vBnWthHm3ZgtlAim
    uJUPAUOA1n2sieRs
    CFfkAZsJOLSk2bgo
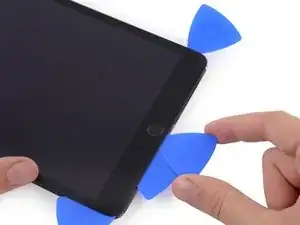
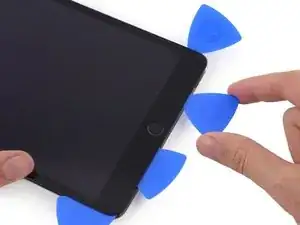
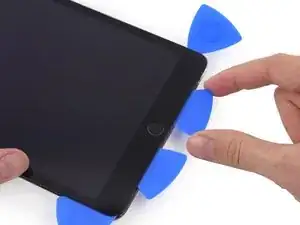
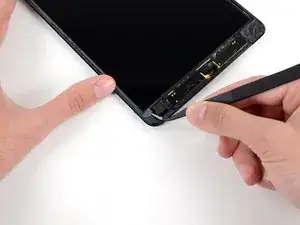
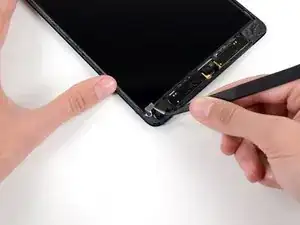
    • Fai scorrere il plettro sotto l'angolo in basso a sinistra attorno all'angolo per tagliare l'adesivo.

    • Lascia il plettro sotto l'angolo. Non andare oltre e non rimuovere il plettro dall'iPad.
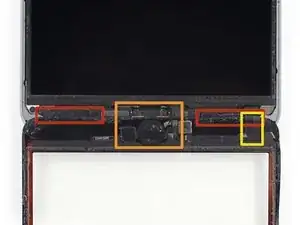
    • Ci sono alcune componenti da evitare sotto il bordo inferiore, quindi presta attenzione alla terza immagine:

    • Antenne

    • Alloggio tasto Home

    • Cavo digitizer

    • I prossimi passaggi ti mostreranno dove fare leva per evitare queste componenti. Scalda e fai leva solo dove indicato.

  25. rS3EXcDUWtSZCMYN
    rS3EXcDUWtSZCMYN
    1yWedd6EZxNMptpo
    YuQNn5PtjTUqRGDf
    • Lascia dove si trova il plettro che hai usato nell'ultimo passo dove si trova per evitare che l'adesivo si reincolli.

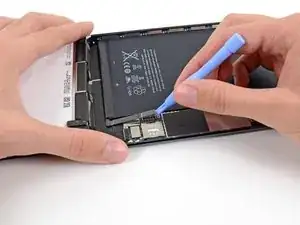
    • Infila un altro plettro e fallo scorrere delicatamente sopra l'antenna sinistra, fermandoti prima del tasto Home.

    • Fai scorrere il plettro solo verso il tasto Home dall'angolo sinistro. Non farlo scorrere in direzione opposta o potresti danneggiare l'antenna.

    • Se devi far scorrere il plettro lungo il bordo inferiore più di una volta, rimuovilo e reinfilalo vicino all'angolo e fallo scorrere verso il tasto Home.

    • Lascia il plettro vicino al tasto Home prima di procedere.

  26. iNDwARAADDdWXHdJ
    iNDwARAADDdWXHdJ
    UNp1etUebdkVlKSG
    ecvGPRphMxBUHIhR
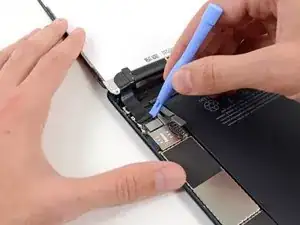
    • Infila solo la punta di un ultimo plettro accanto a quello del passaggio precedente e fallo scorrere sotto il tasto Home.

    • Fermati a circa 25 mm dall'angolo destro per evitare di rompere il cavo del digitizer.

    • Infila il plettro più a fondo e fallo scorrere verso il tasto Home.

    • Come nell'ultimo passaggio, assicurati di far scorrere il plettro solo nella direzione che va dall'angolo verso il tasto Home quando è inserito a fondo, altrimenti potresti danneggiare l'antenna sotto il vetro.

  27. qDrHeJXOw5C4wGWO
    • Scalda di nuovo e riappoggia l'iOpener al bordo superiore dell'iPad.

  28. UbqM2HpuccIer5HZ
    UbqM2HpuccIer5HZ
    SLjWQkyOsoDWdkNJ
    • Stai molto attento durante questo passaggio. Prenditi tutto il tempo necessario e assicurati che l'adesivo sia caldo e morbido e di aver tagliato abbastanza adesivo con i plettri. Non esitare a fermarti e scaldare di nuovo se necessario.

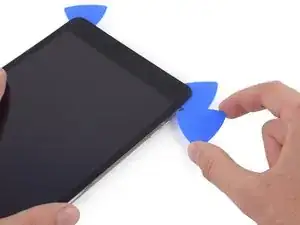
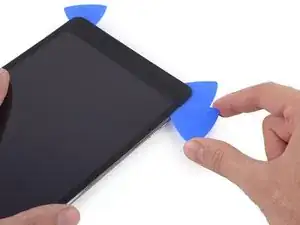
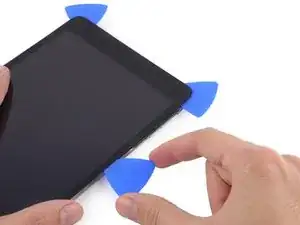
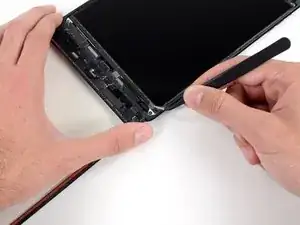
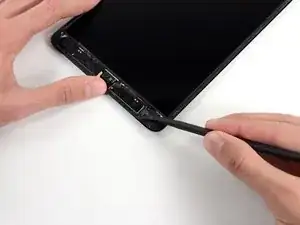
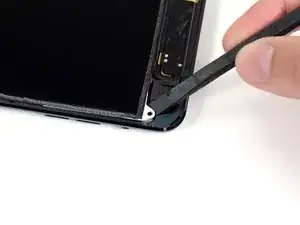
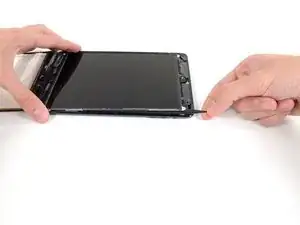
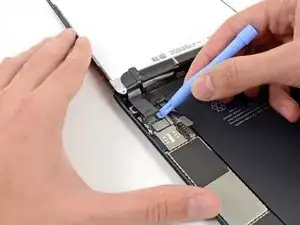
    • Sul bordo superiore dovresti avere un plettro infilato sotto ogni angolo. Torci i plettri per fare leva e sollevare leggermente il vetro, separando l'adesivo rimasto sotto i quattro bordi.

    • Se incontri troppa resistenza fermati. Lascia i plettri in posizione, scalda di nuovo e riappoggia l'iOpener e fai scorrere un plettro sotto il punto problematico un'altra volta.

  29. VYhvMmFvpDTWOtK4
    VYhvMmFvpDTWOtK4
    iWUOi6fVuTVBnB3V
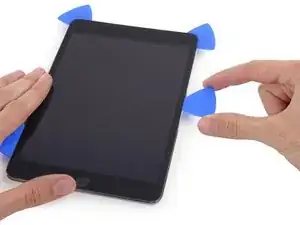
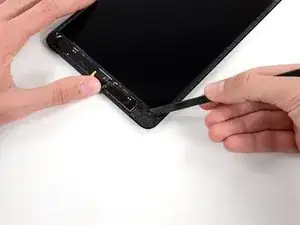
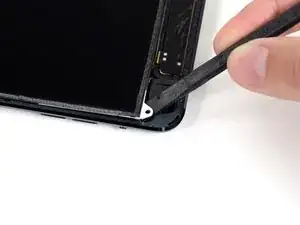
    • Solleva con cura e lentamente il bordo superiore per separare ulteriormente l'adesivo lungo il bordo inferiore.

    Really, add a few more pics and a few more picks, see how long and difficult you can make this guide. 26 steps to get the top screen off is ridiculous.

    B. A. Computer Services -

  30. vwplaDO5A41e1FXn
    vwplaDO5A41e1FXn
    FHVgY6qDfwkbrF12
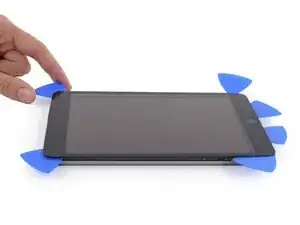
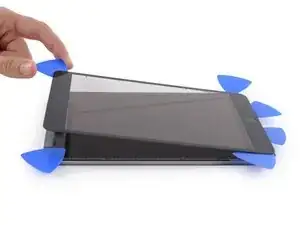
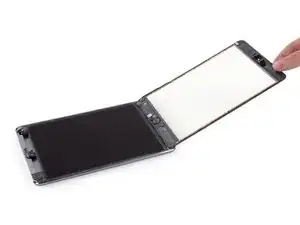
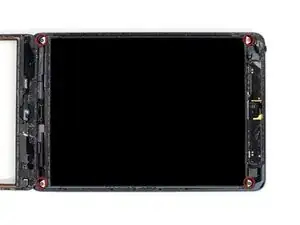
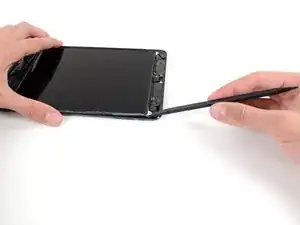
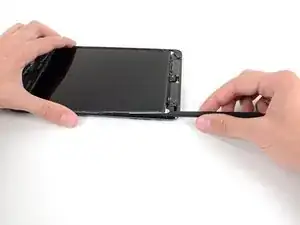
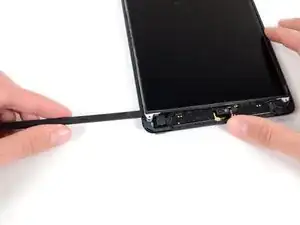
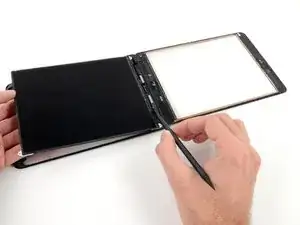
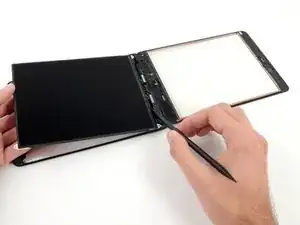
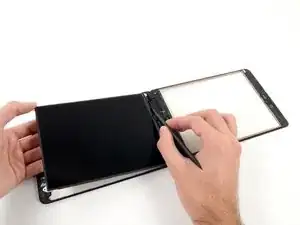
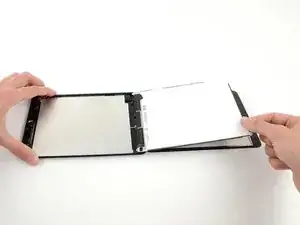
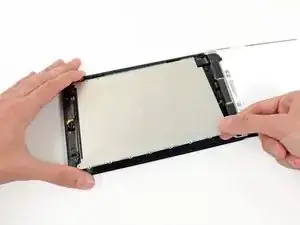
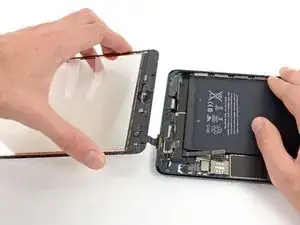
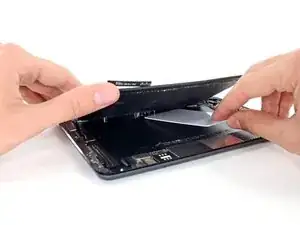
    • Una volta separato tutto l'adesivo, apri il vetro come la pagina di un libro e appoggialo sulla superficie di lavoro.

    • Se vuoi riusare il gruppo dello schermo, durante il rimontaggio dovrai sostituire l'adesivo. Segui la nostra guida per l'applicazione dell'adesivo dello schermo per farlo e sigillare di nuovo il dispositivo.

    I recommend wearing latex gloves or be sure not to put too many finger prints on the front or back of this front glass when lifting it or completing the remainder of the steps. I made this mistake and upon installing the new LCD and putting the iPad back together I realized that I left a few finger prints on the inside of the front glass. After re-securing the adhesive strips putting the iPad back together there are now unremovable fingerprints visible when the LCD is turned off. Just a recommendation on the gloves or be sure to wipe both sides of the front glass clean before putting all back together.

    Christian Screen -

  31. DBENplxMDlIJqJym
    DBENplxMDlIJqJym
    dKYqaUFUQI6KoldJ
    SuMWOrWAI4au3JJZ
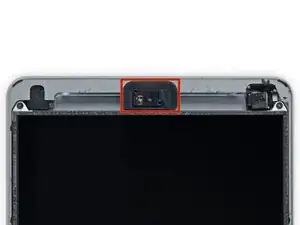
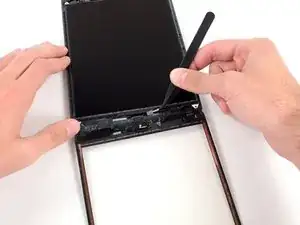
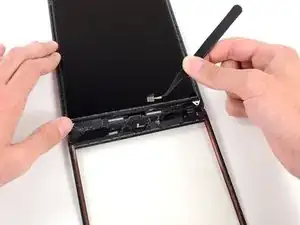
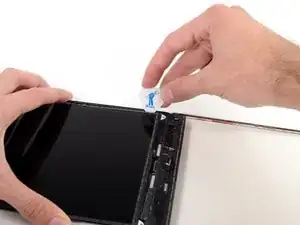
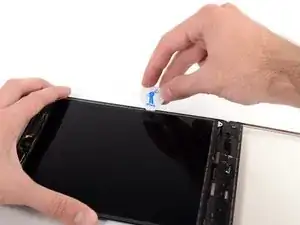
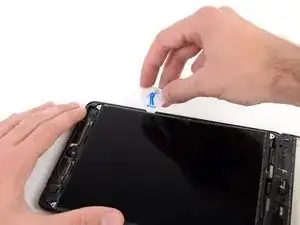
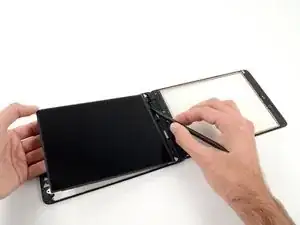
    • Il supporto della fotocamera frontale potrebbe restare incollato al pannello anteriore: rimuovilo e rimettilo sulla fotocamera per proteggerla.

    • Fai oscillare il supporto attorno a uno dei suoi bordi per liberarlo dall'adesivo e poi rimuovilo dal pannello anteriore.

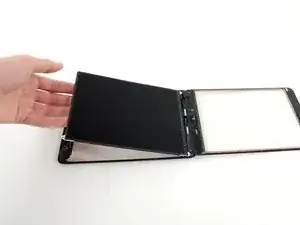
    • Rimetti il supporto della fotocamera frontale nel suo alloggio nel case posteriore.

    this didn’t happen to me BUT the glue was still sticking to the top of the glass because one pick had gone OVER the glue and the other under, so I had to pull the glue off and cut it with scissors

    jfaulks1 -

    OK this was glue, it was the tape from step 35!

    jfaulks1 -

  32. dDy3OwMrUbjFFfAR
    dDy3OwMrUbjFFfAR
    5u6dwjujXLDeePwg
    DECBEVviNy1QfvAZ
    • Dei piccoli pezzi di schiuma adesiva coprono le viti in alto e in basso a destra di fissaggio del pannello LCD alla copertura posteriore.

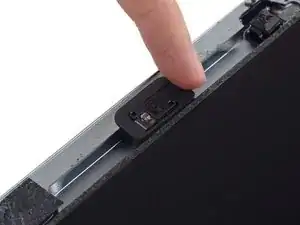
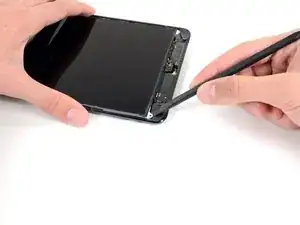
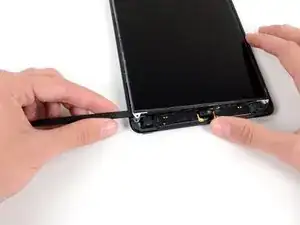
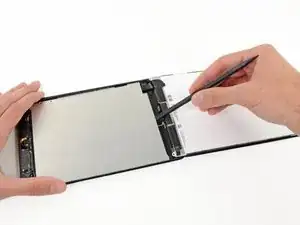
    • Usa un paio di pinzette per rimuovere il pezzo di schiuma rettangolare sopra la vite del pannello in alto a destra.

    • Rimuovi il pezzo di schiuma triangolare sopra la vite del pannello in basso a destra.

  33. lbbpyFj4r3ROWoTS
    lbbpyFj4r3ROWoTS
    HYeUEyQGkhqc2XvZ
    • La vite del pannello LCD in alto a sinistra potrebbe essere coperta da del nastro adesivo del vetro anteriore.

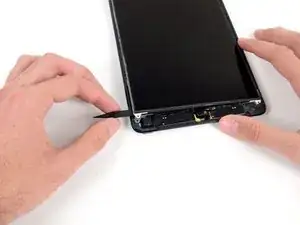
    • Se il nastro è presente, usa la parte piatta di uno spudger per rimuoverlo, scoprendo la vite sottostante del pannello LCD.

  34. 1qLSyBAe4V6DOMSi
    • Svita le quattro viti a croce Phillips #000 che fissano il pannello LCD al case inferiore.

    In my case the 4 screws are not the same. One is 4mm, and 3 of 3.5mm, or better 2 x 3.5mm and one 3.45mm. I put the longest one at the left edge at left of the LCD flat cable.

    mitja

    Mitja Jankovic -

    Hi Mitja. I just checked the measurements with an electronic digital caliper. I got 3.9 mm for all four screws. Are you sure it was the same model? Thanks.

    Walter Galan -

    The top left screw is longer than the other 3 - iPad mini Retina Wi-Fi.

    sandro -

    On mine the top right screw is longer

    oliver -

    top right is longer on an ipad mini 2 retina wifi 32GB

    sagert -

    ipad mini wifi no screws are longer

    iliketrains kid -

  35. Pb6TRgvtOcTsELLh
    Pb6TRgvtOcTsELLh
    iuDdMMAS5O6XETXV
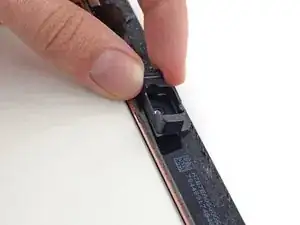
    • Usa un paio di pinzette per rimuovere il piccolo pezzo di nastro adesivo che unisce la cornice del pannello LCD allo speaker destro.

    I wonder what does this sticker stands for…

    K8L -

    what sticker?

    iliketrains kid -

  36. qm6fitZarP1pNMSN
    qm6fitZarP1pNMSN
    G25jBRqXWBlSbWKJ
    IqPjA3Zh4NdBsRPQ
    • Un sottile pezzo di schiuma adesiva sulla cornice del pannello LCD copre un pezzo di nastro adesivo che unisce la cornice del pannello LCD al pannello sottostante. Per procedere dovrai rompere e rimuovere parte della schiuma per scoprire il nastro nascosto sotto.

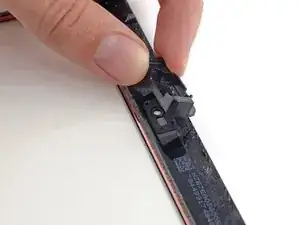
    • Usa un paio di pinzette per sollevare la schiuma adesiva attorno al pannello LCD.

    • Stai attento a non toccare il pannello LCD con le pinzette: potresti danneggiarlo.

    • Usa un paio di pinzette per sollevare la schiuma adesiva per scoprire la parte superiore del pannello LCD.

  37. GFbNmhSBmUVfVX55
    GFbNmhSBmUVfVX55
    tqUeCkEdRFJxIlV2
    jaO6LhLjrilZpfNw
    • Infila la punta di uno spudger tra la cornice del pannello LCD e il nastro sulla parte superiore del pannello.

    • Fai scorrere lo spudger lungo lo spazio tra la cornice del pannello LCD e il nastro adesivo, separando quest'ultimo dalla cornice.

    I finished a successful replacement of my screen following these instructions. Thanks.

    Step 36 (remove tape from LCD perimeter), however, seems unnecessary. I ended up spending a lot of time separating the tape from the LCD frame only to discover it was not necessary for steps 37-44 and actually made things really difficult for step 45-46 (removing the tape near the speakers). Finally, steps 45-46 can be skipped since it is much easier to remove this tape once you flip the LCD over (Step 55).

    Kenneth Snyder -

  38. ArGZYabBVuTAdDkm
    ArGZYabBVuTAdDkm
    ZBVfedEEXliUuIaJ
    • Il pannello LCD è incollato alla schermatura di protezione in metallo sul retro del pannello lungo i bordi superiori, destro e sinistro. Per ammorbidire in sicurezza questo adesivo dovrai usare un plettro per spostare di qualche millimetro il pannello LCD a destra e a sinistra più volte.

    • Infila un plettro nella fessura tra il pannello LCD e la copertura posteriore, vicino alla parte superiore del bordo sinistro del pannello.

    • Inclina leggermente il plettro verso l'esterno dell'iPad, giusto il necessario per allargare la fessura tra il pannello LCD e la copertura posteriore.

    I found a very simple method for removing the LCD from the metal shield. Slightly lift one of the top corners and insert a 1' piece of fishing line. Insert the line under the other top corner placing the length between the LCD and shield. Once in place, gently pull each end toward the bottom of the LCD breaking the adhesive as you go. This will make things much easier than using the picks and possibly breaking the LCD.

    bababooey -

    The fishing line trick is amazing… although i had already broken the LCD when i saw that comment. Good Learn!

    Brandon Lukasik -

    This step is what destroys my LCDs :(

    Dan Harris -

    Just destroyed my LCD as well. A red warning remarking is missing here! The LCD assembly is very fragile an cannot be bent, even slightly!!

    brauliox -

    I have broken about 10 of the 50 or so iPad minis that I have repaired. I always try to have a LCD on hand. I’ll have to try the fishing line trick!

    northstar -

    I also recommend doing step 45 first (removing the two pieces of foam tape at the bottom).

    northstar -

    I was able to do this the first time w/out damaging the LCD simply by following the instructions to the letter, slowly and carefully. The only thing I did differently was to follow Northstar’s instructions to remove the two pieces of tape at the bottom of the LCD before beginning.

    Jenny Lawson -

    I found a good way to remove the LCD without breaking it. Once you finish to clean up around the LCD just lift a bit one of the white metal backing plate and insert in the gap a plastified playing card under le LCD and slowly make your way to the center of the LCD. Repeat on the other side and the LCD will lift up intact.

    lemerise -

    nothing Brocken after

    (I did not read the comments before doing it lol)

    iliketrains kid -

  39. BwLWVyFypwEtqtNB
    BwLWVyFypwEtqtNB
    DtkNCX6mtPfZ62iY
    6AoUwJLtlwHhpKFv
    • Infila il plettro in tre altre posizioni lungo il bordo sinistro del pannello LCD e inclinalo in ogni posizione per far scorrere il pannello verso il bordo destro del case posteriore.

  40. 2xAIc63CSGJQF1sl
    2xAIc63CSGJQF1sl
    baxbUFmPywfuNhOy
    cOTcENNnUFoolydP
    • Ora passa al lato destro del LCD, fai leva col plettro in diversi punti lungo il bordo per muovere il pannello LCD verso il bordo sinistro.

    • Ripeti un po' di volte questi ultimi due passaggi, finché il pannello LCD non riesci a muoverlo facilmente da destra a sinistra.

  41. Ny32cm3NuKB2oBBB
    Ny32cm3NuKB2oBBB
    rWvTODV5q6DMYQOC
    DxtYHmpDHU3EllGt
    • Nei prossimi passi dovrai far scorrere uno spudger tra il pannello LCD e la piastra posteriore in metallo per separare del tutto il pannello dall'adesivo sottostante.

    • Infila la parte piatta di uno spudger tra la cornice del pannello LCD e la piastra posteriore in metallo.

    • Assicurati di infilare lo spudger tra la cornice del pannello LCD e la piastra di schermatura in metallo e non sotto la piastra stessa. Far leva direttamente sulla schermatura la danneggerà, in quanto è avvitata sul case posteriore sotto il pannello LCD.

  42. YFLy6KnoWFGxGDIc
    YFLy6KnoWFGxGDIc
    jqnnwqmFoblSMV3w
    1R44fhUmogMeDopV
    • Iniziando nell'angolo in alto a destra del pannello, fai scorrere lo spudger tra la cornice del pannello LCD e la sua protezione in metallo, il che separerà l'adesivo man mano che avanzi.

    • L'obiettivo è separare l'adesivo, non di sollevare il pannello LCD, quindi tieni la punta dello spudger il più in basso possibile per evitare di piegare il pannello.

    • Se infilare lo spudger causa una piega nell'angolo del pannello, ripeti i passaggi precedenti con il plettro per ammorbidire ulteriormente l'adesivo.

    These steps were hard. I was too scared that I was going to brake the LCD. Luckily I got it off! Don’t know how delicate these things are and how much force they can take.

    Padraic Hoselton -

    me to it was hard

    iliketrains kid -

  43. WAGHN2T2hLggR5UC
    WAGHN2T2hLggR5UC
    tYR4iIkIBAUlZnK6
    OHQUq3vircBtRVAd
    • Ripeti la precedente procedura lungo il bordo superiore del pannello LCD.

    • Infila la parte piatta dello spudger tra la cornice del pannello LCD e la schermatura in metallo e spingilo delicatamente sotto al bordo superiore, separando l'adesivo.

  44. qMTF4hKvYBtmLaBQ
    qMTF4hKvYBtmLaBQ
    j1Afji3RCxVe5Yr6
    2hACPxRdTGuWJdpe
    • Continua con il bordo sinistro del pannello LCD: infila la parte piatta dello spudger tra il pannello LCD e la protezione e spingilo fino in fondo.

    • A questo punto il pannello LCD dovrebbe staccarsi dall'adesivo che lo teneva fermo. Se non succede, reinfila lo spudger sotto il bordo destro o superiore per separare del tutto il pannello.

  45. ZnjcmscLMS3yBH5S
    • Solleva il pannello LCD di qualche centimetro dal case posteriore per assicurarti che si sia scollato del tutto.

    When I did it I found that the adhesive sticking was mainly on the edges, so if you take a spudger and just break that adhesive carefully it will help. Be gentle lifting the lcd as it’s very breakable.

    Jasper Holden -

  46. X1o1AwQVpnm5SMEn
    X1o1AwQVpnm5SMEn
    brYnHKUwyNYWtYyH
    • Due larghe strisce di nastro adesivo uniscono il pannello LCD agli altoparlanti.

    • Mentre tieni il pannello LCD con una mano, infila la parte piatta dello spudger nella fessura tra questo nastro e lo speaker sinistro.

    • Tira delicatamente il pannello via dagli altoparlanti mentre ruoti lo spudger verso l'esterno per rimuovere il nastro dallo speaker.

    I recommend removing these two pieces of foam tape prior to loosening and lifting the LCD.

    northstar -

  47. yqFCZlX2BQG1XO1h
    yqFCZlX2BQG1XO1h
    txqPaDfPDF1Uyisv
    • Infila la parte piatta dello spudger nella fessura tra l'altoparlante destro e il nastro del pannello LCD.

    • Mentre tiri il pannello allontanandolo dagli speaker, ruota lo spudger verso l'esterno per allargare la fessura e rimuovere il nastro dall'altoparlante.

  48. 4DQ25dbGRVbZrEhd
    4DQ25dbGRVbZrEhd
    Z4NDNrhv5Kb2uWEi
    • Gira il pannello LCD a testa in giù e appoggialo sopra il vetro anteriore.

    • Non cercare di rimuovere il pannello dall'iPad: è ancora collegato con dei cavi.

  49. ZhDNbfdjYTiZMSBT
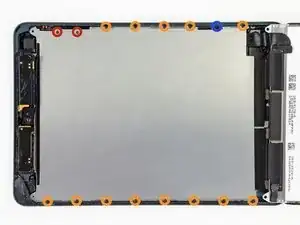
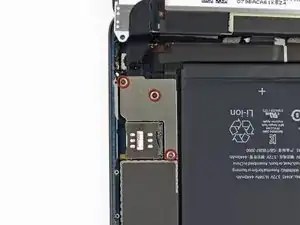
    • Svita le seguenti viti che fissano la protezione del pannello LCD alla copertura posteriore dell'iPad:

    • Due viti a croce Phillips #00 da 2,6 mm

    • Tredici viti a croce Phillips #00 da 1,7 mm

    • Una vite a croce Phillips #00 da 1,7 mm aggiuntiva su alcuni dispositivi.

    At the iPad mini retina Wi-Fi there are only 7 screws.

    sandro -

    On my iPad Mini (Gen 1 WiFi; A1432), these are not #00 screws, but #000 screws. They're much tinier than the first four screws that held the LCD tabs in place. The #00 driver sorta works, but requires a lot of force to get traction. The #000 driver works like a charm, though.

    volty -

    On my 1432 there were mixed in 4 tiny #000 screws holding the shield plate aong the right side. Looks like these can be mixed in without consequence as they are shorter anyway

    gfriedman99 -

    I have a missing plate and screws

    Keah Smith -

  50. PwPNndCBVJpLoHPr
    PwPNndCBVJpLoHPr
    MYEI1qOb4IT2wBHY
    • Infila la parte piatta di uno spudger sotto il centro della piastra di schermatura del pannello LCD dal bordo inferiore.

    • Fai leva con lo spudger per sollevare la piastra dai bordi della scocca posteriore.

  51. KEyIHBaKYeqItEYY
    • Rimuovi la piastra metallica del pannello LCD dall'iPad.

    theres a lip on the rear case that prevents you from lifting this straight out, be careful to not bend the plate.

    jfaulks1 -

    Once the LCD is clear of the shield, wiggle a long plastic spudger up the center between the shield and the battery to gently bend the shield. That will help in getting it away from the sides and make it easier to come out.

    Bill Shannon -

  52. aZYLqaFDDqiGABps
    • Svita le tre viti a croce Phillips #00 da 1,3 mm che fissano la copertura del connettore alla scheda madre.

    • Assicurati di non scambiare queste tre viti con delle altre, in particolare quelle che fissano la protezione del pannello LCD alla copertura posteriore dell'iPad. Qualsiasi vite leggermente più lunga potrebbe rovinare la presa della vite, causando un danno irreparabile alla scheda madre.

    Note: These three screws are smaller than the rest of the screws holding the larger LCD shield although they look similar. If you substitute the larger screws, you will pop a screw bracket which can damage the board on both the mini original and mini 2 retina. I just wrote a blog post about how this happens: http://mendonipadrehab.com/entries/gener...

    jessabethany -

    Hi jessabethany. Thank you for the warning. I read your blog post and found it to be very informative. Thanks for adding the warning to the step. It will most definitely help others avoid any damage to the logic board. Thanks!

    Walter Galan -

    Be careful: At iPad mini retina Wi-Fi there are thw short and one longer screw! Don't mix them!

    sandro -

  53. ypOjwrdfQGQcfVFS
    • Usa un paio di pinzette per rimuovere la copertura del connettore dall'iPad.

  54. qUkH4blu5CaSPSvP
    qUkH4blu5CaSPSvP
    KvwMvvxHyg3r4JRl
    • Usa uno strumenti di apertura in plastica per fare leva e sollevare delicatamente il connettore dalla sua presa sulla scheda madre.

    • Stai molto attento a fare leva sul connettore della batteria e non sulla presa. Se fai leva sulla presa sulla scheda madre, potresti danneggiare l'intero connettore.

    Make sure you disconnect the battery. If not and ipad is still on you can have problems with the LCD backlight. To fix that problem you have to solder

    Mattis -

    I may be experiencing the backlight problem you mentioned. What connection needs to be soldered?

    Grillwrecka -

    Have an issue - heard that if you don't disconnect the battery a fuse is blown. I need help to fix the blown fuse.

    Andrew Kivell -

    There is an extensive thread in Answers about iPad mini backlight problems.Th screen stays black after a digitizer replacement.

    jessabethany -

    After unplugging the battery place a guitar pick in-between the two connections.

    While continuing to work on the iPad you may inadvertently cause the two connections to touch.

    Michael Vovaris -

    Yeah, you need to put the pick in between the connections so the battery doesn't touch the logic board connector and blow a fuse and make your backlight not turn on. You really don't want to have to solder the 2 connections together, especially if you don't know how, like me! I will use your comment's advice when working.

    WolfyHD -

    I put a piece of cellotape on the contact side of the connector and could happily forget about it while getting on with the rest of the repair.

    Rory Filer -

  55. 2HvHNwdD3XTUCSlq
    2HvHNwdD3XTUCSlq
    3XhYYFFHaipOOdbR
    • Usa uno strumento di apertura in plastica per fare leva e sollevare il connettore del pannello LCD dalla sua presa sulla scheda madre.

    • Non fare leva sul grande IC vicino al connettore, o potresti romperlo. Fai leva dal lato del connettore come mostrato nelle immagini.

    Putting the iPad back together: While plugging the LCD Connector back in, take your time finding the socket on the logic board. Do no use pressure until you are certain it is seated properly. Trust me, if you take your time you will know its seated correctly.

    Michael Vovaris -

    Does it shares the same shape/size of the LCD connector between the ipad mini wifi only WHITE and the other one ipad mini 32gb BLACK?

    muhammadbukhari10 -

  56. RZEXLeQ1MRNWk2fP
    RZEXLeQ1MRNWk2fP
    VGCUlbBrLBLrYhUm
    3rgKiPOxTcYue5Wb
    • Il pannello LCD è ancora unito all'iPad da due larghe strisce di nastro adesivo che vanno dall'interno del case posteriore alla parte frontale del bordo inferiore della cornice del pannello.

    • Mentre tieni il pannello LCD con una mano, infila la parte piatta di uno spudger tra il pannello LCD e il nastro sul bordo destro dell'iPad.

    • Fai scorrere lo spudger verso l'esterno per separare l'adesivo, mentre sollevi delicatamente il pannello LCD per staccarlo dal nastro.

    • Può essere utile torcere lo spudger per allargare la fessura e separare il pannello dal nastro.

    Removing this tape and such to take the LCD off completely is unneccessary when replacing just the glass and digitizer, the digitizer cable is easily removed without further work to the LCD

    Dave Davidson -

    When this tape damage, how we can take a new?

    Muhammed Kilic -

    When this tape are damage, how we can order and take a new one?

    Muhammed Kilic -

    Following from Nick H’s comment about LCD removal being unnecessary - I tried that first and got my broken glass OUT of the assembly by threading it thru a limited space beneath the LCD. Later when trying to reseat the digitizer connector I gave up and removed the LCD anyhow. Not that much extra work but a LOT easier to install the digitizer and reseat the connector without having to navigate around the LCD and its cable. Removal of the tape holding the LCD was easy - there are two short lengths of rubber or foam along the bottom edge of the LCD that faces the outside world. Remove those(save them) and then _carefully_ peel up the tape; I saw some metallic looking residue underneath. Later when re-assembling everything, I put the tape back and then those two short lengths of foam.

    Rory Filer -

    on mine this tape was already loose.

    jfaulks1 -

  57. wGdK1cvEkK1BDnUG
    wGdK1cvEkK1BDnUG
    ydRCYPoiBDFmllMW
    g4fpuBUQmlsn24AO
    • Mentre tieni il pannello LCD con una mano, passa al bordo sinistro dell'iPad e ripeti il passaggio precedente per rimuovere il secondo pezzo di nastro.

    • Infila la parte piatta di uno spudger tra il pannello LCD e il nastro e fallo scorrere verso l'esterno per separare l'adesivo mentre sollevi delicatamente il pannello LCD.

  58. 62fLk5XuRCWRkVWa
    62fLk5XuRCWRkVWa
    sBArmtYdcWc3NkkD
    • Solleva e rimuovi il pannello LCD dall'iPad Mini.

  59. 1ym4vKIcLIBqERKB
    1ym4vKIcLIBqERKB
    GIlXGZSLyJbCqxC5
    • Stai molto attento a fare leva uniformemente sul connettore del digitizer, ma non sulla sua presa. La presa e il connettore sono molto delicati e se danneggi uno dei due il digitizer non funzionerà più.

    • Per ridurre lo sforzo sulla presa, prova a fare leva sotto i lati corti del connettore piuttosto che sotto quelli lunghi, come mostrato nelle immagini.

    • Fai leva delicatamente sul connettore del digitizer per sollevarlo dalla sua presa sulla scheda madre.

  60. SI6AlepadFUCxn5m
    SI6AlepadFUCxn5m
    BGgDnXKAqRemrFeM
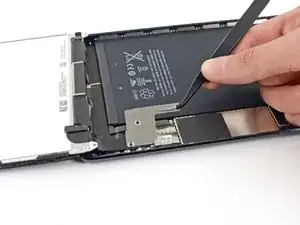
    • Fai leva delicatamente sulla scheda del cavo del digitizer per sollevarla dal case posteriore.

    Be careful not to dislodge any of the surface mount components next to the connectors. This is sometimes a reason for the digitiser not working.

    Simon -

    There is adhesive holding it down, so it may take some time to get it off. It helped me to push with my spudger on the piece with the yellow text instead from the same side.

    Jasper Holden -

    I put the iOpener under the iPad to weaken the adhesive for this step.

    Nathan Lloyd -

  61. KTcYv5FatVdl3ZMI
    KTcYv5FatVdl3ZMI
    FC3MaF6Mn2H2OQWm
    • Solleva e rimuovi il pannello anteriore dall'iPad.

    == After step 55 ==

    Before installing your new digitizer (front panel), make sure to put the necessary bends on the new digitizer's ribbon cable. Look at the old panel that you've removed to see the bends that you'll need to make. Without doing this, once you are at the last step of laying down the digitizer, the cable may bunch-up in between the glass and the iPad's aluminum frame. Thus, it will not allow that corner to sit flush and glue down. If you didn't make the bends, you can use the tweezers at that point to situate the cable. It is just easier to do this beforehand. Do not make the bends as if you were folding paper. You run the risk of damaging the ribbon by doing so. You just want enough pressure to make the cable retain a bend. Again, look at and copy the cable from your old panel.

    Good Luck!!!!

    Mike -

    If your panel is shattered, you may want to have some canned air to get rid of all those pesky little glass pieces that fly everywhere. I used a Giottos air blaster because that is all I had at my disposal.

    Mike -

    might be better to use a vacuum for safety reasons. you really dont want glass shards all over the place

    gfriedman99 -

    If your case corners are damaged from being dropped, seal across the corners with wide packing tape, then grind them out carefully with a small motor tool. Use a corner piece from the broken screen (adhesive side upwards) as the template. Keep removing aluminium until screen piece above fits snug and flat. Remove all traces of metal filings before reassembly.

    Jennifer Fordyce -

    Good tip! Most times the corners are damaged.

    northstar -

  62. etHnAXbs5PtW6WCn
    etHnAXbs5PtW6WCn
    c5nPPCOOaW1c5rEU
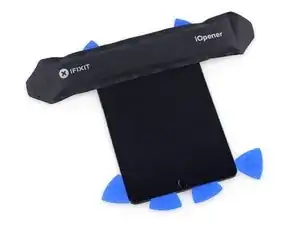
    • Riscalda l'iOpener nel microonde per un minuto.

    • Ricordati di non surriscaldare l'iOpener durante questa procedura. Aspetta almeno due minuti prima di scaldare di nuovo l'iOpener, e non riscaldarlo nel microonde per più di un minuto.

    • Appoggia l'iOpener sul retro dell'iPad, lungo il centro. Lascialo appoggiato per 90 secondi per ammorbidire l'adesivo della batteria.

    • Sposta l'iOpener sulla destra del retro dell'iPad (il lato opposto alle fotocamere) e lascialo in questa posizione per altri 90 secondi.

    • Se l'iOpener si è raffreddato notevolmente dopo i primi 90 secondi, riscaldalo per un altro minuto.

    There are warnings all over the iOpener I have to not put in microwave for longer than 30 seconds. For now that’s what I’m going to do; please clarify iFixit folks!!

    Tom Georgelas -

  63. NZQLBedDUPTqVoc3
    NZQLBedDUPTqVoc3
    rhZJLrOBdFREN3Q3
    • Durante questa procedura dovrai infilare delle sottili schede in plastica tra la batteria e la copertura posteriore dell'iPad per separare l'adesivo che tiene ferma la batteria. Stai attento a tenere le schede il più piatte possibile per evitare di piegare la batteria, il che può danneggiarla e farle rilasciare dei pericolosi composti chimici.

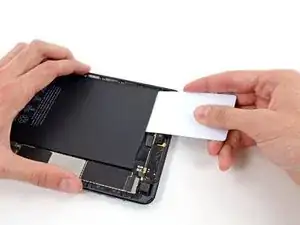
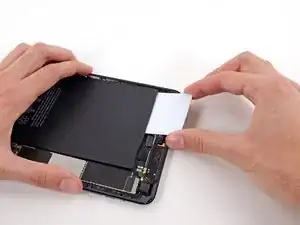
    • Ruota l'iPad a faccia in su ed infila una scheda in plastica tra l'angolo superiore sinistro e la copertura posteriore.

    • Se incontri una notevole resistenza, scalda di nuovo l'iOpener e ripeti il passaggio precedente per ammorbidire ulteriormente l'adesivo.

    I found it helped to lift the battery a little bit with a guitar pick then slide the cards in.

    Tom Georgelas -

  64. Qf1E35udg6bhdJCC
    Qf1E35udg6bhdJCC
    tW1WZVW5Ub5DnLQQ
    • Infila la scheda più a fondo, separando quanto più adesivo possibile.

  65. spwV1SLmrGckSCKy
    spwV1SLmrGckSCKy
    DJyyC3dyZUZMACqY
    • Rimuovi la scheda in plastica e reinfilala sotto l'angolo superiore destro della batteria.

  66. 2YbQyyQ6BoYNquid
    2YbQyyQ6BoYNquid
    HbmfRXfTeGZqQEC2
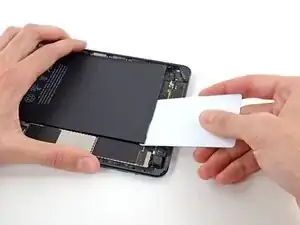
    • Ancora una volta, infila più a fondo la scheda per separare quanto più adesivo possibile sotto la batteria.

    • Lascia lì sotto questa scheda per evitare che l'adesivo si reincolli.

  67. XgTpspCMvHRCCasP
    XgTpspCMvHRCCasP
    nQoPxq2mAKqe5F4X
    • Infila una seconda scheda in plastica sotto l'angolo inferiore sinistro della batteria.

  68. YXpdMq51iJwDwyTP
    YXpdMq51iJwDwyTP
    kyrgQhuAo6LB3jni
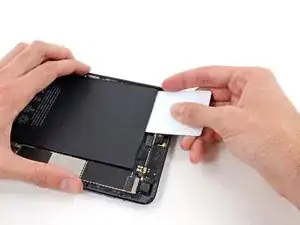
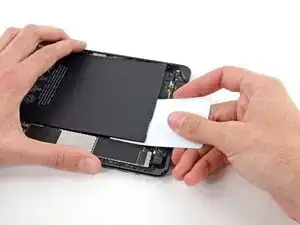
    • Spingi lentamente la scheda più a fondo per separare quanto più adesivo possibile tra la batteria e il case posteriore.

  69. DQk2UQWpCPeUhPWx
    DQk2UQWpCPeUhPWx
    35INny21HMcIOjpL
    • Rimuovi la scheda e reinfilala sotto l'angolo inferiore destro della batteria.

  70. CHWUJVPAvuEPMCtg
    CHWUJVPAvuEPMCtg
    MCITVeiVMYVDfQmu
    • Spingi la scheda più a fondo sotto la batteria.

  71. eHhA1QweLUOyGsCH
    eHhA1QweLUOyGsCH
    3H3Zcs2q6VacFqjH
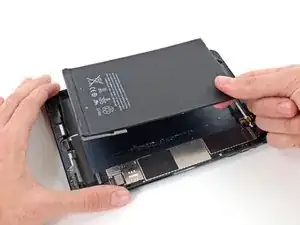
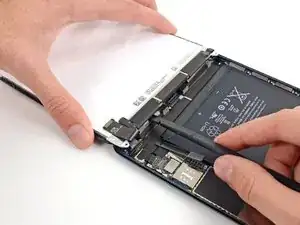
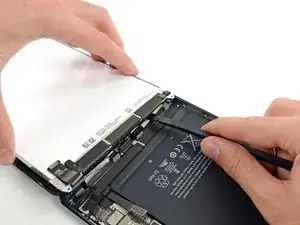
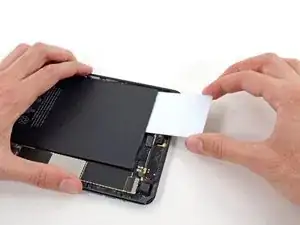
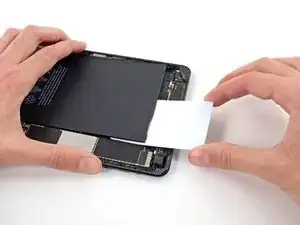
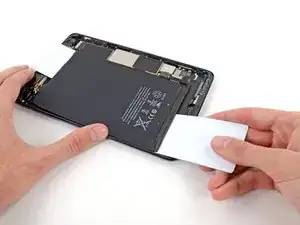
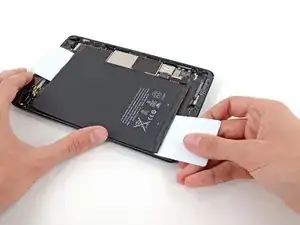
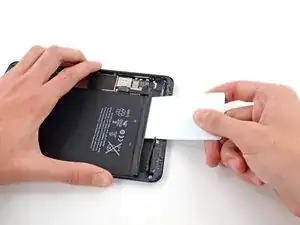
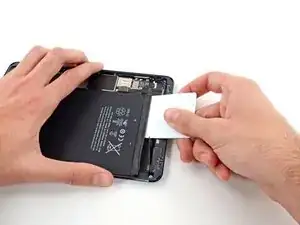
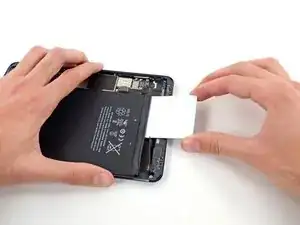
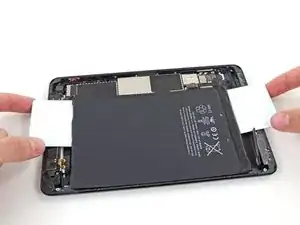
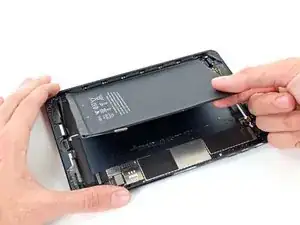
    • Afferra entrambe le schede e solleva lentamente il bordo destro della batteria di circa cinque centimetri dalla copertura posteriore.

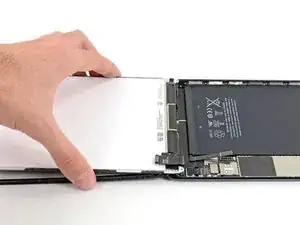
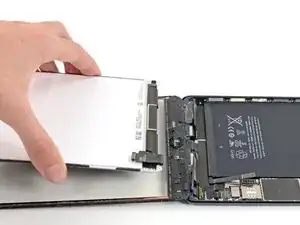
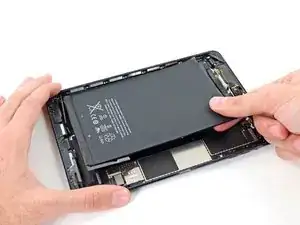
    • Rimuovi lentamente la batteria e cerca di tenerla il più dritta possibile.

  72. FXuMDiWG4tEQisUx
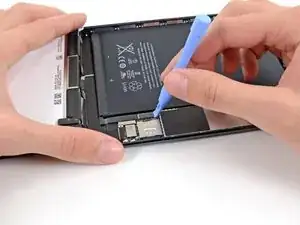
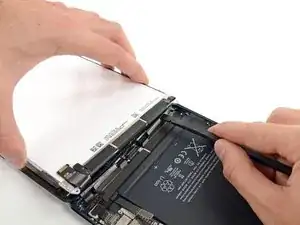
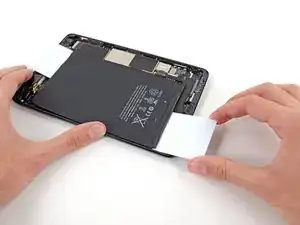
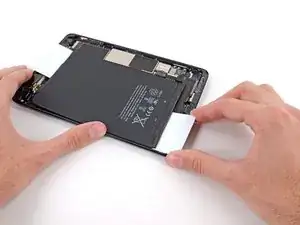
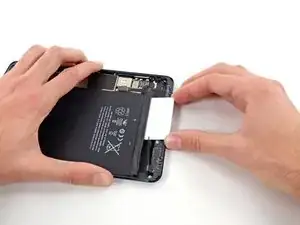
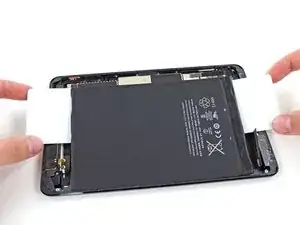
    • Mentre tieni sollevato il bordo destro della batteria con una mano, usa una scheda in plastica per separare tutto l'adesivo rimasto incollato tra batteria e case posteriore.

  73. xChidJjGDEhV3wep
    xChidJjGDEhV3wep
    LfR1UOx32cux4kXT
    K1YFVAdHQfjrHyAw
    • Solleva e rimuovi la batteria dall'iPad.

    Where can I get a battery?

    Mike Munn -

    Hi as a novice i found this page absolutely BRILLIANT...

    there are so many tiny screws and components that i would of buggered something for sure if i didnt have your instructions

    can you advise when you reinstall everything does the tapes have to go back on ( most are not sticky now. some seem to have a metallic surface ????

    if so what is the name of the tapes and can i get in New Zealand?

    or do you sell??

    thanks again

    BRILLIANT.

    Richard New Zealand

    Richard Sutton -

Conclusione

Per rimontare il dispositivo, segui le istruzioni in ordine inverso.

Andrew Optimus Goldheart

Membro da: 17/10/09

502162 Reputazione

8 commenti

What a great guide! Using this, I was able to disassemble my iPad Mini and replace the batter for around $30. I used a heat gun (carefully, 10 seconds at a time) instead of the microwaveable sock thingy. Everything went perfectly, just like in the pictures and instructions. Thanks again!

Charles Haase -

For the re-assembly, do we need to apply fresh adhesive to keep the digitizer from coming loose?

pfaulconer -

It is a !&&* of work, but it works at least from being capable to do it and it went relativerly smoothly. But!!! Even if for sure I didn’t break anything, the iPad doesn’t work at all. It looks to me as for sure nothing went wrong during the change and repair process, that simply the new battery is broken, or is there any trick to get it running like in other cases were a battery activation process is required? I’m really disappointed after all this work and being so careful with each step during the process!!!

Dirk Neudert -

wait, that’s it? What do I do with the included adhesive???????????????????

jfaulks1 -

Thanks for this tutorial. What else could I use for heating a tablet? This is the most questionable part I think. Anything else is a quite usual and simple at least for me.

Clayton Simpson -

Step 54 to 60.. Do you really have to remove the screen panel?

Katsumi Yamada -

to get into the iPad you must remove the screen

Space -

Thanks so much for this repair guide.

I love iFixIT tools!

Paul Wicks -