Introduzione

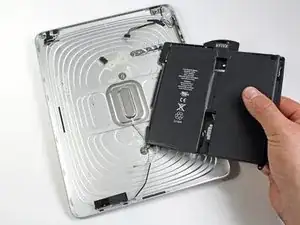
Segui questa guida per sostituire la batteria del tuo iPad.

  1. CR4uCijdW1OugLYO
    CR4uCijdW1OugLYO
    H1FdIigqyDXVftPq
    juxJIpQPuYHqjCn5
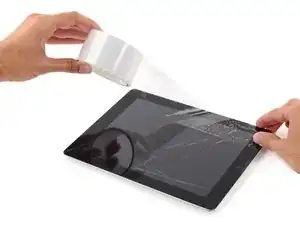
    • Se il tuo vetro è in pezzi, evita di romperlo ulteriormente e di tagliarti con le schegge coprendolo con del nastro adesivo.

    • Applica delle strisce di nastro adesivo trasparente da pacchi sul vetro, una sopra l'altra, finché è completamente coperto.

    • Ciò conterrà le schegge di vetro e manterrà l'integrità strutturale quando dovrai fare leva e sollevare lo schermo.

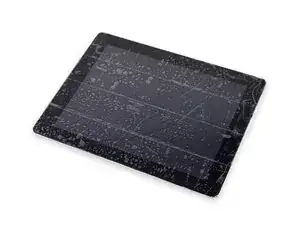
    • Fai del tuo meglio per seguire il resto della guida come descritto. Comunque, una volta rotto il vetro, continuerà a rompersi mentre ci lavori e potresti dover usare uno strumento di apertura in metallo per rimuovere il vetro.

    • Indossa degli occhiali protettivi per proteggere gli occhi e stai attento a non danneggiare il pannello LCD.

    1) Are you recommending to cover the display with clear packing tape even if it is intact (not cracked)?

    2) If so,will the tape take the display’s oleophobic coating with it when removed?

    Mitch Stary -

  2. 6iSBMxolHICgNLWh
    6iSBMxolHICgNLWh
    V2YBEIlGCwbukrd2
    • In questa guida dovrai fare leva sul gruppo dello schermo per rimuoverlo dalla scocca in alluminio. Segui le indicazioni attentamente per evitare di danneggiare lo schermo o i delicati ganci che lo tengono fermo.

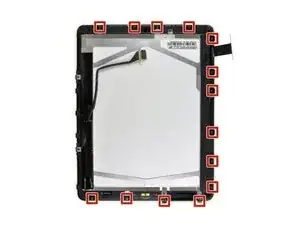
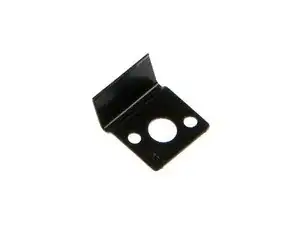
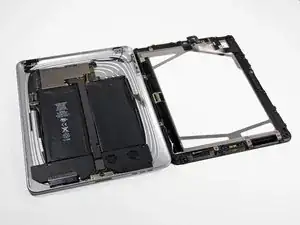
    • Ci sono 14 clip in metallo che tengono fermo lo schermo, mostrati a sinistra. Mentre fai leva nei prossimi passaggi, cerca di fare forza attorno a questi e non cercare di passarci attraverso con il tuo strumento di apertura.

    • Se rompi qualche gancio, puoi comprarne di ricambio qui.

    A clearer explanation of the orientation is needed here. The bar code is at the top left of the iPad when you are looking at the screen.

    David Hincks -

  3. HtoIZ4Z5f3XgDvtI
    HtoIZ4Z5f3XgDvtI
    KwUArQsNhHqLVhqh
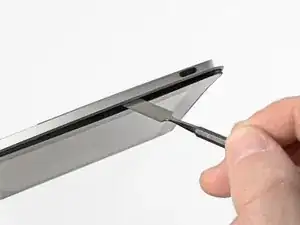
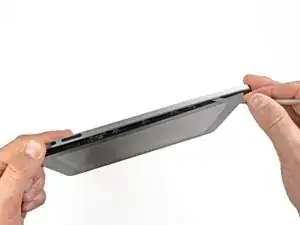
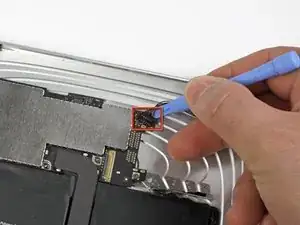
    • Infila uno spudger di metallo tra il bordo superiore del gruppo dello schermo e la scocca.

    • Ruota lo spudger lontano da te per sganciare le clip lungo il bordo superiore dello schermo.

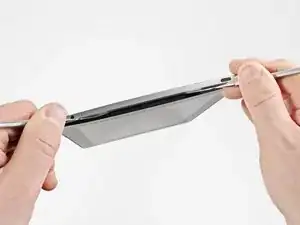
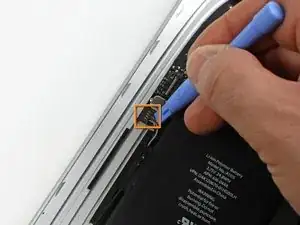
    • Infila un secondo spudger di metallo tra il bordo superiore dello schermo e la scocca per evitare che i ganci si richiudano.

    Tip* "ONLY WITH METAL SPUDGER* heat it with a lighter till its warm to touch, then slide it like a butter knife. it reduces chances of chipping glass.

    luckie -

    I've found that by using a thicker iPad tool dents the back less(not at all if your careful) and start prying just under the volume button and working my way down works better as the metal clips are on all sider except the right side.

    richard -

    It would be really helpful to point out where all the clips and tabs are, and to show a picture of them (unbroken), so you know what you're trying to release.

    Styg -

  4. nFUMWpOBTYG5bNsY
    nFUMWpOBTYG5bNsY
    4TSnIcqdX6akNcYF
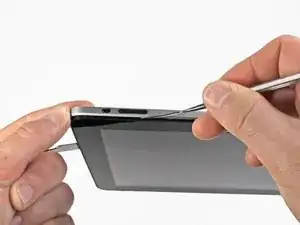
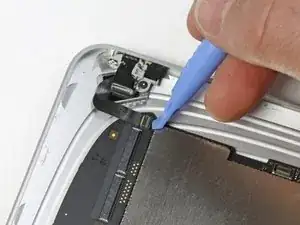
    • Con uno spudger, procedi lungo il bordo destro dell'iPad.

    • Lo schermo è tenuto fermo dai ganci metallici lungo i bordi superiore, inferiore e sinistro. Il bordo destro ha delle clip in plastica che fanno presa direttamente sulla scocca.

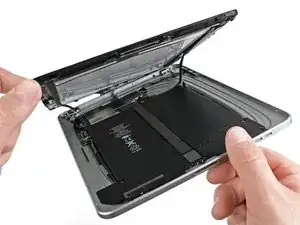
    • Una volta rilasciati i ganci, solleva il bordo sinistro dello schermo e fallo scorrere verso sinistra per liberare i ganci dalla scocca in alluminio.

    • Fai leva attentamente e delicatamente: se senti della resistenza, fermati e cambia posizione.

    Its seems easier to undo the clips on the left and bottom by levering them with an iPad tool and pusing the clips in from the edge with another tool when i can visually see them. One the right side, bottom and most of the left side is done there isnt much need to do the top as it will slide off if moved about a centimeter

    richard -

  5. xKFU6GyBqRZ5KXGb
    • Solleva il bordo inferiore del gruppo dello schermo dalla scocca .

    • Non cercare di rimuovere lo schermo a questo punto: è ancora collegato alla scheda madre.

    By it's BOTTOM edge.

    jonathan -

  6. iCYYTspPb3ZJHnc2
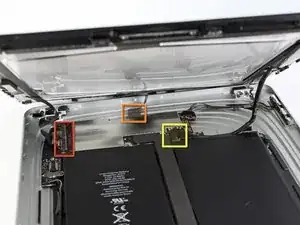
    • Nei prossimi passaggi dovrai scollegare i tre cavi che collegano il gruppo dello schermo alla scheda madre. I cavi sono per le seguenti componenti:

    • Digitizer

    • Sensore di luce ambientale

    • Cavo dati dello schermo

    It would be easier to detach the Display Data Cable at its connector on the far right in the picture, since there doesnt seem to be much play to undo the suggested one.

    David Hincks -

  7. m4HEFXaEBkcC4IPq
    m4HEFXaEBkcC4IPq
    wKG4aXYiHmixlJGN
    baKisuemuiuM2VOM
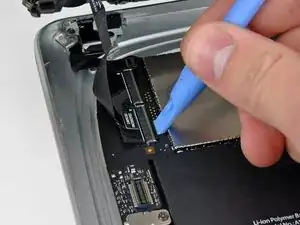
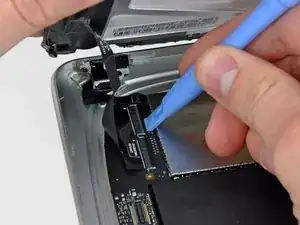
    • Usa la punta di uno strumento di apertura in plastica per girare verso l'alto le alette di bloccaggio che tengono fermo i cavi del digitizer nelle loro prese sulla scheda madre.

    • Assicurati di far leva sull'aletta e non sul connettore.

    • Sfila i cavi a nastro del digitizer dalle loro prese.

    Adding this comment in its proper place:

    After flipping up the metal retainer, pull it sideways.

    Do not pull it up vertically.

    Joe in PA

    David Hincks -

  8. f1wApEiGxXdDZJcC
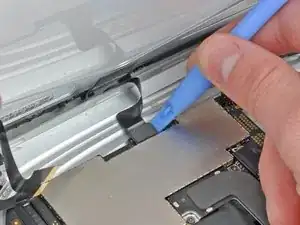
    • Usa uno strumento di apertura in plastica per scollegare il connettore del sensore di luce ambientale dalla sua presa sulla scheda madre facendo una leggera leva verso l'alto.

  9. P5MYJfP1QFCrW4gE
    P5MYJfP1QFCrW4gE
    wYPNMPOurVWxRP23
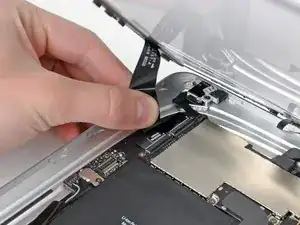
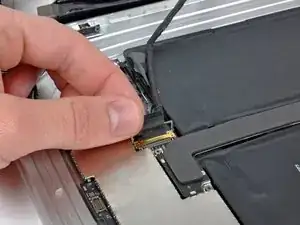
    • Scollega il cavo dati dello schermo dalla scheda madre ribaltando la staffa in metallo di bloccaggio tirandola dalla sua linguetta in plastica.

    • Sfila il connettore del cavo dalla sua presa.

    • Tira il connettore parallelamente al piano della scheda madre.

    IMHO, unhooking data display cable from the other end is preferable to the above location, since the cable itself is sealed or taped onto the assembly.

    Roger Buttermore -

  10. LG5vRuJmF6wL12Of
    • Rimuovi il gruppo dello schermo dalla scocca.

  11. LqNANIdPyyBSTEgX
    LqNANIdPyyBSTEgX
    5132ZimZHVf22WPX
    4cyJwIfjvMGoRN1O
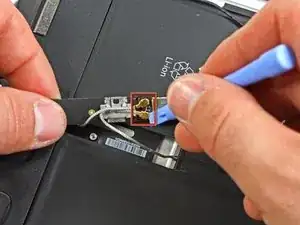
    • Usa la punta di uno strumento di apertura in plastica per:

    • Fare leva da sotto i cavi del connettore dei tasti laterali per scollegarlo dalla scheda madre.

    • Fare leva da sotto i cavi del connettore dello speaker per scollegarlo dalla sua presa.

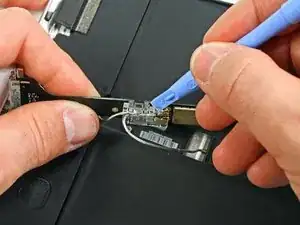
    • Gira attentamente verso l'alto l'aletta di bloccaggio del connettore ZIF della presa vicino al jack cuffie.

    • Assicurati di far leva solo sull'aletta e non sulla presa stessa.

    • Tira il cavo a nastro della presa jack verso il bordo sinistro dell'iPad per sfilarlo dalla sua presa.

    Just skip removing the “side button connector” as you may instead sever the small solder connections to the socket. It’s not a necessary step and is more dangerous than anything.

    Max Powers -

    I wish I had understood your post a little better, the socket popped off of the logic board for me. Is there any way to reconnect it or did I just waste my money trying to fix my own device? Thanks for any suggestions, listen to Max, good advice, there’s no reason to remove that connection and it just puts you in danger of doing what i did. Good luck to all.

    George Pradel -

  12. MpjXDSXaeTQYRd6w
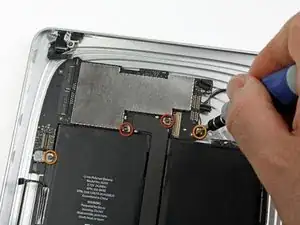
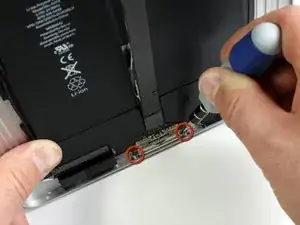
    • Svita le seguenti viti che tengono ferma la scheda madre sulla scocca.

    • Due viti Torx T5 da 4,56 mm.

    • Due viti Torx T5 da 3,76 mm.

    确定是T5吗,为什么在这个拆解里是写T4,我都糊涂了

    iPad Wi-Fi Teardown

    keeeeeep -

    red are t5, orange are t4

    Patrick -

  13. j6dQ5SvRVU1HkWKM
    j6dQ5SvRVU1HkWKM
    FqZOqI5VsrjYQtCw
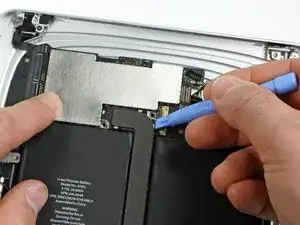
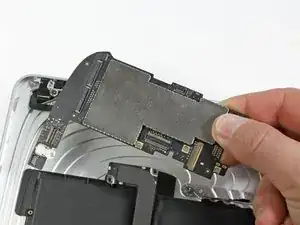
    • Usa la punta di uno strumento di apertura in plastica per sollevare con cura il connettore della presa di carica per scollegarlo dalla scheda madre.

    • Solleva la scheda madre dal gruppo del pannello posteriore.

    Hello, what kind of adhesive should i use when i put the new battery?

    Helyousa -

  14. VqkWgCU3chZCIXe4
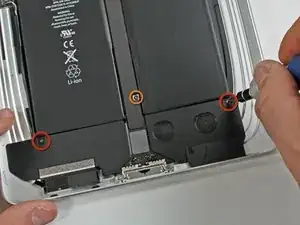
    • Svita le due viti Torx T5 da 2,84 mm che ancorano alla scocca il gruppo dell'altoparlante.

    • Svita la vite Torx T5 che fissa il cavo della porta di ricarica sulla scocca.

    All are T4 Trox

    Patrick -

  15. CyyDHAqTtSaFMaCn
    • Svita le due viti Torx T5 da 2,84 mm che tengono ferma la porta di ricarica sulla scocca.

  16. NfXURAlPx4SqMkOp
    • Usa uno strumento di apertura in plastica per rimuovere attentamente la copertura di protezione della scheda WiFi/Bluetooth e del cavo della porta di ricarica.

  17. GjiSLw6nH2AZHAwG
    • Solleva attentamente i connettori delle antenne WiFi e Bluetooh dalle rispettive prese sulla scheda WiFi/Bluetooth.

  18. SLG6Fn4qybSKKkEI
    • Solleva e rimuovi la porta di ricarica e il suo cavo dalla scocca.

  19. AsQGGWRPZRDVYCKK
    AsQGGWRPZRDVYCKK
    oVnSgGOpc2tvNiub
    • Sfila il cavo dell'altoparlante dal suo percorso a sinistra della batteria.

    • Sfila il cavo dell'antenna WiFi dalla sua canalina nel gruppo dello speaker.

  20. DGpXP6TJ5kBuditp
    DGpXP6TJ5kBuditp
    refWfL55pi2nPPIB
    • Solleva e spingi in avanti il gruppo dello speaker finché non si libera dal bordo inferiore della scocca.

    • Rimuovi il gruppo dello speaker dal case inferiore.

  21. 2ge6u5KC4sUCCibE
    2ge6u5KC4sUCCibE
    MaMeU4ELWLEByZ2I
    • La batteria è incollata alla scocca da una gran quantità di adesivo. Procedi con pazienza e attenzione.

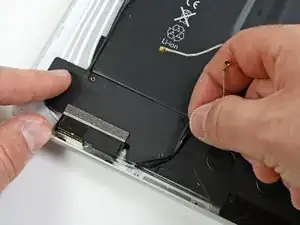
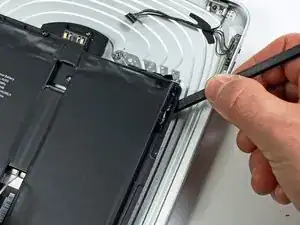
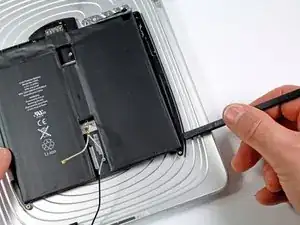
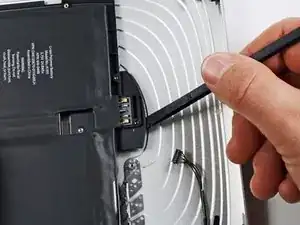
    • Usa la parte piatta di uno spudger per far leva delicatamente sulla batteria per sollevarla dalla scocca.

    • Continua ad allargare delicatamente la fessura facendo ondeggiare lo spudger e facendolo scorrere lungo il bordo destro della batteria.

    • Continua a fare leva finché il bordo destro della batteria si è scollato dalla scocca.

    No joke with the “excessive amount of adhesive” you may cut yourself or bend your metal sponger like I did. This part alone took me about 25 min, just the removal from the back panel.

    Megan Klein -

  22. iW6kEFakxRVGnFoD
    iW6kEFakxRVGnFoD
    Zc3BbXP4gJpvMmKs
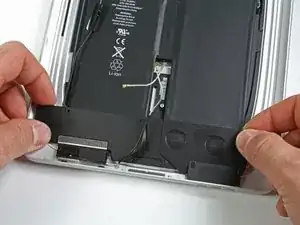
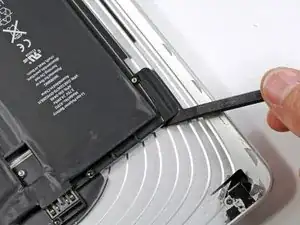
    • Infila la parte piatta di uno spudger sotto il bordo superiore e continua a separare l'adesivo.

    • Continua come nel passo precedente finché il bordo superiore della batteria si è scollato dalla scocca.

  23. VZeGBsgTZjWpiGNY
    VZeGBsgTZjWpiGNY
    pthYTltdUD1AQMXd
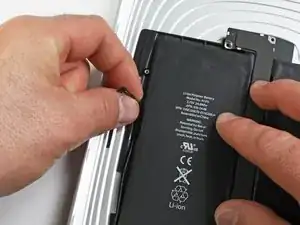
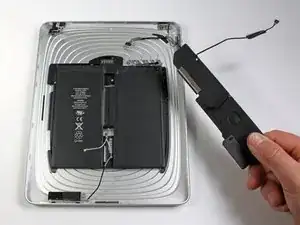
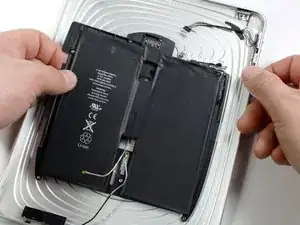
    • Una volta creato sufficiente spazio, usa le mani per sollevare la batteria separandola dall'adesivo rimasto sulla scocca.

    • Rimuovi la batteria dalla scocca.

    Thank you very much for a well done job.

    Rick j

    Oceanside CA

    Richard T Jacinth -

Conclusione

Per rimontare il dispositivo, segui le istruzioni in ordine inverso.

Walter Galan

693762 Reputazione

14 commenti

make sure when putting back together to push down the digitizer clasps

zach -

Tried this with 2 ebay "OEM" cheapo batteries. Both failed- wouldn't charge, reboot every few minutes.

Solution: Dissected both new and original batteries. Snipped out old LI-ION cells from original Apple battery pack frame. Soldered new LI-ON cells into original battery frame.

Success!

The battery pack includes both LI-ION cells and an small circuit board. The cheapo replacement battery packs don't work (with newer IOS versions? are they actively blocking 3rd party battery replacements?)

Using the circuit board from the original battery pack with new LI-ION cells seems to fix everything.

Be ready to peel off a lot of adhesive label stickers and maybe use a bit of electrical tape to produce a renovated battery pack that works- original Apple battery frame + new LI-ION cells..

Jason Sodergren -

Thanks for letting us know that battery PCB takes LiIon cells replacement. I have the same problem with reboot using cheap ebay replacement battery. Going to test new LiIon cells for capacity and if OK - will resolder them.

Paul G -

PS: just replaced two cells, it works. Just in case, to prevent the charging PCB to loose the power (some LiIon controllers can lock because of power loss) I did it one by one. First I removed one cell, soldered replacement, then second one. I estimated capacity of new cells using Imax B6 charger - both of them were around 3100mah, not bad for noname $12 battery from ebay.

Paul G -

I am new to this. Does the iPad need to be kept powered up by an external battery while changing out the battery pack to prevent loss of apps and data? I don't mind so much losing data, it is backed to cloud. But apps are a problem as many of mine are no longer available.

Mike Nixon -

No, iProduct storage doesn't depend on the battery.

jasonq -

Should the iPad boot if i reassemble it without a battery?

Heiner -

I've performed the steps and it worked with Kastar replacement part, just to note that to open it first I've used the side were the volume button is located and slided through the botton were the front button is located.

Also is almost impossible to open it without broke some clips, I've bought some spares (10 pieces) that come handy because 6 were broken during the procedure.

luizcn -

All I get on mine is the time of day and nothing else..Is there a cure ?

Carol -

What kind of replacement adhesive would I need to secure the new battery? Or is it okay without any new adhesive?

Phillip Andrews -

The iPad gen 1 battery I replaced did not need any extra adhesive. It stuck to the old large mess without issue.

Megan Klein -

Post battery replacement. Looks like it worked but the screen would not light up. I assumed the back light was damaged from the water damage (was dropped in a full bath tub) so I replaced the screen and now it will not charge. Should I assume it’s a cable or the logic board?

this is purely entertainment and not for work.

Megan Klein -

tres bien moi jaurais preferer un film sur youtub

Berton Roland -

Muchas gracias

Hope -