Introduzione

Questa è una guida solo prerequisita per sostituire la batteria di un iPhone 8.

Questa guida ti spiega come rimuovere completamente il gruppo display allo scopo di evitare danni accidentali ai cavi del display stesso. Se pensi di essere in grado di rimuovere la batteria senza dover forzare troppo sui cavi del display, puoi evitare i passi sulla rimozione del display. Inoltre, anche se è possibile rimuovere le strisce adesive che fissano la batteria non appena hai aperto il telefono, questa guida raccomanda la preventiva rimozione del Taptic Engine. Questa operazione riduce i rischi di rompere accidentalmente le strisce adesive inferiori, sia perché si possono impigliare nel Taptic Engine sia perché la trazione sulle strisce è esercitata secondo un angolo eccessivo.

Per ottimizzare le prestazioni, calibra la tua batteria appena installata: scaricala sotto il 10%, poi caricala senza interruzione fino al 100%.

L'apertura dell'iPhone 8 danneggerà le guarnizioni impermeabili del display. Se non sostituirai i sigilli adesivi, il tuo telefono funzionerà normalmente, ma non sarà più resistente all'acqua.

  1. QEiwXOLOCt5t6bkO
    • La batteria dell'iPhone 8 è tenuta in posizione da quattro pezzi di adesivo elastico: due in alto e due in basso.

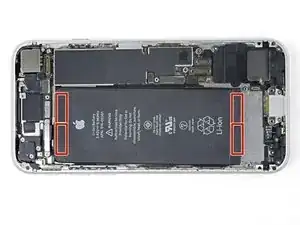
    • Ogni pezzo di adesivo ha una linguetta da tirare alla sua estremità, incollata non tenacemente alla superficie frontale della batteria.

    Be careful prying around the side button connector when trying to remove the top tabs. There is very little room to maneuverer

    Tom Millard -

    £ Tapes broke on me so I applied iISOPROPYL ALCOHOL using an Eye Dropper waited 30 seconds tHen heated up some oil in the bag rice for 2 minutes on 700W and the applied the unopened packet to the back of the iPhone for 90 seconds.

    Themn I used an out of date credit card with the raised numbers facing down to easily release the battery.

    David Howard

    David Howard -

    Great tip! Worked perfectly and easy. Thanks.

    Stephen Smith -

    It should read heated up some boil in the bag rice

    David Howard

    David Howard -

    Very difficult. be very careful on the limited space end that you don't puncture the battery!

    Carl Schultz -

    I really hope you guys not to skip steps for detaching taptick engine because it is really hard to pull out string with taptic engine. 4 of 3 strings were cutted when I treid to detach batteries with taptic engine. So, I really recommend you to get rid of taptic engine before you start this step. But if you skipped and strings are cutted, there is a way. Use hair dryer 90 secs as maximum hot behind the battries and detach the batteries. It worked to me.

    Min Su Kang -

  2. vs4oMYcRlWEFb2lY
    vs4oMYcRlWEFb2lY
    jImYu1JRHGErUfnj
    okM1ORGZUueh1Xi6
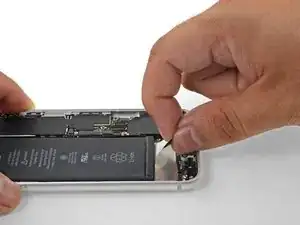
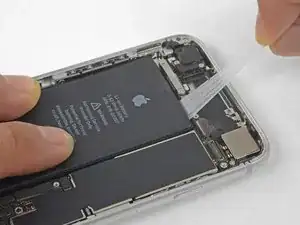
    • Stacca la linguetta della prima striscia adesiva dall'angolo inferiore destro della batteria.

    • Se possibile, usa le unghie o delle pinzette a punte smussate. Stai attento a non perforare la batteria con attrezzi affilati.

    Vor Schritt 30 umbedingt die Rückseite des iPhone erwärmen. Ich habe das iPhone 10 Minuten auf eine heiße Wärmflasche gelegt.

    Moritz Hartges -

    Strongly suggest you remove the display. Also the picture shows the "perfect world" it is far ore difficult to remove and get to those white adhesive pull strips. be very careful!!!

    Carl Schultz -

  3. 4eDyPbJ62yPLKLAd
    4eDyPbJ62yPLKLAd
    J3TMbulIt5RYhCcJ
    fjKZrs3OCvNRVb3I
    • Cerca di tenere la striscia adesiva piatta e non arricciata nel corso di questa procedura; le strisce piegate o ritorte si incolleranno su se stesse e si romperanno invece di venire fuori senza problemi.

    • Altra precauzione: non premere sulla batteria mentre tiri le strisce. Se lo farai, creerai dei punti di pressione che potrebbero bloccare la striscia adesiva causandone la rottura.

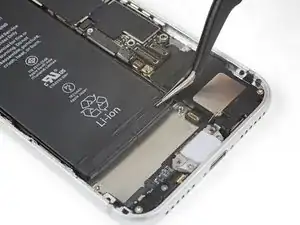
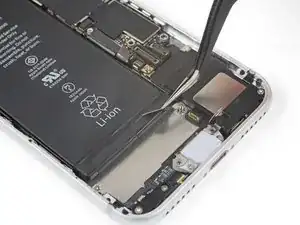
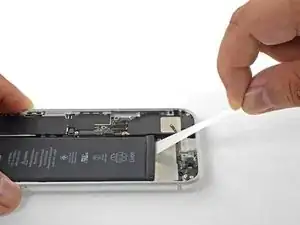
    • Tira lentamente una delle linguette dell'adesivo della batteria allontanandolo dalla batteria stessa, verso la parte bassa del telefono.

    • Tira con fermezza, mantenendo una tensione costante sulla striscia finché non scivola fuori dalla sua posizione tra la batteria e il case posteriore. Per risultati ottimali, tira la striscia di piatto, a un angolo il più basso possibile, evitando di farle impigliare in qualcuno degli altri componenti dell'iPhone.

    • La striscia si allungherà sino a varie volte la sua lunghezza originale. Continua a tirare e, se necessario, afferra la striscia più vicino alla batteria.

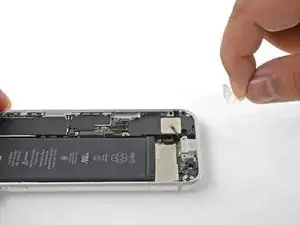
    • Se la linguetta dell'adesivo si rompe nel corso del processo di rimozione, usa le dita o pinzette a punte arrotondate e quindi riprendi a tirare.

    • Se una delle strisce adesive si è rotta sotto la batteria e non può essere recuperata, cerca di rimuovere le strisce rimaste e poi continua come da istruzioni qui sotto.

    This was the most frustrating step of the process. I found that if you pull steadily and slowly while continuing to grip the adhesive as close to the battery as you can there is a much smaller chance of breaking the adhesive strip and losing it under the battery.

    Benjamin Boldt -

    I did not have replacement adhesive tabs for my battery so I needed to re-use the old ones. First, I pulled back the black tabs from the top and sides of the battery (Steps 28 and 29). Then I laid the phone on a hot water bottle (Wärmeflasche for our German friends) while I very, very, very slowly prised the battery out of the body using the flat end of a spudger, starting at the corner closest to the volume buttons. The battery did deform somewhat during the process, but it was fully discharged and I had no combustion problems. After a few minutes of gentle pressure on the battery corner, it started to release from the adhesive. Full removal took about 5 minutes and the adhesive tabs were not damaged in any way and happily re-adhered to the new battery.

    I did all this after skipping over steps 18 to 27 and put the new battery in place after connecting it first to the circuit board to ensure correct alignment.

    jnbruin -

    All 4 strips tore after just removing a small portion… even though I took great care to pull slowly and at a small angle. Could not imagine how anyone could have managed this with my phone. Had to heat and pry out.

    griffin.weber -

    I damaged the graphite film underneath the battery while removing it from stubborn adhesive using a card from the side. Can I buy replacement graphite film? Should I remove it altogether since it's ripped or will that cause problems for heat dissipation? Thank you for any information.

    Anne Marie Hammock -

    Every time I've tried to remove these strips they just wind up breaking, regardless of the Taptic Engine being removed, or not.

    tripmusic -

  4. yAxAcOuZkVKD1xAY
    yAxAcOuZkVKD1xAY
    vMCND6xEQrEDRyJI
    woB3TYHUSBFt1Phm
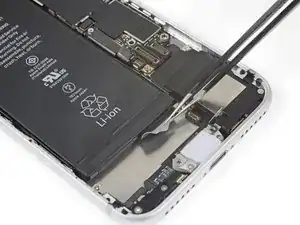
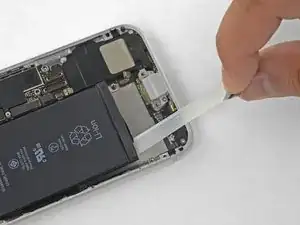
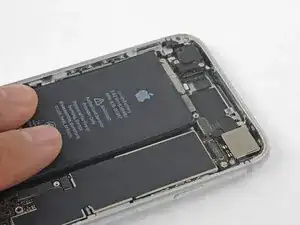
    • Ripeti i passi precedenti per rimuovere le tre strisce rimaste.

    • Tieni giù la batteria mentre rimuovi l'ultima striscia, altrimenti la striscia stessa potrebbe far volar via la batteria.

    • Se hai rimosso con successo tutte le strisce adesive, salta il prossimo passo.

    • Altrimenti, se una delle strisce adesive si è rotta sotto la batteria e non può essere recuperata, continua con il prossimo passo.

    If you have a thin flexible plastic shim shaped like a letter opener, you can slip it under the battery and take it off the adhesive.

    Spencer Chan -

    I damaged the graphite film underneath the battery while removing it from stubborn adhesive using a card from the side. Can I buy replacement graphite film? Should I remove it altogether since it's ripped or will that cause problems for heat dissipation? Thank you for any information.

    Anne Marie Hammock -

    Good luck with the top two…. Virtually impossible to remove. Both of mine broke almost immediately. I tried floss and a strong thread and both broke before they did much good.

    so I took a plastic card (an old credit card would work, but you’ll have to cut it thinner or work from the sides. If you got the bottom two out successfully, you should be able to get enough lift to start prying gently with the card.

    Good chance you’ll scuff up the super-thin carbon film over the charging coil if you’re too aggressive. And DO NOT use alcohol to soften the glue because it will melt right through that thin carbon layer and make a mess. Best bet is to go gradually…. Put the plastic card under the battery, pull up a bit to add tension, and then stick a pencil or popsicle or something under the card to keep keep the tension and give it 5 minutes or so for the tape to loosen. Then pull up on the card to add new tension, move the stick up, and wait again. It’ll take 20-30 minutes. Repeat until free and don’t rush.

    Bigh -

    Anne, I had little rips in that layer, and it doesn’t seem to have affected anything.

    Bigh -

    @bigh I’m surprised nobody else mentions this problem! With the piece above the battery still in place, impossible to pull « at the smallest possible angle with horizontal » as for the 2 bands below: I suppose that’s why they make us remove the taptic engine! Why not similarly remove the things above the top of the battery?

    Jean Orloff -

  5. DBnvH5CTIVnxfCdd
    DBnvH5CTIVnxfCdd
    Ch4yrKmbroeQvpsG
    • Se una delle strisce adesive si è rotta e la batteria resta attaccata al case posteriore, rimuovila applicando qualche goccia di alcool isopropilico (>90%) sotto la batteria accanto alle strisce rotte. Dopo circa un minuto, solleva delicatamente la batteria.

    • Non cercare di fare leva forzando la batteria. Se necessario, applica qualche altra goccia di alcool per ammorbidire ulteriormente l'adesivo. Non deformare o forare mai la batteria con il tuo strumento di apertura.

    • Se scegli di usare strumenti per far leva per sollevare la batteria dall'iPhone, devi agire con estrema cautela per non danneggiare i cavi a nastro o la bobina di ricarica che stanno direttamente sotto la batteria.

    • Se la batteria resta attaccata al case posteriore, prepara un iOpener o utilizza un asciugacapelli per riscaldare il case posteriore direttamente dietro la batteria.

    • Scalda l'iPhone finché il case posteriore sia lievemente troppo caldo per essere toccato senza scottarsi. Non surriscaldare il telefono, perché questo potrebbe provocare l'incendio della batteria.

    • In alternativa, fai passare sotto la batteria un pezzo di filo robusto (come un filo interdentale o una corda sottile di chitarra).

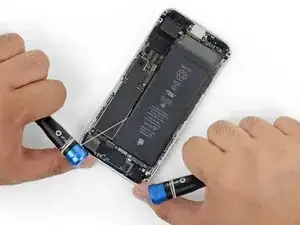
    • Tira il filo in modo alternato da un lato all'altro, come se usassi un seghetto, sull'intera lunghezza della batteria per separare l'adesivo. Non deformare o danneggiare la batteria.

    • Per proteggerti le dita, usa i guanti oppure arrotola l'estremità del filo attorno a un attrezzo (come i due manici dei cacciavite mostrati nell'immagine).

    In my case the floss caught on the sharp edge of the wireless charging coil pulling up the edge of the coil, butane cutting off the floss. I think the coil had been damaged by some previous repair, but be careful. After you pull past the first two adhesive strips, peek under the battery to make sure the floss is sliding over not under the coil. The coil doesn't look like a coil – more like a paper thin pad.

    Joel -

    Soaking the floss in rubbing alcohol helped also. It took some doing, but eventually came through without issue.

    Trever Knie -

    the wireless coil accidently got a little tear just to the right middle area. I put the new battery in and everything seems fine. I wonder if I should change the coil? anyone have any suggestions of what symptoms to look for if there were to be an issue ? thank you

    cb brooks -

    I ended up heating the back of the phone for 30-60 seconds (don't do anymore than that) and used the opening tool as a fulcrum to lift the battery. As long as you're careful it should work!

    Vladimir Stanev -

    I damaged the graphite film underneath the battery while removing it from stubborn adhesive using a card from the side. Can I buy replacement graphite film? Should I remove it altogether since it's ripped or will that cause problems for heat dissipation? Thank you for any information.

    Anne Marie Hammock -

    We used my heating pad set on low, placed the case on it, about two minutes and using the opener tool, lifted the battery out. This was the only bump/snag we had, the remaining steps went well and I have my phone back.

    Pete P -

    All the adhesive strips broke, so I used the long plastic tool for brute force extraction, twisting the old battery in the process. Most of the old strips in the back remained, so reused them for the new battery.

    Boaz Ben-Zvi -

    A hairdryer and dental floss dipped in Isopropyl alcohol worked for me. You need to use the blue pick and pointy end of the spudger to get the floss down deep enough into the crevice near the taptic engine. Then I just slowly pulled both ends of the floss down the length of the battery. DO NOT use the blue triangle pick, or similar to try and pry the battery up. The last time I very nearly damaged the charging coil near the center of the battery.

    tripmusic -

  6. 4bYRPYeqSJkQMwrH
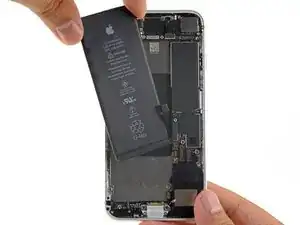
    • Rimuovi la batteria dall'iPhone.

    • Se la tua batteria sostitutiva è fornita in un astuccio di plastica, rimuovilo prima dell'installazione tirandolo dalla parte opposta del cavo a nastro.

    • Se c'è dell'alcool rimasto nel telefono, puliscilo attentamente o lascialo asciugare prima di installare la nuova batteria.

    • Se la tua nuova batteria non ha l'adesivo preinstallato, fai riferimento a questa guida per sostituire le strisce adesive.

    • Effettua un riavvio forzato dopo il rimontaggio. Questa operazione può evitare diversi inconvenienti e semplificare la risoluzione dei problemi.

    • Prima di incollare la batteria di ricambio, collegane momentaneamente il connettore alla presa sulla scheda madre. Questo garantisce che la batteria sia allineata correttamente nel suo alloggio.

    • Incolla la batteria, scollegala, e continua a rimontare il tuo dispositivo.

    Having received a replacement battery from CE Store, the phone is now OK with top battery performance. The one received earlier was just a scrap, not chargeable. Now, I’m quite satisfied.

    Miklos Barton -

    I made the mistake of powering the phone on once the new battery was connected to make sure it was working, before I put the screen back on. Now my home button doesn’t work, even after two hard resets. Anyone know how I can get it working again? Note I didn’t disconnect the screen or taptic engine or anything else. I just left the screen hinged 90°, the only connector I touched was the battery connector.

    John M -

    Same issue. Home button is dead. No cables were damaged. Everything else works. Any ideas?

    Aaron Soderholm -

    I had the same issue with the Home button, I turned on Virtual Home Button, which makes the phone usable. Shutting the power off off and restarting the phone bring you to the login screen. go to Settings, Accessibility, Touch, Assistive Touch.

    Gary Berman -

    I recommend making sure the battery connector is lined up with the socket before setting it down on in the compartment, mine was very close, but a little too high and it made getting it connected a little more difficult than it needed to be.

    Benjamin Boldt -

    I agree Benjamin. Eager to ask anyone starting this, since it added 90 minutes onto my project, be careful, though I can testify that the metal flex connector bends. In other words, I bent it about 3 times so the proper alignment could be attained - sort of a zig zag. Amidst that phase I had practically given up, almost started removing the new battery, but alas I got the phone to work again. We'll see if its function can last.

    Steph B -

    Performing a force restart at this point makes no sense. Shouldn’t it be performed after the display is installed?

    Richard Dempsey -

    Creio que a "reinicialização forçada" deverá ser feita "após a remontagem" do aparelho como está instruído.

    Samuel Vitor Alves dos Anjos -

    He said:

    I believe that the "forced restart "should be done "after reassembling" the device as instructed.

    Roman Khalikov -

    After you connect the new battery and before laying it down, make sure the end closest to the Taptic Engine has as much of a gap as possible and don't lay it down until you are absolutely sure that you are happy with the placement of it. This time around that end of the battery wound up being pretty much flush against the Taptic Engine and there really isn't much of a gap compared to the previous battery I put in there. I suspect there may be some inconsistencies with how the metal flex connector is attached to the battery itself from the factory and possibly the connector's length. With the battery connected, laying it down and leaving as much of a gap as possible, will help for the next time you replace it, especially if you choose not to remove the Taptic Engine.

    tripmusic -

Conclusione

Per rimontare il tuo dispositivo, segui i passi qui sopra in ordine inverso.

Porta i tuoi rifiuti elettronici a un riciclatore certificato R2 o e-Stewards.

La riparazione non è andata secondo i piani? Vai sulla nostra comunità Risposte per trovare aiuto nella risoluzione dei problemi.

Arthur Shi

Membro da: 03/01/18

248236 Reputazione

0 commenti