Introduzione

La batteria non dura più molto? Sostituiscila (richiede delle saldature).

  1. f3VLjUkllASpBsSy
    • Ricordati che rimuovere la copertura posteriore dall'iPod la danneggerà considerabilmente. Ti consigliamo vivamente di acquistarne una nuova per rimontare l'iPod.

    • Prima di aprire il tuo iPod, assicurati che l'interruttore Hold sia nella posizione di blocco.

    I found removing the back to be very difficult and had to use a mini screwdriver to complete it. While removing the back to replace the clickwheel, I not only destroyed the back, I inadvertently mangled the video cable and so I then had to replace that too.

    gruntso -

  2. SRSp1IEOFyiCabd1
    • La copertura posteriore è fissata a quella anteriore da otto alette attaccate permanentemente alla copertura posteriore stessa. Queste alette si agganciano a dei piccoli ganci sulla copertura anteriore.

    • Per liberare i ganci, devono essere spinti verso il centro dell'iPod Nano. Ricordati la posizione di ogni gancio sulla copertura posteriore. Mentre usi uno strumento di apertura per iPod per liberare la copertura posteriore, assicurati di infilarlo dove sono questi ganci.

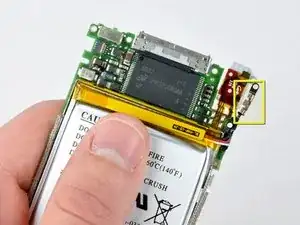
    • Per aiutarti nel trovare i ganci, i due cerchiati in rosso sono i più vicini alla presa jack.

    i don't know what genoration my ipod is...but it looks exactly like that on and it doesnt have the clips......what do i do?

    lydija mizell -

    https://www.ifixit.com/info/ID-your-iPod

    Try that first to find what you have

    Kevin Bhasi -

    Given the inherited risks of damaging the components, it would also be important to mention that the area where there are no clips is where the flat cable to the screen resides. So NO deep sticking tools in that area. It’s attractive to do because at that right side the back panel is intruded the easiest way - but dont do it.

    frederik boersma -

  3. B31gu3DJaCWHBfYC
    B31gu3DJaCWHBfYC
    jPqqcbvYKkxQg1ew
    • Aprire l'iPod può risultare complicato. Non scoraggiarti se ti serve più di qualche tentativo prima di riuscirci.

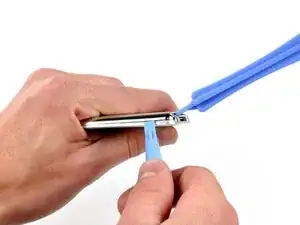
    • Infila lo strumento di apertura per iPod nella fessura tra la copertura anteriore e quella posteriore dell'iPod, sopra la porta di connessione. La punta dello strumento dovrebbe essere rivolta verso la copertura posteriore per evitare di graffiare per sbaglio la copertura anteriore in alluminio anodizzato.

    I don't have a gap big enough to put anything in it what do I do?

    Jayden Gamble -

  4. pcaTvfLghFIo3JAX
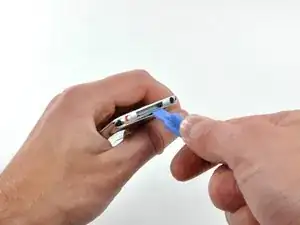
    • Infila uno strumento di apertura per iPod nella fessura sul lato della presa jack dell'iPod, con la punta dello strumento rivolta verso la copertura posteriore.

    • Allarga delicatamente la fessura esistente premendo/muovendo lo strumento di apertura nella fessura vicino ai due ganci, spingendoli verso il centro dell'iPod fino ad averli liberati entrambi.

    the tool i bought because you suggested it to me got inevitably broken like it was butter made, thanks

    Daniele Ciriello -

    This is virtually impossible! I have already cut myself when the stupid tool slipped trying to push in on the clips. Why on earth would anyone design something to impossible to open when they know the battery would need to be replaced at some point?

    Virginia VeDepo -

    Forget the iFixit plastic tools. You need to use steel on steel. I used a heavy duty engravers knife I happened to have, to get it started. Then, a fine chisel and jeweler’s screwdrivers and LOTS of force to pry it off. I messed up the aluminum front case a bit, but I cleaned that up with sandpaper. The back case was bent a bit, but I straightened that, and after replacing the battery I fastened it back on with black electricians tape. It looks quite well, and good enough for me. I will cancel my order for a replacement back. Joe M 2/3/2018

    Joseph Mensch -

    Garbage tutorial, this step was probably scribbled down in 2 minutes off the top of someone’s head for real.

    ᅚᅚMauxie -

    i never needed the large tool i just needed i little flat head screwdriver

    Jaxon Smith -

  5. kMmjUM1XX6UxS6V6
    kMmjUM1XX6UxS6V6
    eirbSDcbFTVfRejN
    • Lo strumento di apertura per iPod vicino alla porta di connessione non serve più per accedere al bordo sinistro dell'iPod.

    • Ripeti la stessa procedura del passo precedente per liberare i tre ganci lungo il bordo dell'iPod con l'interruttore Hold.

    this part is really tough - stuck here

    Mark -

  6. PcCTErdAFnVKwWRb
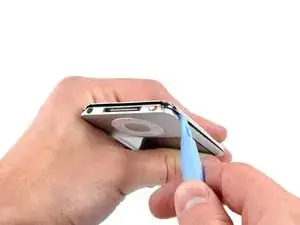
    • Infila uno strumento di apertura per iPod nella fessura vicino all'angolo in alto a sinistra e libera i tre ganci lungo il bordo superiore della copertura posteriore.

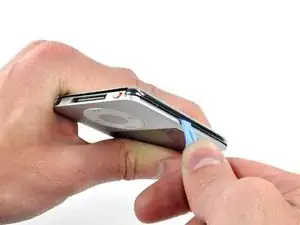
    • Dopo esserti assicurato di aver liberato tutti i ganci, separa le due metà dell'iPod.

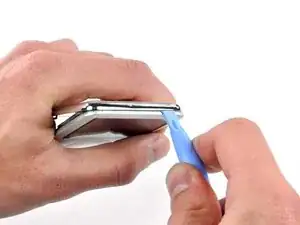
    • La copertura posteriore è ora separata dall'iPod.

    thanks you for help

    jeff -

    i gotta say this is some of the worst prying I’ve ever done on a delicate electronic piece. Even with three sides off, that last top wouldn’t budge. I had to ram a thin alumninum tool in there and bend the top lip and it still wouldn’t move.

    Mark -

  7. X2xYM3VEvb4fdJTX
    • Dopo aver rimosso la copertura posteriore, il retro del tuo iPod Nano dovrebbe essere come nell'immagine.

    At this stage an alternative (and more simple) procedure is to cut the battery wires between the battery and the logic board (one at a time to avoid shorts), remove the old battery, fit the new battery, strip and prepare the ends of the old cut wires, then solder the new battery to these wires again being careful not to short connections. Then sleeve or encapsulate these soldered joints (wax or blu tack will do). This makes it an easier and quicker job.

    viridens -

    Sounds a much better idea to me.


    I was just given some old parts in a box. Scored a decent router, laptop power supply and 2 ipods. Unfortunately, the newer one has half it's power connector snapped off and the other (4GB/A1236), I successfully reset via iTunes but it doesn't hold a charge! %#*@. I might just scout for an old speaker dock at a garage sale or such and put it in the bathroom or something.

    Tracy Fortune -

  8. uRGixICajr6ivqJZ
    • Svita le sei viti seguenti:

    • Una vite a croce Phillips da 1,8 mm

    • Tre viti a croce Phillips da 1,9 mm

    • Una vite a croce Phillips da 2,4 mm

    • Una vite a croce Phillips da 2,6 mm

    If your headphone jack isn't working, note that it is possible to replace just the headphone jack here:

    There are just 4 soldering points that need to be loosened, and then you can put on the new one.

    iTronics Repair -

    One 2.6 mm Phillips. The colour of this screw isn´t blue in the picture, it´s green.

    Daniel -

    I was able to remove the back cover using two think plastic guitar picks and my red cross donor card

    Professor Wagstaff -

    I read some steps further back and it was recommended to NOT remove all the screws and the boards indicated in the following steps, but to go directly to replace the battery. It is no more difficult to go directly to cut the battery leads, or unsolder them. I tried to splice the new battery wires to the cut leads from the board, but it was hard working with the fine wire. I ended up clearing the top of the three battery solder-through holes, but I did not clear the holes. I soldered the battery leads directly to the top of the small round solder dots…first the white, then the black, and finally the red. I fastened the battery in-place with a piece of two-sided carpet tape. I straightened up the back and taped into place with black electricians tape. It is very delicate work, and not for a beginner…I repair family jewelry, which is valuable practice. Joe M 2/3/2018

    Joseph Mensch -

  9. OWvJGtYldhWeSmIM
    OWvJGtYldhWeSmIM
    3NWThcewSac4EBr6
    • Usando uno spudger, ruota verso l'alto l'aletta di bloccaggio marrone sul connettore del cavo a nastro della ghiera cliccabile.

    • L'aletta è incernierata sull'estremità più vicina al bordo della copertura.

  10. 2RB5vXjVfVuArppn
    • Usa la punta di uno spudger per sfilare il cavo a nastro della ghiera cliccabile dalla sua presa.

    • La scheda madre è ancora collegata all'iPod dal cavo a nastro dello schermo.

  11. JsNeBBJVUryM1GRT
    JsNeBBJVUryM1GRT
    mvVpBKBvvwn3ishs
    • La scheda madre è ancora collegata alla copertura anteriore dal cavo a nastro dello schermo, posizionato dal lato della scheda madre dove si trova la presa jack.

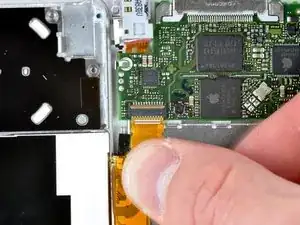
    • Solleva il gruppo della scheda madre dal bordo del connettore della ghiera cliccabile (il cavo che hai appena scollegato). Ruota il gruppo della scheda madre attorno al cavo dello schermo e appoggialo accanto alla copertura anteriore.

    When reassembling the logic board into the case, watch out for the tiny nose of the audio jack that's facing towards the center of the device. This nose has to be inserted first, then the rest of the audio jack followed by the logic board itself.

    Alexander Schwab -

  12. YTcdTAWq1CbAVQYC
    • Usa uno spudger per ruotare verso l'alto l'aletta di bloccaggio sul connettore del cavo a nastro dello schermo.

    • L'aletta è incernierata sull'estremità più vicina alla batteria.

  13. 4LHrdBXhRRLdn4Hu
    • Sfila il cavo a nastro dello schermo dalla sua presa.

    • La scheda madre è ora completamente scollegata dalla copertura anteriore.

  14. 3VIxBVOY4QHRDODr
    3VIxBVOY4QHRDODr
    CCrncIYFMDSCTpW5
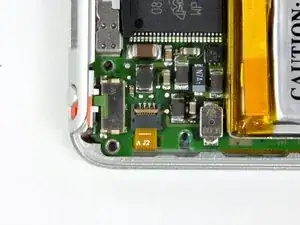
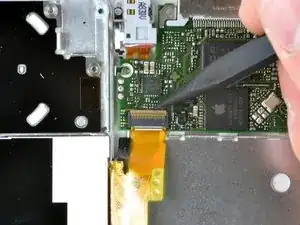
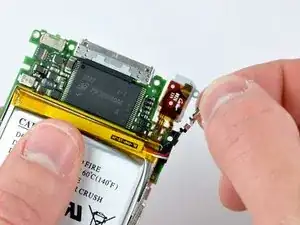
    • Prima di procedere, rimuovi la banda metallica EMI evidenziata tirandola via dall'adesivo sulla scheda madre.

    • Non dimenticarti di reinstallarla durante il rimontaggio.

  15. TI4BDVq51xLFqZ1A
    • Sostituire la batteria dell'iPod Nano di 3a generazione richiede delle saldature. Prima di procedere, assicurati di avere tutti gli strumenti necessari e di avere una certa pratica nel saldare delle piccole componenti elettroniche.

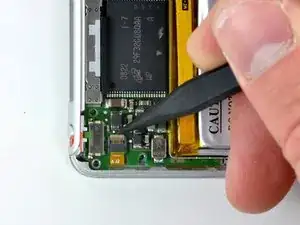
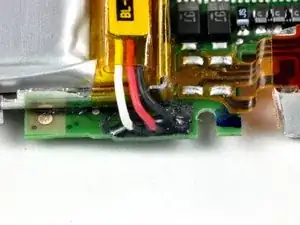
    • Prima di dissaldare i cavi della batteria, dovrai rimuovere un piccolo adesivo gommoso che li fissa alla scheda madre.

  16. iYHhPI6kRretSirR
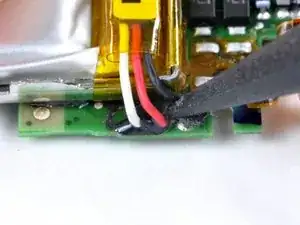
    • Spingi la punta di uno spudger sotto l'adesivo e verso la batteria per separarlo dalla superficie della scheda madre.

    • Inizia a separare l'adesivo attorno ad uno che cavi esterni, quindi liberalo dai due spazi tra i cavi ed infine spingi lo spudger sul retro dei cavi per rimuoverlo completamente dalla scheda madre/contatti della batteria.

    • I contatti della batteria sono delicati, quindi stai attento a non strapparli mentre rimuovi l'adesivo nero.

    It’s actually much easier to remove the rubber adhesive if the battery is taken out and laid upside down.

    frederik boersma -

  17. AjAhWcmYDDowJARl
    • I cavi della batteria, dopo aver rimosso l'adesivo, dovrebbero essere così.

  18. 3Io5SdOyodqxFxBQ
    • I prossimi passaggi richiedono un saldatore.

    • Le estremità dei cavi della batteria sono infilate in dei fori nella scheda madre e tenuti fermi da saldature.

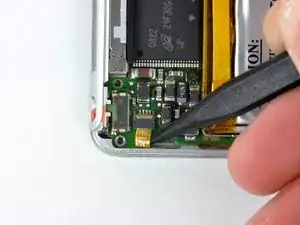
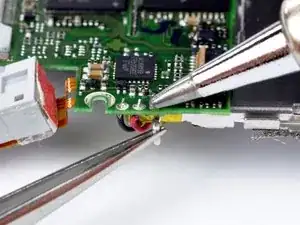
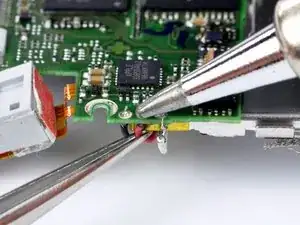
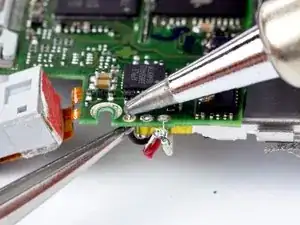
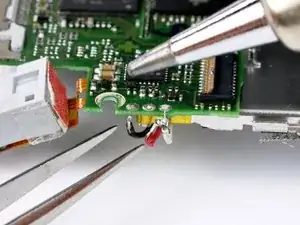
    • Inizia scaldando l'estremità esposta del cavo della batteria bianco con la punta di un saldatore mentre al contempo lo tiri via dalla saldatura, usando delle pinzette per prendere l'isolamento del cavo.

    • Poiché i componenti elettrici sono delicati, è fondamentale limitare il calore trasferito dal saldatore alla scheda madre. Un modo facile per riuscirci è tirare il cavo della batteria con una leggera forza costante mentre il saldatore scalda il contatto. Appena la saldatura si scioglie e il cavo si sfila, alza subito il saldatore per evitare danni.

    When you clamp the logic board in a small vice for electronic work, the battery hangs down and with the soldering iron in one hand it’s easy to pull the leads with the tweezers. For anyone with soldering experience this soldering is actually easy to do as long as you have the right soldering tool: sharp point, low wattage.

    frederik boersma -

  19. FhJH3BXUUhkdoZWC
    FhJH3BXUUhkdoZWC
    ZvrQJ6wcAAlKVm1O
    • Dissalda i cavi restanti, seguendo la procedura mostrata nel passo precedente.

  20. Wn4DldZG1nJbffQd
    • Tutti i cavi dovrebbero essere ora dissaldati e scollegati dalla scheda madre.

  21. VXiEMH2WuKnNuATG
    VXiEMH2WuKnNuATG
    XLrQdrMaRX1SWeUq
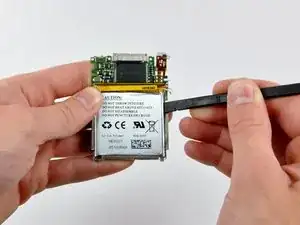
    • Usando uno spudger, fai leva sulla batteria per separarla dall'adesivo che la fissa alla sua protezione.

    • Inizia a fare leva sotto l'angolo in alto a destra della batteria e continua lungo il perimetro finché si è sollevata abbastanza da poterla prendere con le dita.

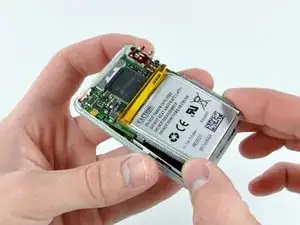
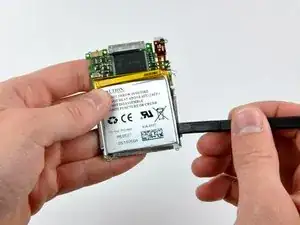
    • Rimuovi la batteria dalla sua protezione.

Conclusione

Per rimontare il dispositivo, segui le istruzioni in ordine inverso.

Walter Galan

693762 Reputazione

0 commenti