Introduzione
Dopo 20 o più anni, i condensatori del Sega Game Gear inizieranno a perdere e guastarsi. Se hai un Sega Game Gear che si spegne appena acceso, ha un volume basso o assente, o una luminosità bassa, la sostituzione dei condensatori riportati nella guida può dare nuova vita nella tua classica console.
Strumenti
Ricambi
-
-
Dopo 20 o più anni, i condensatori del Sega Game Gear inizieranno a perdere e guastarsi. Se hai un Sega Game Gear che si spegne appena acceso, ha un volume basso o assente, o una luminosità bassa, la sostituzione dei condensatori riportati nella guida può dare nuova vita nella tua classica console.
-
-
-
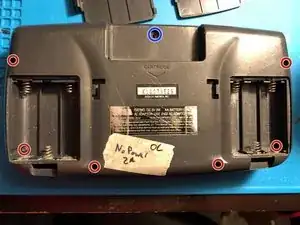
Svita le sei viti Philips #1.
-
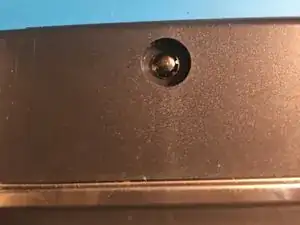
C'è una settima vite, progettata per evitarti di apre il dispositivo senza degli strumenti speciali. La punta che ti serve per svitare questa vite si chiama "4.5mm Game Bit" (nota anche come 4.5mm Nutsetter).
-
-
-
Solleva attentamente la metà posteriore della scocca. Ci sono dei cavi collegati alla scocca posteriore che devono essere scollegati prima di rimuoverla.
-
-
-
Per capire il corretto numero di condensatori, valori di capacità e posizionamento sulla scheda, devi determinare la versione della scheda del tuo Game Gear.
-
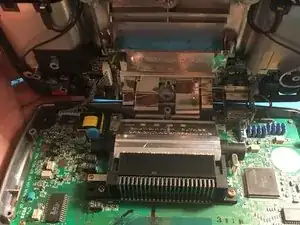
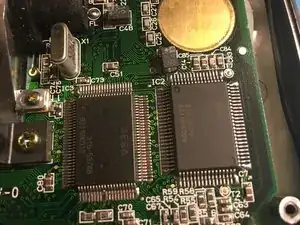
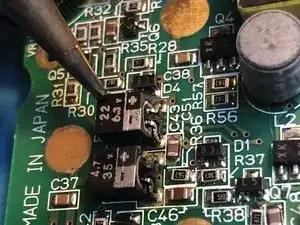
Per determinare la versione, guarda sulla destra della scheda. Avrai uno o due chip ASIC a seconda della versione.
-
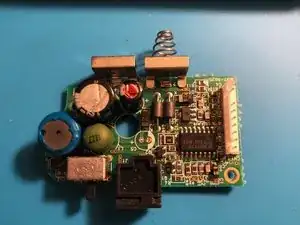
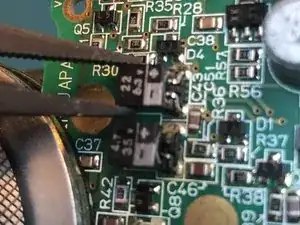
Se il tuo Game Gear ha due chip ASIC (immagine 1) ci saranno due IC sulla destra della scheda, e dovrebbero essere dei VA1. Se il tuo Game Gear ha un chip ASIC (immagine 2) dovrebbero essere un VA4, Anche se sono possibili delle ulteriori differenze.
-
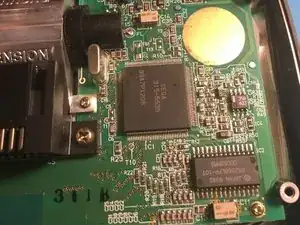
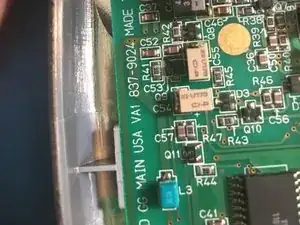
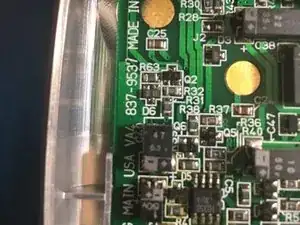
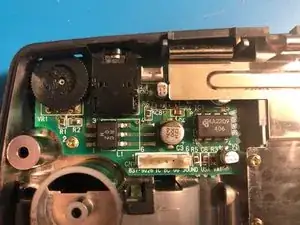
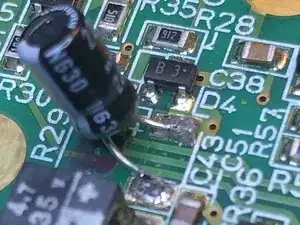
Guarda sul bordo sinistro della scheda per trovare il numero VA (immagine 3). Ci sono due possibilità: VA1 e VA4, seguito dal numero della scheda a sette cifre.
-
-
-
Usa il numero della scheda per capire quale lista di condensatori (vedi il PDF allegato) ti serve per quella specifica scheda: 837-XXXX
-
Per le schede madri VA1, con due chip ASIC e numeri di scheda 837-7398, 837-7719 eo 837-7996: lista condensatori 1
-
Per le schede madri VA1, con un chip ASIC e numeri di scheda 837-8560 o 837-9024: lista condensatori 2
-
Per le schede madri VA4 e numero di scheda 837-9537: lista condensatori 3
-
Per le schede madri VA4 e numero di scheda 837-9537-01: lista condensatori 4
-
Per le schede madri VA4 e numero di scheda 837-10766 o segnate come 1.71-7923A da Majeseco Game Gears: lista condensatori 5
-
-
-
Una delle due schede figlie è l'alimentatore. Usa le informazioni seguenti per capire quali condensatori ti servono.
-
Per gli alimentatore delle schede madri segnate come 837-9025 o 837-7720-01: C5 22uF 35v, C11 100uF 25v, C13 820uF 6.3v
-
Per gli alimentatore delle schede madri segnate come VA4 837-9538: C5 22uF 35v, C11 100uF 25v, C13 820uF 6.3v, C9 10uF 16v
-
-
-
La seconda scheda figlia è la scheda audio. Dovrebbero avere tutte gli stessi condensatori: C1 100uF 6.3V, C2 100uF 6.3V, C3 100uF 6.3V, C5 47uF 4V, C7 47uF 4V
-
-
-
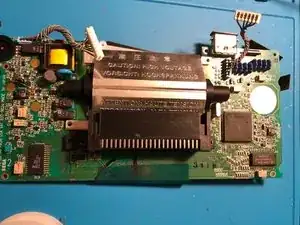
Svita le 8 viti Philips e solleva la scheda madre dalla scocca. Sii delicato con lo schermo.
-
-
-
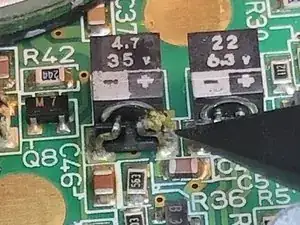
I condensatori sono le componenti rettangolari indicare in figura.
-
I condensatori originali sono incollati in posizione. Usa un paio di pinzette per tirarli delicatamente verso l'alto per liberarli.
-
I condensatori sono saldati in superfice, quindi sciogli semplicemente la saldatura su ogni contatto e tiralo per rimuoverlo.
-
Sostituisci solo UN condensatore per volta. Questo riduce le possibilità di dimenticarsi quale vada dove.
-
-
-
I condensatori elettrolitici come questi sono polarizzati, il che significa che hanno un polo positivo e uno negativo. Stai attento a come sono posizionati i vecchi condensatori e posiziona di conseguenza i nuovi.
-
Pulisci l'area dove era incollato il vecchio condensatore e applica della nuova saldatura ai contatti. Assicurati di pulire qualsiasi sostanza fuoriuscita e qualsiasi segno di corrosione con alcool isopropilico (>99%).
-
Piega e taglia i contatti dei nuovi condensatori in una posizione comoda e saldali. Assicurati che quando appoggi il condensatori non copra nessun cerchio dorato sulla scheda logica, poiché questi sono punti dove la scocca superiore fa contatto Quando il Game Gear è montato.
-

Per rimontare il dispositivo, segui le istruzioni in ordine inverso.

8 commenti
Thank you, this made the process extreamly easy
I ma not able to open the pdf file I just take me to another page but everything else it works
I just tried it on my computer and it still works for me. Do you have Adobe downloaded on the computer you’re using? If you still can’t get it to work let me know and I’ll try to email you the word document.
Travis -
Hi Travis,
Thanks for putting this guide together. I am having the same issue as Henry—if I click the View button next to “See Attached PDF” and then click on “Sega Game Gear Capacitor Replacement”, the website returns me to this guide instead of opening the PDF. Tried it in Edge and Chrome. Do you still have another copy of the guide available?
It turns out that the link to the PDF that is listed under the Parts section is broken. If you scroll down to the link below the Conclusion section you can download or open the PDF just fine. I’ll leave my question and answer up here in case anyone else has the issue.
Hey Doc, if you scroll to the bottom of the guide there is a section for attached documents. If you click the “view” button it should take you to the capacitor lists. I don’t know why the other button doesn’t work. If this still doesn’t work let me know and I’d be happy to email you the original document. Good luck with your Game Gear!
Travis -
Danke für diese mega gute Anleitung! Trotzdem würde ich bei den Caps nicht zu Amazon verlinken, da dort fast nur minderwertige Caps aus China angeboten werden die sehr schnell wieder ausfallen!!! Lieber mouser .de!
Alex Hase -