Introduzione
Prerequisito
Strumenti
-
-
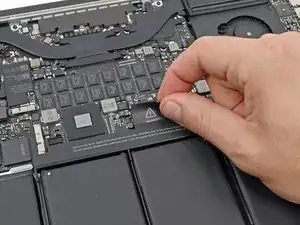
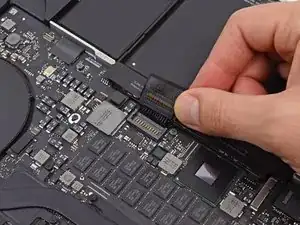
Usando l'estremità piatta di uno spudger, stacca con cautela il connettore della batteria dal suo zoccolo sulla scheda logica.
-
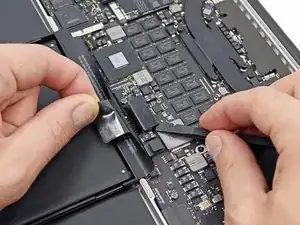
Piega indietro il cavo della batteria per evitare che il connettore possa fare contatto accidentalmente con la scheda logica.
-

Conclusione
Per rimontare il tuo dispositivo, segui queste istruzioni in ordine inverso.

For rMBP 2012 Late, you don't need to remove this sticker.
iyeori -
Have laptop charging issues after this. When fully charged and i plug in magsafe it starts with green, then turns red and stays red (like if it was charging). Status bar says NOT charging. If i use battery a little bit (down to 69%) magsafe does the same (green then stay red). Status bar says battery 69% NOT charging. and it seems to be true. Any suggestions?
g000phy -
Double check the connection from the battery to the logic board and the logic board socket itself... Might have damaged by disconnect/reconnect.
max damage -
This step is necessary to prevent any discharging, arcing, friction/static charges from damaging any of the extremely delicate and intricate parts of this (or most any) electrical system. In practice, you should even be wearing an anti-static band or be working on an anti-static bench even with the battery disconnected so your body doesn't create any unintentional charges.
One of the first things you should learn in electronics repair and and electrical in general is to cut the power source whenever possible before performing any work. Some systems have schedulers/triggers set that will wake the system up (even when closed) to perform updates and other maintenance tasks as to not eat up CPU and RAM during 'peak hours'. The last thing you need is to have your $2,000 laptop turn on while pulling an SSD (which, correct me if wrong, isn't a plug-and-play based device) which could do some serious corruption and/or damage; when all you had to do was peel a sticker and plug.
Hope that helps!!
~the more you know~
Colin Devenney -
I did not peel back the sticker. It is probably there to help unplug the battery. You can apply a gentle constant pull while you use spudger to lift the battery connector out of the socket as per the next step. It made this very easy.
Achilles -
I've found that it's actually better to NOT remove the sticker. I wish I had skipped that 'peel off the sticker part' ugh
Miles Raymond -
There is another connector here on mine, just to the left and up above the text on the battery sticker. It is an empty ZIPF socket on all these photos.
Richard C -
Let me stop you guys here. You can skip steps 5-35.
That’s what I did without a problem.
Go directly to step 35 after the next step. 5-35 is only so you have more room to pry the old battery off.
If you are not keeping the old battery, then just pry it off with a flathead screwdriver.
This is not a difficult fix.
Chris -
Chris,
Thank you for providing the advise to skip several steps. I agree that you will have ample space to remove the old battery without removing everything else. I would like to provide a small correction in your directions. You will need to go to step 34 to remove the two screws holding the battery cable versus directly to step 35. You will not be able to completely remove the battery without this step.
Laurence Rooks -
I successfully followed all the instructions and all the steps in this guide. I installed the new battery successfully. However, looking back at the process now, I have no idea why I had to take out the memory, air card, speakers, fans, and motherboard to change the battery. None of that was necessary. I did it, and it worked out for me, but honestly, if you just want the battery out, do what Chris and Laurence said above me. Go straight to step 34.
matthew.toledo -
Again, that label will loose its stickyness... order B09WMWH3LM from Amazon so you can reglue - a little smear on both parts, let it dry a few seconds and join them. Done. ... a little will go a long way.
Alex De Lara -
I agree that this entire procedure is unnecessarily complex, unless you’d like to disassemble your entire laptop for the sheer fun of it. The point of all the disassembly is to avoid damage to other components from the adhesive remover. So what I did was not to pry at all, no leverage whatsoever, no strain on the battery cells. Instead, I simply slid the provided plastic scraper cards underneath the batteries from every side possible to begin removing the adhesive. Then I put one drop of the remover on each side of the card at the front edge so it was barely wet, slid it in and worked it deeper bit by bit…. When I got near the speakers, I pulled the screws, lifted them slightly, and wedged one of the picks under the long arm coming off each speaker to give it a few mm clearance from the case, so no remover/alcohol could wick underneath. That worked well for me; the hardest part was getting all the old adhesive off the case, which just took some careful soaking. Good luck! .
Tor Matson -