Introduzione

Prima di sostituire o riparare qualsiasi cosa all'interno del tuo Lenovo Tab 3, dovrai seguirequesta guida.

  1. TFCqsMnEXfVtFqHT
    • Apri il cavalletto integrato.

  2. Tl2Pfk4toNRLpZ5A
    Tl2Pfk4toNRLpZ5A
    CFbtiXi3pgk6vwtR
    oJdGFSBDZrIXmsXe
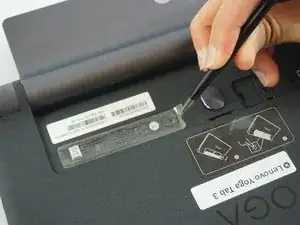
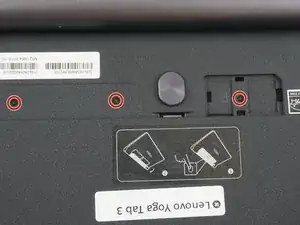
    • Rimuovi l'etichetta sotto il cavalletto per accedere a due viti da 0,75 mm.

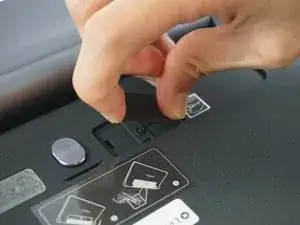
    • Rimuovi la copertura dello slot per la scheda micro SD. Rimuovi la scheda SD (se presente).

    • Usa un cacciavite a croce Phillips per svitare le tre viti da 0,75 mm.

    On 3 plus model the third screw is not under microSD card but rather under a small sticker on the right side. Plus has longer battery.

    George -

    on the Tab 3 plus , the third screw is not under the sd card but a little further over under another sticker and is painted white

    dan o brien -

  3. yVF45qKSubHrYrZH
    yVF45qKSubHrYrZH
    4RGONwjDhHHduEnv
    UIJQgTfd6e12AOcU
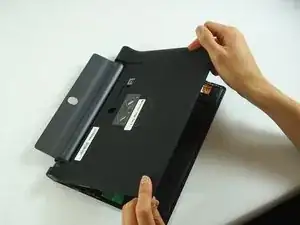
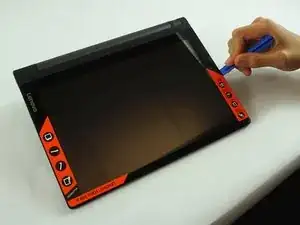
    • Appoggia il dispositivo in modo che lo schermo sia rivolto verso di te.

    • Infila attentamente uno spudger nella fessura tra lo schermo e la copertura posteriore e separa delicatamente la copertura dalla cornice del dispositivo.

    • Continua a separare la copertura posteriore dalla cornice facendo scorrere lo spudger lungo il perimetro del dispositivo.

    • Sarà necessaria della forza per liberare i piccoli ganci in plastica che fissano la copertura posteriore al dispositivo.

    On some models there is glue pad under the sim/sdcard tray.

    Ervins Stepanovs -

    Ein Hinweis auf den Federrahmen an der Kamera wäre nützlich. Er ist sehr empfindlich. Ich habe ihn beim Öffnen zerstört und jetzt stellt die Kamera nicht mehr scharf.

    Thomas Spieker -

    Hallo Thomas, tut mir leid, dass deine Kamera nicht mehr schart stellt. Aber die Anleitungen funktionieren wie Wikipedia: Wenn du mehr Infos hast, stelle sie gern allen anderen zur Verfügung!

    Fabian Neidhardt -

    (at least on the Plus model) the most difficult plastic clips are near the micro-SD/SIM. So it is easier to release the other side, where the camera not is. or pull the casing "down" towards the battery/stand.

    Hans Wurst -

Conclusione

Per rimontare il dispositivo, segui le istruzioni in ordine inverso.

Nathan Huang

Membro da: 20/02/17

1113 Reputazione

0 commenti