Introduzione

Solo prerequisito.

  1. G5Jo2NlpVoHkSiRd
    • Lavorare sul dispositivo mentre è accesso potrebbe farti prendere la scossa. Assicurati di spegnerlo e scollegarlo dal caricatore prima di iniziare.

    • La rimozione dello schermo può risultare difficile a causa dell'adesivo resistente usato.

    • Scalda tutti i 4 bordi del dispositivo appoggiandoci un iOpener o usando una pistola termica per ammorbidire l'adesivo lungo i bordi dello schermo.

    m.E. wichtig vorher die Kartenhalter für SIM und SD entfernen, sonst löst sich der Kontakt unkontrolliert bei Schritt 6.

    Frank Huebner -

    You make no mention of re-Glueing the screen, just applying the steps in reverse order - does that mean simply applying heat again will re-glue the components from the residue?

    Robin Penny -

    i replaced the battery, the sticky tape did hold up again, but if you replace the screen it depends on whate side the tape sticks to. On ine the most part of the tape stuck to the screen.

    Steffen Hahn -

    I know its 2020 but i cracked my screen and idk if its on or not

    benjamin burkowski_FaZe -

  2. BLZ2ilURXWWMtnqH
    BLZ2ilURXWWMtnqH
    yAmeeyVFkboaMmbN
    • Infila uno strumento di apertura in plastica nella fessura sul bordo del dispositivo vicino ad un angolo, dal quale inizierai a rimuovere lo schermo.

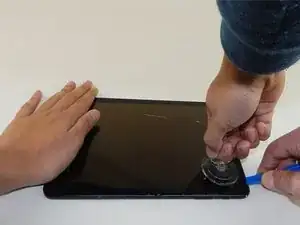
    • Applica una piccola ventosa vicino all'angolo dove hai infilato lo strumento di apertura.

    • Tira verso l'alto la ventosa mentre spingi verso il basso lo strumento di apertura per rimuovere lo schermo (potrebbe servirti una mano per tenere fermo il dispositivo mentre fai leva).

    • Un cavo a nastro è collegato al retro dello schermo. Evita di sollevare o muovere lo schermo più di 8-10 centimetri prima di scollegare il cavo, altrimenti potresti danneggiare il cavo stesso o il dispositivo.

    The lower portion of the screen is glued to the body. The screen is unable to be completely removed.

    Chad Naville-Cook -

    That blue plastic tool doesn’t work

    Jarred -

    starte oben, unten verhindert eine Nase an dem Audioanschluß das erste anheben.

    start upside, downside a nose at the audio connector prevents the first lifting.

    Frank Huebner -

    Difficile, j'ai acheté les outils nécessaires. Après avoir chauffé les côtés et essayé de les décoller, la vitre a craqué.😠

    Pierre Simard -

    Had to use a heat gun to remove with patience and time, using a pic to "saw" into the seal, starting with the right side corners. Stopping every few seconds to reheat with heat gun. Take care on the bottom left corner, and left side. There is very little room between the edge and LCD, making it easy to stick a plastic pick or removal tool in between the LCD and front glass. The other sides have more room for prying. I nicked the bottom left corner with a prying pic, which killed the entire display :-( Good luck!

    Dustin Eyestone -

  3. MopncCRVsusSWaEW
    • Un pezzo di nastro argentato è incollato sopra il cavo a nastro dorato che collega lo schermo al tablet.

    • Usa un paio di pinzette per rimuovere attentamente il nastro argentato.

    Hi. My SM T 815 (Tab 2) flickers and switches off. The screen is still fine. Well atleast it looks fine. But it doesn’t switch on. Could it be the reflex cable? Why is it doing this? And how can it be solved?

    Thabo -

  4. FZRqiZVICTA1HWwV
    FZRqiZVICTA1HWwV
    cALdJRorR3I33xdI
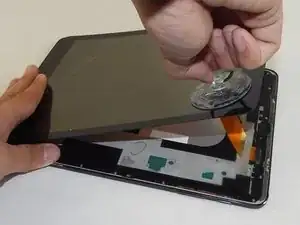
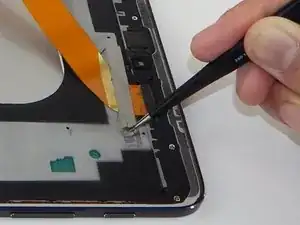
    • Usa lo strumento di apertura in plastica per sollevare delicatamente e scollegare il contatto del cavo a nastro dorato dello schermo dalla sua presa nel tablet.

  5. v2wPcLhfmnVWg5w5
    v2wPcLhfmnVWg5w5
    a2MfE1TagKEqcTfM
    • Svita le diciannove viti Philips #1 da 3 mm.

    make sure to remove the 2 black screws on the frame. i fix it doesnt say to take those off. nearly damaged the frame

    bryzz tortello -

  6. Xaji5FQuplJkS6hG
    Xaji5FQuplJkS6hG
    uWoe5HLB16AcSlrG
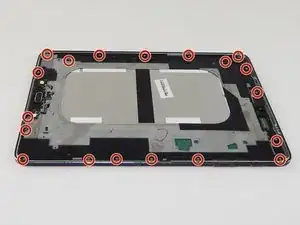
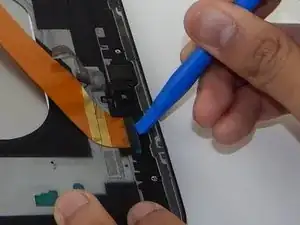
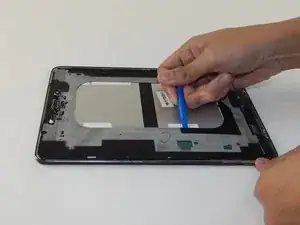
    • Apri la copertura protettiva del dispositivo facendo leva con uno strumento di apertura in plastica.

    • Anche se il dispositivo si apre lungo i bordi esterni, usare quelli interni (come nelle immagini) per fare leva può semplificare la procedura.

    -Zuvor unbedingt SIM Karte u microSD entfernen, sonst bleibt der Elekronikpart am Gehäuse fest und das Flachbandkabel davon kann beschädigt werden!

    -Lösen des unteren Teils des Innengehäuses zum Schluss, da Ladebuchse eine Nase hat und sich erst löst wenn man es schräg nach unten abhebt.

    Michael -

Conclusione

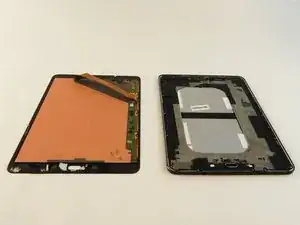
Per rimontare il dispositivo, segui le istruzioni in ordine inverso.

Jovina Martinez

Membro da: 20/01/16

2084 Reputazione

0 commenti