Introduzione

  1. Y4NSkMoD3Cuglj3h
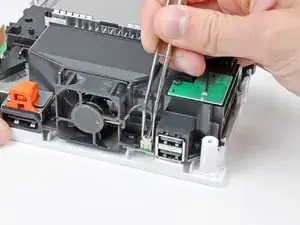
    • Utilizza delle pinzette per sollevare il connettore della ventola e rimuoverlo dalla sua presa sulla scheda logica.

    • Assicurati che le tue pinzette siano fissate al connettore della ventola, non alla presa sulla scheda madre.

  2. wqvDqwjeY6D6ttxA
    wqvDqwjeY6D6ttxA
    2JspZVMimi2pNhVT
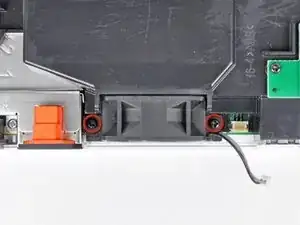
    • Rimuovi le due viti Phillips da 10 mm che fissano la ventola al convogliatore ventola.

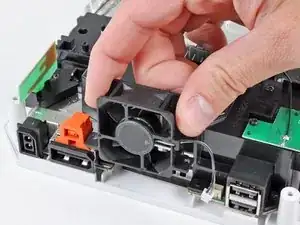
    • Rimuovi la ventola dalla Wii.

    There may be a removable metal "comb" under the fan shroud, remove after removing the fan shroud when disassembling, and replace before inserting the fan shroud when reassembling: it is held in place with same screws as fan shroud.

    Gregory Salton -

  3. 3R6UEtmCmnUDglQK
    3R6UEtmCmnUDglQK
    suYtNLiM4IhZWyT2
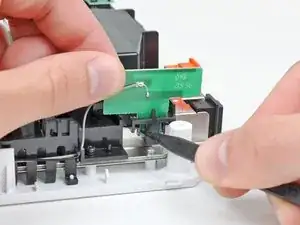
    • Utilizza la punta di uno spudger o un altro strumento appuntito per allontanare con attenzione uno dei piccoli perni di bloccaggio in plastica nera attaccati al convogliatore ventola dalla scheda dell'antenna Wi-Fi.

    • Rimuovi l'antenna Wi-Fi dal convogliatore ventola.

  4. sEnLTVQulfqStjOq
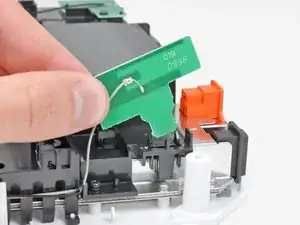
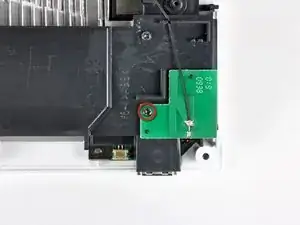
    • Rimuovi la singola vite Phillips da 10 mm che fissa la seconda antenna Wi-Fi sulla parte alta del convogliatore ventola.

  5. COVLSiYFuxyZu5Sc
    • Rimuovi i due pezzi di nastro adesivo che fissano il secondo cavo dell'antenna Wi-Fi alla staffa in plastica vicino al dissipatore di calore.

    Some newer models may have the Wi-Fi antenna wires taped to the top of the plastic bracket instead of the front as pictured.

    Jabu -

  6. lPCRZMfYK4yJlrZ5
    • Sfila attentamente entrambe le antenne dal telaio della Wii e mettile da parte.

  7. TISNmeBuJQxQusHF
    TISNmeBuJQxQusHF
    C2EKxmndWHPkmLBT
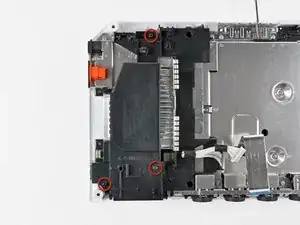
    • Rimuovi le tre viti a croce Phillips da 10 mm che fissano il convogliatore ventola alla Wii.

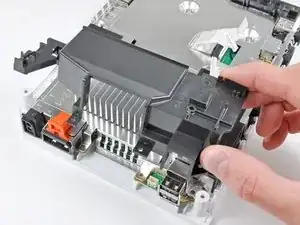
    • Solleva il convogliatore ventola dal dissipatore di calore e rimuovilo dalla Wii.

    Mine (RVL-CPU-01) Is probably The first revision, and mine had another EMI Shield Under the fan shroud. I’m Guessing that they removed it in later revisions. It just fits under the shroud normally. For Pics, here is a link. Images are there soon.

    https://sites.google.com/site/ninteardow...

    Lucas Hoekstra (Lucas9810) -

  8. evvpEFWhrNQNvkUa
    evvpEFWhrNQNvkUa
    UYDrgOYGcQKKl2OV
    soMNExAXauR3ZPPG
    • Rimuovi le seguenti sei viti che fissano le EMI fingers al pannello inferiore:

    • Quattro viti a croce Phillips da 7 mm

    • Due viti a croce Phillips da 11,3 mm

    • Rimuovi entrambi i set delle EMI fingers dalla Wii.

    Actually, at east for me, these “fingers” were beneath the motherboard cover, and the screws could be removed at the same time as the ones on step 33.

    shaitanpt -

    shaitanpt thanks for pointing this out! Mine were also beneath the motherboard cover, and the first set of "fingers" were actually two small brackets between the controller ports, rather than one long bracket over all of them.

    Cynthia -

  9. r1oFWvya22CJVFhY
    r1oFWvya22CJVFhY
    6P1nxLfWGRO1JwoC
    • Rimuovi le seguenti tre viti:

    • Una vite a croce Phillips da 7 mm

    • Due viti a croce Phillips da 10 mm

    • Rimuovi la staffa dalla Wii.

    Be careful not to drop the 7 mm. I did and I spent 10 minutes trying to roll it and rattle it out from under the shroud, until I figured out that you can just remove the fan and shake it out of the bottom

    Curt Swalley -

  10. asbrrw63CRCVKIpt
    asbrrw63CRCVKIpt
    AGQcRXFIx2MkTnfI
    5DfaHnGZ5Qyoi4BK
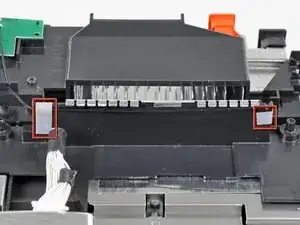
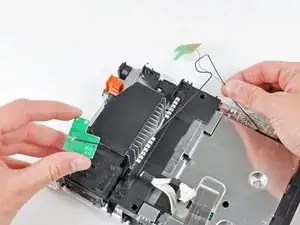
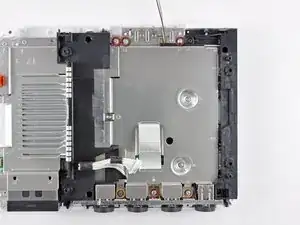
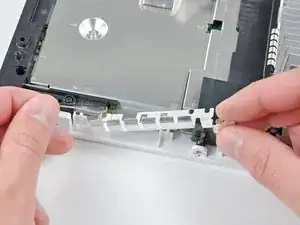
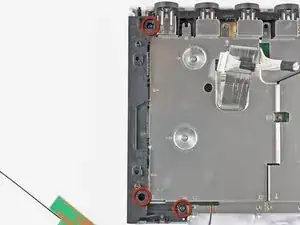
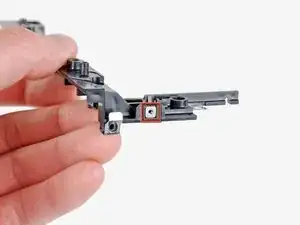
    • Rimuovi le tre viti a croce Phillips da 10 mm che fissano la staffa nera al pannello inferiore accanto alla parte frontale della Wii.

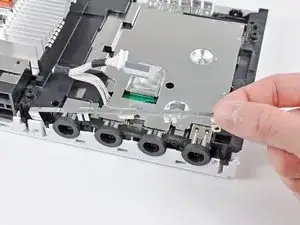
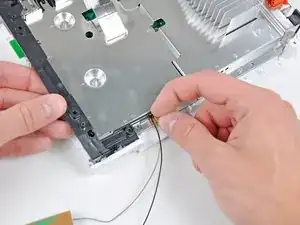
    • Solleva leggermente la staffa e utilizza l'altra mano per tirare via la clip di bloccaggio da dove le antenne Wi-Fi entrano nella copertura della scheda madre.

    • Rimuovi la staffa dalla Wii.

    • Assicurati di non perdere il piccolo dado quadrato debolmente tenuto dalla staffa nera in plastica.

    For reassembly: I believe the nut is for the CR2032 battery

    Jack Bailey -

  11. OIGxembVqWfSWddN
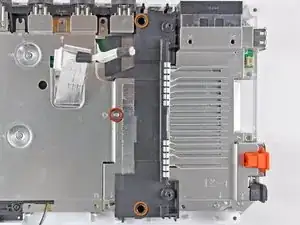
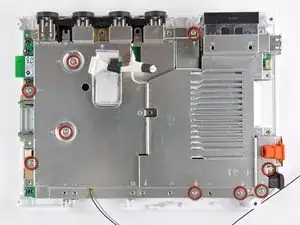
    • Rimuovi le rimanenti nove viti a croce Phillips da 7 mm che fissano la copertura della scheda madre al pannello inferiore.

  12. bsLLYWppWnGQX2Ha
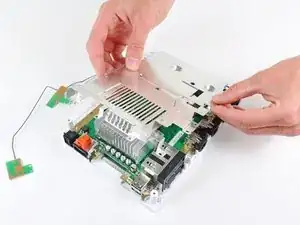
    • Rimuovi attentamente la copertura della scheda madre dalla scheda madre, prestando attenzione ad eventuali cavi che possono incastrarsi.

    • Su alcuni modelli, un pad termico per il wireless chip è attaccato al di sotto della copertura della scheda madre. Assicurati di sostituirlo quando rimonti il tutto.

    There is a thermal pad on the WiFi chip as well! NB this because disassembling past this point requires you to also reapply a thermal pad to the WiFi chip.

    Jonatan Noponen -

    When reassembling, put the wifi fingers near the battery compartment beneath the motherboard cover before screwing the cover back on. Can someone add "thermal paste" to the items needed to the top of the guide?

    Gregory Salton -

Conclusione

Per rimontare il tuo dispositivo, segui queste istruzioni in ordine inverso.

Andrew Bookholt

585555 Reputazione

0 commenti