Introduzione

Questa guida mostra come aprire l'iPhone originale.

  1. kYQbjXiPj3QR52nQ
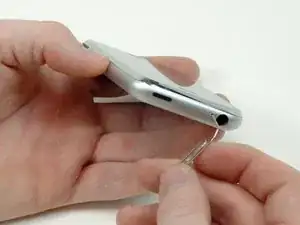
    • Inserisci uno strumento di espulsione della scheda SIM o una graffetta nel foro accanto al jack delle cuffie.

    • Premi sull'attrezzo finché il vassoio della scheda SIM non fuoriesce.

    To remove the SIM, insert the end of a SIM eject tool or a small thin paper clip into the hole on the SIM tray. Press firmly and push the tool straight in until the tray pops out.

    http://support.apple.com/kb/ht1438

    neuronetix -

    I put the SIM card back in, and the slide to unlock does not work.

    dean -

    The only carrier to accept this iPhone was AT&T, they have discontinued use of that baseband. Nobody else in the world except for early renegade reverse engineers such as Geohot can get the device to work as a really old iPod no use unlocking the device because the technology inside the most recently OEM sold/refurbed iPhone 1st gen fails universally. You should only buy a screen assembly and snap it onto the back and call it a dummy phone and put it in a museum.

    Alexander Weinhart -

  2. EAoVyltI36jgdQY1
    • Afferra il vassoio della scheda SIM e fallo scorrere fuori dall'iPhone.

  3. OylfJVUojJTlqpSX
    • Questa immagine mostra le due linguette e due fermi situati sul lato inferiore del coperchio dell'antenna. Le due linguette nella parte superiore dell'immagine devono essere spinte verso il coperchio nero per rilasciarle.

    YOU NEED TO PUT THE OPENER TOOL BETWEEN THE ANTENNA COVER AND THE DOCK CONNECTOR FIRST, THEN YOU WILL HAVE SPACE TO OPEN IT.. MY 2 CENTS

    riversde -

    You better lay off the caps.

    lol SPLAAT -

    Very hard to remove and the plastic is very fragile

    Take care when removing

    miguelvillela -

    When you get stuck follow this guy guide

    http://www.youtube.com/watch?v=sYHnr89HM...

    miguelb -

    Great Guide.

    My dad banged his iPhone in a table after arguing with someone and got the aluminum cover next to the volume control bent in such a way as it got the volume control stuck in the max position. I used this guide to remove all parts out of the way so I can get the shape of that region and corrected it the "Han Solo" Way. It was an excellent opportunity to get the phone cleaned up as well

    The biggest problem I had was screwing some of the screws back. The screwdriver that I had was not magnetized, so I used a little bit of superglue to bind the screw and the screwdriver until I had it screwed tightly.

    The second biggest problem I had was that I lost a screw twice, but was lucky enough to find it quickly on the floor next to me.

    I am very happy as I waited more than a month to get the confidence to get this iPhone repaired.

    lantinian -

    how do i know what part is in my phone? There are 2...

    Ivanfrost -

    Citazione da Ivanfrost:

    how do i know what part is in my phone? There are 2...

    Once you have the phone apart and have gently unplugged the power ribbon, read the part number on the ribbon. If it's in the 821- family, you can safely use corresponding 821 headphone assembly. If it is the other part number, use the newer replacement. Many sites list both parts and let you order the appropriately numbered part. Otherwise (if you order the wrong part) it won't work or you'll have to [unnecessarily] hack the part to get it to work.

    Steve -

    Citazione da Steve:

    Once you have the phone apart and have gently unplugged the power ribbon, read the part number on the ribbon. If it's in the 821- family, you can safely use corresponding 821 headphone assembly. If it is the other part number, use the newer replacement. Many sites list both parts and let you order the appropriately numbered part. Otherwise (if you order the wrong part) it won't work or you'll have to [unnecessarily] hack the part to get it to work.

    I bought the wrong one.... how do I hack it?

    Rune Smistad -

    My iPhone is very first model. It doesn't have any of the four tabs shown.

    gameplayer2 -

    The very first model does not have the four tabs. To open this version, use a plastic opener tool and push it into the middle of the tiny space between the rectangular dock connector and the antenna cover. Move the tool to the side and push it in a little deeper. A small gap should open up at the bottom of the antenna cover, where it meets the metal. Continue using the plastic opener tool in there, pushing it in and forcing it around the edge so that the antenna cover further separates. Then repeat this on the other side. To me it seems like a very brittle piece of plastic, so be careful. But now that it's loose at the bottom you can lift it with your fingers and work it off.

    Alexander Ljungberg -

  4. jUHvjBbogjKT4LWn
    • Assicurati di far scorrere lo spudger di metallo tra il connettore del dock e il coperchio dell'antenna e non nel connettore del dock stesso.

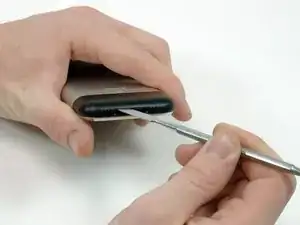
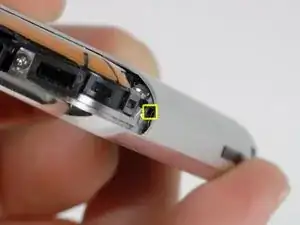
    • Inserisci uno spudger di metallo nello slot tra il connettore del dock e il coperchio dell'antenna. Fai leva delicatamente vicino alle due linguette per creare un piccolo spazio tra la cover dell'antenna e la cornice anteriore cromata.

    Take heed to the note about getting the spudger between the dock connector and the cover. The dock connector is black plastic, as is the antenna cover, so it's difficult to see any gap between them. Putting the spudger between the metal shielding of the connector and the plastic is incorrect.

    Michael Lance -

    Rens' duct tape technique (see comment in step 6 section below) worked very well. No need to risk breaking the antenna with a spudger.

    jbshoe -

  5. IbJomOddGpq5nMuJ
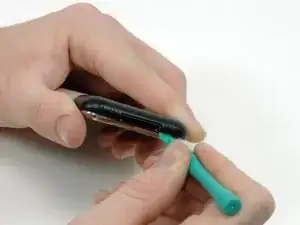
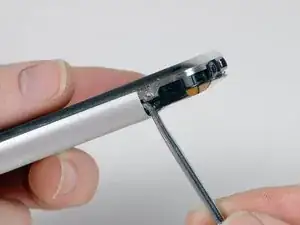
    • Inserisci uno strumento di apertura per iPod nello spazio tra il coperchio dell'antenna e il frontalino. Il cuneo dello strumento dovrebbe puntare verso la cover dell'antenna. Fai scorrere lo strumento attorno all'angolo e verso l'alto fino a raggiungere il supporto metallico.

    • Ripeti la stessa procedura sull'altro lato del connettore dock.

  6. KexceVTpHPS2SSEy
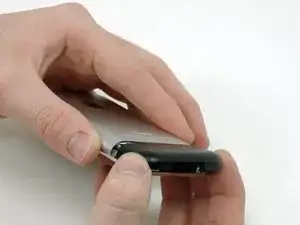
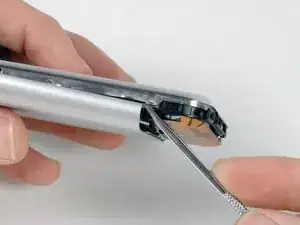
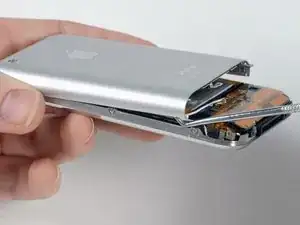
    • Afferra il coperchio dell'antenna su entrambi i lati e fallo scorrere verso l'alto allontanandolo dall'iPhone. Ciò richiede una certa forza. Se non si libera, assicurarsi che la cover dell'antenna sia sollevata abbastanza da liberare i fermi.

    It was released very hard on my iPhone 2G but the problem comes when i have to put it back.

    It remains a little more space between the dock and the Antena cover and maybe that's because the two tabs between the mic and the speaker are not entered under the gold board?

    If someone knows please tell me how to put it back.

    Thanks

    infomihai -

    There is a very easy way to remove the cover by simply sticking duct tape on it and pulling the tape away of the phone.

    It will leave no marks and it didn't damage my antenna cover as much(my "chinese" repair tools were to weak).

    rens -

    Thanks, using the tape was quick and easy, no damage at all.

    Roeland -

    Brilliant. Works perfectly. 20 seconds of work.

    koenatclaes -

  7. 2hJwIgKUTkSgmJjG
    • Rimuovi le tre viti a croce Phillips #00 che fissano il pannello posteriore all'iPhone.

  8. WTBObyY1AVtcVDTC
    • Aprire l'iPhone è un'impresa impegnativa, quindi non scoraggiarti. Fai un respiro profondo e assicurati di avere tutto il tempo per portare a termine il lavoro.

    • Il piccolo foro quadrato è il punto in cui inserire lo scovolino nel passaggio successivo.

    Be sure to use the square hole, more to the inside, not the one between the outer shell and the little piece of metal. The Outer shell is attached to the metal.

    Gyuri Ordody -

    You guys show this is vanilla dessert. And it's more difficult than building a DIY space shuttle. I wonder why Apple did the iPhone so problematic to disassemble. It's just the battery!

    Sebastian Di Mateo -

    I've seen some instructions recommending using a knife to open up a space between the back cover and trim. Using the dental pick as shown here, it is very easy to break off the screw attachment near the edge of the cover.

    Bill Parquet -

    Agree with Bill, I did break off one of the screw attachments. In retrospect, using a small putty knife between the cover and battery (which I'm replacing anyways) to apply force against the cover while prying at the hole would have helped.

    Michael Lance -

  9. 4Og6SPw1nhNowVyp
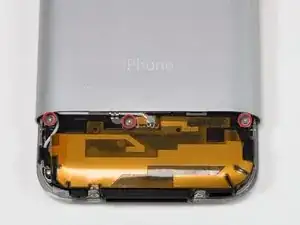
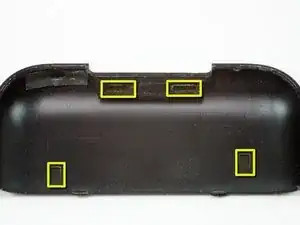
    • Inizia a rimuovere il pannello posteriore sul lato con i pulsanti.

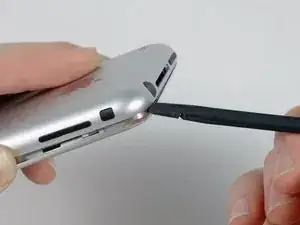
    • Fai scorrere completamente lo scovolino per i denti nel foro quadrato. Potrebbe essere necessario muovere lo strumento e applicare una buona quantità di forza per farlo andare fino in fondo.

  10. SKRluDogTQcXyFwC
    • Solleva il pannello posteriore tirando lo scovolino in senso antiorario con un movimento rapido. Applica una forza perpendicolare al piano del gruppo schermo. Potresti aver paura ad andare veloce, ma procedendo lentamente è più facile che la custodia si pieghi.

    ugh. i totally mangled my case. snapped off the 2 outer screw brackets... broke my dental pick, too. and my small screwdriver. thank goodness for craftsman tools! ;)

    i was pretty disheartened by the whole thing, but i keep it in a hard shell anyway so it's not that noticeable.

    umopapisdn -

    Like others - this is where I am stuck. No dental pick, so I search for alternatives. Good the get reminded - if I mangle the case too, hey, my speck cover will hide the scars!

    Spikey2 -

    What material is that dental pick made of? Adamantium?

    Sebastian Di Mateo -

    I could NOT get this method to work. I tried three different picks and all bent when I tried to lever them this way. I did break one of the frame screws off in the process as well. I ended up going back to my old standby... The Exacto Knife and a 1/8 inch flat head screw driver... I used the exacto to get the flat head started, then worked my way up one side toward the top of the phone slowly and carefully wiggling the screw driver until it popped open on that side. Then I did the same to the other. That worked well for me. These plastic openers and dental picks just bent and broke on me. GOOD LUCK. My Advice: Get a 3G or 3GS, I can break one down in under a minute!

    Adam Susong -

    I didn't have a dental pick. I used a narrow, flexible hobby putty knife. The button side edge popped right off. The blank side required me to slowly wiggle along, continually pushing the putty knife up to 2" to detach each of the clips.

    dennishodge -

    I can’t get past here… I ruined 3 screwdrivers trying to do this, but failed

    Nick75704 -

  11. M1WJSCuYr5oFd1l5
    • Usa uno spudger per liberare il pannello posteriore dell'iPhone lungo l'angolo e in alto.

  12. sLsggipm4ET4AhNr
    • Ripeti la stessa procedura sull'altro lato dell'iPhone. Fai scorrere completamente lo scovolino nel foro quadrato. Potrebbe essere necessario muovere lo strumento e applicare una buona quantità di forza per farlo andare fino in fondo.

    wich dental pick should I use? I´d bought some but they twist or didn´t fit on the scare... thx in advance and really good guide!!

    Chad720 -

    I know this is old, but I've had some success. Rather than the dental pick, which I bent too, I ground down a very small "L" bend hex wrench. Worked like a champ. Also: If you have an iPhone 4 and are looking to use the microSIM in your 1st gen iPhone with the use of a microSIM adaptor... DO NOT put the empty adaptor in the SIM slot. That's what I did and had to dismantle the phone to get it repair the SIM contacts.

    tthomashardie -

    Actually, the "button" side released fairly easily and I was able to loosen the top end with a plastic spudger. However, the remaining side was a @#!@! and the process of popping it off caused the protruding screw lug to break off the internal guide, which itself came off seconds later. Oof! While the side guide was easily glued back in, the lug ultimately became a casualty since it was too small and unweildy to SuperGlue™ back on. But, as Meat Loaf wisely sings, "two out of three ain't bad." The 'phone can live w/o one screw and possibly two if the center lug remains.

    turkeyneck -

    I didn't have a dental pick so i used a very small high quality allen key which worked perfectly. The back cover is interference fit to the front bezel and i found with the correct lever action it separated easily.

    Bigkarkus -

  13. stjuVIEWYc4RZlBx
    • Solleva il pannello posteriore tirando lo scovolino in senso orario con un movimento rapido. Applica una forza perpendicolare al piano del gruppo schermo. Potresti aver paura ad andare veloce, ma procedendo lentamente è più facile che la custodia si pieghi.

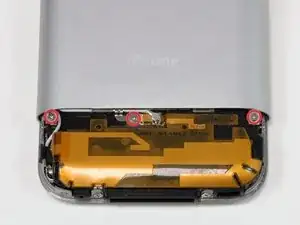
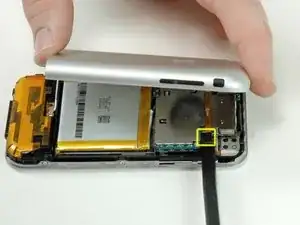
    • Il pannello posteriore è ancora collegato all'iPhone tramite il cavo del jack delle cuffie, quindi non rimuovere ancora completamente il pannello posteriore dall'iPhone.

    I've seen some guides that recommend a technique for prying up on the center of the case. if you do so, it is easy to accidentally damage the battery if you pry in the wrong direction.

    Bill Parquet -

  14. ntHQ2PA2WutVDlhq
    • Verifica che il telefono sia spento prima di scollegare il cavo del jack delle cuffie.

    • Usa uno spudger per scollegare il cavo del jack delle cuffie dalla scheda logica.

    You need to stick the end in, and it detaches if you push it upwards.

    Gyuri Ordody -

    A picture of what the dental pick is poking at would be useful inside the back case. If you get on the wrong side of the frame rail you can break the ear where the screw goes pretty easily with that pick (yes it appears to be titanium). Guess that is why only the plastic pick was part of the toolset, but used a metal one as depicted and ran into this. As you say this is challenging, and more pictures are better.

    edl -

Conclusione

Per riassemblare il tuo dispositivo, segui queste istruzioni in ordine inverso.
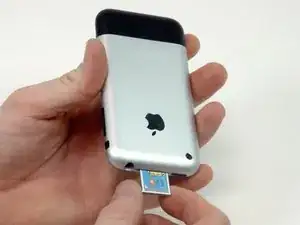
Miroslav Djuric

158138 Reputazione

0 commenti