Introduzione

Usa questa guida per sostituire la cover posteriore su uno Steam Deck LCD o per rimuoverla per ulteriori riparazioni.

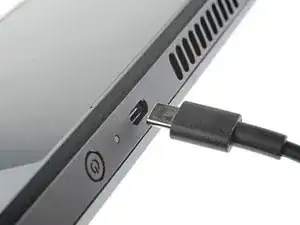
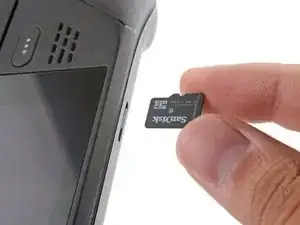
Prima di iniziare, spegni e scollega tutti i cavi dal tuo Steam Deck. Ricordati di seguire le procedure di sicurezza dalle scariche elettrostatiche (ESD) mentre ripari il tuo dispositivo.

Nota: le facce dei pulsanti posteriori (L4, R4, L5 e R5) fanno parte della cover posteriore e non possono essere rimosse separatamente.

Valve avvisa che rimuovere la cover posteriore può indebolire l'integrità strutturale dello Steam Deck.

  1. vQyR3PAE4HOMSLAZ
    vQyR3PAE4HOMSLAZ
    aIKAs5r3P3bY2iTE
    hD1USYJCkAbkluud
    • Accendi il tuo Steam Deck e lascia che la batteria si scarichi sotto al 25% prima di iniziare la riparazione, perché una batteria agli ioni di litio potrebbe essere pericolosa se danneggiata accidentalmente.

    • Come ulteriore precauzione, Valve raccomanda di mettere il tuo Steam Deck in modalità di conservazione della batteria dal BIOS prima di iniziare riparazioni invasive. Leggi come farlo qui.

    • Spegni il tuo Steam Deck e scollega tutti i cavi.

    • Se hai installato una microSD, assicurati di averla rimossa prima di iniziare ad aprire il tuo Steam Deck. Se cercherai di rimuovere il pannello posteriore con una microSD installata, potrebbe spezzarsi a metà.

    • Durante la riparazione, potrebbe esserti d'aiuto poggiare la Steam deck a faccia in giù nella sua custodia per proteggere gli analogici e prevenire le vibrazioni.

  2. bpUGGPG32OkLXnC4
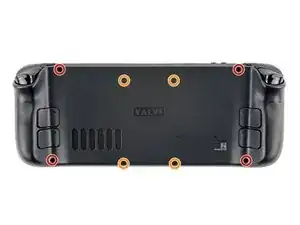
    • Usa un cacciavite a croce Phillips per rimuovere le otto viti che tengono fermo il pannello posteriore:

    • Quattro viti da 9,5 mm a filettatura grossa

    • Quattro viti da 5,8 mm a filettatura fine

    • Nonostante gli standard, i cacciaviti a croce Phillips possono variare in dimensione e forma: due cacciaviti della stessa dimensione potrebbero entrare in modo diverso sulla stessa vite. Utilizza la dimensione che meglio si adatta alla testa della vite.

    • Nel corso di tutta la riparazione, tieni traccia di ogni vite e assicurati di riposizionarla nel suo posto originario per evitare danni al tuo Steam Deck.

    there should be a picture of the SD card slot at the start of every Steam Deck teardown. i know the note is there but i generally use the pictures to guide me and forgetting to remove the SD card is a very critical step

    Nathan Barrow -

    I agree, I just broke mine...

    Camille B -

    What is the the #1 philips used for? Only the #0 is mentioned in the instructions.

    Christopher Martin -

    I wish they would specify which size to use for which screws.

    Mark D -

    I found it easiest to use a PH1 for the red screws, and PH0 for the rest (including the internals.)

    Chris Clawson -

    Be careful you can strip the screws take your time

    I use PH00 bit

    jaybush74 -

    I used the PH1 bit for this. You can use smaller bits but ideally there should be no play of the bit in the screw head.

    Charles Semple -

    are there playstation replacements (circle,square,cross,triangle)

    Deór -

    I used the ifixit tools and used the 00 size for the screws on the back.

    Luis B -

    I've completed the guide and found it very helpful!

    I think somewhere in this part it would be helpful to name the size of the correct Phillips driver to use:

    Use a Phillips driver to remove the eight screws securing the back cover:

    Four 9.5 mm screws

    Four 5.8 mm screws

    Maynard -

    I used the PH1 for the 9.5mm screws and PH00 for the 5.8mm screws. The PH0 wanted to strip one of the small ones.

    Pol Llovet -

    FYI - 512gb version has blue threadlocker on the Orange screws.

    Kyle -

    Just a point for knowledge sake, the Four 5.8mm screws on this step are factory installed with a version of locktite. Not sure why but there will be slight resistance when removing the first time.

    Derek Schmidlin -

    Stripped two of the 5.8mm screws, feel pretty dumb, now I'm stuck at step 2 of 43 :|

    Yareyous -

  3. 6jtVcFtMGa5ZMqcF
    6jtVcFtMGa5ZMqcF
    Ux5LEj3JfJlkmQMQ
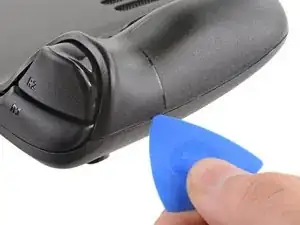
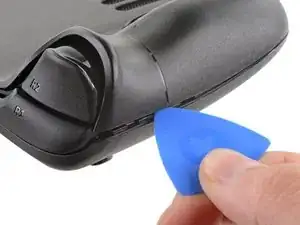
    • Inserisci un plettro di apertura nella fessura sottile tra la cover posteriore e il guscio frontale, lungo il bordo dell'impugnatura destra.

    • Se dovessi avere difficoltà nell'inserire il tuo plettro nella riga sull'impugnatura, prova prima iniziando superiormente o inferiormente sul margine lungo, dopodichè fai scivolare il plettro verso l'impugnatura.

    • Fai leva sulla cover posteriore per sganciare le clip di bloccaggio.

    I found it easiest to start this process at the top of the device near the fan exit.

    Peter Lindberg -

    second that and inserting the pick in the bottom middle and sliding the pick to each side

    Sub -

    I also found the top near the fan exit to be easier

    Travis Patton -

    Thank you for this tip, it definitely was easy starting at the top instead of by the bumper/triggers. After I opened the top I did the bottom and then it was way easier to gently open the sides. be very careful and go slowly to make sure that none of the clips are damaged

    Luis B -

    this as suggested above:

    1. open the top

    2. open the bottom

    3.gently open the sides

    austrasier -

    same; i pried from the top of the screen area. I was unable to find an opening on the side

    Dennis Wu -

    I also started from the middle of the deck and worked my way out since I couldn't get a grip with the pick on the deck's side grips. Since this is a common step for pretty much all guides for opening the deck I think it's also worth noting that you should be careful not to bend the trims/seams where the front and back covers meet with the pick. When I first opened my deck you can definitely see where I nudged the pick in between the covers since I was probably using too much force on the pick itself.

    Kaleb McKone -

    It would be useful to note here that if you want to insert the little blue triangular iFixit opening picks into the right side along the edge, there isn't actually a gap as the directions say, at least not on newer Decks. You'll be making the initial gap using the pick. Brace it on something because you will need to use enough downward force that you're flexing the pick a bit and it'll probably be digging into the skin of a bare hand. With enough force suddenly it will make a click and go in just a bit, and then you're in business.

    CaptFrost -

    plastic picks didnt work for me but finger males did the job on prying this open

    jacobbagsic -

    I found it easiest to open starting with R1 or L1 buttons and proceeding to the center of the top edge

    Karol Gro -

    This step was the hardest by far. First I didn't find an opening at the sides, and it did take a really long time until I finally got it open... Then, when I had the one side opening open it didn't just pop out, I needed to slide all the way to the other side with the pick and open everything. I guess they made it even more drop resistant.

    Dollique -

  4. 6IvIWWqEXPTqW1XB
    6IvIWWqEXPTqW1XB
    1FxwYDjIGOAOCZT2
    KpIx4YIAZrDH1b5T
    • Una volta sganciate le clip da uno dei bordi, il resto si stacca facilmente.

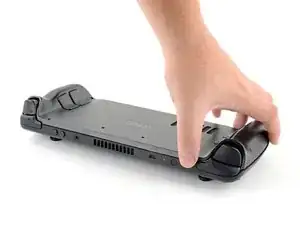
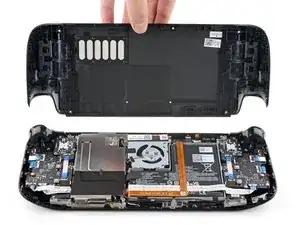
    • Afferra la cover posteriore dall'apertura che hai appena creato e sollevala e allontanala dal dispositivo per sganciare le clip sui lati lunghi.

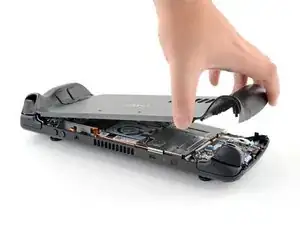
    • Rimuovi la cover posteriore.

    If you have an SD card, you will want to take it out. I followed the guide and didn't think about the SD card I had inside. When I went to snap the case back on it clapped shut on the exposed SD card, shearing it in half and leaving the bottom half stuck in the SD card slot. I am still endeavoring to get it out.

    Novice -

    you can use the case that comes with the steam deck to support it once the lid is removed

    Luis Barbosa (Armored Saint) -

    You can get the pry pick inserted easier if you start in the gap for the shoulder buttons. A lego brick separator works well here

    Andrew Borsje -

Conclusione

Per rimontare il dispositivo, segui le istruzioni in ordine inverso.

Porta i tuoi rifiuti elettronici a un riciclatore certificato R2 o e-Stewards.

La riparazione non è andata secondo i piani? Prova delle soluzioni ai problemi di base o chiedi alla nostra comunità Risposte Steam Deck per trovare aiuto.

Carsten Frauenheim

Membro da: 10/03/20

110753 Reputazione

5 commenti

Alguien sabe donde puedo comprar los 4 tornillos del medio de la tapa trasera, creo que hacen 1,6x5mm ?

La tapa que venden vienen con los tornillos?

Si pueden ser los originales mejor.

Muchas gracias.

israel manzano -

one of my screws stripped what should I do?

Marco Barnes -

Can I use it on OLED steamdeck?

Peace Maker -

Is this backplate also compatible with the OLED model?

kadiroeztel -

For everyone wondering: it is compatible with the OLED model! I just replaced my backplate with this one and it fits perfectly! :)

kadiroeztel -