Introduzione

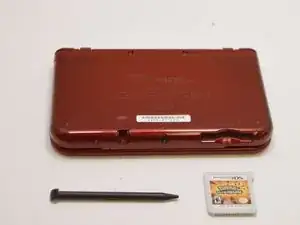
Questa guida ti permetterà di riparare un Circle Pad rotto sul tuo Nintendo 3DS XL del 2015. Se il tuo Circle Pad non funziona più correttamente o non funziona affatto, questa è la guida adatta a te. Avrai bisogno solamente di un nuovo Circle Pad, alcuni cacciaviti e con un po' di pazienza, il tuo 3DS tornerà ad avere piena funzionalità.

  1. f4Bt5pbatZdHri1F
    • Assicurati che il dispositivo sia spento e che il pennino e la scheda di gioco siano rimosse.

  2. MOXPGqNWgc6Nnd5S
    MOXPGqNWgc6Nnd5S
    YMEjteelpVJU3BwM
    5oRcMrRdHqjQ5Txs
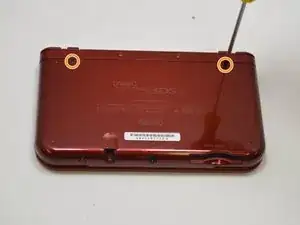
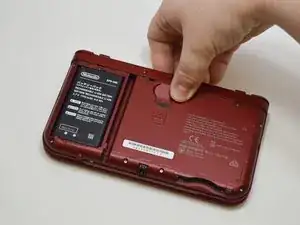
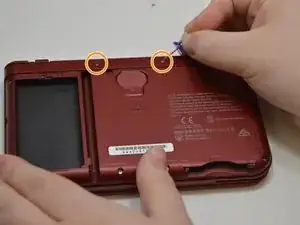
    • Gira il dispositivo in modo che il retro sia rivolto verso di te e individua le due viti nella parte superiore del coperchio posteriore.

    • Utilizzando il cacciavite a croce di dimensioni #000, allenta le viti sul coperchio posteriore.

    • Le viti non vengono rimosse, ma possono essere allentate per consentire la rimozione del coperchio posteriore.

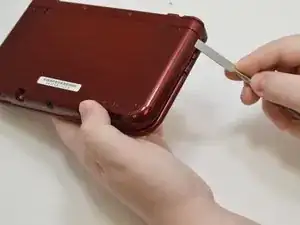
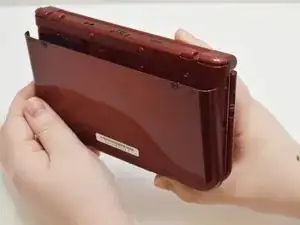
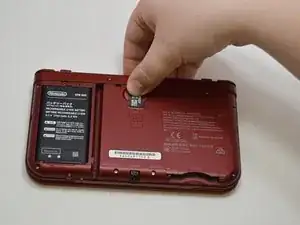
    • Solleva delicatamente le linguette sul lato del dispositivo con il metal spudger o con la tua unghia e rimuovi il coperchio posteriore.

  3. xaKvYxDCqZEWc2Zm
    xaKvYxDCqZEWc2Zm
    VOrQvE5mJUiTKTD1
    • Rimuovi la scheda microSD spingendola verso l'interno; la scheda dovrebbe fuoriuscire automaticamente.

  4. 3XnCJSqSmYQSennW
    3XnCJSqSmYQSennW
    i62RuWDOMXJEZv2p
    u1ULPHBAUZYsDPMh
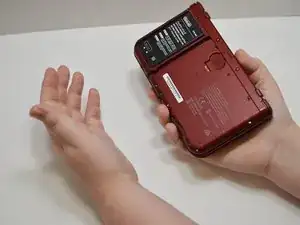
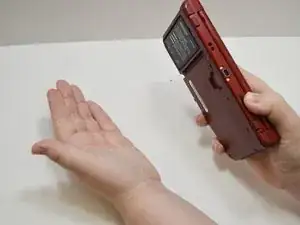
    • Per rimuovere la batteria, tieni il dispositivo con la batteria rivolta verso l'alto in una mano, con un dito che tiene saldamente il coperchio del dispositivo, e delicatamente rovescia il dispositivo nell'altra mano. La batteria dovrebbe cadere nella tua mano.

  5. 4DyTSFZDuhfrsMog
    4DyTSFZDuhfrsMog
    1ybdpgwNxpX11VYb
    CytfQ6dtMoYFs6Hb
    • Rimuovi i due piedini in gomma sul retro del dispositivo con uno stuzzicadenti.

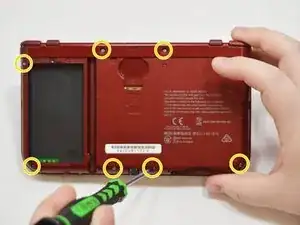
    • Utilizzando il cacciavite a croce di dimensioni #00, rimuovi tutte e 8 le viti che tengono il coperchio inferiore alla scheda madre.

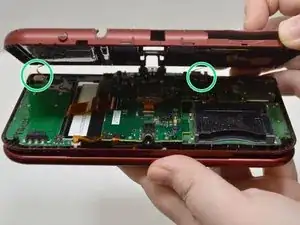
    • Solleva il coperchio inferiore, facendo attenzione a non disconnettere i due connettori ZIF per i pulsanti L/R sul retro del dispositivo.

    2 of My Screws are un-openable & its like sealed it cant be like this forever & my circle pad is kinda faulty.

    George -

  6. vEj2FMGhkDrLiVlD
    vEj2FMGhkDrLiVlD
    f2RDkLYfnWVQNgCt
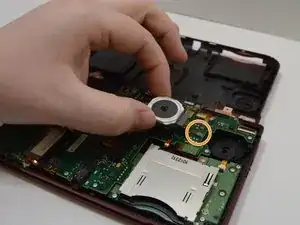
    • Utilizzando il cacciavite a croce di dimensioni #00, rimuovi le due viti che tengono il Circle Pad in posizione.

    • Assicurati di tenere separate queste viti da quelle del coperchio inferiore; le viti del Circle Pad sono leggermente più lunghe e compatibili solo con il Circle Pad.

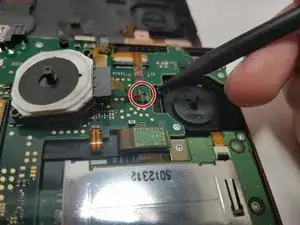
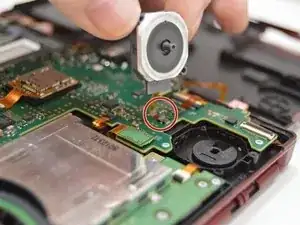
    • Solleva il Circle Pad dal suo alloggiamento per esporre il connettore ZIF.

  7. 5xtUZCnMc1ZPQqU1
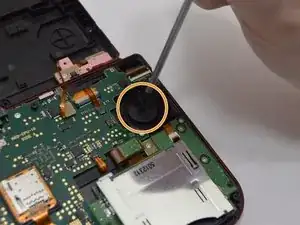
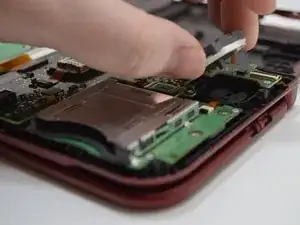
    • Utilizzando la punta del metallo spudger, solleva delicatamente il coperchio del connettore ZIF per rilasciare il cavo del Circle Pad.

    what am i supposed to do to get the rest of it off? there's a whole part of the circle pad missing in these steps.

    Garrett Schilling -

  8. pJFZIFQGdAYNXEbl
    pJFZIFQGdAYNXEbl
    HCmSkBrNOOEbSJKs
    YuEjfwYayJZUlvLN
    • Prendi la nuova unità del Circle Pad e inserisci il cavo nel connettore ZIF aperto, quindi chiudilo utilizzando il metal spudger.

    • Assicurati che il componente interno del Circle Pad sia orientato correttamente con un piccolo cacciavite o spudger.

    • Posiziona delicatamente il nuovo Circle Pad al suo posto e fissalo con le viti.

    • Abbiamo dovuto ripetere questo passaggio alcune volte prima di riuscire a orientarlo correttamente. Cerca di assicurarti che il Circle Pad non sposti l'assemblaggio interno una volta inserito.

    No where does this Mention the 3 different sized screws and where they go after disassemble.

    Daniel Castro -

    Great guide, it could also do with how to replace the rubber top half of the circle pad too. I've also done this. From the photo in step 8, there's a thin split plastic washer underneath the underside of the circle pad still attached to the 3DS. You can carefully slide this washer out through it's split, then you can remove the upper half of the circle pad by carefully sliding one prong of the C shape through the hole, sliding it through going round, then the other prong will side out and it will be removed. To replace, do it in reverse, but it's very fiddly sliding the split washer back into place, but it can be done with tweezers. On all 3DSs I've opened, the notch on the C shape on the underside is facing down towards the bottom, on this photo it's shown facing the top, but I don't know if it makes any difference. This applies to both old and new 3DS XL and I imagine applies to others too.

    Andrew -

Conclusione

Per riassemblare il tuo dispositivo, segui queste istruzioni nell'ordine inverso.

Tori Anderson

Membro da: 20/02/18

670 Reputazione

5 commenti

oh my gosh this is the best guide my grand-son and i fixed his sons 3DS he is so happy

Andrew Dahm -

2 of my motherboard screws can’t open with my newly ordered philips 00 screwdriver. the screws insides look like circles rather than crosses.

George -

Thanks for the guide! I needed to replace the internal component of the circle pad as well, as the rubber pad came off mine. @thirtyninester 's comment on Step 8 helped! Thanks to that comment as well!

Justin Alex -

Help! I'm stuck on Step 5. Upper leftmost screw refuses to come out and I can't tell whether I've worn down the screwhead or the screwdriver. Removal advice please. Otherwise my only recourse may be to replace the entire system. Just transfer everything datawise and be done with it. It'd be a shame if I had to admit I spent $90+ on parts & tools for nothing just for it to come to this. And I don't even want to think about how much a new unit will cost on the secondhand market. I'll be lucky to find one at it's original MSRP.

Matthew Conklin -

Hey,

you could try to use a slightly larger screwdriver and see if the screw comes out. Otherwise you have to drill the screw out which is probably still better/cheaper than replacing everything. Hope this helps!

Henrynaja -