Introduzione
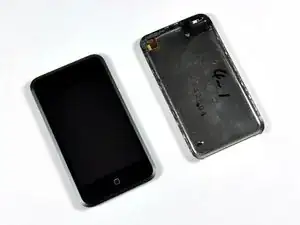
Questa guida mostra come aprire il case dell'iPod Touch di Prima Generazione.
Strumenti
-
-
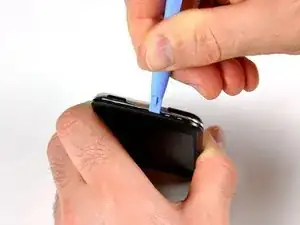
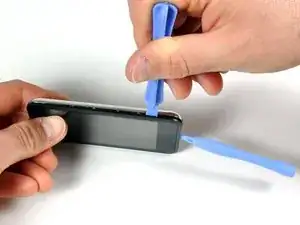
Inserisci il piccolo strumento di apertura di plastica dentro la giuntura in mezzo al pannello del display di plastica e il pannello posteriore di metallo. Il bordo angolato dovrebbe puntare verso il pannello posteriore di metallo.
-
Mantieni lo strumento in posizione una volta che questo è incastrato e i due pannelli sono separati.
-
-
-
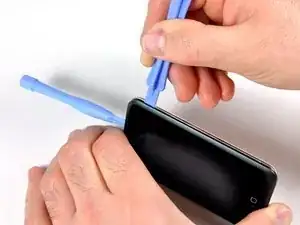
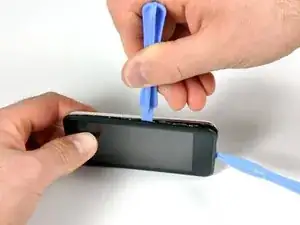
Inserisci il grande strumento di apertura di plastica nel lato destro dell'iPod, con il bordo dello strumento che punta verso la parte posteriore metallica.
-
Allarga l'esistente fessura ondeggiando il grande strumento di apertura e muovendolo verso destra.
-
Continua a fare così fino a che il lato destro dell'iPod non si allenta.
-
-
-
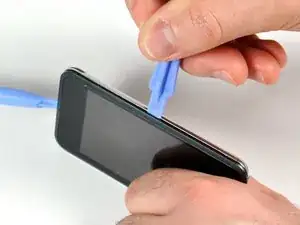
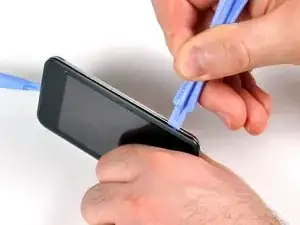
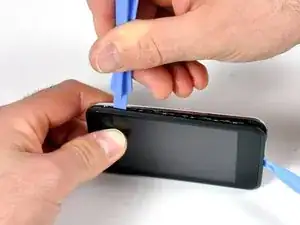
Passa all'altro lato dell'iPod.
-
Segui la stessa procedura del passaggio precedente per sganciare le sette clip che mantengono i pannelli in posizione.
-
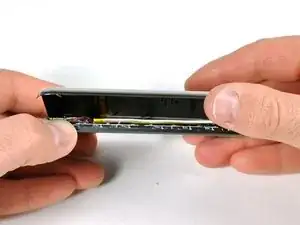
Una volta che i pannelli sono separati in questa parte, il pannello posteriore può essere separato dal resto dell'iPod.
-
-
-
Solleva gentilmente il pannello posteriore usando le dita.
-
La parte frontale e la parte posteriore dell'iPod ora dovrebbero essere completamente separate.
-
Per riassemblare il tuo dispositivo, segui queste istruzioni in ordine inverso.

I found the little plastic tools to be useless. I finally got the case apart using jeweler's screwdrivers, guitar picks, and believe it or not, a wood chisel to split the sides of the case open. And believe it or not, I got back together again - not quite as good as new, but good enough.
I'd REALLY love to know how Apple technicians get this little beast apart without damaging or nicking the case.
phinegan -
Who's betting the actually replace the back with a brand-spanker - if they repair them at all!
marc draco -
They do replace it with a new back, thats why they said that if you have words on the back (engraved) by someone other then apple, your going to lose those but if there done by apple then they'll do it again (when replaceing the battery they say that)
shadowfox00101 -
I replaced my battery in my 1st gen iPod and it still doesn't hold a charge for more then 5 min. Any ideas?
ae86keidori -
mine has the same problem. My 1st gen iPod touch dropped in water. after that It still works but can't hold a charge for more than 5 mins. I changed the battery and still the same.
One of my friend give me some advices, I simply clean the whole logic board with some non water alcohol, and it works. It works perfect now. You can have a try.
Liku -
I found a method that worked for me in opening the case. I started at the top, and used a sewing needle. I'm sure a straight pin world work also. Using some padding between the back of the needle and my hand, I worked the point of the needle between the casing and the metal back. Don't push straight into the gap, push on the edge of the gap down toward the back of the iPod. Once you feel the needle slip in, use it as a guide to get your prying tool in there.
Paul Jones -
Hey, I made it, it's open! My opener tool was useless. A swiss army knife and lots of brute force is your friend. My tool broke apart not resisting such force that is necessary.
http -
lol i dropped my iPod this fixedit because it had no back
elais -
Count get past step 1 :( began seperating the back but the metal back sooner bent than the clips letting loose. I heard something chip then the ipod started getting very hot so I think I punctured the battery :( its going to live outside for a while before I throw it out.
Mike -