Introduzione

Nota:: smontare il tuo dispositivo potrebbe invalidare la garanzia sul dispositivo, procedi con cautela e considera di inviarlo prima se possibile per essere lavorato dall'azienda. L'obiettivo di questa guida è aiutarti a risolvere i tuoi problemi con il joystick. Se questo significa portarli fuori semplicemente per pulirli o sostituirli tutti insieme. I joystick dovrebbero essere una procedura semplice. Finché ti prendi il tuo tempo e interagisci attentamente con il sistema, dovresti stare bene.

  1. MWUymU6oT1rGeD6u
    • Assicurati che il sistema sia completamente spento e che la scheda SD e le cartucce di gioco siano state rimosse prima dell’inizio della riparazione.

    • Tutte le viti da 6,35 mm sono state rimosse utilizzando una punta J00 dal Pro Tech Toolkit di iFixit.

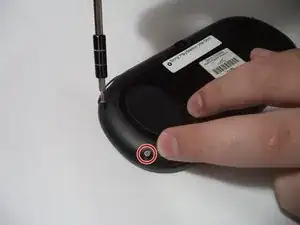
    • Ci sono quattro viti dietro al dispositivo, rimuovile come mostrato.

    I actually broke a 32GB storage card because I didn’t remove it first before I open the chasis. Beware of this!!! REMOVE YOUR CARD FIRST!!!

    Daniel Wang -

  2. dNixpdkvqXrEXvRX
    dNixpdkvqXrEXvRX
    6FOyLDiaHJn3JbMJ
    • Ci sono due viti sul fondo, vicino alla porta di ricarica, rimuovile usando il cacciavite J00 sulle viti da 6,35 mm del toolkit iFixit pro.

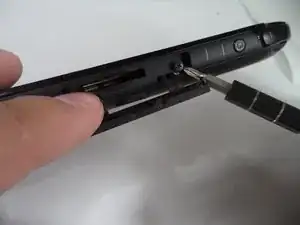
    • Infine, rimuovi la vite superiore sotto il coperchio antipolvere usando il cacciavite J00 sulle viti da 6,35 mm del kit di strumenti iFixit pro.

  3. oB5eopNayEQgQNdm
    oB5eopNayEQgQNdm
    AFU4gg4k5bwrPruG
    JjhdMGePJxTZe1sZ
    • Il passo successivo richiederà lo strumento di apertura.

    • Si prega di separare con cautela la parte posteriore dalla parte anteriore. Dovrai scollegare il piccolo cavo a nastro all'interno prima di rimuovere completamente la parte posteriore. Altrimenti potresti finire per danneggiare i nastri all'interno.

    • Mentre separi il pannello posteriore, fai leva con attenzione intorno. Sentirai rumori schioccanti mentre giri e questo è un buon segno.

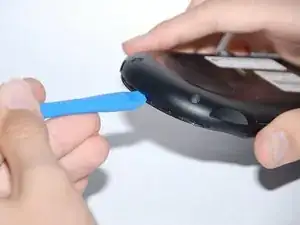
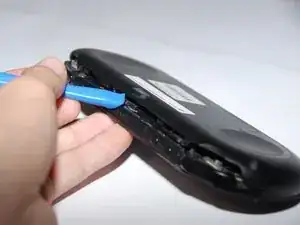
    • Dopo aver rimosso il pannello posteriore, dovrai rimuovere lentamente e con attenzione i nastri che collegano l'hardware per accedere alle parti necessarie da riparare.

  4. nQrlvZtdJYWOSKtU
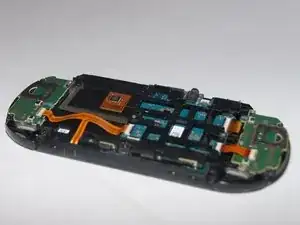
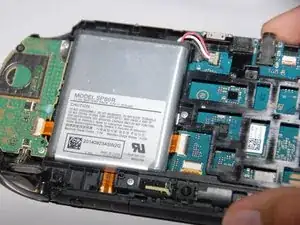
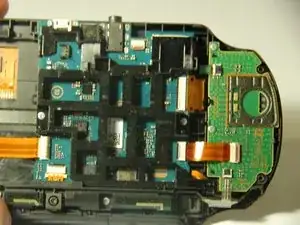
    • Una volta che i nastri sono stati rimossi, la parte posteriore può essere completamente rimossa e puoi accedere all'hardware all'interno.

    Don’t forget to remove the battery at this point. The little corners of the connector that poke out a bit are there for you to pry the connector up. Be careful pulling the battery connector out by the wire, you could damage the wire where it is attached to the connector.

    Landon Burnette -

  5. QSNJrxCmCyFXIeh2
    QSNJrxCmCyFXIeh2
    Lb1G1YFEPEekblMA
    lLtXeglFALgVTgKA
    • Iniziare dal joystick sinistro.

    • C'è un involucro verde che tiene nel joystick che dovrà essere rimosso per consentire l'accesso.

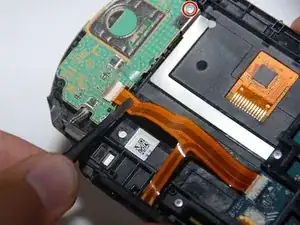
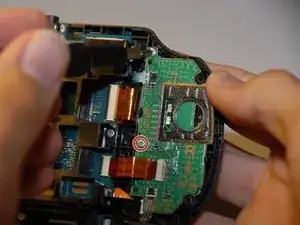
    • Ci sono 3 nastri che tengono insieme la sezione. Rimuovili con attenzione.

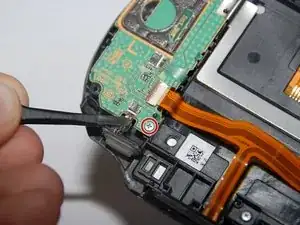
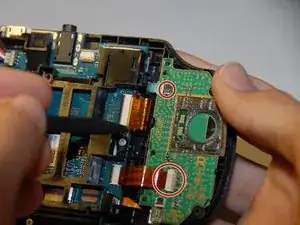
    • Quindi svita le due viti che tengono premuto l'involucro. Saranno entrambe ancora viti da 6,35 mm e potranno essere estratte da una punta J00 dal toolkit iFixit pro.

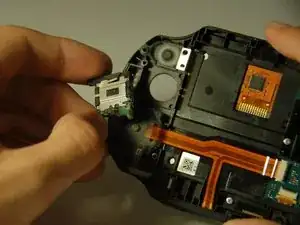
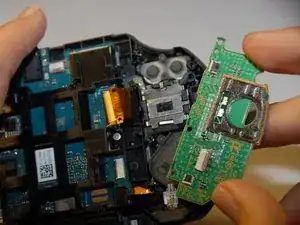
    • Ora ha lasciato con attenzione il pezzo di metallo che tiene premuto l'involucro verde, sarà l'ultima resistenza. Solleva ora l'involucro verde

  6. AIXCtAZLwmegXc5L
    AIXCtAZLwmegXc5L
    6eEPWHupvPhMx3VZ
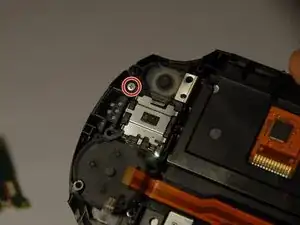
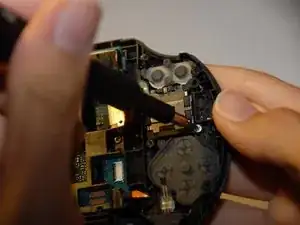
    • Una volta rimosso l'involucro, ci sarà un'altra vite da rimuovere. Sarà una vite da 6,35 mm che richiede un cacciavite J00 dal kit di strumenti iFixit pro.

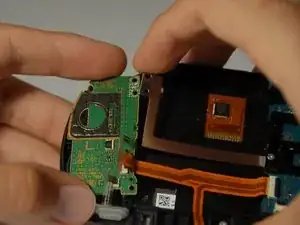
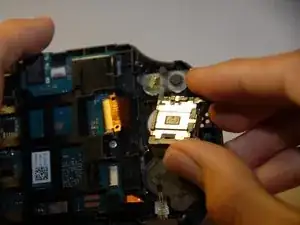
    • Ora estrai semplicemente e con attenzione il joystick

    • Con il joystick estratto ora puoi fare ciò che è necessario sul joystick sinistro o addirittura sostituirlo.

  7. F4K26GsPPCjfbXH3
    F4K26GsPPCjfbXH3
    os2A4OSK3RQenxpI
    qGWVIB6hCjEnF6cC
    • Passare al joystick destro

    • Ci sarà un involucro verde contenente il joystick. Per prima cosa deve essere rimosso.

    • Rimuovi con attenzione i nastri dall'intera sezione.

    • Procedi per rimuovere le due viti che tengono premuto l'involucro. Saranno viti da 6,35 mm e possono essere rimosse usando una punta J00.

  8. ry3DolYPKYEPOP5Y
    ry3DolYPKYEPOP5Y
    kB4YyjX2YvAiNkEN
    eL6DwNUywrfYdDCY
    • Una volta spento l'involucro, ci sarà solo un'altra vite da togliere. Sarà anche una vite da 6,35 mm che utilizza la punta J00 del kit di strumenti iFixit pro.

    • Ora rimuovi semplicemente il joystick dal dispositivo .

    • Una volta rimosso il joystick, puoi fare ciò che è necessario per la parte giusta del joystick o persino sostituirlo se necessario.

Conclusione

Per riassemblare il tuo dispositivo, segui queste istruzioni in ordine inverso.

Daniel Woodard

Membro da: 23/08/17

2959 Reputazione

15 commenti

Would I have a problem if I used 2 screws for the right analog stick , it solved my ghost movement

Art Front -

I have changed the analog stick, but it is still not working

akash shah -

Can you switch left with right analog stick?

Pyro Haze -

yes you can switch them. but its recommended to get a pair of new analog sticks so you dont have to open it again when the other side fails

Darian Perisic -

Fixed, very easy! Thanks a lot

Julien Lemoine -

did it with a philips 00. Just be extra careful and push down hard so the driver does not skip and strip the screws. I would recommend getting a prying tool and plastic tweezers. I removed the casing by hand and removed and installed the ribbon cables by hand which took a while and was a big pain in the rear end.

Darian Perisic -

Gran ayuda por parte del autor: super fácil saludos desde Puebla México

Gustavo Cadena -

It should be noted, the battery is not secured to the case in any way and has a tendency to fly about if you’re not careful with it. I learnt this the hard way when it came loose and snapped one of its cables.

Sam Cain -

Just a note: the small green ribbons have little clips on-top that you can pop open to take them out and put them back in. If you’re experiencing some wonky connectivity you may need to go back in and re-secure them.

Stevie Dow -

Hey! Thanks for this. Was trying to figure out why removing the ribbons were so difficult. Appreciate you!

chris garcia -

Hey! Many thanks! This guide was very helpful and I finally got my PS Vita fixed after I had a broken joystick for about 2 years (which was the reason I stopped playing). One thing that was not mentioned in your guide was how to put the ribbon cables back into the connectors, which was my only problem. Eventually I figured out I had to pull out a small black plate on the connector so I can put in the cable (which wasn’t possible before). Anyway, thanks! =)

--- -

Very useful guide, found that mine had blue PCBs for the L/ R sides, however could be due to mine being a Japanese unit. I do recommend disconnecting the battery while doing this to keep from inadvertently powering the unit up.

I did have difficulty getting the ribbon cable for the rear touch pad re-seated properly. Found that I had to GENTLY bend the cable to make it easier to line up with its port on the mainboard.

Spencer Peat -

Anyone have recommendations as to who makes/sells reliable, good quality replacement joysticks for the 2000/slim series?

Having issues with mine drifting as soon as I boot it up, I'm gonna hit it with the contact cleaner (once I find where it's hiding), hopefully it helps, but since this was preowned, have to factor in wear and tear, so it might be easier to just replace them both.

Strings Cat -

Update:

Found a OEM styled part on amazon by a "Deal4GO", drift gone. Now I can experiment with the old stick at my leisure.

Strings Cat -

My PS Vita is no longer turning on after doing this, the orange light also does not come on when the charger is plugged in.

long_justifier -