Introduzione

Usa questa guida per sostituire l'unità ottica.

  1. kKHOYvEWyQqv2ikT
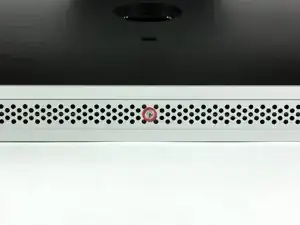
    • Allentare la vite con testa a croce al centro dello sportello di accesso.

    • La vite resta all'interno dello sportello di accesso.

    • Rimuovere lo sportello di accesso dall'iMac.

    PH2 head necessary to remove screw.

    airshack -

    Mine was as written, a PH1.

    tpivo -

  2. LnOEmYPxI5PBIQJY
    LnOEmYPxI5PBIQJY
    HqUOYlGhDnRbRBOu
    • Il pannello di vetro è fissato nella mascherina anteriore con quattordici magneti posizionati lungo il perimetro.

    • Far aderire due ventose agli angoli opposti del pannello di vetro.

    • Per far aderire le nostre ventose, per prima cosa posizionarle con la maniglia semovente parallela alla superficie del pannello di vetro. Tenendo delicatamente la ventosa contro il vetro, sollevare la maniglia semovente finché non è parallela all'altra maniglia.

    • Se la ventosa non aderisce, provare a ripulire il pannello di vetro e la ventosa con un solvente delicato, come i detergenti per i vetri.

    Save $15 dollars and use a plunger. Works perfectly.

    Michael Ybarra -

    Even better and more elegant: go to a household shop and buy two transparent plastic bathroom baskets with two suction cups each. I found them in Xenos in the Netherlands (maybe also in Germany).

    freed -

    Perhaps not so elegant but equally effective without any adverse effects to either... try a vacuum cleaner.

    Andrew Dobson -

    The same kind of suction cups are available from Harbor Freight Tools (Item # 62715) for $2.99 each or $5.98/pair (plus sales tax).

    Bob Atkinson -

  3. wOWEkQRIZSmjoKvF
    • Estrarre delicatamente il pannello di vetro dall'iMac.

    • Il pannello di vetro presenta diversi piedini di posizionamento lungo il perimetro. Per evitare di staccare i piedini dal pannello di vetro, fare attenzione a rimuoverlo solo tirando verso l'alto.

    • Pulire con attenzione la parte interna del pannello di vetro e l'LCD, poiché la polvere e le impronte digitali saranno sgradevolmente visibili durante l'accensione del display.

    The glass panel is somewhat thin and should come away quite easily without much force so be gentle.

    adamngordon -

    Just an FYI - my glass panel did not line up perfectly when reinstalled. Off by just 1mm. May take another attempt at it later, but does not interfere with the iSight camera. Only someone with an eagle-eye (like me) will notice it's not perfect.

    ajpfl -

    To reinstall the glass, I lined up the bottom edge first, then pivoted the top in. The magnets pulled it quickly into place.

    Magnus Dalen -

    I didn't want to use such small suction cups.. so I got suction bathroom handles from Home Depot. Very sturdy and to me, safer choice.

    Gail -

  4. npTFBSoJoA4tyHCC
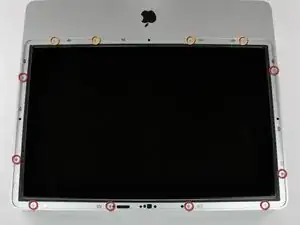
    • Rimuovere le 12 viti seguenti, che fissano la mascherina anteriore al case posteriore:

    • Otto viti Torx T8 da 13 mm.

    • In alternativa, potrebbero esserci sei viti Torx T8 da 13 mm e due da 25 mm.

    • Quattro viti Torx T8 da 25 mm.

    • In alternativa, potrebbero esserci due viti Torx T8 da 25 mm (all'esterno) e due da 35 mm (all'interno).

    I only had two 25 mm T8 Torx on my model. (The two inner orange circles as shown in the diagram.)

    stevejansen -

    I don't know if this is different but i am in the process of disassembling a 24' imac emc: 2134. i have only: (2) 25 mm T8 screws the inner two on the bottom of the screen. I have (4) 13 mm t8 screws the outer most holes on the bottom and the 2 holes on the right side of the monitor above the drive entrance and the remaining holes are (6) 11 mm t8 screws

    ccarter314 -

    I have the same screws as ccarter on a 2211 except on the bottom row there are only 4 screws total, the longer ones go in the middle two.

    maccentric -

    The Torx set I bought from ifixIt is well worth the money. My screw heads in this step were T9 not T8. THe T8 bit was too sloppy in the screwhead and there was a risk of rounding the slots. Having the option to go a size-up was perfect.

    Troy -

    My 2211 has a different screw configuration.

    2 - 32mm long screws towards the middle of the bottom edge

    4 - 18mm long screws (2 at the corners of the bottom edge and 2 along the right edge)

    6 - 13mm screws along top and left edges

    christian -

    Mine is the same — two very long, four medium, and six short. Also my T9 worked better than my T8 which was a bit loose.

    johann beda -

    I have the same screws as Christian. The key is to make sure all screws are flush to the surface, so that the glass can be held up by the magnets.

    Kelvin Lau -

    On mine, for the red circles, I had the six 13mm Torx plus two 25mm Torx. It's not indicated in the picture here, but the 25mm Torx went on either side of the optical drive.

    JD Fox Micro -

    I marked next to each hole with a pencil "S, M or L" to indicate which length screw goes where. No guess work on reassembly.

    Magnus Dalen -

    I dropped my screwdriver on the lcd and nicked it. :(

    hewsey -

  5. OKTJoZ3T2TX2RBMP
    OKTJoZ3T2TX2RBMP
    NAuKQkjbMXru3q5Y
    • La mascherina anteriore è ancora collegata all'iMac mediante il cavo del microfono.

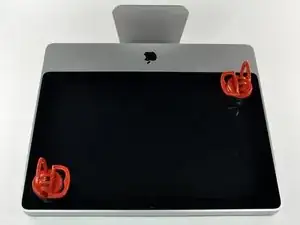
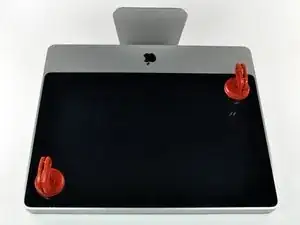
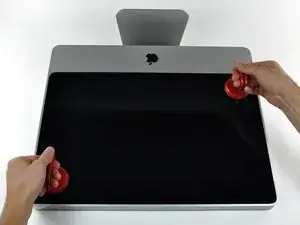
    • Sollevare delicatamente la mascherina dal bordo superiore, lontano dal case posteriore. Può essere utile premere delicatamente gli angoli del display con i pollici.

    • Dopo aver rimosso il bordo superiore della mascherina anteriore dal case posteriore, ruotare la mascherina verso la staffa ed estrarla dal case posteriore.

    • Per la reinstallazione della mascherina anteriore, iniziare dal bordo inferiore e verificare che sia allineata con il case posteriore prima di poggiare il bordo superiore sull'iMac.

    The microphone cable must be disconnected BEFORE rotating the bezel towards the stand.

    Also, the bezel covers the sides of the case, not just the front. This isn't obvious from the pictures.

    wallace -

    Looking at the meaning of the LEDS

    i've got 3 LEDS on but i don't get a chime or the screen.

    i am going to check the inverter voltages but can only find info for the 20" macs iMac Intel 20" EMC 2210 Power Supply Output Voltage Test

    does anyone know where i can get info for the 24"

    samraby -

    i have the same thing, 3 LEDs on but no chime and no screen.

    what is the fix? and problem?

    Bill -

    I'm in the same position. 3 LED's, No chime, no life in the screen, Optical drive starts up but no other signs of life i.e.:fans also don't start up.....

    Any guidance would be greatly appreciated!!

    Dominik -

  6. hOeFeOWv1UYq2nCp
    • Scollegare il connettore del cavo del microfono, rimuovendo il nastro secondo necessità.

    • Affinché la mascherina anteriore sia posizionata correttamente, verificare di aver inserito il connettore nello spazio vuoto accanto alla scheda della fotocamera.

    I didn't disconect the cable. I was working on a large table that allowed me to carefully flip the bezel upside down and rest it that way with the cable connected through the entire process.

    fulker -

    I also skipped disconnecting the microphone cable. I have a large table and I stacked some books next to the iMac. There was plenty of cable for the bezel to fold nicely over the top of the iMac.

    mikkorongas -

    I needed to move the bezel away, so disconnected the cable. On reassembly found that the pins had pulled out of the plastic housing. Need to know orientation of the 3 wires in the housing.

    prreitz -

    I used the floor instead of a table and left the cable connected.

    Frank Carrano -

  7. umnnwlhRrOfwrPTj
    umnnwlhRrOfwrPTj
    mK4BYWSlwEMnMdjj
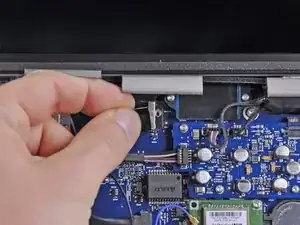
    • Scollegare il sensore temperatura dell'LCD estraendone il connettore direttamente dal connettore femmina sulla scheda logica.

    • Se occorre, deviare il cavo del sensore temperatura dell'LCD dalla parte posteriore della scheda logica.

    The temp sensor on my EMC2134 is located underneath the LCD and the cable is not very long. I propped up the LCD to facilitate removal.

    Pierre Scerri -

    I got an error for the LCD thermal sensor(4sns/1/40000000: TLOP-130.000), and now the fan runs full tilt all the time! I guess I may have damaged the cable...

    morgandan -

    there are two connections together; picture does not make that clear or which one to remove.

    jay -

    You have to be extremely careful when pulling out the LCD Temp connection as it doesn't want to come easy. I almost pulled the entire connection off the logic board using too much force. I therefore, used a pair of hemostats to grab the male end (the very top of the connector) and used a small screwdriver to hold the base of the connection in-place (female end attached to the logic board) in order to pull the connector apart.

    tpolak -

    There apparently is a variant of the EMC2134, like Pierre Scerri said. It has its LCD temp sensor underneath the LCD; the thin wires are about 5 in / 13 cm long and taped to the back of the LCD, and only about 2 in free, so lift the LCD gently.

    There is a connector on the place where the LCD temp connector is on the iFixit photo, but in this variant it is marked 'CPU FAN' and there is no reason to disconnect it.

    The logic boards in my computer are black, not blue.

    goosveen -

  8. 3BXnkKiYwhhww1mp
    • Rimuovere le due viti Torx T6 da 5,3 mm che fissano il cavo dati del display alla scheda logica.

    When they assembled my imac, they forgot to put the two torx screws in. Saved me about 10 seconds. The cable was quite secure and easily popped on and off.

    ljheppner -

    I used surgical tweezers to put place these two tiny screws back in without dropping them into the computer.

    Magnus Dalen -

    In my situation, the T6 (fixit's version) got the screw stripped. I'm eyeing the screws with suspicions. It's way too tight than necessary that I have difficulty to unscrew it. Will add comment if I ever get successful to get it out somehow.

    xa0s -

    Okay. It was extremely difficult. I had to use precision screw (1.4 m/m). It worked on one of the screw. The other one... I was forced to use a hexagon bit at 1.5 size to a success with extreme precision and careful maneuver. I just hope nobody else experiences this as much as I have. Good luck.

    xa0s -

  9. TK1tBrYXUCQUfxYr
    • Scollegare il connettore del cavo dati del display dal connettore femmina sulla scheda logica, estraendo le linguette di plastica a esso collegate dall'iMac all'utente.

    For my 2134 iMac, I ended up just (carefully) putting my fingers on the edges of the little board and (gently) pulling up. Did the trick for me (I couldn't get anything to happen when I pulled up on the plastic tab, which I did also have trouble finding purchase on)

    Emmett Framson -

    Same for me :just pull upwards with your nails on both edges.

    thierry28722 -

    Pull up works, no clue why they say pull down because you can’t no room to pull down.

    Antonio j. -

    Depends on exactly where the tape was positioned originally; this determines whether it will easily pull “up”. I find that grabbing the connector opposite the screw holes with two fingers and jiggling it free was dead easy. Much easier than keeping a grip on the tape tag.

    Edward Wojcik -

  10. fLDcayZjxSpVKTFb
    fLDcayZjxSpVKTFb
    vUAafmGwbG1aqIuW
    • Prima di rimuovere l'LCD, poggiare l'iMac su un tavolo per impedirne una caduta accidentale.

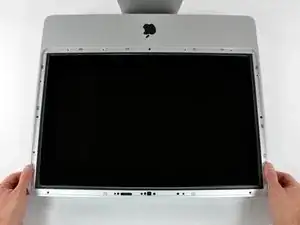
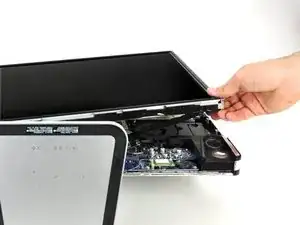
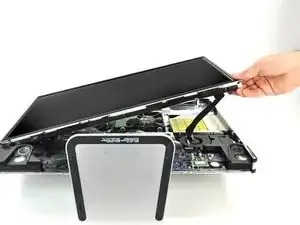
    • Rimuovere le otto viti Torx T8 da 12 mm che fissano il pannello del display al case posteriore.

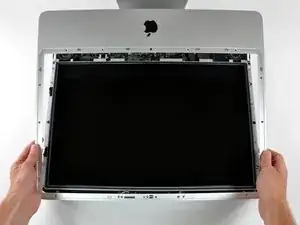
    • Sollevare il pannello del display dal bordo sinistro e ruotarlo verso il bordo destro dell'iMac.

    • Non sollevare l'LCD rimuovendolo del tutto, poiché è ancora collegato alle parti interne mediante alcuni connettori.

    In the photo it appears you're lifting it from its right edge. Sue

    (sue.w.clark@gmail.com)

    suewclark -

    When you fit the LCD back be aware that the microphone cable may be hidden between it and the case and make sure it's free. I had to back track a few stages when I couldn't find it.

    suewclark -

    My T9 bit fits better than my T8 bit.

    johann beda -

  11. 4dHQvPDglAYk6RmR
    4dHQvPDglAYk6RmR
    GE3DBKCIHLdDCJcE
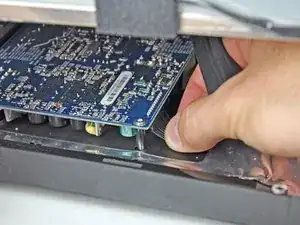
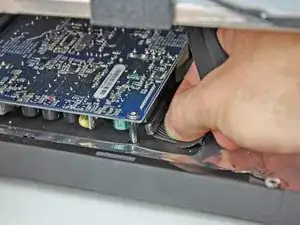
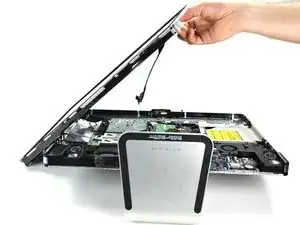
    • Tenendo l'LCD sollevato, scollegare l'apposito cavo tirandolo verso il basso.

    • Il cavo dell'LCD è collegato alla parte inferiore dell'alimentatore. Fare molta attenzione quando si usano le dita per evitare scariche elettriche dai condensatori.

    • In fase di rimontaggio, può essere utile rimuovere l'alimentatore, ricollegare il cavo di alimentazione dell'LCD e quindi rimontare l'alimentatore.

    • In alternativa, il cavo di alimentazione dell'LCD può essere scollegato dall'LCD stesso, invece che dal lato alimentatore.

    I was unable to disconnect the LCD cable, possibly due to fear of breaking the connector. I was able to swap drives with it connected. The iMac was placed on its rear cover on a large table, leaving plenty of workspace to rotate the LCD panel to the left side while still connected. The screen will lay at an angle on the case edge. I verified the LCD cable was clear of the case endue and not pinched.

    This also avoids going near high power capacitors with your fingers.

    stevejansen -

    I found it easier to disconnect the LCD cable at the LCD end after lifting the black tape.

    Pierre Scerri -

    Fully agree. Easiest is to remove cable from LCD in stead of trying to pull it off the board

    Rik Veldhuizen -

    Remove cable from the LCD Display not the board

    Fully agree with others. It is easiest is to remove cable from LCD display instead of trying to pull it off the board. It comes off the board very easily, but it is difficult to put it back onto the board. It is easier to snap the cable bad onto the LCD Display itself.

    ToddR -

    I could not get the LCD power cable disconnected from the board - it is on really hard and there is no way to leverage it off without breaking something. My solution was to leave the screen attached and rotate it away from the work area/computer (granted you need a work surface that is large enough and a soft surface to place the screen on). If you try this method, be careful that you keep clear of the screen during the remaining steps - should not be hard.

    It seemed that if I ever got the connection unplugged, there would be no way to get it back under and re-attached properly.

    This is probably the toughest step of the entire process that needs a workaround.

    ljheppner -

    On re-assembly, Have something ready to rig the display! reconnecting the lcd cable is the most difficult step in the whole procedure

    bootsch -

    I agree with the previous poster, this is indeed the most challenging part. I ended up removing the screws for the IC board that this connector connects to. This allowed me to pull the board up an extra inch and plug in properly. 4 screws, 120 seconds, done.

    orders651 -

    As said previously, reconnecting the data cable is really difficult and I managed to bend a pin. Thanks to good support from ifixit staff I managed to bend it back - not sure how as it's so small. Unscrewing the IC board is a good idea. If I ever had to do this again I would avoid disconnecting this cable and just move it out of the way, or disconnect it at the other end as previously suggested.

    suewclark -

    LIke others mentioned, this was the most difficult step because of the awkward angle. Working alone I managed to get it off but found it much harder to line it up properly for reattachment. What I ended up doing was getting someone to hold the the LCD (resting on the left side, perpendicular to the iMac which was laying down) and I removed the 4 screws that hold the power supply in place. Removing those screws allowed me to lift the power supply a couple inches which made it so much easier to reattach. I wish I had done that when I was trying to remove the cable during disassembly. Good luck!

    alexflood -

    This was near impossible to remove as there is no room to grip the connector and no easy way to wedge something in there to help remove it. I felt like giving up but the hard drive removal and swap was so easy you just need to get someone to hold the screen for 10 minutes. Don't try removing the cable ... you most likely will get frustrated unnecessarily.

    Troy -

    I did not disconnect the LCD power cable as others recommended. I simply rotated the LCD to the side, rested on table. This worked really well for me and did not have to be concerned about reattaching this complex connector.

    ajpfl -

    I agree with others. Just lift display and lean against a prop, perpendicular to table. No need to disconnect, which is error prone.

    dkulp -

    Les commentaires sont tous en anglais à cette étape, et j'aurai dû faire l'effort de les lire avant de perdre 1h à cause de ce connecteur. Effectivement, il n'est pas nécessaire de débrancher le connecteur de l'écran, car c'est une vrai galère à remettre sans risque de le casser. On peut donc laisser l'écran branché, à la verticale, soigneusement incliné sur un mur, l'imac toujours posé sur le bureau. J'espère que ce message sera utile, car j'aurai bien aimé qu'on me le dise avant !

    Nicolecameleon -

    +1 for removing the LCD cable from the screen side, not the mac side.

    Not removing it, depending on the lenght of the cable which doesn't seem to be fixed, might not be an option for everybody.

    Michael Sacchi -

    Remove cable from the LCD Display not the board

    Fully agree with others. It is easiest is to remove cable from LCD display instead of trying to pull it off the board. It comes off the board very easily, but it is difficult to put it back onto the board. It is easier to snap the cable bad onto the LCD Display itself.

    ToddR -

    This is really a good way to break the cable! Avoid the stress easily by removing the four screws (T-9) holding the video board down, then lift the edge near the cable before removing. Also, the cable is easily reattached to the board with these four screws removed. Reattaching without doing so is time consuming and quite difficult. This approach is easier than removing the cable from the LCD.

    airshack -

    Reconnecting the LCD Connector was the only challenging part of this procedure. I must have bent the pins on the LCD connector when taking it off so was unable to reattach. I ended up taking off a bracket that was adjacent to the LCD connector as well as the other end of the cable....O I disconnected these 2 pieces and was able to examine the other end of the LCD connector I was able to bend the pins back into place and the connector snapped back into place. The display works and the hard drive works as well. Thanks iFixIt!

    csimmons20 -

    I wish I had read your comments about not disconnecting the LCD. It was really hard disconnecting and connecting it back was !@#$. I managed to twist some of the pins so in the end I had to unscrew the board, twist the pins back and plug the cable. When I restarted, I really thought that it was never going to work. So a down point for not pointing to comments at step #11. Otherwise great tutorial.

    Alain Bartolo -

    Too difficult to re-connect afterwards. Accidentally, one pin was bended when re-plugged. I ended up unscrewed the power board, and fixed the pin. Re-connect and OK.

    Nick Lam -

    I found a far easier way. Just gently turn the screen 90° to one side and don't disconnect the cable! If all you are doing is replacing the HD, there's plenty of room without disconnecting the cable. At least on my machine the cable is flexible and I didn't have any problem making room. Way, way easier.

    baslking -

    Thanks for the suggestion to remove the IC board. This was indeed the easiest for me, after spending 15 minutes trying to reconnect the cable.

    Sccoaire -

    I didn't disconnect the LCD cable. I stacked some books on the side and put a blanket on them. I was then able to fold the screen next to the computer LCD still connected. Should some iMacs have a shorter cable this may not be an option to everyone. Thanks for good tips everyone.

    mikkorongas -

    I also did not remove LCD cable. Just rotated the LCD away and propped it by the edges with the plastic inserts from the box my new drive came in. Plenty of room to get to the HDD.

    EBS -

    No need to remove the LCD panel.

    I agree this is the toughest step in the process — and the most unnecessary. I was able to rotate the panel out of the way without disconnecting it, placing a cloth between the chassis and the panel now leaning against it to prevent any inadvertent damage.

    Tim Murtaugh -

    As others have stated, disconnecting the inverter cable from the power supply first is NOT the way to go. I ended up damaging the cable trying to get it out before I went to disconnect it from the LCD panel end instead. Much easier to do and much less prone to damaging the cable or it's insertion socket.

    The guide needs to be updated and the suggestion to pull the inverter cable downward from the power supply removed. It is not a good idea and will cost you at least a few days and $10 to replace the cable should something go wrong. Please update this guide.

    multimediavt -

    Get the male part out of the female fitting is a standard problem with boards. There are pulling/clamping devices you can get at electronics stores to pull the fitting out. They are like fuse pullers many car fuse boxes are equipped with. IFixit should sell them with the kit. I did it all without any problems, formatted the drive and then installed the operating system and defeated Apple who wouldn't even consider replacing the drive in my "obsolete" machine which my wife now uses instead of a crappy Dell PC.

    peterhaggstrom -

    If you are just changing the HDD, instead of removing the cable at the left, simply pivot the LCD 90 degrees counter-clockwise and gently set it back down. This allows one to access the HDD to swap.

    Eriamjh 1138 -

    I completely agree, it is way easier to remove the LCD cable from the LCD panel itself

    Sve Jo -

    I didn’t find my own solution in the previous comments, so here it is… Oh, I worked on the Apple iMac "Core 2 Duo" 2.8 24-Inch (Early 2008) A1225 EMC 2211.

    I simply lift the LCD panel from the other side! Look at the photo in the previous step: after you disconnected that cable (data cable) you can lift the lcd panel and rotate it and the cable is long enough to bring the panel at a 90 degrees position (vertically in the air).

    Than it’s up to you. I tried to place the panel side on the table but again the cable was too short. So I placed it on the inside of the case, which is free from other cable and boards. Not elegant, I know.

    The important part is that in that position I was able to remove the 4 screws from the Power Supply board and easily disconnect the LCD cable! And it’s equaly easy to reassembly it.

    Important note: the LCD panel is pretty heavy! Be very careful with the edges (the metal is sharp). Don’t let it fall. Don’t touch the boards and the other components.

    ITbert605 -

    I also bent two pins of the board connector while trying to plug it back in… so I unscrewed the board, managed to bend the pins back with tweezers but I’m afraid I might’ve damaged the connector as I still get a black screen and LED 4 is off, even though everything is back in its place…

    newmarie416 -

  12. BVJS3FPECsmcFokP
    BVJS3FPECsmcFokP
    EjhsYRqO3xoAXJvN
    • Continuare a sollevare l'LCD dal lato destro.

    • Rimuovere l'LCD.

    Much simpler to remove the LCD cable at the LCD insertion site, rather than trying to remove it as suggested in the manual. Reinsertion is also less traumatic.

    Eric Shaffmaster -

  13. 3GdMScnAyJeZNHnO
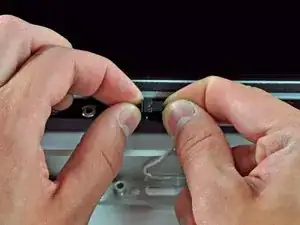
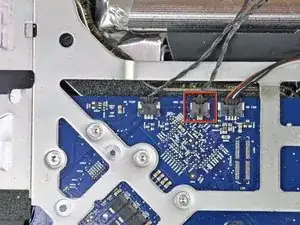
    • Se occorre, rimuovere i pezzi di nastro che fissano i cavi del sensore termico dell'unità ottica o del disco rigido all'iMac.

    • Scollegare il connettore del sensore termico dell'unità ottica dalla scheda logica, estraendolo verso la parte superiore dell'iMac.

  14. 3sAChFIcKR1O1XEA
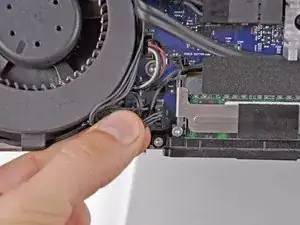
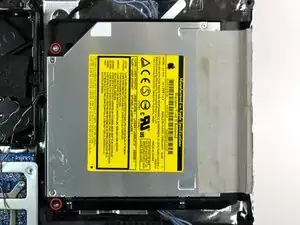
    • Rimuovere le due viti Torx T10 da 7 mm a passo fine che fissano l'unità ottica al case posteriore.

    Mine were T8 Torx

    Frank Carrano -

  15. WVvPIjdTWqYZNqaO
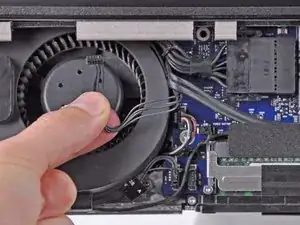
    • Sollevare l'estremità libera dell'unità ottica, leggermente fuori dal case posteriore.

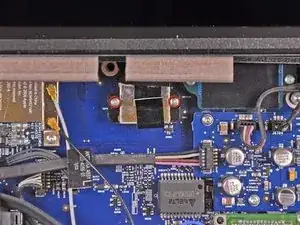
    • Rimuovere le due viti Torx T6 da 3,5 mm che fissano il connettore dell'unità ottica a quest'ultima.

    My EMC 2134 had no torx screws on the ODD. The SATA connector plugs straight into the ODD.

    Pierre Scerri -

  16. lPso5faQKCUQnC4B
    lPso5faQKCUQnC4B
    NoLMAl35C2OECBCL
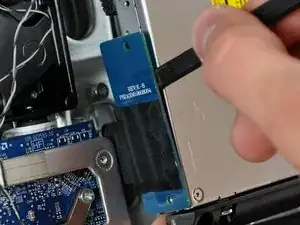
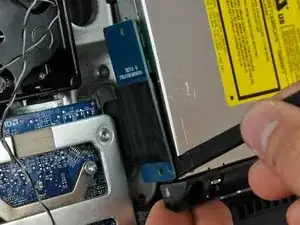
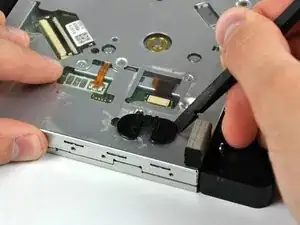
    • Inserire l'estremità piatta di un inseritore fra il connettore dell'unità ottica e il corpo di quest'ultima.

    • Ruotare l'inseritore per separare il connettore dall'unità ottica.

    • Potrebbe essere necessario lavorare alternativamente sui lati del connettore fino alla sua disconnessione.

  17. HTvKuSydEPKXvJoQ
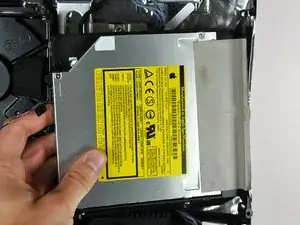
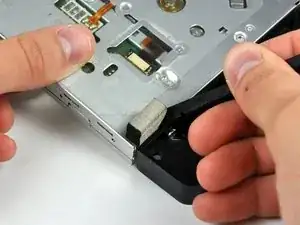
    • Sollevare l'unità ottica dal case posteriore e tirarla dal lato del case posteriore stesso per liberare la striscia di nastro EMI che aderisce alla superficie.

    • Il sensore termico dell'unità ottica è ancora collegato sul lato inferiore dell'unità stessa.

  18. JvTgZNGTUAWKPyEJ
    JvTgZNGTUAWKPyEJ
    pDFlTHWhKxTqUFqW
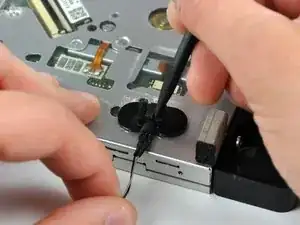
    • Se necessario, rimuovere la porzione di nastro in schiuma che copre il sensore termico dell'unità ottica.

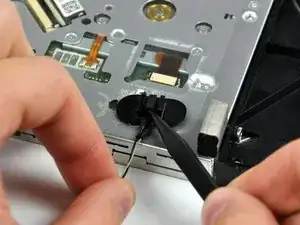
    • Per rimuovere il sensore termico dell'unità ottica, utilizzare la punta di un inseritore per sollevare l'aletta centrale della staffa del sensore termico, applicando una leggera tensione al cavo del sensore.

    • Se il sensore termico è incastrato nell'unità ottica, andare al passaggio successivo.

  19. ggndSUCwoMIioJ6U
    • Mediante l'estremità piatta di un inseritore, rimuovere la staffa del sensore termico dell'unità ottica dall'adesivo che la fissa all'unità stessa.

    • Qualora l'adesivo si sporcasse o non aderisse alla nuova unità ottica, posizionare un pezzo di nastro biadesivo sotto le due linguette semicircolari della staffa del sensore termico.

  20. JrnFWBGybDSX3lNO
    • Mediante un inseritore, rimuovere la piccola parte di schiuma EMI dal lato inferiore dell'unità ottica.

    • Non dimenticare che deve essere trasferito alla nuova unità ottica.

  21. kpQZFACjQ2aCsYN5
    kpQZFACjQ2aCsYN5
    VdaZ4ytN26LDRTMx
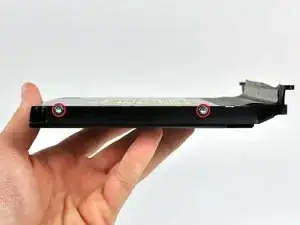
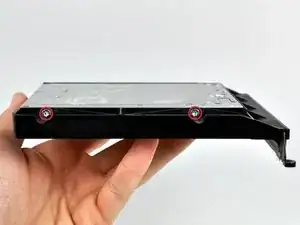
    • Rimuovere le due viti Torx T10 da 6,5 mm da entrambi i lati dell'unità ottica, per un totale di quattro viti.

  22. sqmVBkv12FIsA4gl
    • Sollevare la striscia di nastro EMI dall'unità ottica.

    • Non dimenticare che deve essere trasferito alla nuova unità ottica.

  23. Je3ETU32aLUxgyEA
    Je3ETU32aLUxgyEA
    Q6XvgbYMD3tBvbLe
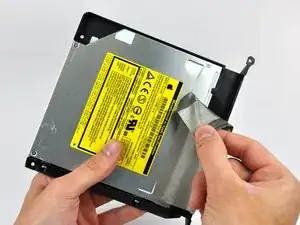
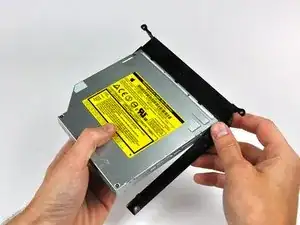
    • Ruotare leggermente la staffa dell'unità ottica, allontanandola dall'unità stessa.

    • Estrarre la staffa dall'unità ottica dall'estremità aperta di quest'ultima, prestando attenzione a non fare incastrare le linguette.

    • Se c'è un disco o altro bloccato nella tua unità ottica, abbiamo una guida per risolvere la situazione.

Conclusione

Per riassemblare il dispositivo, seguire queste istruzioni in ordine inverso

Brittany McCrigler

Membro da: 05/03/12

88905 Reputazione

0 commenti