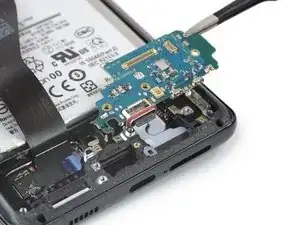
Introduzione

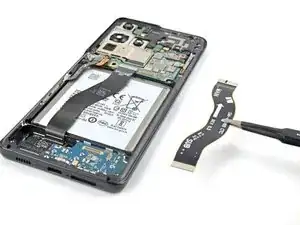
Usa questa guida per sostituire la porta di ricarica USB-C e la scheda figlia del tuo Samsung Galaxy S21 Ultra.

Prima di iniziare, fare riferimento al Documento Samsung Self-Repair per informazioni sulla sicurezza.

Nota: Mantenere la resistenza all'acqua dopo la riparazione dipende da quanto bene viene riapplicato l'adesivo, ma il tuo dispositivo perderà la sua valutazione IP (Protezione Ingresso).

  1. CEanXxnVSSFDxULP
    CEanXxnVSSFDxULP
    JQj2FZTbjkwkqRAL
    Uy53JWljB4mv3gCW
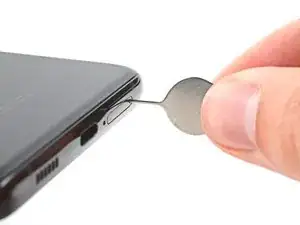
    • Inserisci uno strumento di espulsione della SIM, una punta o una graffetta raddrizzata nel foro del vassoio della scheda SIM sul bordo superiore del telefono.

    • Premi lo strumento di espulsione della SIM nel foro del vassoio della scheda SIM per espellere il vassoio della scheda SIM.

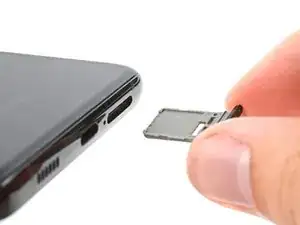
    • Rimuovi il vassoio della scheda SIM.

    • Se hai inserito accidentalmente lo strumento di espulsione della SIM nel foro del microfono, non preoccuparti! Probabilmente non ha danneggiato il microfono.

  2. dnZwOwWRGYRSh2a2
    • Scollega e spegni il tuo telefono prima di iniziare.

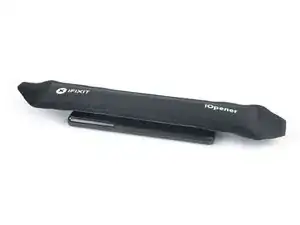
    • Prepara un iOpener e applicalo sulla scocca posteriore per almeno tre minuti per allentare l'adesivo sottostante.

    • Un asciugacapelli, una pistola termica, o una piastra riscaldante potrebbero anch'esse essere utilizzate, ma fai attenzione a non surriscaldare il telefono: il display e la batteria interna sono entrambi suscettibili a danneggiamenti da calore.

    I have had no luck with the iOpener so far after heating it for 30 seconds. At what temperature does the glue become loose? I noticed that the iOpener heated up the back of the phone to up to 110F (43 C).

    Imtiaz Chowdhury -

    Hi Imtiaz,
    if you're struggling to get the adhesive loose enough you can try to reapply the iOpener several times or try using a hair dryer or heat gun instead. In terms of temperature, I'm afraid I can't give you an exact number for when it's high enough for the adhesive to loosen, as that varies by manufacturer and model.

    Dominik Schnabelrauch -

  3. mDJrMgKhCj3ytvQN
    mDJrMgKhCj3ytvQN
    LwoAPCrTWOmLkOUP
    N4Cc4MPaF6rt5eQy
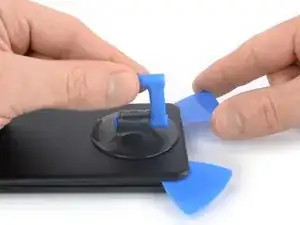
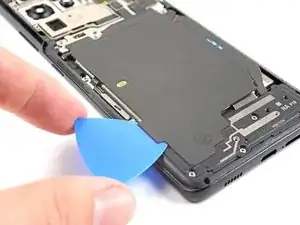
    • Posiziona e premi una ventosa sul lato inferiore della cover posteriore, il più possibile vicino al bordo.

    • Se la scocca posteriore è molto rotta, coprirla con uno strato di nastro adesivo trasparente potrebbe far aderire la ventosa. In alternativa, è possibile usare del nastro adesivo molto forte al posto della ventosa. Se tutto il resto fallisce, puoi incollare la ventosa sul coperchio rotto.

    • Alza la cover posteriore con la ventosa per formare una piccola fessura tra la scocca e il telaio.

    • Se hai problemi nel formare una fessura, applica più calore per ammorbidire ulteriormente l'adesivo. Segui le istruzioni dell'iOpener per evitare il surriscaldamento.

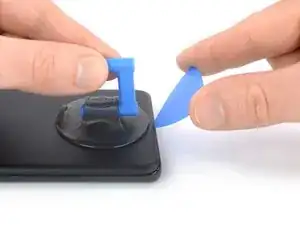
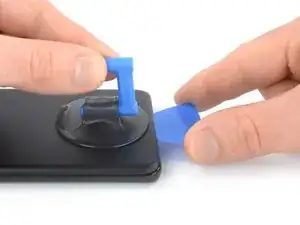
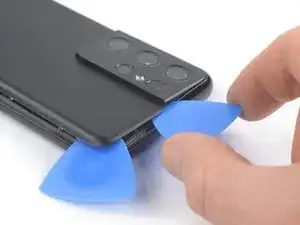
    • Inserisci un plettro di apertura nella fessura che hai formato.

    • Fai scivolare il plettro di apertura sull'angolo inferiore sinistro per tagliare l'adesivo.

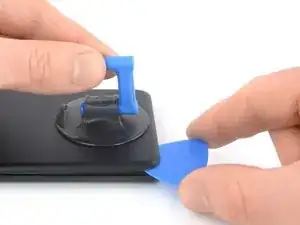
    • Lascia il plettro di apertura in posizione per evitare che l'adesivo riaderisca.

  4. TlD1m5HNSPFuC5LB
    TlD1m5HNSPFuC5LB
    jw6QkMKFXAskwHWf
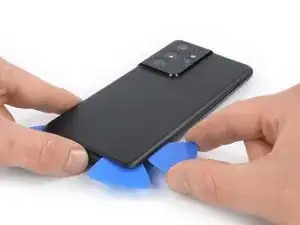
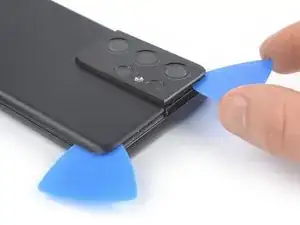
    • Inserisci il secondo plettro di apertura sotto al bordo inferiore del tuo telefono.

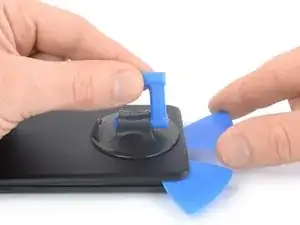
    • Trascina il plettro verso l'angolo destro inferiore per staccare l'adesivo.

    • Lascia il plettro in quella posizione per prevenire la richiusura dell'adesivo.

  5. j3SEACBrPGVaWEDK
    j3SEACBrPGVaWEDK
    C1bhcnRMvGDHR61n
    wuMsuYbLPVwlmFod
    • Se l'adesivo diventa difficile da tagliare, molto probabilmente si è raffreddato. Usa il tuo iOpener per due o tre minuti per scaldarlo di nuovo.

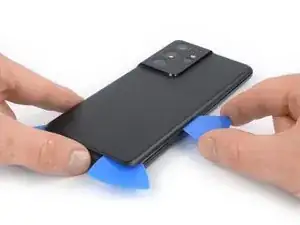
    • Inserisci un terzo plettro di apertura nell'angolo in basso a destra del telefono.

    • Fai scorrere il plettro di apertura lungo il lato destro del tuo telefono per tagliare l'adesivo.

    • Lascia il plettro di apertura nell'angolo in alto a destra per evitare la richiusura dell'adesivo.

  6. r5HRUCDLtMj3fyyO
    r5HRUCDLtMj3fyyO
    vjxL4quOANhWcOEi
    NLmMABcELXiV6Xny
    • Quando tagli vicino al gruppo della fotocamera, inserisci solo la punta del plettro (circa 4-5 mm) per evitare di danneggiare o sporcare la fotocamera.

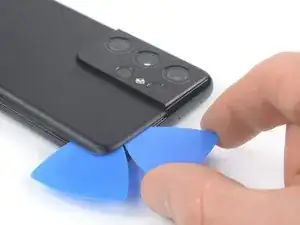
    • Inserisci un quarto plettro sotto l'angolo in alto a destra del telefono.

    • Fai scorrere il plettro lungo il bordo superiore per tagliare l'adesivo.

    • Lascia il plettro nell'angolo in alto a sinistra per evitare che l'adesivo si rincolli.

  7. XwLPlrxHlVakBeFJ
    XwLPlrxHlVakBeFJ
    xljXQVixhBbnr3kj
    CSK4HYitOnWMH4Zw
    • Inserisci un quinto plettro sotto l'angolo in alto a sinistra.

    • Fai scorrere il plettro lungo il bordo sinistro della cover posteriore per tagliare l'adesivo rimasto.

    • Quando tagli vicino al pulsante di accensione, inserisci solo la punta del plettro (circa 3-4 mm) per evitare di danneggiare il cavo flessibile del pulsante di accensione e volume.

  8. fiXBTtgsPT2nqtQX
    fiXBTtgsPT2nqtQX
    6VxOZGj6JMLjJgdp
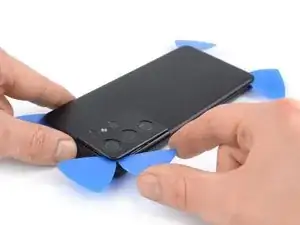
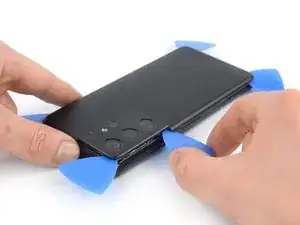
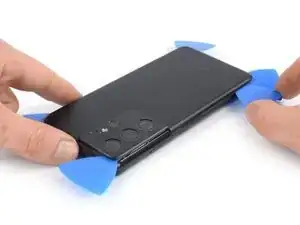
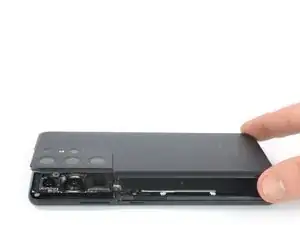
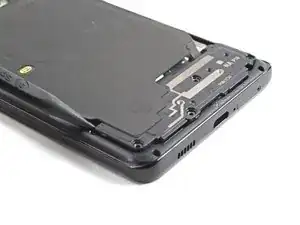
    • Rimuovi la cover posteriore.

    • Durante il riassemblaggio:

    • Questo è un buon punto per accendere il telefono e testare tutte le funzioni prima di sigillarlo. Assicurati di spegnere completamente il telefono prima di continuare a lavorare.

    • Rimuovi eventuali pezzi di adesivo con un paio di pinzette o con le dita. Applica del calore se hai problemi a separare l'adesivo

    • Usa un po' di alcol isopropilico ad alta concentrazione (oltre il 90%) per rimuovere eventuali residui di adesivo.

    • Se stai utilizzando adesivi pretagliati Samsung, segui questa guida.

    • Se stai usando il nastro biadesivo, segui questa guida.

  9. wOjsQDOahS2MNSPr
    wOjsQDOahS2MNSPr
    pJUkyiASC3B53FQV
    • Inserisci un plettro di apertura sotto l'estremità inferiore sinistra del gruppo dell'antenna NFC e della bobina di ricarica.

    • Fai scorrere con cautela il plettro di apertura lungo il bordo inferiore sinistro del gruppo per separarlo dalla batteria.

    Note: Separate the charging coil from the battery only. The NFC antenna, charging coil, and loudspeaker will be removed as an assembly in step 15.

    Blaine Phillips -

  10. MECaJthFWMFW52vL
    MECaJthFWMFW52vL
    GCFwOPAPgIBlXNku
    • Usa uno spudger per scollegare la bobina di ricarica sollevando il connettore dalla sua presa.

  11. iK4P2TUaXmKb4VNs
    iK4P2TUaXmKb4VNs
    ZL4y1vAxlOuPu6ZF
    • Usa uno spudger per scollegare l'antenna NFC sollevando il connettore dalla sua presa.

  12. oS1JRQXeTI5kv5DX
    oS1JRQXeTI5kv5DX
    BJiqHhxSZxmBjYyT
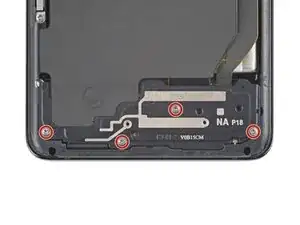
    • Usa un cacciavite a croce Phillips per rimuovere le cinque viti lunghe 3,9 mm che fissano il gruppo antenna NFC e bobina di ricarica.

    • Se stai rimontando con il kit Samsung Self-Repair, assicurati di sostituire le viti con quelle nuove etichettate #3427.

  13. OK2MQSd4YtSjmJLp
    OK2MQSd4YtSjmJLp
    HJWXsrSP3MeWMroP
    • Utilizza un cacciavite a croce Phillips per rimuovere le quattro viti lunghe 3,9 mm che fissano il gruppo altoparlante.

    • Se stai rimontando con il kit Samsung Self-Repair, assicurati di sostituire le viti con quelle nuove etichettate #3427.

  14. d1QnDkTAjs1yKUsv
    d1QnDkTAjs1yKUsv
    tN3gBbKFqlIRdERa
    • Inserisci la punta di uno spudger tra il telaio e la tacca in alto a sinistra dell'altoparlante.

    • Fai leva con lo spudger per liberare l'altoparlante dalle sue clip di plastica.

    When reconnecting this be sure the left end (power button side) is inserted under the edge of the frame so that the piece is level with the frame. Then push the other sides in to hear a definite snap on the right and bottom.

    Thomas Hayes -

  15. hpiasYebqulAcDja
    hpiasYebqulAcDja
    JaSTWxsIyEjOeyZC
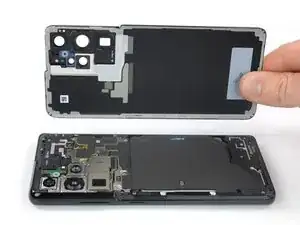
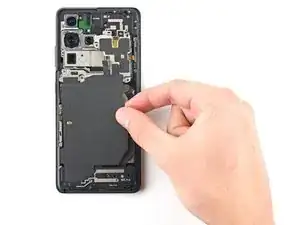
    • Usa un paio di pinzette o le dita per rimuovere con attenzione l'antenna NFC, la bobina di ricarica e il gruppo altoparlante.

    • Metti da parte l'assieme. Lo riutilizzerai durante il rimontaggio.

    I think the thicker main cable is shown backwards (`Main` connection part of the cable is put on the daughterboard/subboard, and the vice versa is also true)

    Antonio GB -

  16. 4Kn2bOXKvZjAFXlt
    4Kn2bOXKvZjAFXlt
    wcBvEDELUUhXMEbQ
    wFT1MBOqRqa5wjkF
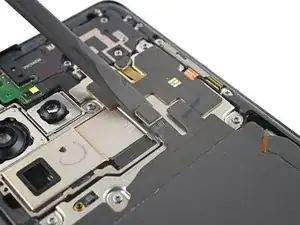
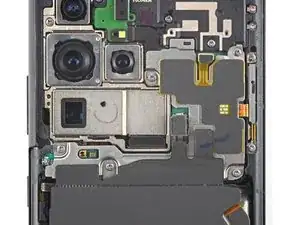
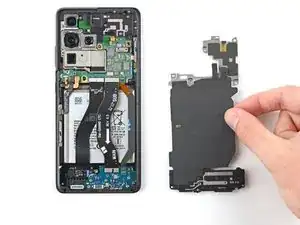
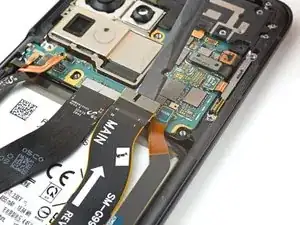
    • Utilizza uno spudger per alzare e disconnettere i connettori a pressione dei cavi di interconnessione primario e secondario sulla scheda madre.

  17. ZXZhyNBibaIWwbBA
    ZXZhyNBibaIWwbBA
    qRxQesXZmdi5waQs
    4lG5PuWSbhnjkpDY
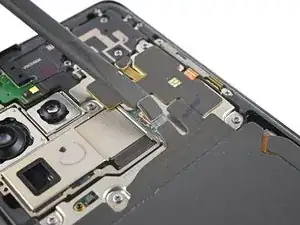
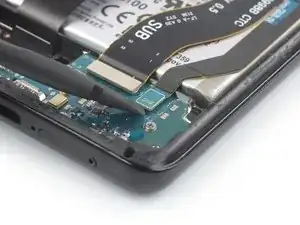
    • Utilizza uno spudger per disconnettere il cavo di interconnessione secondario dalla scheda figlia sollevando il connettore inferiore dalla presa.

    • Usa le dita o un paio di pinzette per rimuovere con attenzione il cavo di interconnessione secondario.

    • Metti da parte il cavo. Lo riutilizzerai durante il rimontaggio.

    Personnellement je trouve que c'est moins risqué d'endommager les flex en les laissant branchés au circuit de charge

    Olivier Fafard -

  18. ypGlUsPDHuDxKbjk
    ypGlUsPDHuDxKbjk
    t5V5yMprN2Hfw3R1
    AIX4Q4YOtXlfD4SL
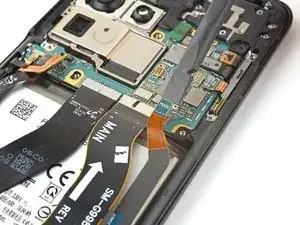
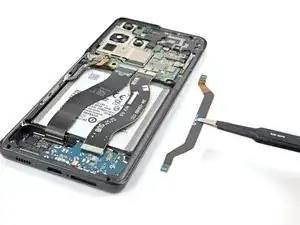
    • Usa uno spudger per disconnettere il cavo di interconnessione primario dalla scheda figlia facendo leva sul connettore inferiore dalla sua presa.

    • Usa le dita o un paio di pinzette per rimuovere con attenzione il cavo di interconnessione principale.

    • Metti da parte il cavo. Lo riutilizzerai durante il rimontaggio.

  19. VwJDiNxEb4khmQmI
    VwJDiNxEb4khmQmI
    a2Go63FmXhPWIttd
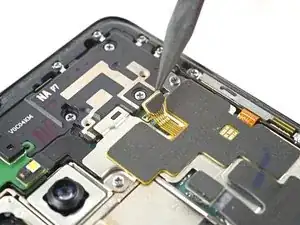
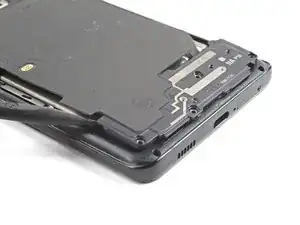
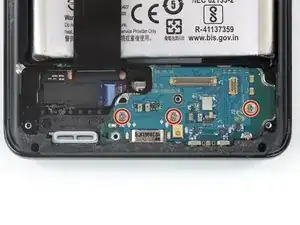
    • Usa un cacciavite a croce Phillips per rimuovere le tre viti lunghe 3,4 mm che fissano la scheda di ricarica.

    • Se stai rimontando con il kit Samsung Self-Repair, assicurati di sostituire le viti con quelle nuove etichettate #3428.

    Before the next step double check to be sure you removed the sim card tray, or you will likely break a piece off inside the charging board.

    Thomas Hayes -

    Hi Thomas.

    Thank you for the comment! I forgot to add the SIM card tray removal step to the beginning. I have added it!

    Alex Diaz-Kokaisl -

  20. bV4rd5ouUWUNVRRw
    bV4rd5ouUWUNVRRw
    a5SEis1OhZRUeXfJ
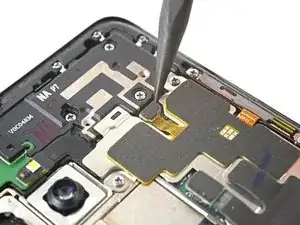
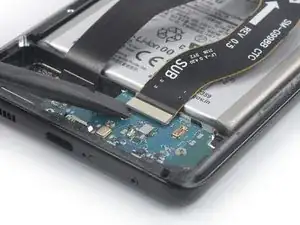
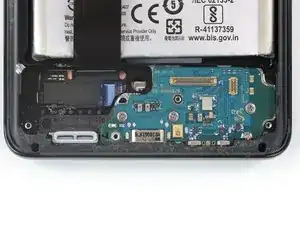
    • Inserisci l'estremità appuntita di uno spudger sotto il bordo sinistro della scheda di ricarica accanto al connettore del cavo flessibile principale.

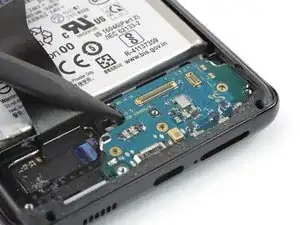
    • Usa lo spudger per sollevare la scheda di ricarica.

  21. GYOiwMqaOyjCTGML
    GYOiwMqaOyjCTGML
    dXrTcbi2rqcj554W
    n1HRtH2aOQKjBkKJ
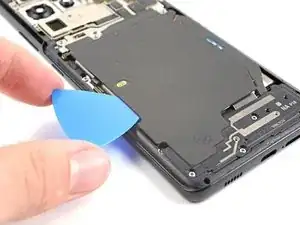
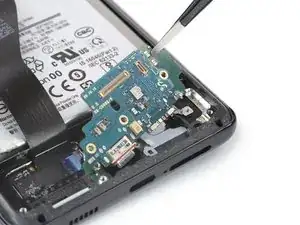
    • Usa un paio di pinzette smussate o le dita per rimuovere la scheda di ricarica. Inizia sollevando il bordo superiore e poi fai scorrere con cautela il connettore USB-C fuori dalla sua rientranza.

Conclusione

Per rimontare il dispositivo, segui queste istruzioni in ordine inverso ed esegui le azioni opposte, ad esempio "riattacca" invece che "rimuovi". Salta i passi che usano calore e per cui serve fare leva e presta molta attenzione ai punti 📌 mentre lavori su ogni passo.

Dopo aver completato la riparazione, scarica l'app Samsung Members dal Galaxy Store o dal Play Store e segui il documento Samsung Self-Repair (da pagina 10) per assicurarti che il tuo dispositivo sia perfettamente funzionante.

Porta i tuoi rifiuti elettronici a un riciclatore certificato R2 o e-Stewards.

La riparazione non è andata come previsto? Prova delle soluzioni ai problemi di base o rivolgiti alla nostra comunità Risposte per trovare aiuto.

Alex Diaz-Kokaisl

Membro da: 16/01/22

117664 Reputazione

8 commenti

Hi,

One month ago I dropped my phone in pool and I took it to the service center where they have dried out the phone. Everything was working fine but later only I was able to find out that the primary microphone is not working and also sim doesn't get detect. So couple of times I did resetting the phone pressing the volume down and power button and that fixed the SIM related issue. After couple of weeks again there was an error saying SIM can't be detected and I tried the same solution , after several attempts it detected again. Then again after two days the issue pops up once again. So I was able to find out that primary microphone and SIM card slot is in the same daughter board and thought of replacing it by myself. I got the new board and replaced it yesterday and still my microphone is not working. What would be the solution ? Is there anything I need to check/replace further like flex cables and all ? Please advise. Appreciate your help.

Thanks

Rahul Manayath -

Hi Rahul!

If your speaker still isn't working after you replaced your daughterboard, then I would suggest replacing the loudspeaker itself. Unfortunately, we don't sell the loudspeaker currently, so you would have to find it from a different source. I wish you the best of luck in your repair!

Alex Diaz-Kokaisl -

Hi

Everytime i put my phone on charge sometimes it works fine but if i take it out and put it back in again it keeps coming up with the moisture detected but theres no water inside there i dried it out and left it alone but before i didnt realise my lead was a little wet would that cause i massive problem charging

shexi_rudeboi_jmz -

The tools kit for this job is inadequate you're better off saving your money and getting the correct one's. The gel heat pad doesn't produce enough heat to loosen the adhesive. The suction cup is worthless as it just pulls right off pretty easily. And the included picks are just not thin enough to slide in. I tried setting the gel heat pad on just the bottom edge to try and put as much heat as possible and then tried to get the pick into there but all that happened was the back glass started to shatter. So now I've got to buy a new back glass piece. You'll need to use a heat gun or hair dryer, find a strong suction cup and some kind of thin enough blade/tool to get in there. I'd make future purchases from IFIXIT if they'd just say hey get and use these tools instead of selling a kit that doesn't work just wasting their customers money.

Blaze Long -

Thanks for the guide. The only suggestion I have is to make sure to separate the camera glass from the back cover while the glue is still warm. I tried to separate them when putting things back together and needed to add the new glue tape and broke the back cover. ifixit shows they are out of stock but luckily "A" online retailer had them in-stock, awesome price, and next day delivery.

Chris K -

I had what I assumed to be a thermistor issue with my phone. Wouldn't charge said it was too cold even when it was obviously not. I replaced the charging board, and the device would charge normally wired or wireless. This only lasted about a week and it is back to doing the same thing. Any advice what might the overall issue?

Adam Bell -

Hi. By doing this by myself, how can I make sure the phone will still be waterproof after replacing the port? Thanks

tms. maco -

Hello, I replaced the charge board as I was getting a moisture warning that could not be removed (including wiping the cache partition, disabling Android App). But even with a replaced board and a fully factory reset, the warning remains? Could there be moisture in the flex cables? Or could it be the main board? There definitely was water penetration, the phone went through a washing machine and dryer...

Tristan Cox -