Introduzione

Usa questa guida per sostituire la scheda di ricarica del tuo smartphone Huawei P10 Lite. Nel rimontare il tuo telefono, applica del nuovo adesivo dove è necessario.

  1. YqiUymRKMTYinZcE
    YqiUymRKMTYinZcE
    1x5qv4HPtVGSmvpD
    byJlAME6WaXCgGa2
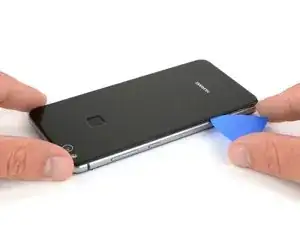
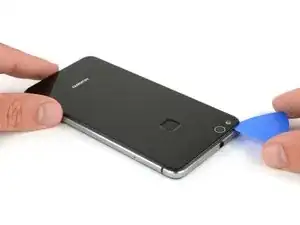
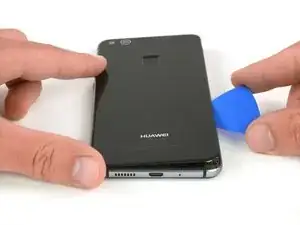
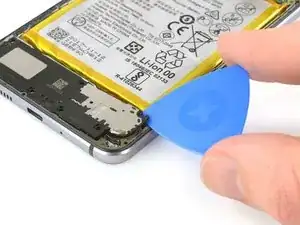
    • Inserisci la punta di un plettro di apertura tra la cover posteriore e il telaio centrale e fallo scorrere attorno al telefono per tagliare l'adesivo.

    • Può facilitare le cose usare una ventosa per sollevare la cover posteriore e creare una fessura iniziale dove inserire il plettro di apertura.

    • Se l'adesivo risulta troppo difficile da tagliare, usa un iOpener per ammorbidirlo.

    Mit dem Saugnapf die Rückseite anheben hilft ungemein…

    Matthias Eberle -

    Had to use blue wedge tool to wedge open bottom plate from the rim part in order to then use the tip of the blue opening pick under the back plate to then cut the glue. It’s like placing a pie server or knife under the plate once there’s a gap between the rim and the back plate.

    Jane -

    Be careful, there’s a cable to fingerprint sensor, very close to the edge (see pictures below)… It’s very easy to cut it through with the pick, as I just learned :)

    dambig -

  2. F5lCy2LZ2xfWDDqg
    F5lCy2LZ2xfWDDqg
    Na6gp15IRbPSW3Ll
    2xyqfXZApukGpaZe
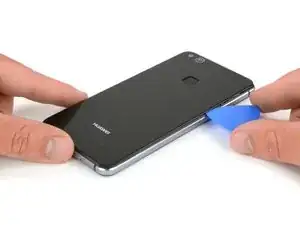
    • Dopo aver tagliato l'adesivo lungo tutti i bordi, fai ruotare il tuo plettro per separare la cover posteriore dal telefono.

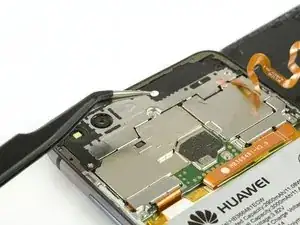
    • Apri la cover posteriore a libro usando il lato destro del telefono come cerniera.

  3. oPLqQqGCxyiCQ6oZ
    oPLqQqGCxyiCQ6oZ
    gZgRjiB2CuBip3Xu
    • Svita le due viti Phillips #00.

    • Svita le quattro viti Phillips #000.

    Schritt 3 und 4 kann man sich komplett sparen. Wozu auch. Kann gleich mit Schritt 5 weitergemacht werden, zuvor einfach das Flachbandkabel vom Fingerabdrucksensor an der Rückabdeckung abklemmen und fertig.

    Bobby mcgee -

    There are four silver screws and two black to be removed.

    Jane -

    Translate what Bobby mcgee said:

    Step 3 and 4 can be completely ignored. What for? You can continue with step 5, just disconnect the ribbon cable from the fingerprint sensor on the back cover and you're done.

    Antonio Sun -

    However, the reason step 3 and 4 should not be skipped is Step 6 — Use an iOpener to loosen the adhesive beneath the battery. I.e., the adhesive cannot be easily removed without heat, however, that heat might damage the electric chips. Thus they’d better be removed first.

    Antonio Sun -

  4. jMQb6f2oPStGtZUm
    jMQb6f2oPStGtZUm
    QdMRkHKjOFsRwEGW
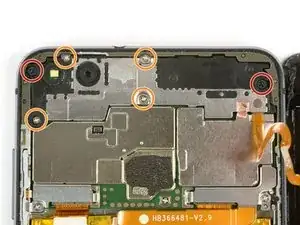
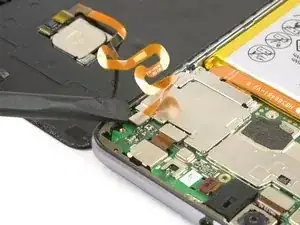
    • Usa delle pinzette per rimuovere la schermatura della scheda principale.

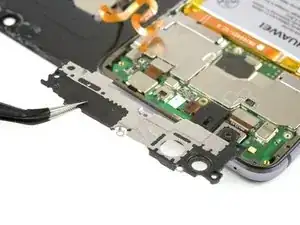
    • Usa l'estremità piatta di uno spudger per disconnettere il cavo flessibile del sensore impronte digitali.

    • In fase di riassemblaggio, applica dell'adesivo dove è necessario.

    Welchen Klebstoff soll man verwenden?

    josef navratil -

    Hallo Josef,

    sollte bei deinem Ersatzteil kein Klebstoff oder Klebeband dabei gewesen sein, kannst du dünne Streifen Doppelseitiges Klebeband verwenden. Es gibt für das Huawei P10 Lite auch schon zugeschnittene Klebestreifen zu erwerben, hierbei gilt aber je nach Händler Rezessionen zu lesen, ob die Klebestreifen auch wirklich halten.

    Dominik Schnabelrauch -

    Note that there is a copper-colored sticker to lift up near the flat cable connected from the phone the finger pad. Lift the main board plate (shield) up SLOWLY from the camera side to the other end as the plate is wedged in place.

    Jane -

    what adhesive is recommended? thanks

    darren -

    Hi darren,
    pre-cut adhesive would be the best solution if you can source it. Otherwise a two-sided adhesive tape or carefully used E6000 adhesive glue will be your friend.

    Tobias Isakeit -

  5. nTMw5AX5g1nyqUwM
    nTMw5AX5g1nyqUwM
    mAFuE2UeYPHsL42O
    qSBmSxYoBbbj6NBB
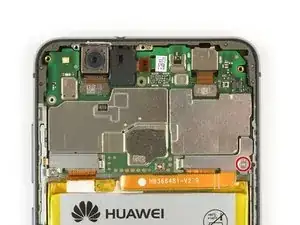
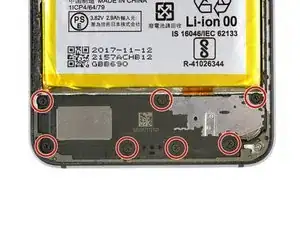
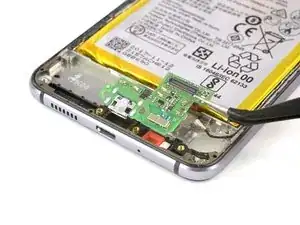
    • Rimuovi la vite a croce che tiene in posizione la piastra del connettore della batteria.

    • Rimuovi la piastra del connettore della batteria.

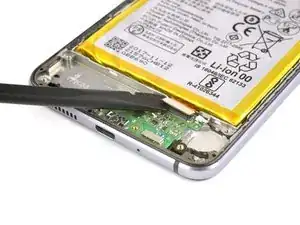
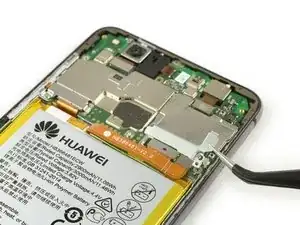
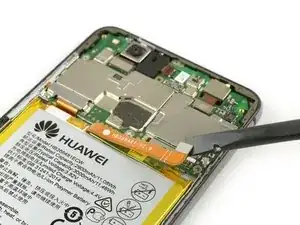
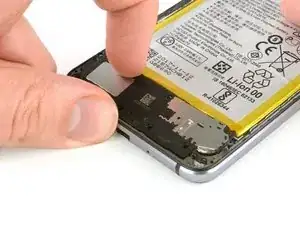
    • Usa l'estremità piatta di uno spudger per disconnettere il cavo flessibile della batteria.

    Very gently lift the silver connecter that was under the battery connecter plate and is at the end of the orange battery cable with the flat end of the spudger as indicated.

    Jane -

  6. MxnBO6lHFNDgPwlF
    • Rimuovi le sette viti a croce Phillips #000.

  7. HWEFfRMDxm1ROC2Q
    HWEFfRMDxm1ROC2Q
    OgeMTjVrpxOXfCm4
    GA2HQUYT6Kf5eECq
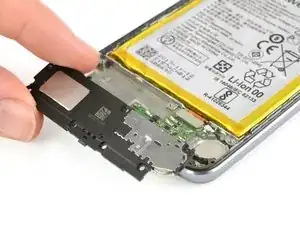
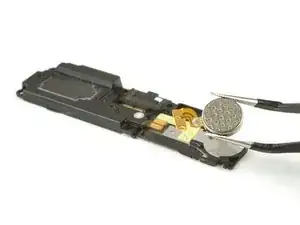
    • Inserisci un plettro di apertura sotto il bordo destro dell'unità altoparlante e sollevalo.

    • Afferra l'altoparlante e rimuovilo.

  8. EUvuHBxIYmvYXZFY
    EUvuHBxIYmvYXZFY
    EOnngZCPAOC6HaxJ
    • Usa un iOpener per ammorbidire la colla sotto il motore di vibrazione.

    • Rimuovi il motore di vibrazione.

  9. euZEYGJYNSLASf2e
    euZEYGJYNSLASf2e
    aL31yGnq1tWHiQ33
    • Usa l'estremità piatta di uno spudger per scollegare il cavo di interconnessione.

    • Usa delle pinzette per scollegare il cavo dell'antenna.

  10. XcO5EHgZFDsXwJRW
    XcO5EHgZFDsXwJRW
    O5E52KyOJncLHVHZ
    • Usa un iOpener per allentare l'adesivo sotto la scheda di ricarica.

    • Rimuovei la scheda di ricarica.

Conclusione

Per rimontare il tuo dispositivo, segui queste istruzioni in ordine inverso. Applica del nuovo adesivo dove è necessario.

Dominik Schnabelrauch

Membro da: 23/11/16

200687 Reputazione

3 commenti

thanks and very nice

mj41574 -

thanks to all team

mj41574 -

p10 lite charging ic change daigram

mj41574 -